Install and Run in a Docker Container on Google Compute Engine
This section describes how to install and start Driverless AI from scratch using a Docker container in a Google Compute environment.
This installation assumes that you already have a Google Cloud Platform account. If you don’t have an account, go to https://console.cloud.google.com/getting-started to create one. In addition, refer to Google’s Machine Types documentation for information on Google Compute machine types.
Watch the installation video here. Note that some of the images in this video may change between releases, but the installation steps remain the same.
Before You Begin
If you are trying GCP for the first time and have just created an account, please check your Google Compute Engine (GCE) resource quota limits. By default, GCP allocates a maximum of 8 CPUs and no GPUs. You can change these settings to match your quota limit, or you can request more resources from GCP. Refer to https://cloud.google.com/compute/quotas for more information, including information on how to check your quota and request additional quota.
Installation Procedure
In your browser, log in to the Google Compute Engine Console at https://console.cloud.google.com/.
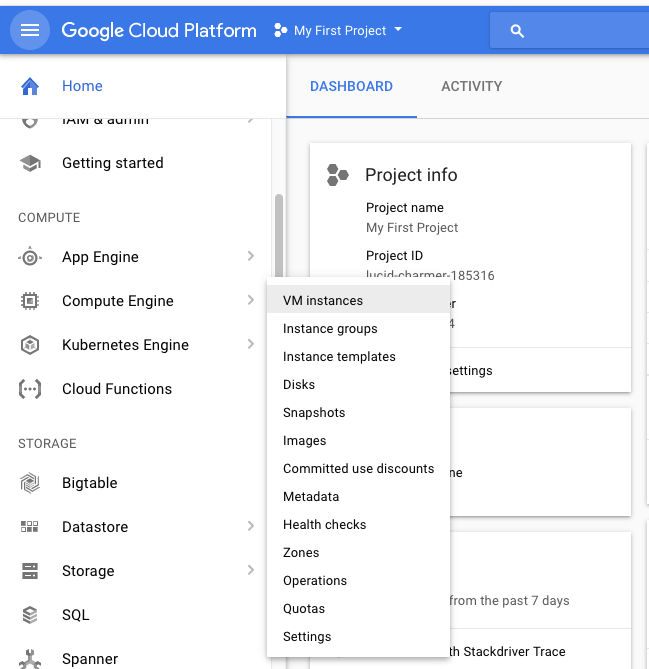
In the left navigation panel, select Compute Engine > VM Instances.
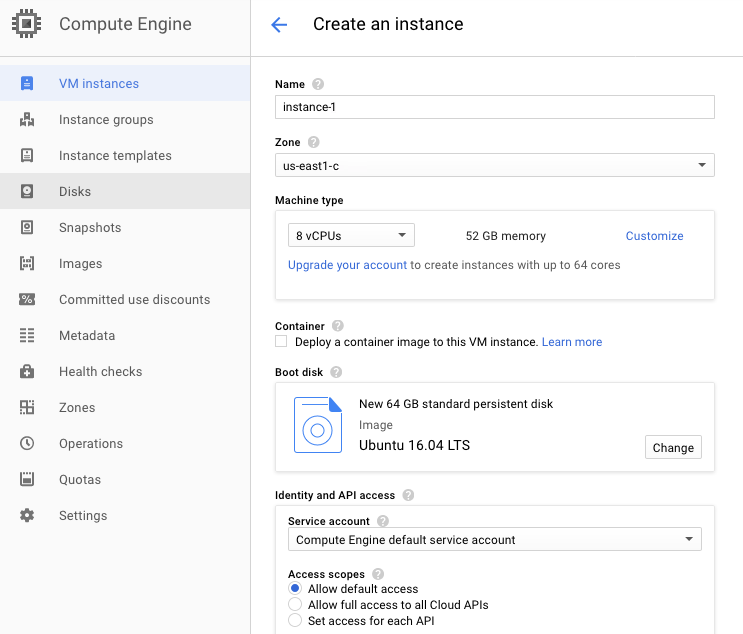
Click Create Instance.

Specify the following at a minimum:
A unique name for this instance.
The desired zone. Note that not all zones and user accounts can select zones with GPU instances. Refer to the following for information on how to add GPUs: https://cloud.google.com/compute/docs/gpus/.
A supported OS, for example Ubuntu 16.04. Be sure to also increase the disk size of the OS image to be 64 GB.
Click Create at the bottom of the form when you are done. This creates the new VM instance.
Create a Firewall rule for Driverless AI. On the Google Cloud Platform left navigation panel, select VPC network > Firewall rules. Specify the following settings:
Specify a unique name and Description for this instance.
Change the Targets dropdown to All instances in the network.
Specify the Source IP ranges to be
0.0.0.0/0.Under Protocols and Ports, select Specified protocols and ports and enter the following:
tcp:12345.Click Create at the bottom of the form when you are done.

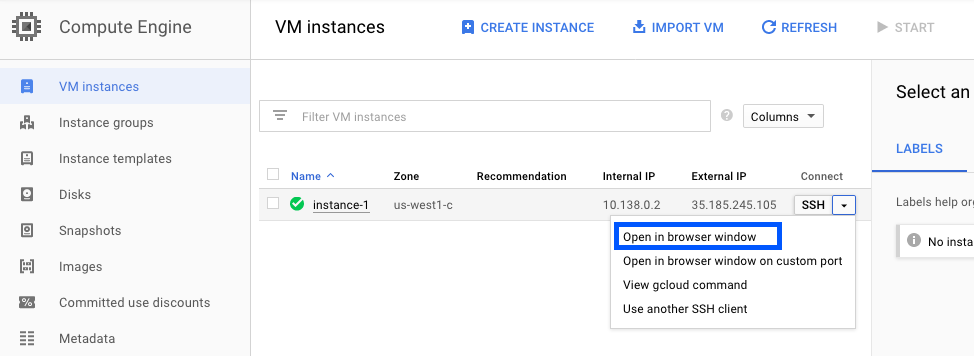
On the VM Instances page, SSH to the new VM Instance by selecting Open in Browser Window from the SSH dropdown.
H2O provides a script for you to run in your VM instance. Open an editor in the VM instance (for example, vi). Copy one of the scripts below (depending on whether you are running GPUs or CPUs). Save the script as install.sh.
# SCRIPT FOR GPUs ONLY
apt-get -y update
apt-get -y --no-install-recommends install \
  curl \
  apt-utils \
  python-software-properties \
  software-properties-common

add-apt-repository -y ppa:graphics-drivers/ppa
add-apt-repository -y "deb [arch=amd64] https://download.docker.com/linux/ubuntu $(lsb_release -cs) stable"
curl -fsSL https://download.docker.com/linux/ubuntu/gpg | apt-key add -

apt-get update
apt-get install -y \
  nvidia-384 \
  nvidia-modprobe \
  docker-ce

curl -s -L https://nvidia.github.io/nvidia-docker/gpgkey | \
  sudo apt-key add -
distribution=$(. /etc/os-release;echo $ID$VERSION_ID)
curl -s -L https://nvidia.github.io/nvidia-docker/$distribution/nvidia-docker.list | \
  sudo tee /etc/apt/sources.list.d/nvidia-docker.list
sudo apt-get update

# Install nvidia-docker2 and reload the Docker daemon configuration
sudo apt-get install -y nvidia-docker2
# SCRIPT FOR CPUs ONLY apt-get -y update apt-get -y --no-install-recommends install \ curl \ apt-utils \ python-software-properties \ software-properties-common add-apt-repository -y "deb [arch=amd64] https://download.docker.com/linux/ubuntu $(lsb_release -cs) stable" curl -fsSL https://download.docker.com/linux/ubuntu/gpg | apt-key add - apt-get update apt-get install -y docker-ce
Type the following commands to run the install script.
chmod +x install.sh
sudo ./install.sh
In your user folder, create the following directories as your user.
mkdir ~/tmp
mkdir ~/log
mkdir ~/data
mkdir ~/scripts
mkdir ~/license
mkdir ~/demo
mkdir -p ~/jupyter/notebooks
Add your Google Compute user name to the Docker container.
sudo usermod -aG docker <username>
Reboot the system to enable NVIDIA drivers.
sudo reboot
Retrieve the Driverless AI Docker image from https://www.h2o.ai/download/.
Load the Driverless AI Docker image. The following example shows how to load Driverless AI. Replace VERSION with your image.
sudo docker load < dai-docker-centos7-x86_64-VERSION.tar.gz
If you are running CPUs, you can skip this step. Otherwise, you must enable persistence of the GPU. Note that this needs to be run once every reboot. Refer to the following for more information: http://docs.nvidia.com/deploy/driver-persistence/index.html.
sudo nvidia-persistenced --persistence-mode
Start the Driverless AI Docker image with
nvidia-docker run(GPUs) ordocker run(CPUs). Note that you must have write privileges for the folders that are created below. You can replace ‘pwd’ with the path to /home/<username> or start withsudo nvidia-docker run. ReplaceTAGwith the Docker image tag (rundocker imagesif necessary.) Also, refer to Using Data Connectors with the Docker Image for information on how to add the GCS and GBQ data connectors to your Driverless AI instance.
# Start the Driverless AI Docker image
nvidia-docker run \
    --pid=host \
    --init \
    --rm \
    --shm-size=256m \
    -u `id -u`:`id -g` \
    -p 12345:12345 \
    -v `pwd`/data:/data \
    -v `pwd`/log:/log \
    -v `pwd`/license:/license \
    -v `pwd`/tmp:/tmp \
    h2oai/dai-centos7-x86_64:TAG
Driverless AI will begin running:
--------------------------------
Welcome to H2O.ai's Driverless AI
---------------------------------

- Put data in the volume mounted at /data
- Logs are written to the volume mounted at /log/20180606-044258
- Connect to Driverless AI on port 12345 inside the container
- Connect to Jupyter notebook on port 8888 inside the container
Connect to Driverless AI with your browser:
http://Your-Driverless-AI-Host-Machine:12345
Stopping the GCE Instance
The Google Compute Engine instance will continue to run even when you close the portal. You can stop the instance using one of the following methods:
Stopping in the browser
On the VM Instances page, click on the VM instance that you want to stop.
Click Stop at the top of the page.
A confirmation page will display. Click Stop to stop the instance.
Stopping in Terminal
SSH into the machine that is running Driverless AI, and then run the following:
h2oai stop
Upgrading Driverless AI
This section provides instructions for upgrading Driverless AI versions that were installed in a Docker container. These steps ensure that existing experiments are saved.
WARNING: Experiments, MLIs, and MOJOs reside in the Driverless AI tmp directory and are not automatically upgraded when Driverless AI is upgraded.
Build MLI models before upgrading.
Build MOJO pipelines before upgrading.
Stop Driverless AI and make a backup of your Driverless AI tmp directory before upgrading.
If you did not build MLI on a model before upgrading Driverless AI, then you will not be able to view MLI on that model after upgrading. Before upgrading, be sure to run MLI jobs on models that you want to continue to interpret in future releases. If that MLI job appears in the list of Interpreted Models in your current version, then it will be retained after upgrading.
If you did not build a MOJO pipeline on a model before upgrading Driverless AI, then you will not be able to build a MOJO pipeline on that model after upgrading. Before upgrading, be sure to build MOJO pipelines on all desired models and then back up your Driverless AI tmp directory.
Note: Stop Driverless AI if it is still running.
Requirements
As of 1.7.0, CUDA 9 is no longer supported. Your host environment must have CUDA 10.0 or later with NVIDIA drivers >= 410 installed (GPU only). Driverless AI ships with its own CUDA libraries, but the driver must exist in the host environment. Go to https://www.nvidia.com/Download/index.aspx to get the latest NVIDIA Tesla V/P/K series driver.
Upgrade Steps
SSH into the IP address of the machine that is running Driverless AI.
Set up a directory for the version of Driverless AI on the host machine:
# Set up directory with the version name
mkdir dai_rel_VERSION

# cd into the new directory
cd dai_rel_VERSION
Retrieve the Driverless AI package from https://www.h2o.ai/download/ and add it to the new directory.
Load the Driverless AI Docker image inside the new directory. This example shows how to load Driverless AI version. If necessary, replace
VERSIONwith your image.
# Load the Driverless AI docker image
docker load < dai-docker-centos7-x86_64-VERSION.tar.gz
Copy the data, log, license, and tmp directories from the previous Driverless AI directory to the new Driverless AI directory:
# Copy the data, log, license, and tmp directories on the host machine
cp -a dai_rel_1.4.2/data dai_rel_VERSION/data
cp -a dai_rel_1.4.2/log dai_rel_VERSION/log
cp -a dai_rel_1.4.2/license dai_rel_VERSION/license
cp -a dai_rel_1.4.2/tmp dai_rel_VERSION/tmp
At this point, your experiments from the previous versions will be visible inside the Docker container.
Use
docker imagesto find the new image tag.Start the Driverless AI Docker image.
Connect to Driverless AI with your browser at http://Your-Driverless-AI-Host-Machine:12345.