Create New H2O-3 System
This section describes how to create a new H2O-3 system. H2O-3 is open source and does not require a license.
- Click Create New H2O-3 System on the Puddle Systems page.
- If prompted, select the cloud environment for the new system.
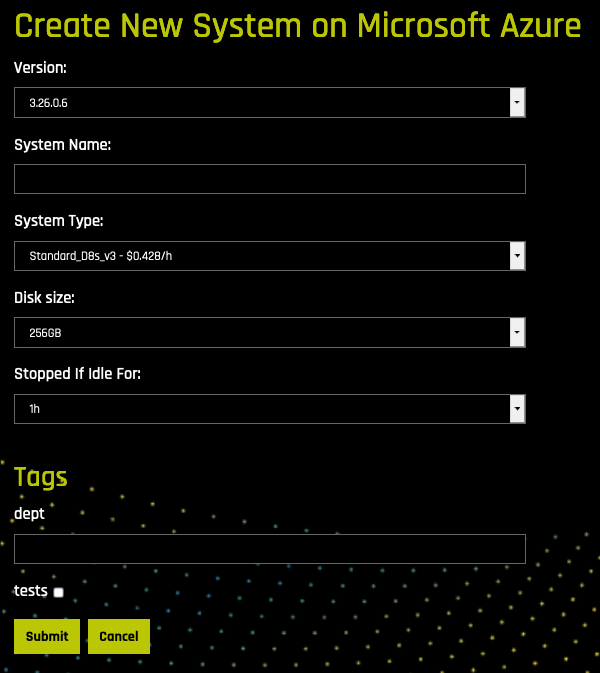
- Specify the following options to create the system:
H2O-3 Version: This defaults to the most current version of H2O-3.
System Name: This is blank by default.
System Type: Available system types are added by Admins.
Note: Your account settings may include a limit as to the number of systems of a certain type that you can run. If you exceed that limit then that option will not be available, and the least expensive option will then become the default.
Disk Size: This can be 256GiB (default), 512GiB, or 1TiB.
Stopped If Idle For: This can be 30 min, 1 hour (default), 2 hours, 3 hours, 4 hours, or Never.
Tag: This shows the Tag(s) that will be applied to this system. Tags are created by Administrators and might include a default value. You can set the value here.
- Click Create System when you are done. The system will begin initializing. Note that this can take several minutes.
Viewing H2O-3 System Information
Click on the H2O-3 system to view its configuration information.

System Information
- The URL for launching H2O-3. Click on the URL to open Flow. This takes you to the DNS of the URL. Note: You can also download the H2O-3 Python or R clients from https://www.h2o.ai/download/, and use this URL to launch H2O-3 in either Python or R. But be sure that the H2O-3 version in Puddle and the version downloaded locally match, or you will receive a version mismsatch error.
- The system status
- The current session cost
- The total session cost
- The SSH command to run in order to securely access the system that is running H2O-3. (See SSH into the H2O-3 System below for more information.)
- The time when the system will stop if remaining idle. There are several operations that can be done with the idle timeout:
- Extend the timer for this session. If you click this button, 1 hour will be added to the timer. You can execute this operation multiple times. This is useful when the system should not be stopped for a certain number of hours, for example when uploading large files.
- Reset the timer. For example, if you reset the idle timeout of system, which has the idle timeout interval set to 1 hour, the system will be stopped after 1 hour from clicking this button, provided there are no experiments in progress.
- Edit the idle timeout interval. This allows you to edit the idle timeout interval of the system. You can specify a new idle timeout of Never, 4 hours, 3 hours, 2 hours, 1 hour, or 30 min.
- The product name and version currently running on the system
- The system type and disk size
- The updated and created dates
- The cloud environment
- The system tag (if Admins have set up tags)
Starting H2O-3
After the system has completed initializing, you will be ready to use H2O-3. As indicated previously, H2O-3 can be started in Flow, Python, or R.
Starting H2O-3 in Flow
Click on the URL to launch H2O Flow. From Flow, you can begin adding datasets and building models. Refer to the Flow section in the H2O-3 User Guide for information on how to use H2O-3 in Flow.
Starting the H2O-3 Python Client
Perform the following steps to start the H2O-3 Python client. Run these commands in a Terminal window.
Note: These steps assume that the H2O-3 system created in Puddle is using the latest H2O-3 release. If your H2O-3 version in Puddle is not the latest, then refer to the H2O-3 Prior Releases page for information on downloading the H2O-3 Python client for your specific version.
- Install dependencies (prepending with
sudoif needed):
pip install requests pip install tabulate pip install "colorama>=0.3.8" pip install futureNote: These are the dependencies required to run H2O. A complete list of dependencies is maintained in the following file: https://github.com/h2oai/h2o-3/blob/master/h2o-py/conda/h2o/meta.yaml.
- Run the following command to remove any existing H2O module for Python.
pip uninstall h2o
- Use
pipto install this version of the H2O Python module.
pip install -f http://h2o-release.s3.amazonaws.com/h2o/latest_stable_Py.html h2oNote: When installing H2O from
pipin OS X El Capitan, users must include the--userflag. For example:pip install -f http://h2o-release.s3.amazonaws.com/h2o/latest_stable_Py.html h2o --user
- Initialize H2O in Python and optionally run a demo to see H2O at work. In the
h2o.init()command, be sure to change <h2o_3_system_address> to the URL provided in Puddle for this H2O-3 system.
python
import h2o
h2o.connect(ip="<h2o_3_system_address>", port=54321)
h2o.demo("glm")
Starting the H2O-3 R Client
Perform the following steps to start the H2O-3 Python client. Run the commands in R, copying and pasting these commands one line at a time.
Note: These steps assume that the H2O-3 system created in Puddle is using the latest H2O-3 release. If your H2O-3 version in Puddle is not the latest, then refer to the H2O-3 Prior Releases page for information on downloading the H2O-3 R client for your specific version.
- The following two commands remove any previously installed H2O packages for R.
if ("package:h2o" %in% search()) { detach("package:h2o", unload=TRUE) }
if ("h2o" %in% rownames(installed.packages())) { remove.packages("h2o") }
- Next, download packages that H2O depends on.
pkgs <- c("RCurl","jsonlite")
for (pkg in pkgs) {
  if (! (pkg %in% rownames(installed.packages()))) { install.packages(pkg) }
}
- Download and install the H2O package for R.
install.packages("h2o", type="source", repos=(c("http://h2o-release.s3.amazonaws.com/h2o/latest_stable_R")))
- Initialize H2O and optionally run a demo to see H2O at work. In the
h2o.init()command, be sure to change <h2o_3_system_address> to the URL provided in Puddle for this H2O-3 system.
library(h2o)
h2o.connect(ip="<h2o_3_system_address>", port=54321)
demo(h2o.kmeans)
SSH into the H2O-3 System
Puddle provides the ability to SSH into a system that is running H2O-3. There are two ways that you can SSH into a system:
The method to use depends on which cloud environment you are working in (Microsoft Azure or Amazon AWS).
Using Your Azure ActiveDirectory Credentials
Follow the steps below to SSH into an H2O-3 system that was created on Microsoft Azure.
- Select the system that you want to SSH into.
- On your local machine, run the provided SSH command.
- You will be prompted to continue the connection. Type
yes. - After the URL is added to your list of known hosts, you will be provided with a login URL and password. The message will be similar to the following:
To sign in, use a web browser to open the page https://microsoft.com/devicelogin
and enter the code AXXXXXXXH to authenticate. Press ENTER when ready.
Open a browser and follow the instuctions in the terminal message.
- After you correctly enter your login and password in your browser, the following message will display.

Return to your terminal window and press Enter. Upon completion, you will receive a welcome message.
Using the Custom SSH Keys
Follow the steps below to SSH into an H2O-3 system that was created on Amazon AWS.
- Download the SSH private key using the download button to the left of the ssh command.

- On your local machine execute
chmod 600 <ssh_key_file>to set the correct permissions on the private key file. - On your local machine, run the provided SSH command. Please be sure to specify the correct path to the private key file in the SSH command.
Stopping a System  
Click the Stop button () to halt a system that is in a “Started” state. No information will be lost when a system is stopped.
Starting a System  
Click on the Start button () to start a system that is in a “Stopped” state. This will launch a new system with a new URL. All prior data will still be available from this URL.
Rebooting a System  
Click the Reboot button () to reboot a system that is in a “Started” state. This will stop the system and launch a new system with a new URL. All prior data will still be available from the new URL. The entire process can take several minutes. Note: A reboot () or Driverless AI restart ( ) is required when you change the config.toml file.
Restarting Driverless AI on a System 
Click the Restart Driverless AI button () to restart Driverless AI on a system that is in a “Started” state. This will restart the Driverless AI without restarting the virtual machine. The URL is preserved in this case. All prior data will still be available. The entire process can take few minutes, but it is much faster than the Reboot () option. Note: A reboot () or Driverless AI restart () is required when you change the config.toml file.
Changing the Size of a System  
Click the Scale button () to resize the System. This will change the size of the underlying VM. All prior data will still be available. It is possible to scale only stopped systems.
Deleting a System  
Click the Delete button () to completely remove a system. A confirmation page will display asking if you are certain about deleting the system. Click Yes complete the delete. This request deletes the system and destroys all data that is on the system.
Marking a System as Failed  
This is a recovery option. Use this if your system is stuck (for example, in a “Starting…” state). Click the Mark as Failed button () to mark a system as failing. After a system is marked as failed, you will be able to stop () or terminate () the system. Note that only “provisioning” and “stopped” systems can be marked as failed.