Create New H2O-3 System
This section describes how to create a new H2O-3 system. H2O-3 is open source and does not require a license.
Note: Please only use public datasets during your evaluation on Puddle, or contact sales@h2o.ai for a private data POC.
- Click Create New H2O-3 System on the Puddle Systems page.
- Specify the following options to create the system:
- H2O-3 Version: This defaults to the most current version of H2O-3.
- System Name: This is blank by default.
- System Type: This can be one of the following. Please also note the cost for each system type:
- CPU Small (default)
- CPU Large
- CPU XLarge
- CPU Huge
- GPU Small
- GPU Memory
- GPU Compute
Note: Your account settings may include a limit as to the number of systems of a certain type that you can run. If you exceed that limit (for example, if you exceed the number of CPU Small systems that may configure for H2O-3), then that option will not be available, and the least expensive option will then become the default.
- Volume Size: This can be 256GiB (default), 512GiB, or 1TiB.
- Stopped If Idle For: This can be 30 min, 1 hour (default), 2 hours, 3 hours, or 4 hours.
- Annotation: This is blank by default.
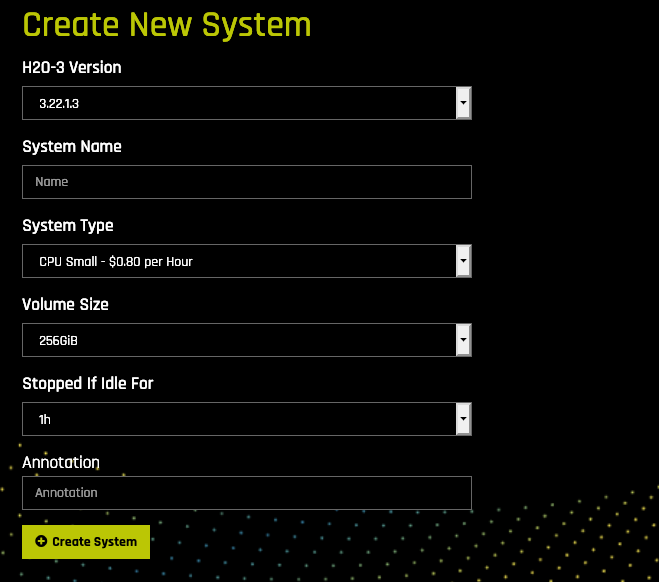
- Click Create System when you are done. The system will begin initializing. Note that this can take several minutes.
Viewing H2O-3 System Information
Click on the H2O-3 system to view its configuration information and system metrics.
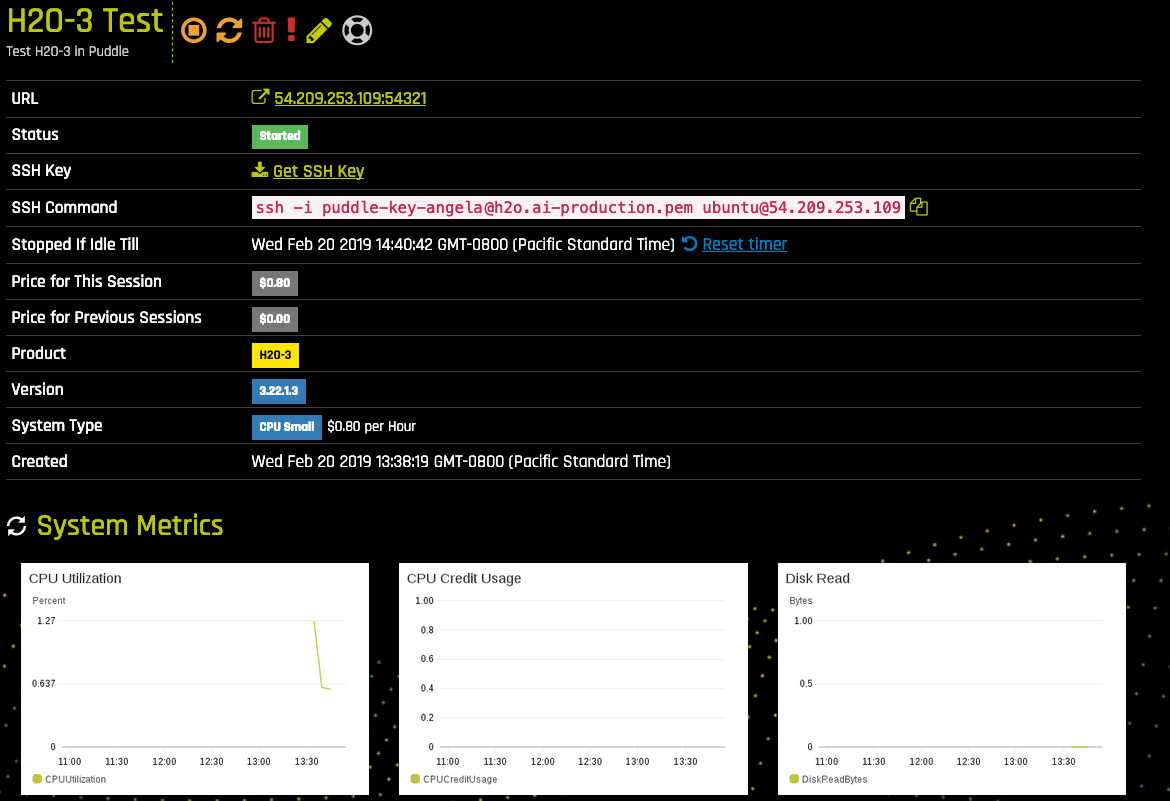
This page provides general system information as well as System Metrics graphs.
System Information
- The URL for launching H2O-3. Click on the URL to open Flow. This takes you to the DNS of the URL. Note: You can also download the H2O-3 Python or R clients from https://www.h2o.ai/download/, and use this URL to launch H2O-3 in either Python or R. But be sure that the H2O-3 version in Puddle and the version downloaded locally match, or you will receive a version mismsatch error.
- The system status.
- An SSH key for accessing the H2O-3 system. Download this key to enable secure access to this H2O-3 system. If necessary, run
chmod 400 puddle-key-<puddle_email>-production.pemto ensure that your private key file is not accessible by others. - The SSH command to run in order to securely access the system that is running H2O-3. Be sure to update this path to point to where you stored the downloaded SSH key. (See SSH into the H2O-3 System below for more information.)
- The time when the system will stop if remaining idle. You can also reset this timer.
- The price for the current session and any previous sessions.
- The product name and version currently running on the system.
- The system type along with the cost per hour.
- The creation date.
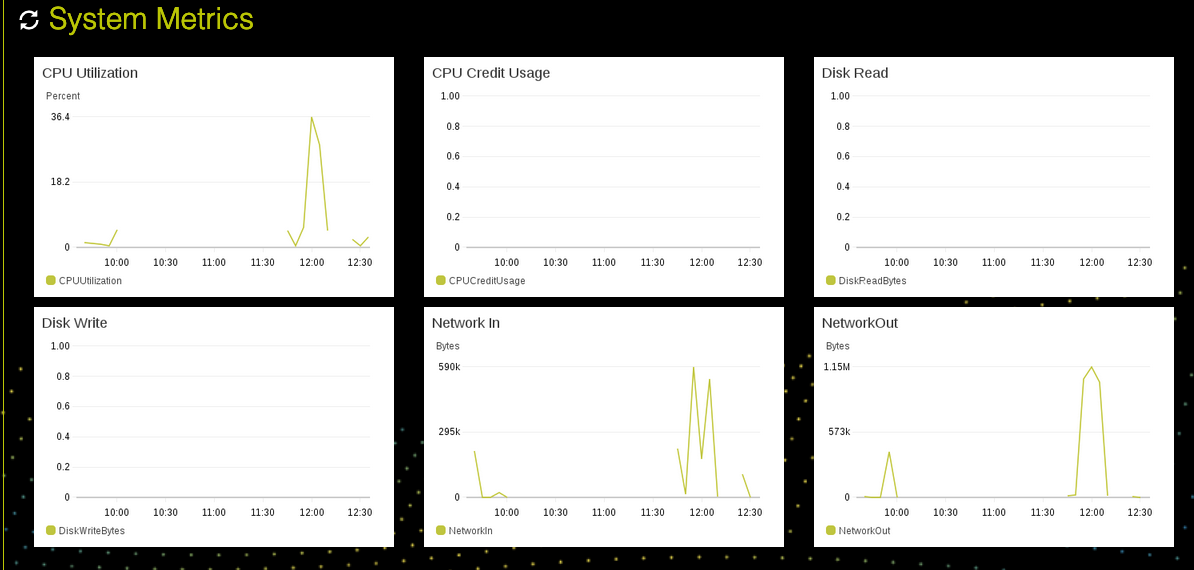
System Metrics
For each system, the following graphs are provided:
- CPU/GPU utilization graph.
- CPU/GPU credit usage (if credit was available).
- Disk Read.
- Disk Write.
- Network In.
- Network Out.
Starting H2O-3
After the system has completed initializing, you will be ready to use H2O-3. As indicated previously, H2O-3 can be started in Flow, Python, or R.
Starting H2O-3 in Flow
Click on the URL to launch H2O Flow. This also takes you to the DNS of the URL. Refer to the Flow section in the H2O-3 User Guide for information on how to use H2O-3.
Starting the H2O-3 Python Client
Perform the following steps to start the H2O-3 Python client. Run these commands in a Terminal window.
Note: These steps assume that the H2O-3 system created in Puddle is using the latest H2O-3 release. If your H2O-3 version in Puddle is not the latest, then refer to the H2O-3 Prior Releases page for information on downloading the H2O-3 Python client for your specific version.
- Install dependencies (prepending with
sudoif needed):
pip install requests pip install tabulate pip install "colorama>=0.3.8" pip install futureNote: These are the dependencies required to run H2O. A complete list of dependencies is maintained in the following file: https://github.com/h2oai/h2o-3/blob/master/h2o-py/conda/h2o/meta.yaml.
- Run the following command to remove any existing H2O module for Python.
pip uninstall h2o
- Use
pipto install this version of the H2O Python module.
pip install -f http://h2o-release.s3.amazonaws.com/h2o/latest_stable_Py.html h2oNote: When installing H2O from
pipin OS X El Capitan, users must include the--userflag. For example:pip install -f http://h2o-release.s3.amazonaws.com/h2o/latest_stable_Py.html h2o --user
- Initialize H2O in Python and optionally run a demo to see H2O at work. In the
h2o.init()command, be sure to change <h2o_3_system_address> to the URL provided in Puddle for this H2O-3 system.
python
import h2o
h2o.init("ip=<h2o_3_system_address>", port=54321)
h2o.demo("glm")
Starting the H2O-3 R Client
Perform the following steps to start the H2O-3 Python client. Run the commands in R, copying and pasting these commands one line at a time.
Note: These steps assume that the H2O-3 system created in Puddle is using the latest H2O-3 release. If your H2O-3 version in Puddle is not the latest, then refer to the H2O-3 Prior Releases page for information on downloading the H2O-3 R client for your specific version.
- The following two commands remove any previously installed H2O packages for R.
if ("package:h2o" %in% search()) { detach("package:h2o", unload=TRUE) }
if ("h2o" %in% rownames(installed.packages())) { remove.packages("h2o") }
- Next, download packages that H2O depends on.
pkgs <- c("RCurl","jsonlite")
for (pkg in pkgs) {
  if (! (pkg %in% rownames(installed.packages()))) { install.packages(pkg) }
}
- Download and install the H2O package for R.
install.packages("h2o", type="source", repos=(c("http://h2o-release.s3.amazonaws.com/h2o/latest_stable_R")))
- Initialize H2O and optionally run a demo to see H2O at work. In the
h2o.init()command, be sure to change <h2o_3_system_address> to the URL provided in Puddle for this H2O-3 system.
library(h2o)
h2o.init("ip=<h2o_3_system_address>", port=54321)
demo(h2o.kmeans)
SSH into the H2O-3 System
Puddle provides the ability to SSH into a system that is running H2O-3.
- Select the system that you want to SSH into.
- Download the SSH key by clicking the Get SSH Key link. Save this on your local machine.
- On your local machine, run
chmod 400 puddle-key-<puddle_email>-production.pemto ensure that your private key file is not accessible by others. (Replace <puddle_email> in the command with your Puddle at H2O email address.) - On your local machine, run the provided SSH command. If necessary, update this path to point to where you stored the downloaded SSH key.
Stopping a System
Click the Stop button ( ) to halt the system that is in a “Started” state. No information will be lost when a system is stopped.
Starting a System
Click on the Start button ( ) to start a system that is in a “Stopped” state. This will launch a new system with a new URL. All prior data will still be available from this URL.
Rebooting a System
Click the Reboot button ( ) to reboot a system that is in a “Started” state. This will stop the system and launch a new system with a new URL. All prior data will still be available from the new URL. The entire process can take several minutes.
Deleting a System
Click the Delete button ( ) to completely remove a system. A confirmation page will display asking if you are certain about deleting the system. Click Yes complete the delete. This request deletes the system and destroys all data that is on the system.
Editing an Annotation
Click the Edit button ( ) to change the annotation of a system, then click Update System to complete the change.
Request Support
Click the Request Support button ( ) or click the Request Support link on the top menu to send any issues to support. This opens the help form. Enter your issue in the form, and then click Send when you are done or click Cancel to return to the My Systems page. Responses to support requests will be sent to the e-mail address associated with your Puddle account. You can also follow up with your Sales Engagement contact.