Snowflake Setup
Driverless AI lets you explore Snowflake data sources from within the Driverless AI application. This section provides instructions for configuring Driverless AI to work with Snowflake. This setup requires you to enable authentication. If you enable Snowflake connectors, those file systems are available in the UI, but you can’t use those connectors without authentication.
备注
For Docker 19.03 and later, use the --gpus all flag with docker run to enable GPU support. The older nvidia-docker wrapper is deprecated and no longer recommended. Ensure that the NVIDIA Container Toolkit is installed. To check your Docker version, run docker version.
Description of Configuration Attributes
snowflake_account: The Snowflake account ID.snowflake_user: The username for accessing the Snowflake account.snowflake_password: The password for accessing the Snowflake account.snowflake_host: The Snowflake hostname to connect to inside Snowpark Container Services.snowflake_port: The Snowflake port to connect to inside Snowpark Container Services.enabled_file_systems: The file systems you want to enable. You must configure this attribute for data connectors to function properly.
Enable Snowflake with Authentication
This example demonstrates how to enable the Snowflake data connector with authentication by passing the account, user, and password variables.
 docker run --gpus all \
 --rm \
 --shm-size=2g --cap-add=SYS_NICE --ulimit nofile=131071:131071 --ulimit nproc=16384:16384 \
 -e DRIVERLESS_AI_ENABLED_FILE_SYSTEMS="file,snow" \
 -e DRIVERLESS_AI_SNOWFLAKE_ACCOUNT = "<account_id>" \
 -e DRIVERLESS_AI_SNOWFLAKE_USER = "<username>" \
 -e DRIVERLESS_AI_SNOWFLAKE_PASSWORD = "<password>"\
 -u `id -u`:`id -g` \
 -p 12345:12345 \
 -v `pwd`/data:/data \
 -v `pwd`/log:/log \
 -v `pwd`/license:/license \
 -v `pwd`/tmp:/tmp \
 -v `pwd`/service_account_json.json:/service_account_json.json \
 h2oai/dai-ubi8-x86_64:2.4.4-cuda11.8.0.xx
This example demonstrates how to configure Snowflake options in the config.toml file, and then specify that file when starting Driverless AI in Docker.
Configure the Driverless AI config.toml file. Set the following configuration options.
enabled_file_systems = "file, snow"
snowflake_account = "<account_id>"
snowflake_user = "<username>"
snowflake_password = "<password>"
Mount the config.toml file into the Docker container.
docker run --gpus all \
  --pid=host \
  --init \
  --rm \
  --shm-size=2g --cap-add=SYS_NICE --ulimit nofile=131071:131071 --ulimit nproc=16384:16384 \
  --add-host name.node:172.16.2.186 \
  -e DRIVERLESS_AI_CONFIG_FILE=/path/in/docker/config.toml \
  -p 12345:12345 \
  -v /local/path/to/config.toml:/path/in/docker/config.toml \
  -v /etc/passwd:/etc/passwd:ro \
  -v /etc/group:/etc/group:ro \
  -v /tmp/dtmp/:/tmp \
  -v /tmp/dlog/:/log \
  -v /tmp/dlicense/:/license \
  -v /tmp/ddata/:/data \
  -u $(id -u):$(id -g) \
  h2oai/dai-ubi8-x86_64:2.4.4-cuda11.8.0.xx
This example demonstrates how to enable the Snowflake data connector with authentication by passing the account, user, and password variables.
Export the Driverless AI config.toml file or add it to ~/.bashrc. For example:
# DEB and RPM
export DRIVERLESS_AI_CONFIG_FILE="/etc/dai/config.toml"

# TAR SH
export DRIVERLESS_AI_CONFIG_FILE="/path/to/your/unpacked/dai/directory/config.toml"
Specify the following configuration options in the config.toml file.
# File System Support
# upload : standard upload feature
# file : local file system/server file system
# hdfs : Hadoop file system, remember to configure the HDFS config folder path and keytab below
# dtap : Blue Data Tap file system, remember to configure the DTap section below
# s3 : Amazon S3, optionally configure secret and access key below
# gcs : Google Cloud Storage, remember to configure gcs_path_to_service_account_json below
# gbq : Google Big Query, remember to configure gcs_path_to_service_account_json below
# minio : Minio Cloud Storage, remember to configure secret and access key below
# snow : Snowflake Data Warehouse, remember to configure Snowflake credentials below (account name, username, password)
# kdb : KDB+ Time Series Database, remember to configure KDB credentials below (hostname and port, optionally: username, password, classpath, and jvm_args)
# azrbs : Azure Blob Storage, remember to configure Azure credentials below (account name, account key)
# jdbc: JDBC Connector, remember to configure JDBC below. (jdbc_app_configs)
# hive: Hive Connector, remember to configure Hive below. (hive_app_configs)
# recipe_url: load custom recipe from URL
# recipe_file: load custom recipe from local file system
enabled_file_systems = "file, snow"

# Snowflake Connector credentials
snowflake_account = "<account_id>"
snowflake_user = "<username>"
snowflake_password = "<password>"
Save your changes, then stop and restart Driverless AI.
Staging Schema Configuration
By default, when you query Snowflake with stages enabled (snowflake_allow_stages = true), Driverless AI creates temporary stages in the same schema as the table you are querying. This requires CREATE STAGE permission on every schema you query. You can simplify permission management by specifying a dedicated staging schema using the snowflake_staging_schema configuration option, requiring CREATE STAGE permission on only that schema.
When to Use a Staging Schema
Consider configuring a staging schema when:
You need to query data from multiple schemas but want to grant CREATE STAGE permission on only one dedicated schema.
You want to centralize all temporary stages in a dedicated schema.
备注
This configuration applies only when snowflake_allow_stages is set to true. If stages are disabled, this setting has no effect.
Configuration
Set the snowflake_staging_schema option in your config.toml file:
To create stages in a schema within the same database you are querying:
snowflake_staging_schema = "STAGING_SCHEMA"
To create stages in a schema within a different database:
snowflake_staging_schema = "STAGING_DB.STAGING_SCHEMA"
Permission Requirements
The Snowflake user or role you use to connect must have the following permission on the staging schema:
CREATE STAGE: Required to create temporary stages in the staging schema.
To grant this permission, a Snowflake administrator can run:
GRANT CREATE STAGE ON SCHEMA <database_name>.<schema_name> TO ROLE <role_name>;
备注
This permission is in addition to the permissions required to query your source data tables.
Temporary Stage Behavior
When you use the Snowflake connector with stages enabled:
Driverless AI creates a temporary stage for each query.
Temporary stages are automatically dropped when the connection closes.
No manual cleanup is required.
If you do not specify a staging schema, stages are created in the table’s schema, which is the default Snowflake behavior.
Snowflake Single Sign-On (SSO)
The Snowflake connector features support for single sign-on (SSO). This means that with the proper setup, you can log into Driverless AI (DAI), connect to Snowflake, and add datasets from Snowflake without having to enter any credentials in the UI or config.toml. To ensure that SSO works correctly, DAI and Snowflake must be configured with the same OpenID Connect (OIDC) authentication provider. For information on setting up OIDC authentication, see Setting up OIDC authentication. For Snowflake, refer to the External OAuth Overview in the official Snowflake documentation.
With H2O Secure Store
You can configure an OAuth Client in H2O Secure Store and use it for OIDC authentication with Snowflake. Use the following Driverless AI configuration options to specify the Snowflake account URL, the OAuth client ID, and the H2O Secure Store endpoint URL.
snowflake_url="https://<SNOWFLAKE_ACCOUNT>.snowflakecomputing.com"
snowflake_h2o_secure_store_oauth_client_id="<OAUTH_CLIENT_ID>"
h2o_secure_store_endpoint_url="<H2O_SECURE_STORE_URL>"
Setup Guide for Azure Entra ID
This guide explains how to configure Driverless AI to use Snowflake through H2O Secure Store SSO, with Azure Entra ID (formerly Azure Active Directory) as the identity provider.
Prerequisites
Before you begin, ensure that you have the following:
An Azure Entra ID tenant
A Snowflake account with ACCOUNTADMIN privileges
Access to H2O Secure Store and Driverless AI configuration
Administrative access to Azure Entra ID
备注
Throughout this guide, replace placeholders (for example, <TENANT_ID>, <OAUTH_CLIENT_ID>) with your actual values.
Step 1: Configure Azure Portal
In the Azure Portal, navigate to Entra ID > App Registrations > New registration.
Register a new application with the following settings:
Name:
Snowflake OAuth ClientSupported account types: Accounts in this organizational directory only (single tenant)
Redirect URI: Leave this empty for now; you will set it later after creating the H2O Secure Store OAuth Client.
Click Register.
Record the following client information from the Overview page:
Application (client) ID: This is your
OAUTH_CLIENT_IDDirectory (tenant) ID: This is your
TENANT_ID
Configure a client secret:
Navigate to Certificates & Secrets.
Click New client secret.
Enter the following information:
Description:
Snowflake SSO IntegrationExpires: 24 months (or shorter for production security)
Click Add.
Immediately copy the Value field. This is your
<OAUTH_CLIENT_SECRET>. It will not be shown again.
Configure authentication settings:
Navigate to Authentication.
Click Add a platform > Web.
You will set the redirect URI after you create the H2O Secure Store OAuth Client. The format is:
https://<your_secure_store_endpoint>/oauth2/<your_h2o_oauth_client_id>/callback. You can leave it empty for now or enter a placeholder.Under Implicit grant and hybrid flows, select the following checkboxes:
Access tokens
ID tokens
Click Save.
Expose an API and add scopes:
Navigate to Expose an API.
Click Set next to Application ID URI.
Use the default value:
api://OAUTH_CLIENT_IDClick Save.
Click Add a scope and enter the following information:
Scope name:
session:role-any(or the role you want to use)Who can consent: Admins and users
Admin consent display name:
Snowflake Role AccessAdmin consent description:
Allows access to Snowflake with any assigned roleUser consent display name:
Snowflake Access(or the name you want to use)User consent description:
Access your Snowflake data with appropriate rolesState: Enabled
Click Add scope.
Add API permissions:
Navigate to API Permissions.
Click Add a permission > My APIs, and then select your app.
Under Delegated permissions, select
session:role-any(or the role you want to use).Click Add permissions.
Click Grant admin consent for <tenant> and confirm. The status should show Granted.
Add optional claims (required for user mapping in Snowflake):
Navigate to Token configuration.
Click Add optional claim.
Select the following options:
Token type: Access
Claim: Select
preferred_username(or the claim you want to use; this must match your Snowflake mapping claim)
Click Add and save.
备注
The optional claim ensures that the claim is included in access tokens for user mapping.
Step 2: Configure Snowflake
Connect to Snowflake using the web interface with the
ACCOUNTADMINrole.Create the external OAuth security integration by running the following SQL commands:
USE ROLE accountadmin;
CREATE SECURITY INTEGRATION external_oauth_azure_integration
TYPE = EXTERNAL_OAUTH
ENABLED = TRUE
EXTERNAL_OAUTH_TYPE = AZURE
EXTERNAL_OAUTH_ISSUER = 'https://sts.windows.net/<TENANT_ID>/'
-- Use the claim you want to use below; this must match your Entra ID optional claim
EXTERNAL_OAUTH_TOKEN_USER_MAPPING_CLAIM = 'preferred_username'
EXTERNAL_OAUTH_SNOWFLAKE_USER_MAPPING_ATTRIBUTE = 'login_name'
EXTERNAL_OAUTH_JWS_KEYS_URL = 'https://login.microsoftonline.com/<TENANT_ID>/discovery/v2.0/keys'
EXTERNAL_OAUTH_AUDIENCE_LIST = ('api://<OAUTH_CLIENT_ID>')
EXTERNAL_OAUTH_ANY_ROLE_MODE = ENABLE
COMMENT = 'Entra ID integration for Driverless AI Snowflake access';
Verify the security integration:
DESC SECURITY INTEGRATION external_oauth_azure_integration;
(Optional) For testing privileged roles, run the following command:
ALTER ACCOUNT SET EXTERNAL_OAUTH_ADD_PRIVILEGED_ROLES_TO_BLOCKED_LIST = FALSE;
警告
The EXTERNAL_OAUTH_ADD_PRIVILEGED_ROLES_TO_BLOCKED_LIST setting should only be set to FALSE in testing environments. In production, review Snowflake security best practices.
Step 3: Configure H2O Secure Store OAuth Client
In H2O Secure Store, create a new OAuth Client with the following settings:
Display name:
Snowflake OAuth(or any name you prefer)Issuer:
https://login.microsoftonline.com/<TENANT_ID>/v2.0Client ID:
<OAUTH_CLIENT_ID>(the Client ID from Entra ID)Client Secret:
<OAUTH_CLIENT_SECRET>(the Client Secret from Entra ID that you noted earlier)Login Principal Claim:
preferred_username(or the claim you want to use; this must match your Snowflake mapping claim)Extra Scopes: Enter the following scopes:
emailprofileapi://<OAUTH_CLIENT_ID>/session:role-any(or the role you want to use)
Click Save.
After saving, note the OAuth Client ID that was generated by H2O Secure Store. This is the
<H2O_SECURE_STORE_OAUTH_CLIENT_ID>that you will use in the Driverless AI configuration.Update the Entra ID callback URL:
Return to Azure Portal > App Registrations > Your App > Authentication > Web.
Click Add redirectURI.
Enter
https://<your_secure_store_endpoint>/oauth2/<H2O_SECURE_STORE_OAUTH_CLIENT_ID>/callbackClick Save.
Step 4: Configure Driverless AI
Update the Driverless AI configuration with the following settings:
h2o_secure_store_endpoint_url = "https://<your_secure_store_endpoint>"
snowflake_h2o_secure_store_oauth_client_id = "<H2O_SECURE_STORE_OAUTH_CLIENT_ID>"
snowflake_url = "https://<your_snowflake_account_url>"
备注
The h2o_secure_store_endpoint_url can be retrieved from the callback URL. The snowflake_h2o_secure_store_oauth_client_id is the ID of the OAuth Client you created in H2O Secure Store (for example, snowflake-oauth).
Step 5: Import Snowflake Dataset into Driverless AI (SSO Authentication)
When using SSO authentication with H2O Secure Store, you do not need to enter a username and password when querying Snowflake.
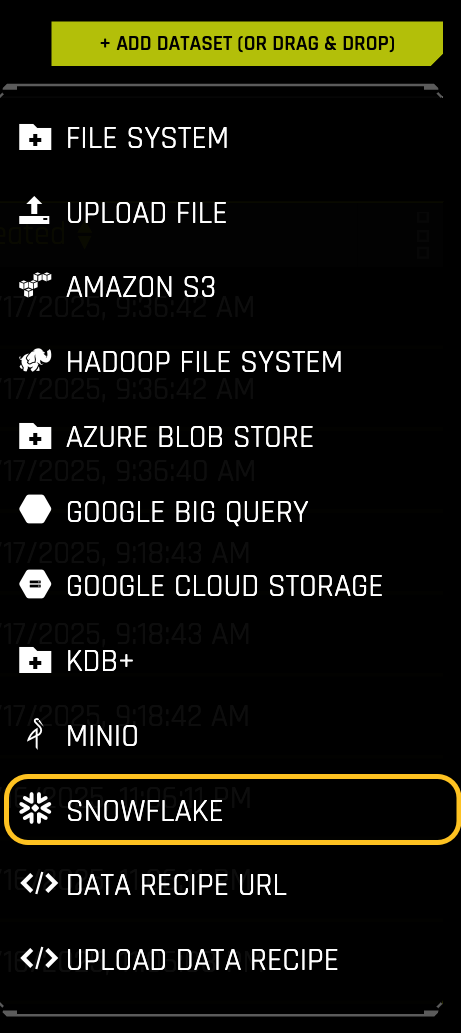
Once your Driverless AI instance is up and running, click + ADD DATASET > SNOWFLAKE.
Enter your SQL query. Leave the username and password fields blank.
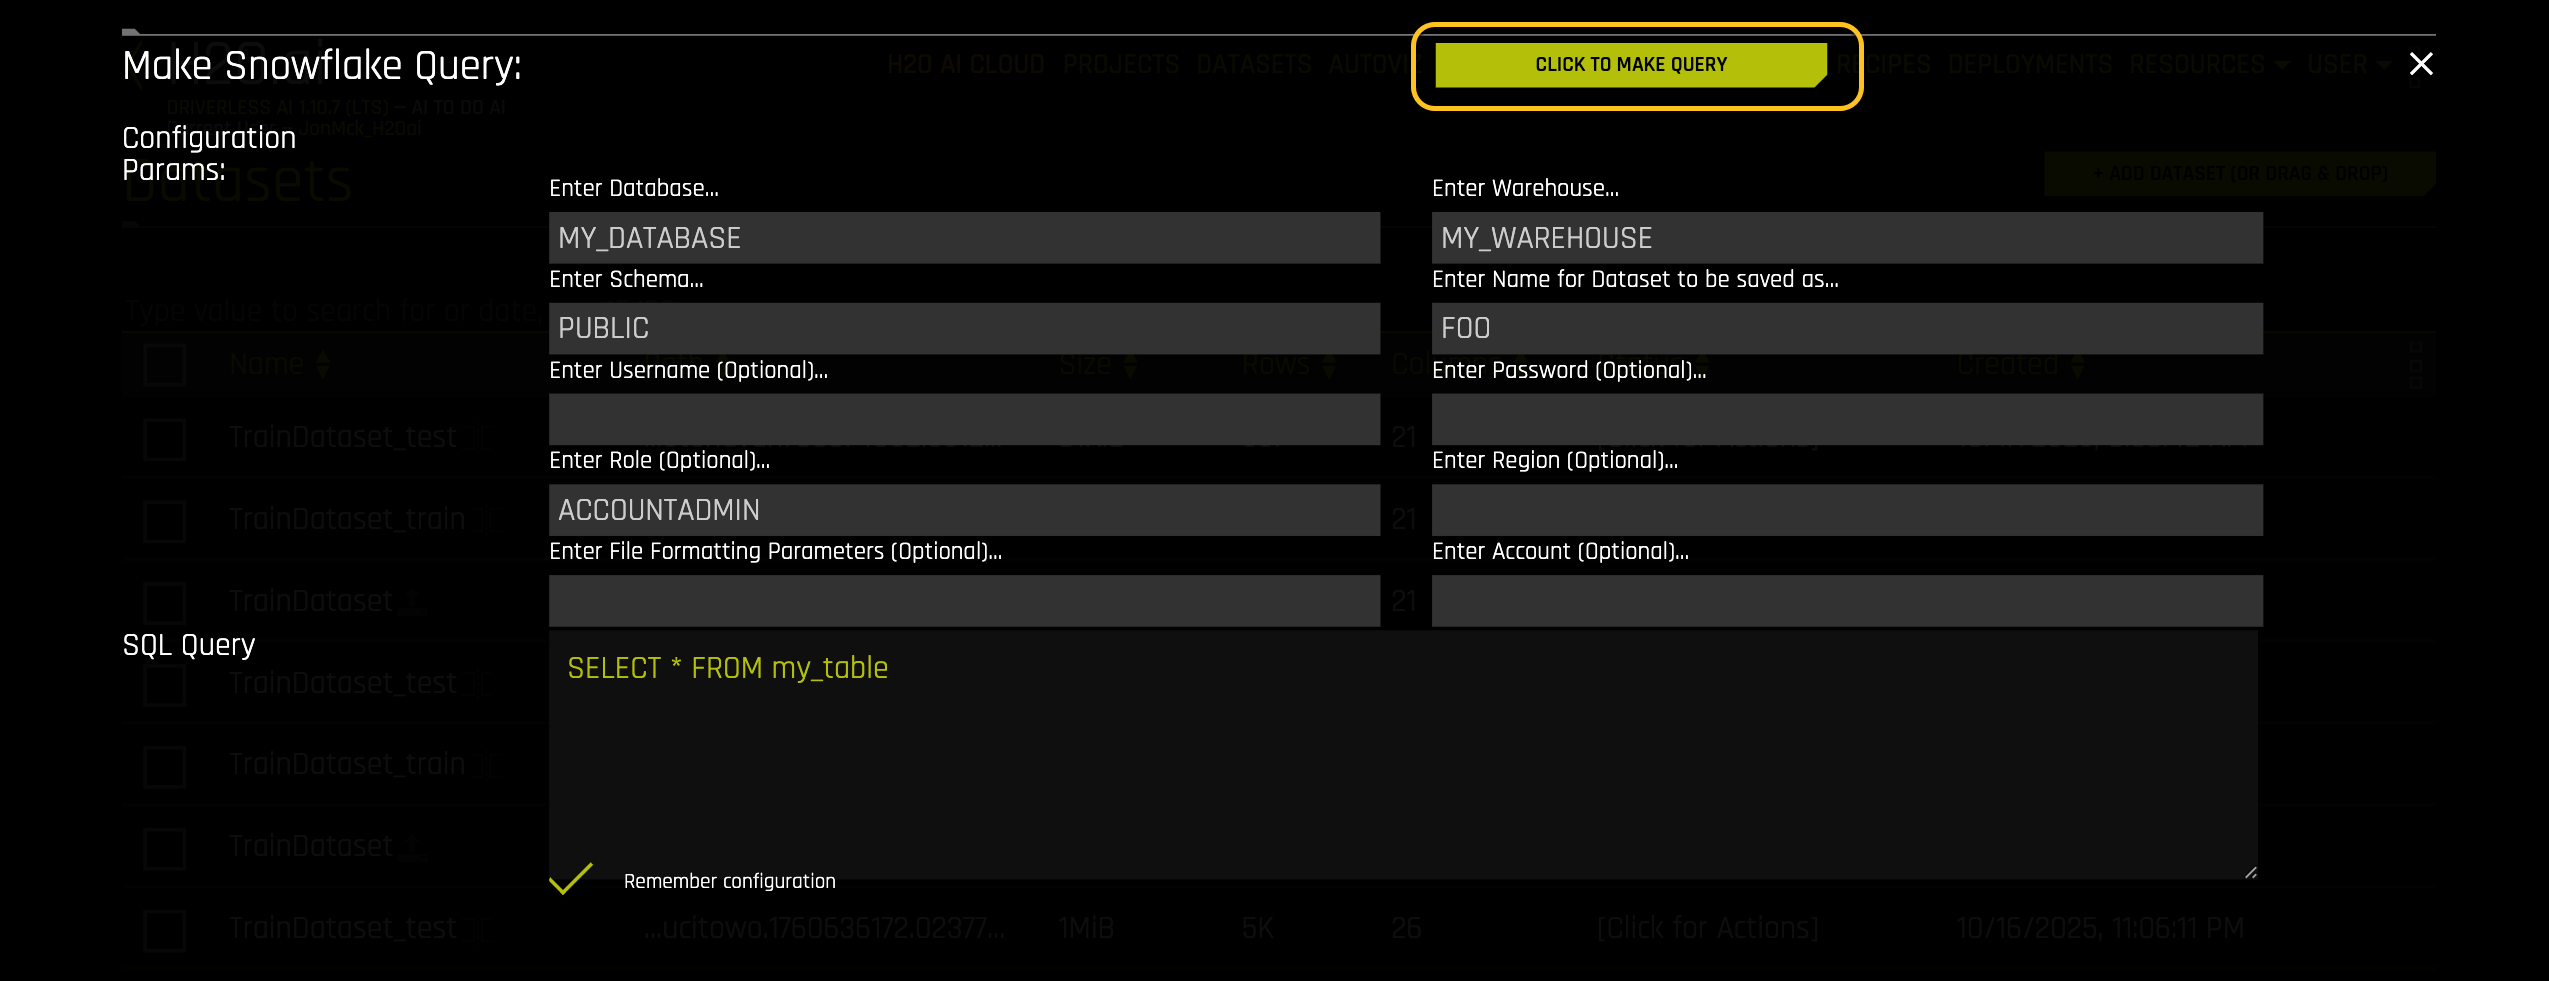
Click MAKE QUERY.
If this is your first query in the session, a Snowflake Authentication Required dialog prompts you to authenticate with your identity provider.
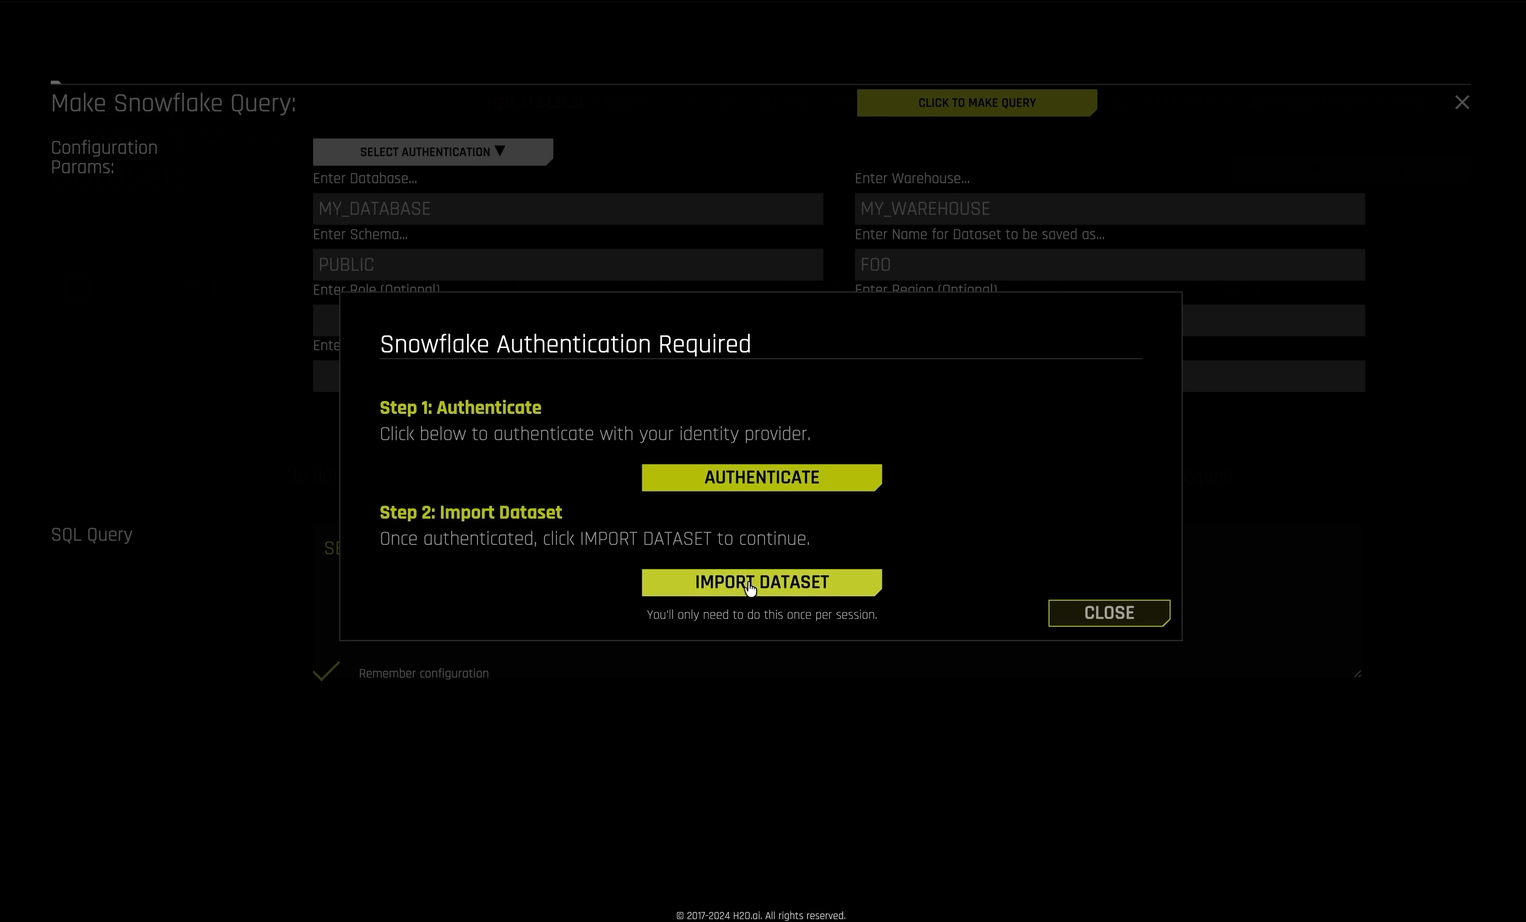
If you have already authenticated during this session, the query runs immediately and you can skip the remaining steps.
In the authentication dialog, click Authenticate. Your identity provider’s login page opens in a new browser tab.
备注
If your browser blocks the new tab, allow pop-ups for your Driverless AI URL and click Authenticate again.
Sign in with your identity provider credentials.
Return to the Driverless AI browser tab.
In the authentication dialog, click Import Dataset. Driverless AI re-executes your query and imports the dataset.
备注
You only need to authenticate once per session. Subsequent Snowflake queries in the same session use your cached authentication token.
Authentication Methods
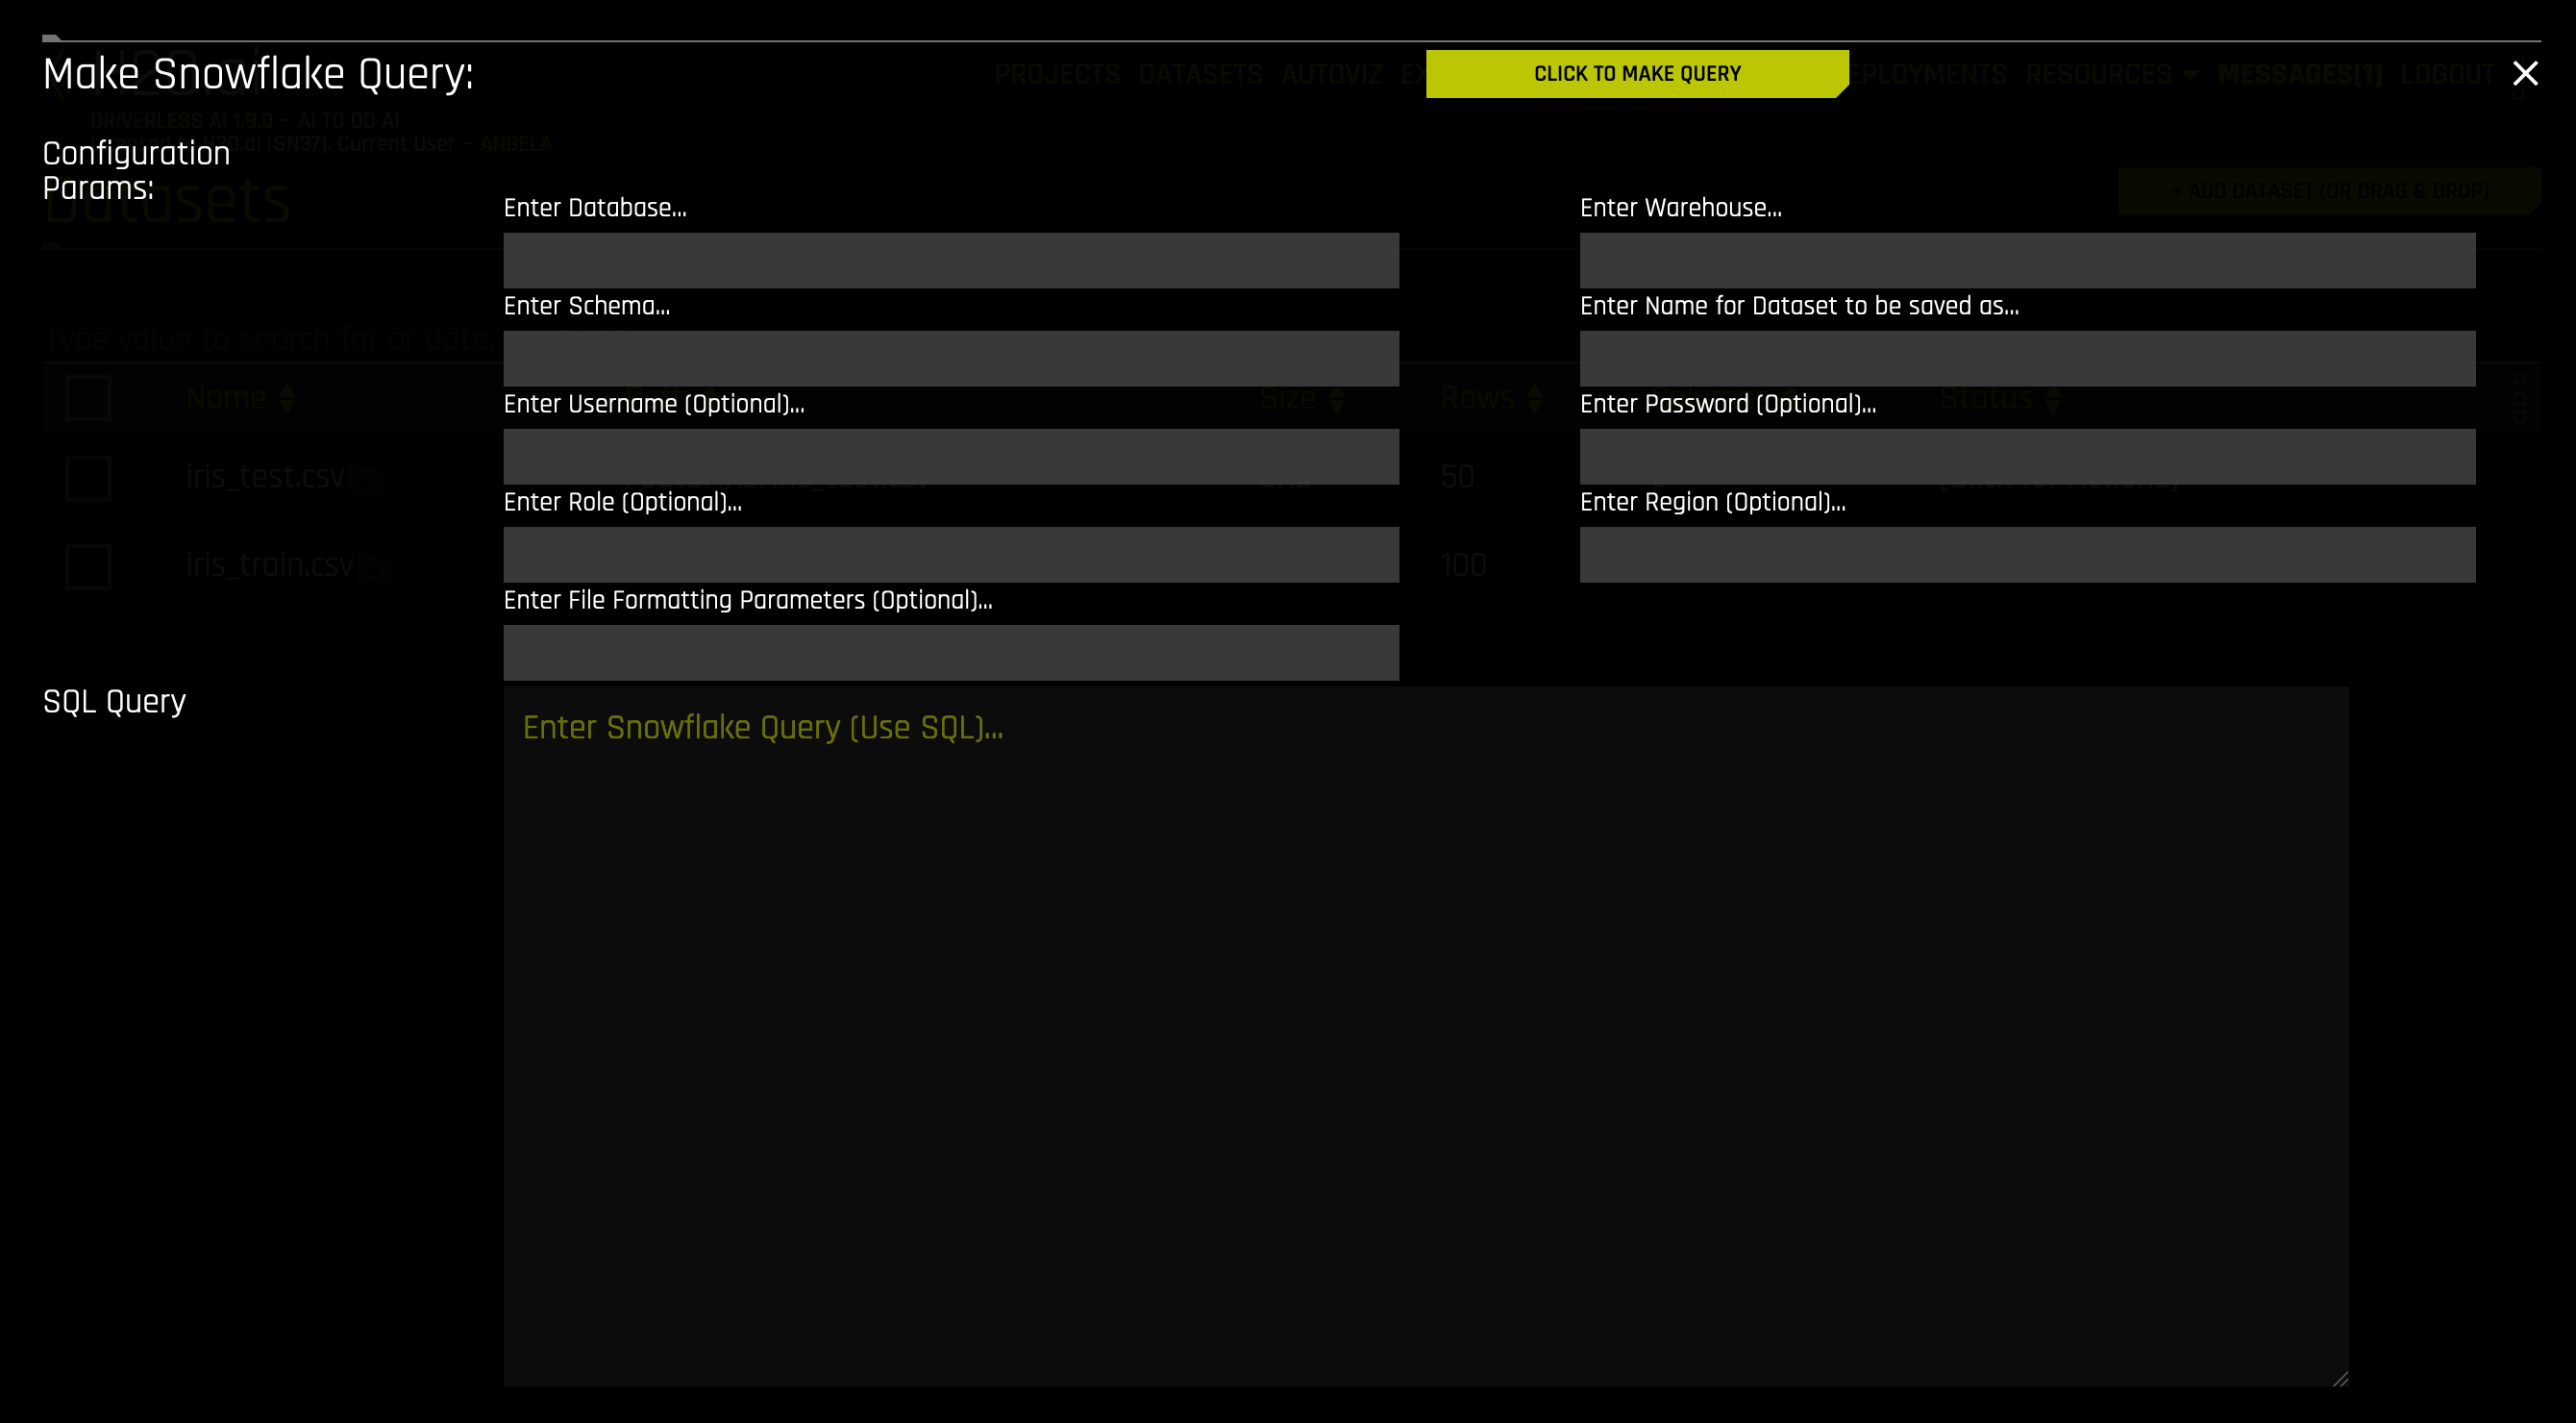
Driverless AI supports multiple authentication methods for connecting to Snowflake. To add a dataset, click + ADD DATASET > SNOWFLAKE.
Common Fields
The following fields are common to all authentication methods:
Enter Database: Specify the name of the Snowflake database that you are querying.
Enter Warehouse: Specify the name of the Snowflake warehouse that you are querying.
Enter Schema: Specify the schema of the dataset that you are querying.
Enter Name for Dataset to Be Saved As: Specify a name for the dataset to be saved as. Note that this can only be a CSV file (for example, myfile.csv).
Enter Role: (Optional) Specify your role as designated within Snowflake. See the Access Control Overview documentation for more information.
Enter Region: (Optional) Specify the region of the warehouse that you are querying. This can be found in the Snowflake-provided URL to access your database (as in <optional-deployment-name>.<region>.<cloud-provider>.snowflakecomputing.com). This is optional and can also be left blank if
snowflake_urlwas specified with a<region>in the config.toml when starting Driverless AI.Enter File Formatting Parameters: (Optional) Specify any additional parameters for formatting your datasets. Available parameters are listed in the CREATE FILE FORMAT documentation. For example, if your dataset includes a text column that contains commas, you can specify a different delimiter using
FIELD_DELIMITER='character'. Multiple parameters must be separated with spaces:备注
Use only parameters for
TYPE = CSV.FIELD_DELIMITER=',' FIELD_OPTIONALLY_ENCLOSED_BY="" SKIP_BLANK_LINES=TRUE
备注
Be sure that the specified delimiter is not also used as a character within a cell; otherwise an error will occur. For example, you might specify the following to load the “AMAZON_REVIEWS” dataset:
Database: UTIL_DB
Warehouse: DAI_SNOWFLAKE_TEST
Schema: AMAZON_REVIEWS_SCHEMA
Query: SELECT * FROM AMAZON_REVIEWS
Enter File Formatting Parameters (Optional): FIELD_OPTIONALLY_ENCLOSED_BY = ‘”’
In the above example, if the
FIELD_OPTIONALLY_ENCLOSED_BYoption is not set, the following row will result in a failure to import the dataset (as the dataset’s delimiter is,by default):positive, 2012-05-03,Wonderful\, tasty taffy,0,0,3,5,2012,Thu,0
备注
Numeric columns from Snowflake that have NULL values are sometimes converted to strings (for example,
\N). To prevent this from occurring, addNULL_IF=()to the input of FILE FORMATTING PARAMETERS.Enter Snowflake Query: Specify the Snowflake query that you want to execute.
When you are finished, click CLICK TO MAKE QUERY to add the dataset.
For username/password authentication, provide the following fields in addition to the common fields described above:
Enter Username: (Optional) Specify the username associated with this Snowflake account. This can be left blank if
snowflake_userwas specified in the config.toml when starting Driverless AI; otherwise, this field is required.Enter Password: (Optional) Specify the password associated with this Snowflake account. This can be left blank if
snowflake_passwordwas specified in the config.toml when starting Driverless AI; otherwise, this field is required.
Key pair authentication provides enhanced security by using RSA key pairs instead of passwords. This method eliminates the need to store or transmit passwords, making it ideal for automated processes and environments with strict security requirements.
Prerequisites
Before using key pair authentication, you must generate an RSA key pair and configure your Snowflake user account with the public key. For detailed instructions on generating key pairs and configuring Snowflake, see the Key Pair Authentication documentation in the official Snowflake documentation.
Your private key file must be in PKCS#8 format with a .p8 file extension. The private key can be either encrypted (password-protected) or unencrypted.
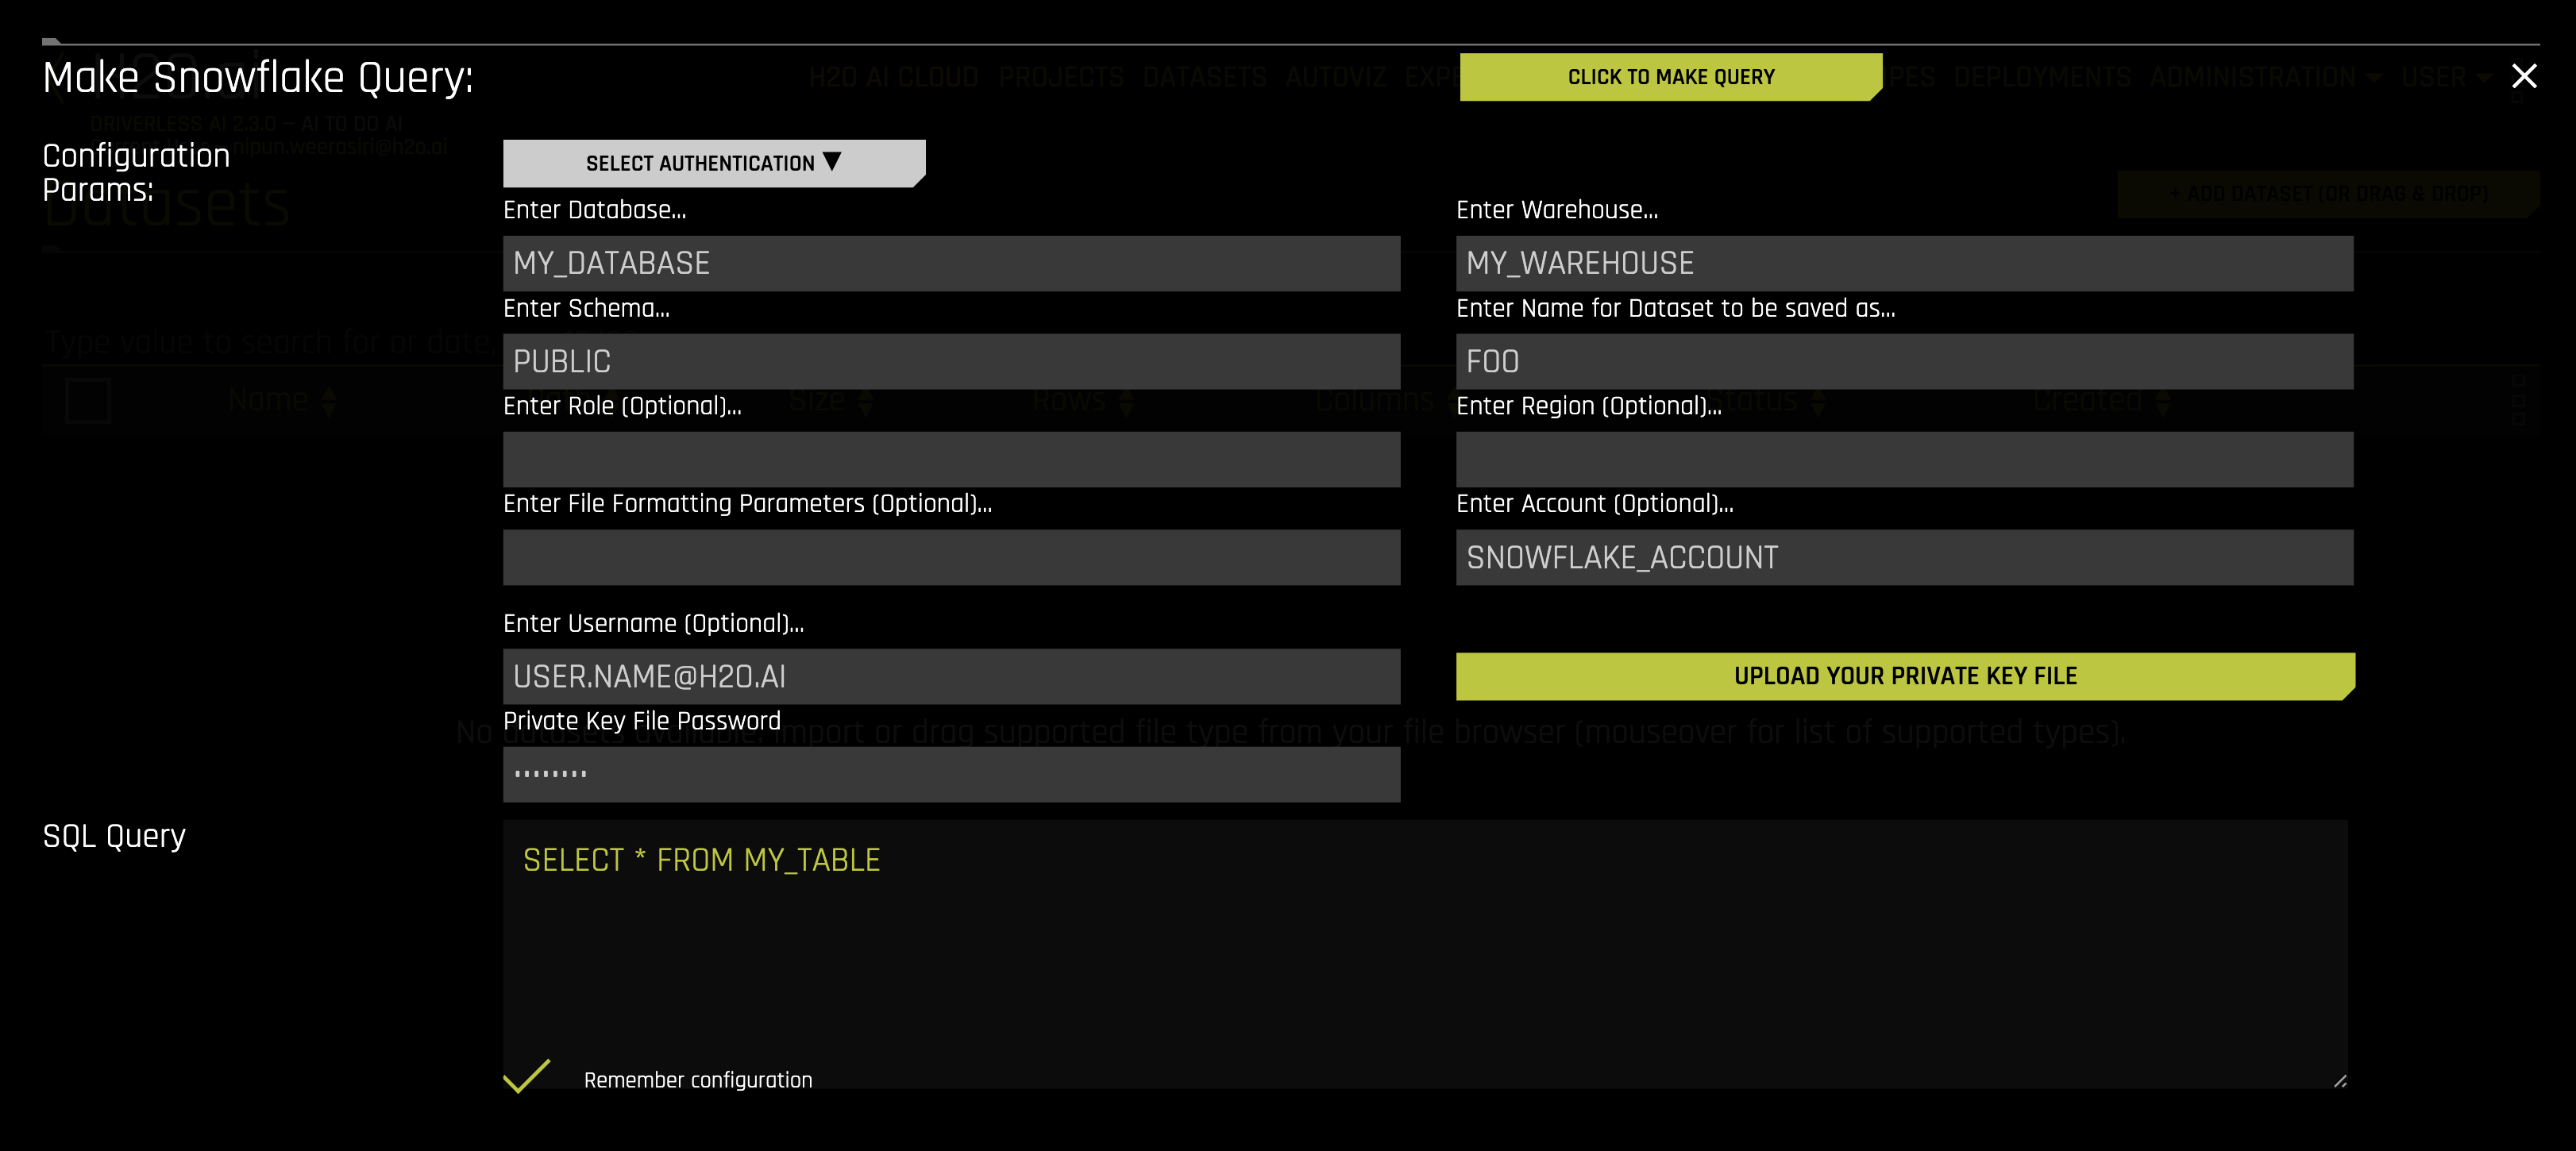
Authentication Fields
Select Keypair Authentication from the Select Authentication Method dropdown.

Provide the following fields in addition to the common fields described above:
Enter Account: (Optional) Specify the Snowflake account ID.
Enter Username: Specify the Snowflake username associated with the key pair. This is the user account that has been configured with your public key in Snowflake.
Upload Private Key File: Upload your private key file in PKCS#8 format (
.p8extension). Click the upload button to select the file from your local system.Enter Private Key Password: (Optional) If your private key is encrypted, enter the password used to encrypt it. Leave this field blank if your private key is unencrypted.
备注
Your private key file is handled securely during the authentication process. The file is used only to establish the connection and is not stored persistently by Driverless AI.
Troubleshooting Snowflake Connection Errors
When you encounter connection errors with Snowflake, the error messages in the Driverless AI logs often include a UUID that can be used to retrieve more detailed information about the error.
Troubleshooting Authentication Failures
For example, when you encounter an OAuth access token error in the Driverless AI logs similar to the following:
250001 (08001): Failed to connect to DB: YDYTYTC-XB02642.snowflakecomputing.com:443.
Invalid OAuth access token. [da0650da-9e1e-4783-81ec-ed744d046cf2]
The UUID at the end of the error message (in this example, da0650da-9e1e-4783-81ec-ed744d046cf2) can be used to identify the cause of the token failure by executing a query in Snowflake.
备注
Only users with a role that has the MONITOR privilege can execute the following query. For more information, see the SYSTEM$GET_LOGIN_FAILURE_DETAILS function documentation.
To investigate the error:
Connect to Snowflake with an account that has the
MONITORprivilege.Execute the following SQL query in Snowflake, replacing
<UUID>with the actual value from the log message:SELECT JSON_EXTRACT_PATH_TEXT( SYSTEM$GET_LOGIN_FAILURE_DETAILS('<UUID>'), 'errorCode' );Use the returned
errorCodeto identify the root cause of the authentication failure, such as an expired token, invalid audience, missing claim, or other OAuth/SAML/key-pair issue.
For more information about Snowflake error codes and troubleshooting SAML/OAuth issues, see the Snowflake SAML Errors documentation.