Browser action tools
Browser action tools let you extend Enterprise h2oGPTe agents with custom browser automation. You upload a Python script (or ZIP package) that uses Playwright to control a real browser, and the agent runs it during conversations when a task requires real web interaction.
Use browser action tools when you need agents to:
- Log in to websites and interact with pages that require authentication
- Fill and submit forms on external web applications
- Scrape content from pages that cannot be reached by a plain HTTP request
- Automate repetitive browser workflows (for example, downloading reports from a portal)
- Test or verify the behavior of a web UI
Prerequisites
- Access to Enterprise h2oGPTe with the Add and edit custom agent tools permission
- A Python script (
.py) or ZIP package (.zip) containing your Playwright automation code - Familiarity with Playwright for Python — specifically
async_playwright, browser context management, and page interactions
How browser action tools work
When the agent determines a task requires browser interaction, it calls your uploaded script in a managed Playwright environment, where your code drives a headless Chromium browser and returns the output to the agent.
The execution flow:
- You upload a Python script that uses Playwright to automate a browser task, and write a description.
- Enterprise h2oGPTe registers the tool and makes it available in agent sessions.
- During a conversation, the agent determines browser interaction is needed and invokes your tool.
- Enterprise h2oGPTe executes your script in that managed environment.
- The script output (extracted text, status, or file) is returned to the agent.
- The agent uses the output to respond to the user.
Single file vs. ZIP package:
If your automation fits in one script with no local imports, upload it as a single .py file.
If your script depends on helper modules, configuration files, or data assets, package everything into a .zip archive. Enterprise h2oGPTe extracts the contents and preserves the directory structure. Make sure import paths in your code match the layout inside the ZIP.
Use case (HTML report to PNG screenshot)
A team uses Enterprise h2oGPTe to generate HTML summaries of research findings. They want to share these summaries as images in presentations and emails without manually capturing browser screenshots. Plain Python cannot render styled HTML to an image without a browser, so this is a natural fit for a browser action tool.
The platform team builds a browser action tool called browser_render_html_to_png. When a user asks the agent to turn a report into a shareable image, the agent generates the HTML content and passes it to the tool, which renders it in a headless Chromium browser and returns a base64-encoded PNG. The agent then makes the image available for download.
This guide walks through that exact workflow.
Before you begin: prepare your tool code
Write a Python script that uses Playwright to perform the browser task. The uploaded file is what Enterprise h2oGPTe executes when the agent invokes the tool.
Example: HTML report to PNG screenshot
Save this script as browser_render_html_to_png.py. The filename must start with browser_ — Enterprise h2oGPTe rejects any uploaded .py file whose name does not begin with that prefix.
import asyncio
import base64
from playwright.async_api import async_playwright


async def render_html_to_png(html_content: str) -> str:
    """Render an HTML string to a PNG screenshot.

    Args:
        html_content: The HTML string to render in the browser.

    Returns:
        Base64-encoded PNG image string.
    """
    async with async_playwright() as p:
        browser = await p.chromium.launch(headless=True)
        page = await browser.new_page(viewport={"width": 1280, "height": 800})
        await page.set_content(html_content, wait_until="networkidle")
        screenshot = await page.screenshot(full_page=True)
        await browser.close()
    return base64.b64encode(screenshot).decode("utf-8")


if __name__ == "__main__":
    sample_html = "<h1>Hello</h1><p>This is a browser-rendered screenshot.</p>"
    result = asyncio.run(render_html_to_png(sample_html))
    print(f"Base64 PNG: {result[:60]}...")
Tool code requirements:
- Use
.pyfor single-file tools or.zipfor multi-file packages - For a single
.pyupload, the filename must start withbrowser_(for example,browser_render_html_to_png.py) - For a
.zipupload, the archive must contain at least one.pyfile whose name starts withbrowser_; it can be located anywhere inside the archive - The script must be self-contained and handle its own browser lifecycle (launch and close)
- Maximum file size: 20 MB
Step 1: Open the browser action tool dialog
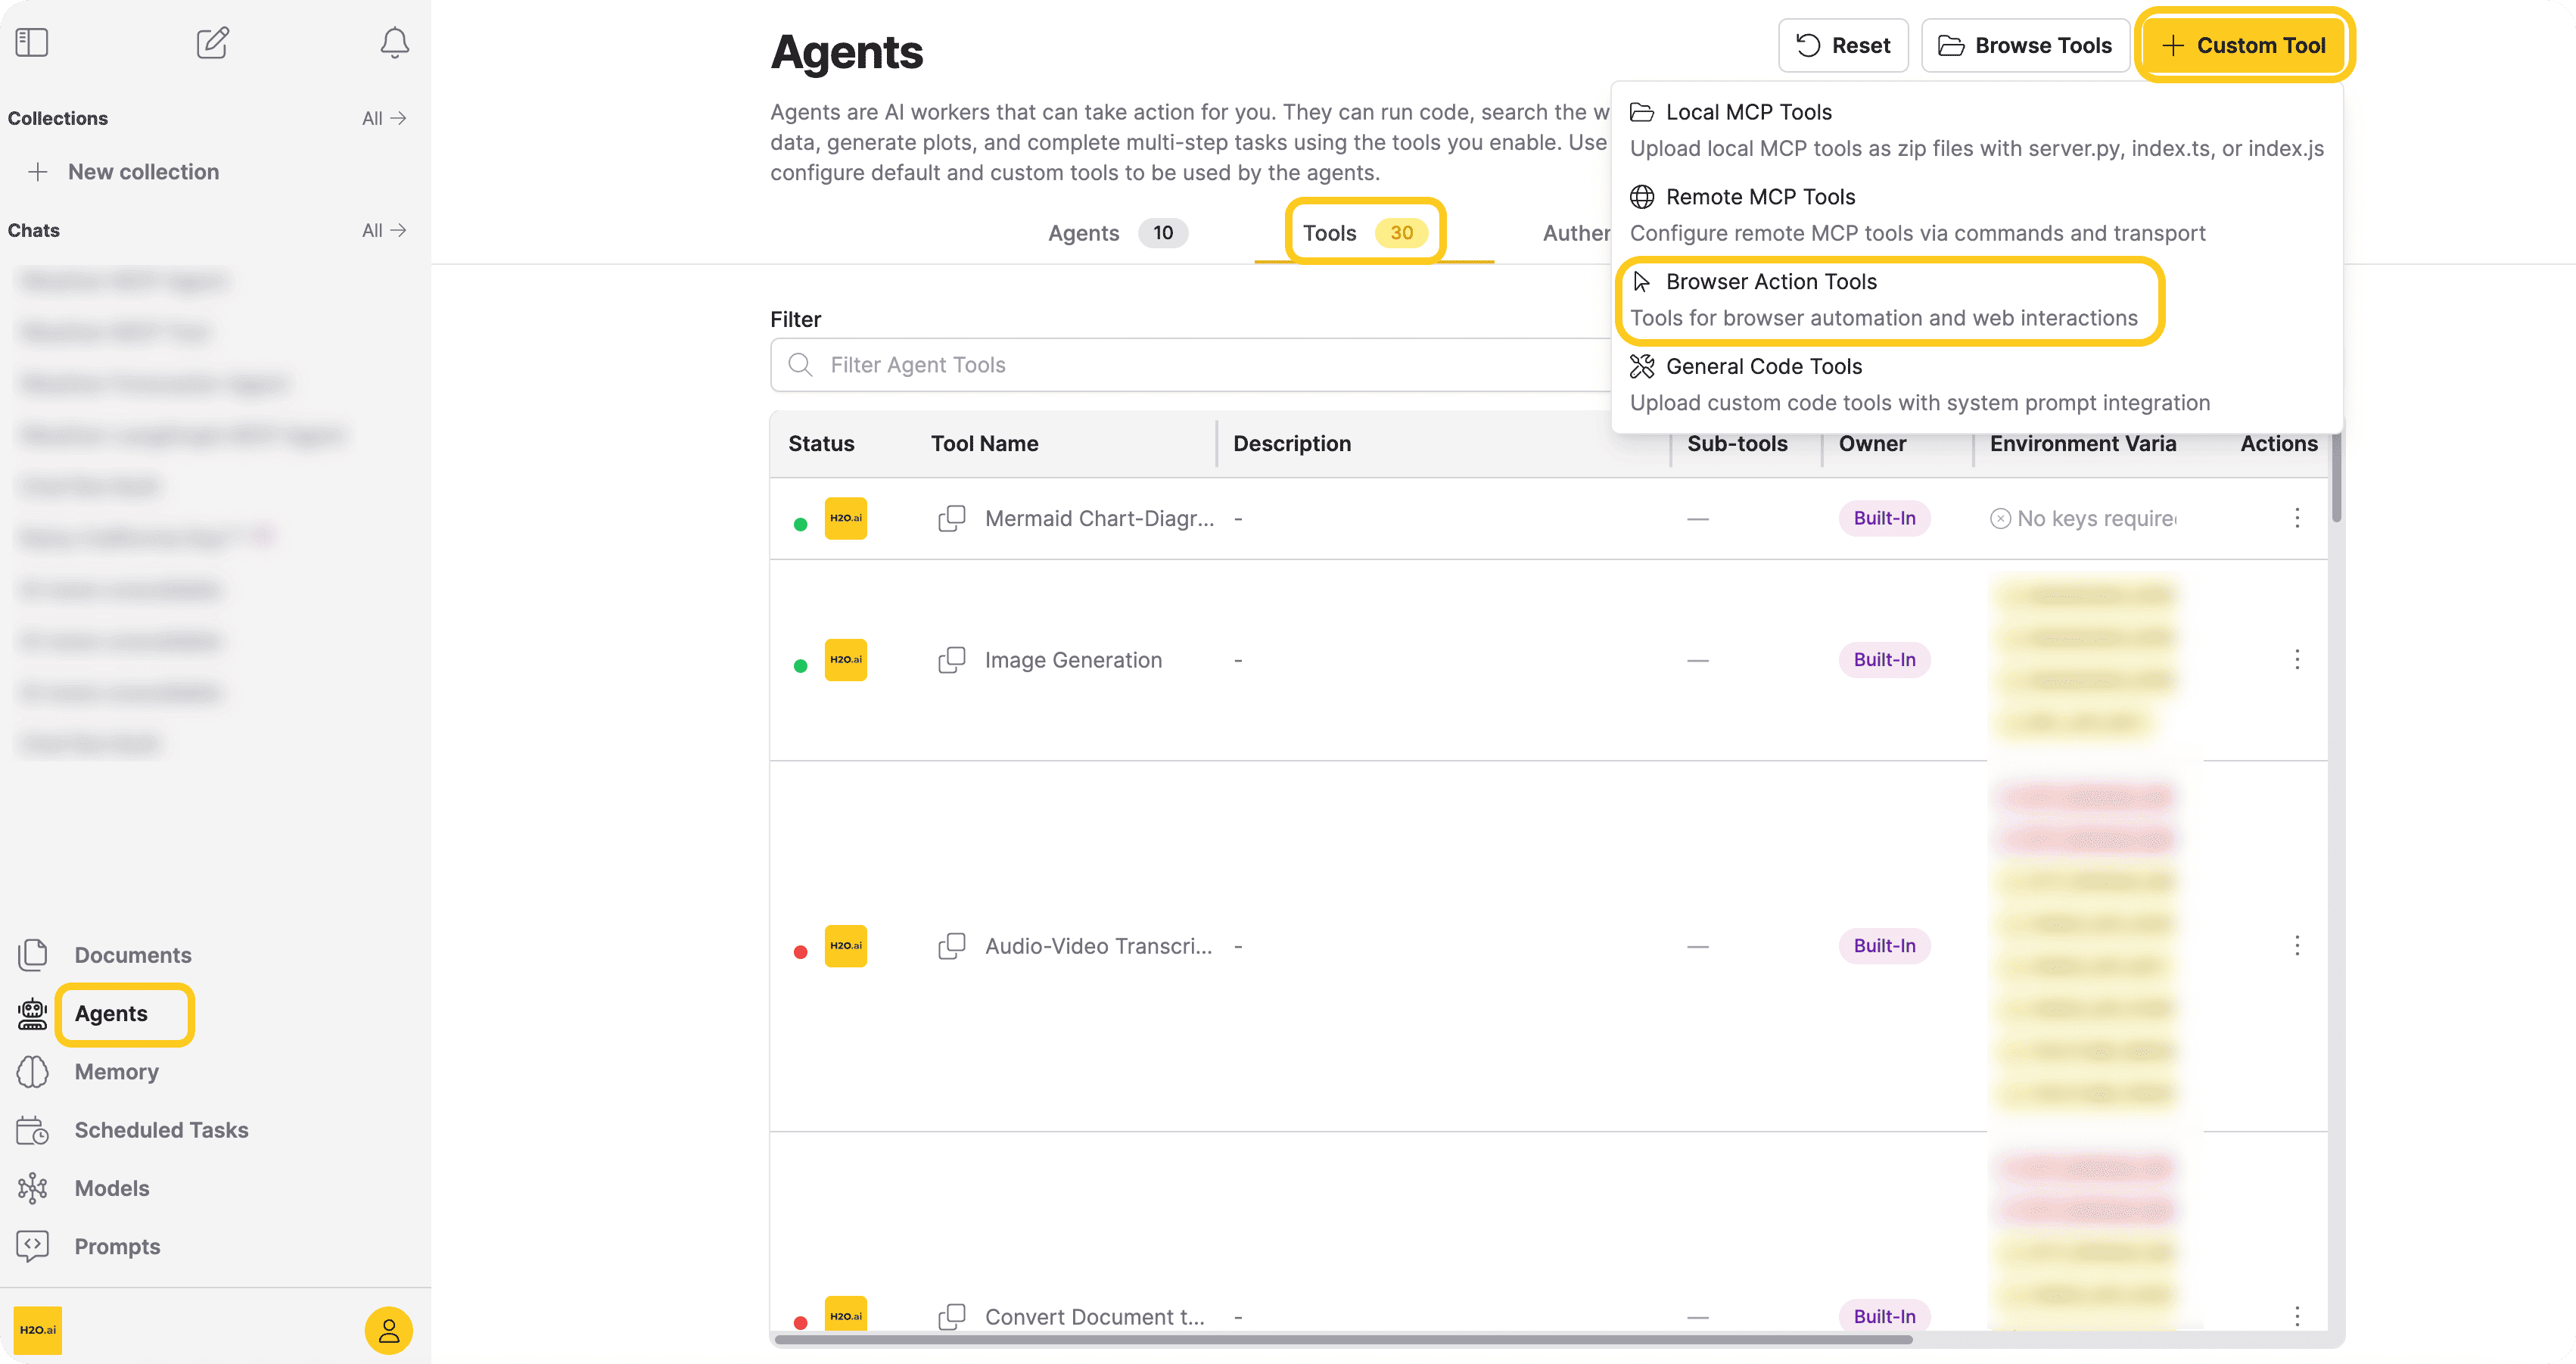
- In the Enterprise h2oGPTe navigation menu, click Agents.
- Click the Tools tab.
- Click + Custom Tool and select Browser Action Tools.
This opens the Upload Browser Action Tool dialog where you configure and upload your tool.
Step 2: Configure and upload the tool
In the Upload Browser Action Tool dialog, fill in the following fields:
-
Description — Enter a description of what the tool does. Write it to describe what the tool does and when the agent should use it (for example, "Renders an HTML string to a PNG screenshot").
-
Upload Browser Action Code — Drag and drop or click Browse files... to select your
.pyor.zipfile containing the Playwright script. -
Enable by Default — Select this checkbox to make the tool automatically available in all new agent sessions. Leave it unchecked if you want to enable it manually per conversation.
-
Click Add Tool.
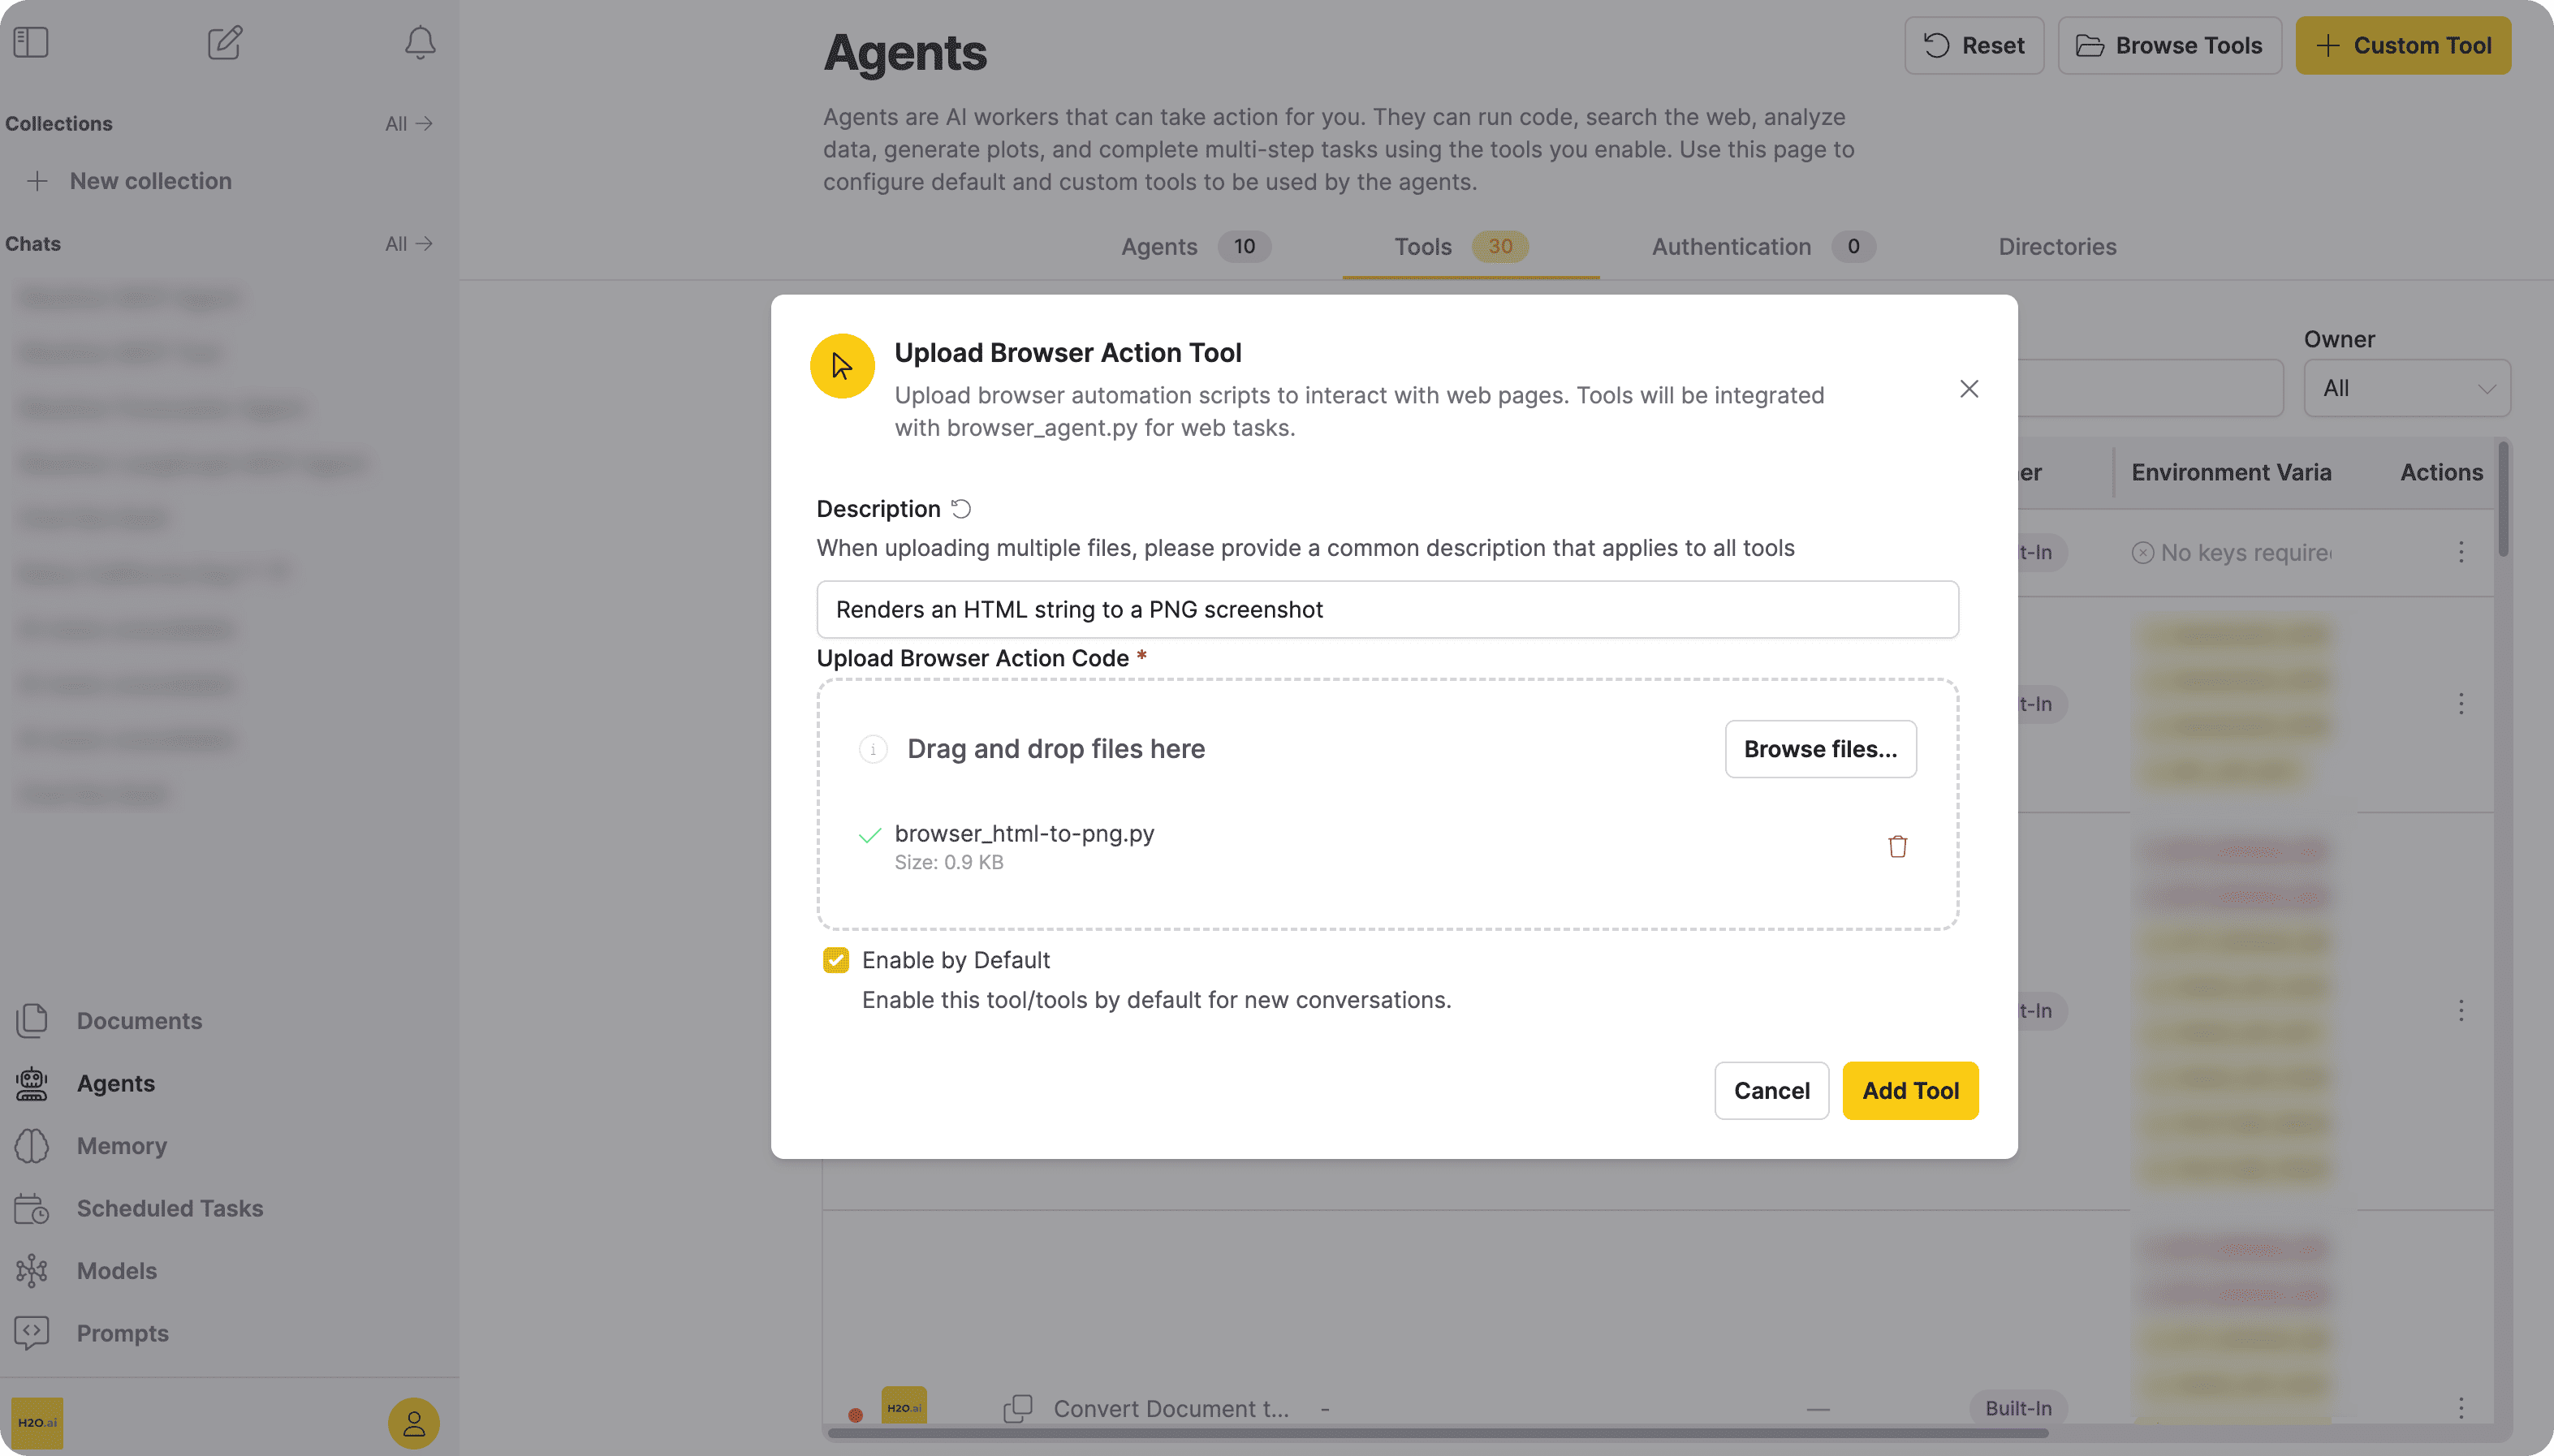
Browser action tools do not have a Tool name or System prompt field. The agent infers when to use the tool from its description and from the context of the conversation. Write a clear and specific description; it is the agent's only guide for deciding when to invoke the tool.
Step 3: Add authentication keys (optional)
If your browser script needs credentials, for example, a username and password to log in to a site, create an authentication key and assign it to the tool. The script can then read the credentials from environment variables at runtime rather than hardcoding them.
For step-by-step instructions on creating keys and assigning them, see Managing authentication keys in the Agent tool configuration guide.
Example: Reading credentials in your script
import os

USERNAME = os.getenv("PORTAL_USERNAME")
PASSWORD = os.getenv("PORTAL_PASSWORD")
Step 4: Test the tool
To verify the tool works as expected, test it in an agent chat session.
-
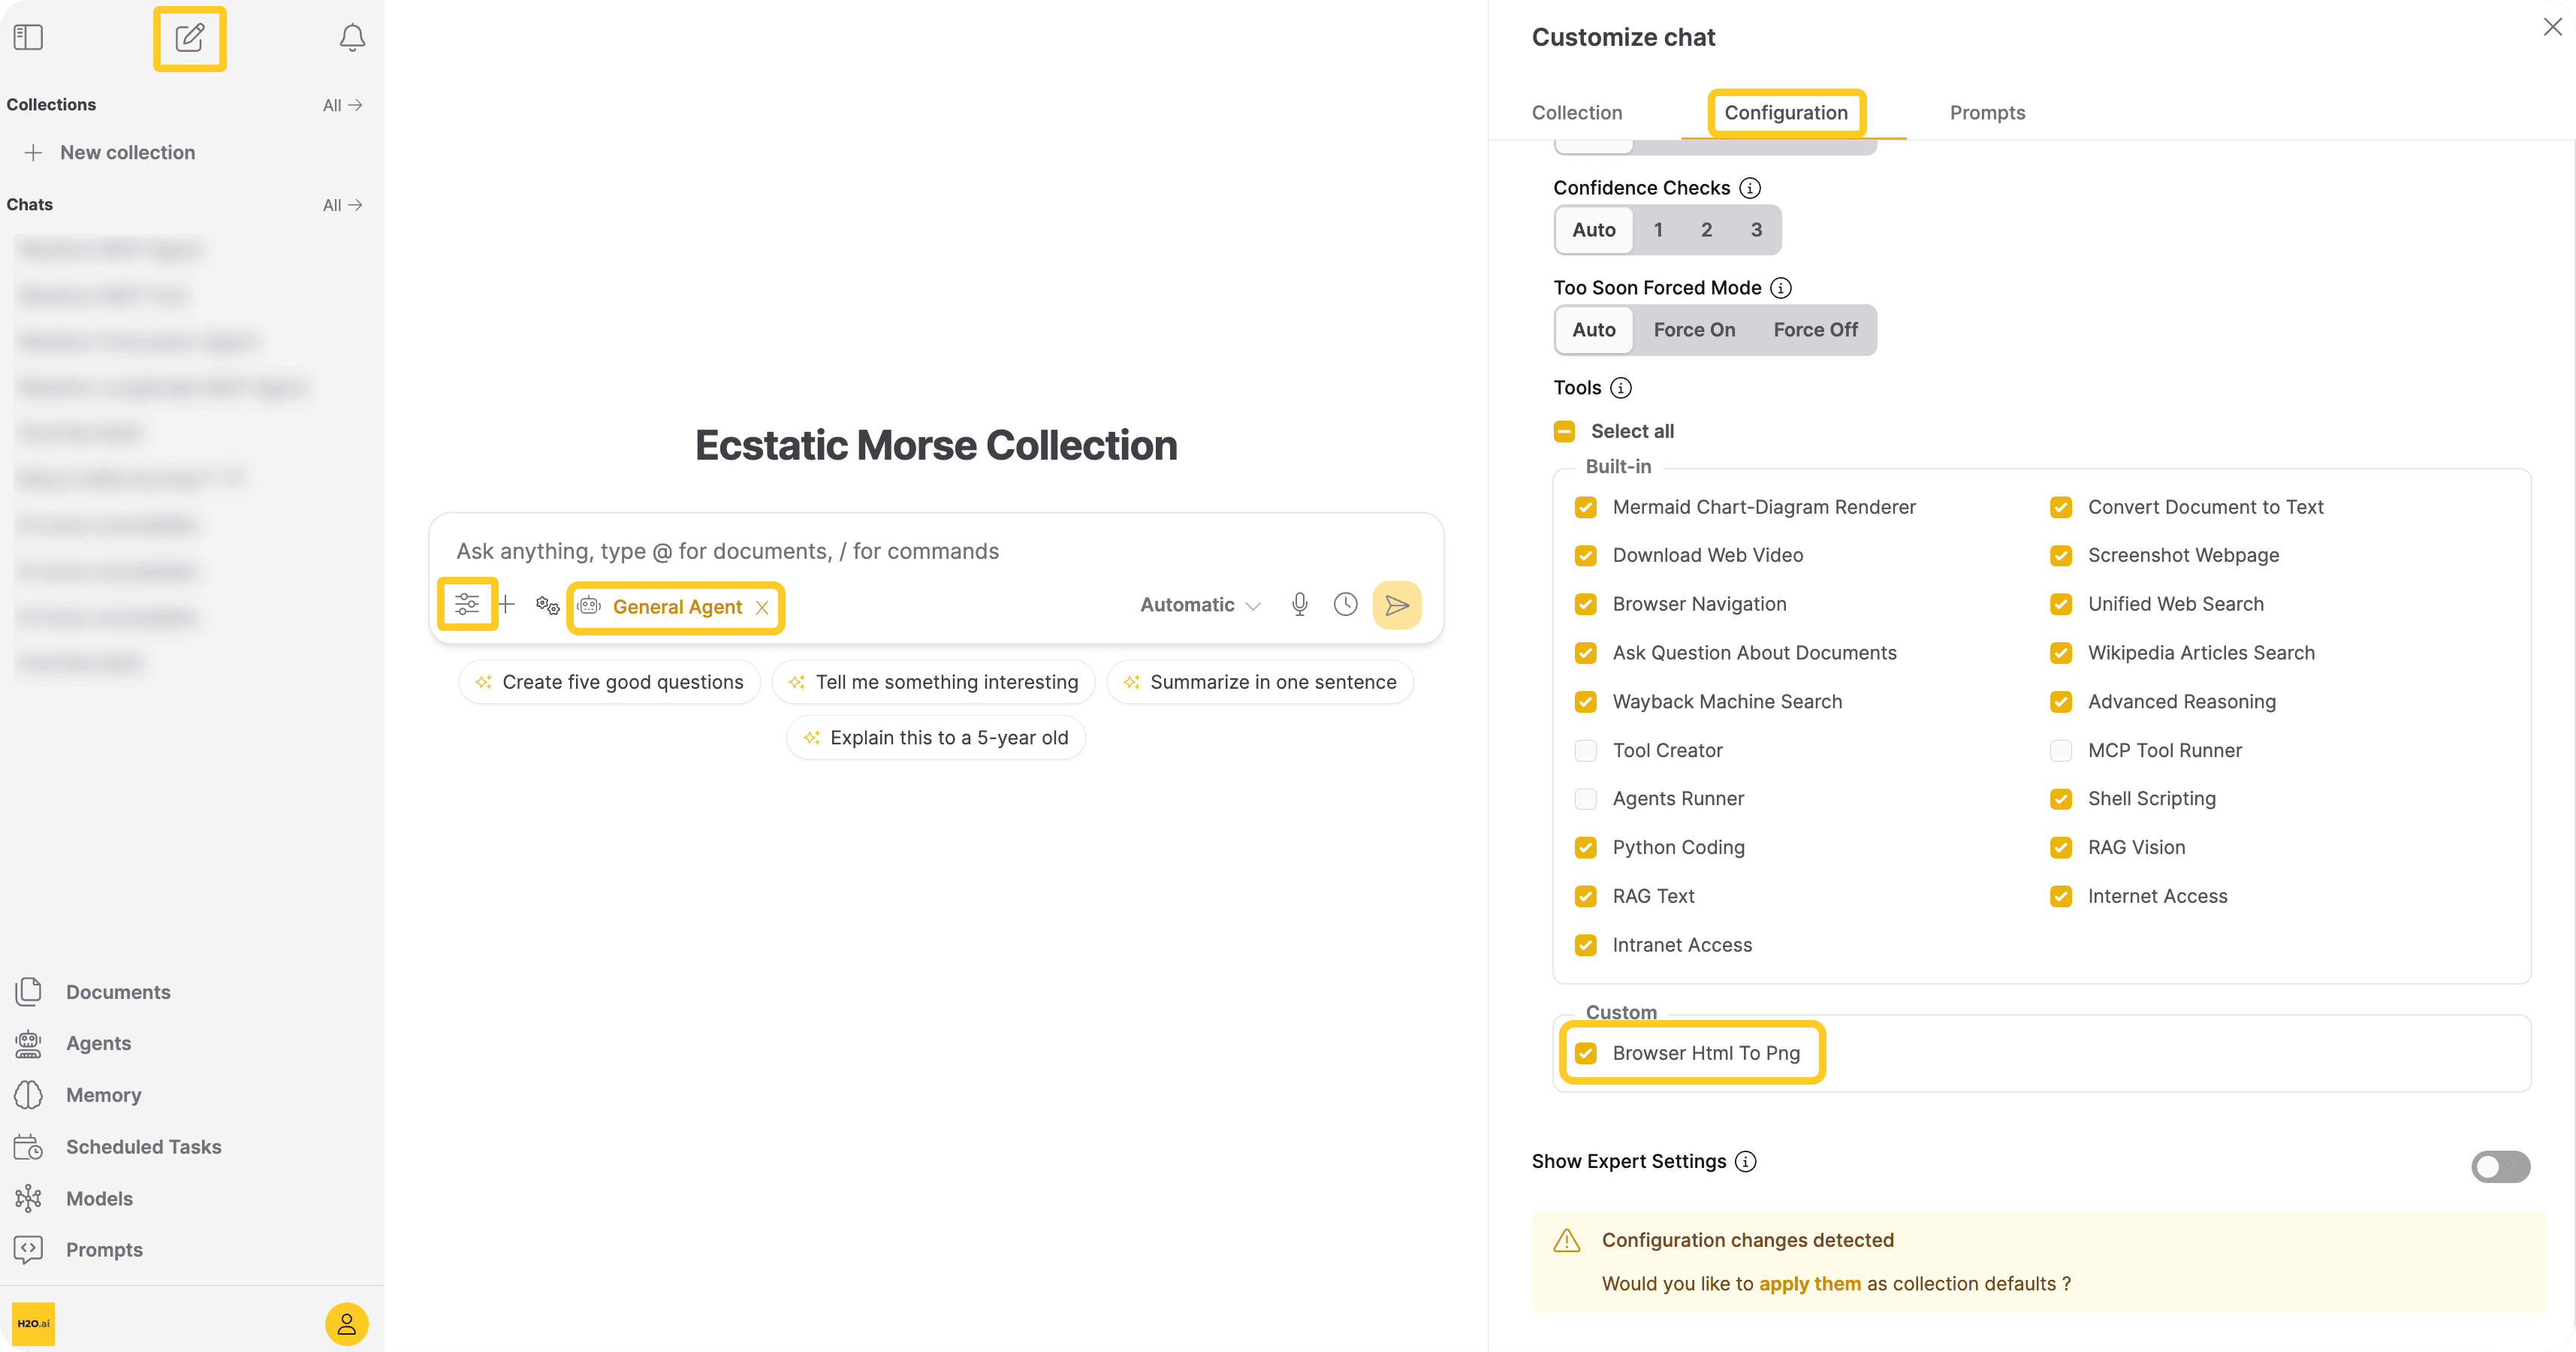
Go to a collection and start a new chat session.
-
Select an agent type from the agent selector in the chat toolbar (for example, General Agent).
-
Click the Customize icon in the chat toolbar to open the Customize chat panel.
-
Click the Configuration tab, and confirm your tool is listed and enabled under the Custom section in the Tools list.
-
Send a test message that matches the description you wrote for the tool.
Example test messages for the HTML renderer:
- "Summarize this document as a styled HTML report and save it as an image."
- "Generate a formatted HTML summary of the key findings and render it as a PNG."
After the agent responds, check the Steps section in the agent response to confirm the tool ran correctly:
- Expand the Steps panel to see the agent's execution trace.
- Verify the agent invoked your browser action tool.
- Confirm the script executed without errors.
- Check that a PNG file is available for download in the agent response.
If the agent does not invoke your tool, make the description more specific. Clarify that it renders HTML to a PNG image and should be used whenever the user asks for a visual or shareable version of a report.
Next steps
- Learn about General code tools for custom Python logic that does not require a browser
- Learn about MCP servers for tools that expose structured, multi-function APIs
- Review the Custom agent tools overview to compare all four custom tool types
- See Agent tool configuration for the administrator guide on enabling and securing tools in production
- Submit and view feedback for this page
- Send feedback about Enterprise h2oGPTe to cloud-feedback@h2o.ai