General code tools
General code tools let you extend Enterprise h2oGPTe agents with custom Python code. You upload a Python script (or ZIP archive), write a system prompt that tells the agent how to call it, and the agent runs your code during conversations.
Use general code tools when you need agents to:
- Apply company-specific business logic (brand guidelines, pricing rules, compliance checks)
- Generate custom file formats (presentations, reports, spreadsheets)
- Connect to internal APIs or databases
- Run data transformations unique to your organization
- Automate repetitive workflows that require custom code
Prerequisites
- Access to Enterprise h2oGPTe with the ConfigureAgents permission
- A Python script (
.py) or ZIP archive (.zip) containing your tool code - Familiarity with your tool's function names, parameters, and expected output
How general code tools work
When you start an agent chat, Enterprise h2oGPTe loads your tool code into the execution environment. Your system prompt tells the agent what the tool does and how to call it. During the conversation, the agent writes and runs a Python code block that imports your tool and calls its functions.
The execution flow:
- You upload a Python file or paste your code directly, then write a system prompt describing the tool.
- Enterprise h2oGPTe adds the system prompt to the agent's context at the start of each session.
- When the agent determines your tool is relevant, it writes a Python code block that imports and calls your tool.
- Enterprise h2oGPTe runs the code and returns the output to the agent.
- The agent reads the output and uses it to respond to the user.
Single file vs. ZIP archive:
Upload your tool as a single .py file, or as a .zip archive.
The Unzip file on server checkbox controls how Enterprise h2oGPTe handles a .zip upload:
- Unchecked (default): Enterprise h2oGPTe stores the
.zipas a single file and doesn't look inside it. It registers one tool. - Checked: Enterprise h2oGPTe registers a tool for each top-level entry in the archive and ignores everything inside subdirectories. This applies only when you add a tool; to expand a different archive later, delete the tool and add it again.
Unzip file on server doesn't preserve a module structure: checking it creates a bundle of independent tools, not a package with shared helper modules. Enterprise h2oGPTe extracts the full archive to disk, but a file inside a subdirectory never becomes a tool, so no tool can import shared code from a subdirectory.
Keep the files you want as tools flat at the top level of the archive. A top-level directory is an entry too, and it doesn't produce a working tool. If your tool imports from other local files, either put all the code in one .py file, or build it as a Local MCP tool, which keeps a directory of files together.
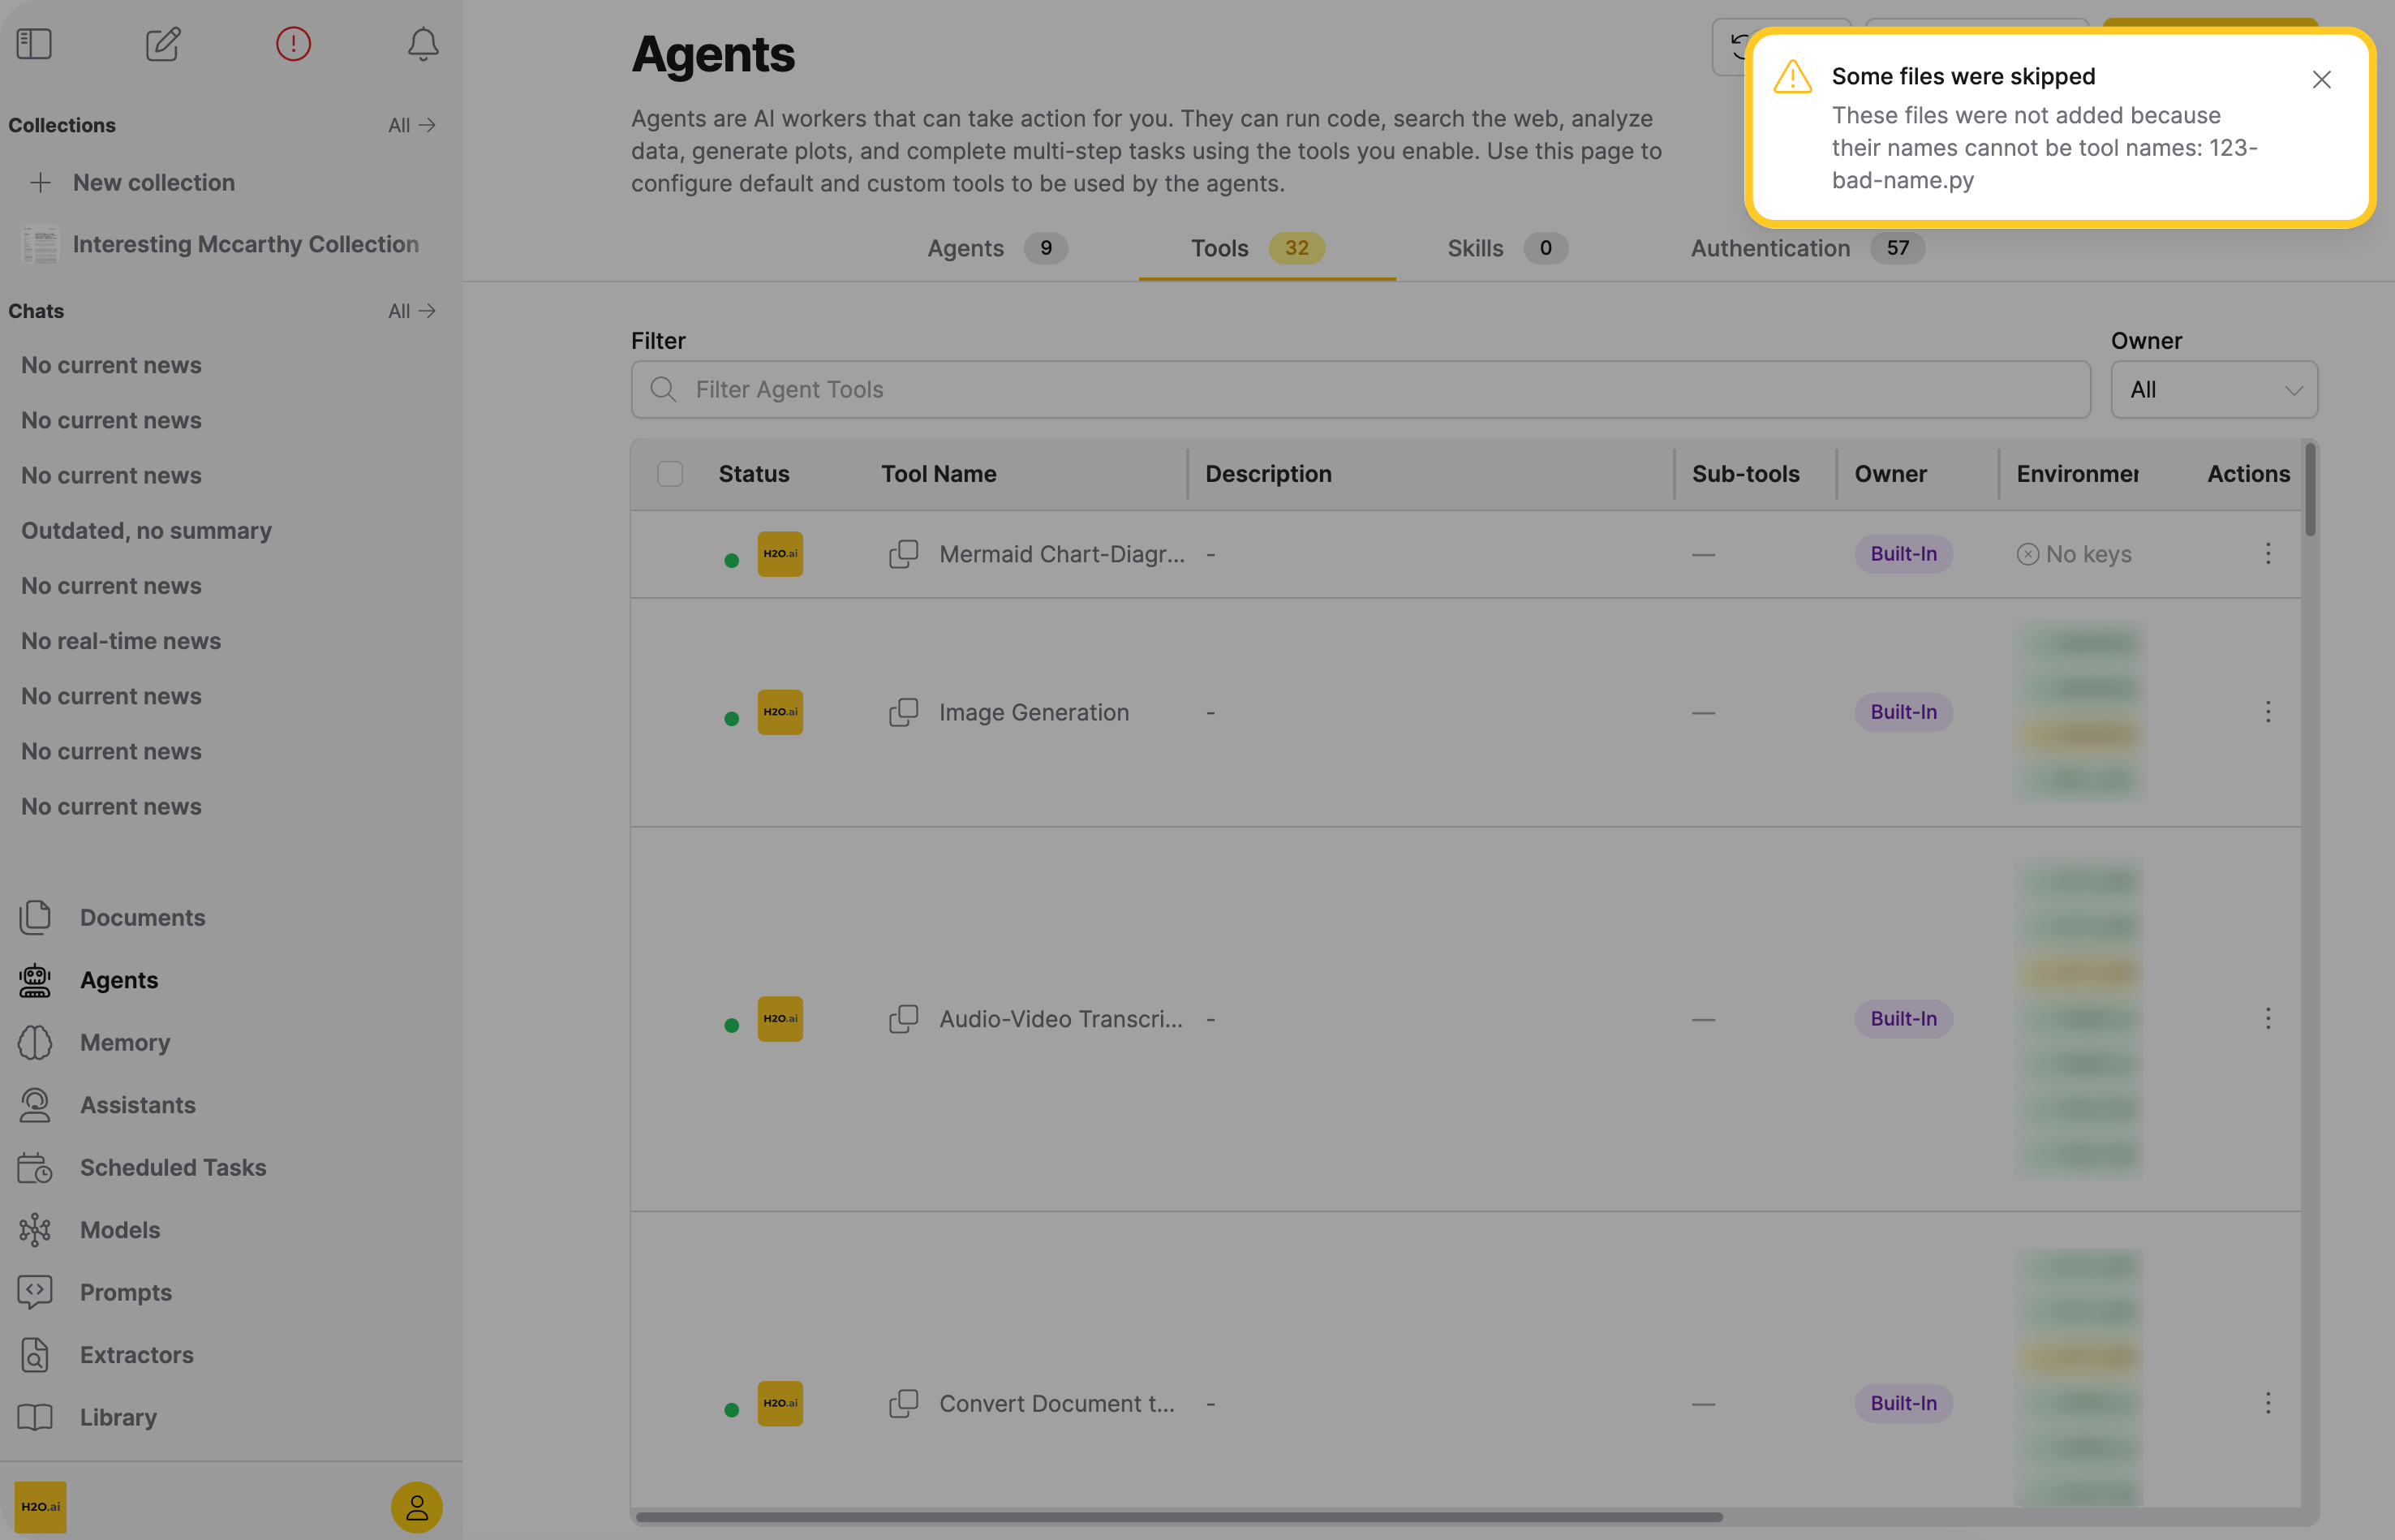
Each file extracted from a .zip must have a name that's a valid tool name (ASCII letters, digits, and underscores, starting with a letter, and not a Python keyword). Enterprise h2oGPTe skips files that don't qualify, rather than failing the whole upload, and shows a Some files were skipped notification that lists them. If the archive is empty, or if no file in it has a valid name, the upload fails with an error. If you entered a Tool name, Enterprise h2oGPTe applies it to the first qualifying file and names every other file after its own filename without the extension. Check the tools it creates before you use them.
Use case (Branded presentations for an enterprise)
In an enterprise, the team of analysts, product managers, and executives uses Enterprise h2oGPTe daily to summarize reports, compare quarterly performance, and create materials for customers. Every presentation that leaves the organization must follow strict brand guidelines including specific accent colors, a corporate font, and a standard slide layout. Employees typically spend time manually reformatting each presentation deck.
To solve this, the platform team builds a general code tool called generate_presentation. When a user asks for a presentation, the agent extracts the relevant content, calls the tool, and outputs a polished .pptx file with the organization's brand colors, fonts, and layout applied. They upload the tool, write a system prompt that tells the agent to use it whenever a user asks for a presentation or slide deck, and select Enable by Default so it is active for every agent session across the organization. From that point on, any employee who asks the agent to "create a deck comparing Q3 and Q4 results" or "build a summary presentation from this uploaded report" receives a download-ready, brand-compliant PowerPoint file. There is no need for manual formatting, and once created, the tool can be accessed from any chat within any collection.
This guide walks through that exact workflow. Replace the brand colors, fonts, and layout constants in the example code with your own organization's brand kit.
Prepare your tool code
Before you begin, write a Python script that contains the function you want the agent to call. The name you give this function is the name you set as the Tool name when you upload it.
Example: Branded PowerPoint generator
import argparse
import json
from pptx import Presentation
from pptx.util import Inches, Pt, Emu
from pptx.dml.color import RGBColor
from pptx.enum.text import PP_ALIGN
from pptx.enum.shapes import MSO_SHAPE

# Replace these colors with your organization's brand kit
BRAND_NAVY = RGBColor(0x00, 0x30, 0x57)
BRAND_CORAL = RGBColor(0xFF, 0x6F, 0x61)
DARK_TEXT = RGBColor(0x1A, 0x1A, 0x2E)
LIGHT_TEXT = RGBColor(0x4A, 0x4A, 0x68)
WHITE = RGBColor(0xFF, 0xFF, 0xFF)
LIGHT_BG = RGBColor(0xF0, 0xF4, 0xF8)
FONT_NAME = "Calibri"
SLIDE_WIDTH = Inches(13.333)
SLIDE_HEIGHT = Inches(7.5)


def _add_bar(slide, top, height, color=BRAND_NAVY):
    bar = slide.shapes.add_shape(MSO_SHAPE.RECTANGLE, Emu(0), top, SLIDE_WIDTH, height)
    bar.fill.solid()
    bar.fill.fore_color.rgb = color
    bar.line.fill.background()


def _add_text(slide, left, top, width, height, text, size, color,
              bold=False, align=PP_ALIGN.LEFT):
    box = slide.shapes.add_textbox(left, top, width, height)
    box.text_frame.word_wrap = True
    run = box.text_frame.paragraphs[0].add_run()
    run.text = text
    run.font.name = FONT_NAME
    run.font.size = Pt(size)
    run.font.color.rgb = color
    run.font.bold = bold
    box.text_frame.paragraphs[0].alignment = align
    return box


def _build_title_slide(prs, title, subtitle=""):
    slide = prs.slides.add_slide(prs.slide_layouts[6])
    slide.background.fill.solid()
    slide.background.fill.fore_color.rgb = WHITE
    _add_bar(slide, Inches(0), Inches(0.15), BRAND_NAVY)
    _add_text(slide, Inches(0.8), Inches(2.0), Inches(11.5), Inches(2.0),
              title, 40, BRAND_NAVY, bold=True)
    if subtitle:
        _add_text(slide, Inches(0.8), Inches(4.0), Inches(11.5), Inches(1.0),
                  subtitle, 20, LIGHT_TEXT)
    _add_bar(slide, Inches(7.0), Inches(0.5), BRAND_CORAL)


def _build_content_slide(prs, title, content):
    slide = prs.slides.add_slide(prs.slide_layouts[6])
    slide.background.fill.solid()
    slide.background.fill.fore_color.rgb = WHITE
    _add_bar(slide, Inches(0), Inches(0.08), BRAND_NAVY)

    header = slide.shapes.add_shape(
        MSO_SHAPE.RECTANGLE, Emu(0), Inches(0.08), SLIDE_WIDTH, Inches(1.2)
    )
    header.fill.solid()
    header.fill.fore_color.rgb = LIGHT_BG
    header.line.fill.background()

    _add_text(slide, Inches(0.8), Inches(0.25), Inches(11.5), Inches(0.9),
              title, 28, BRAND_NAVY, bold=True)

    body = slide.shapes.add_textbox(
        Inches(0.8), Inches(1.6), Inches(11.5), Inches(5.2)
    )
    tf = body.text_frame
    tf.word_wrap = True

    lines = content.split("\n") if "\n" in content else [content]
    for i, line in enumerate(lines):
        stripped = line.strip()
        if not stripped:
            continue
        is_bullet = stripped.startswith(("- ", "* "))
        text = stripped.lstrip("-* ").strip() if is_bullet else stripped

        p = tf.paragraphs[0] if i == 0 else tf.add_paragraph()
        run = p.add_run()
        run.text = ("  •  " + text) if is_bullet else text
        run.font.name = FONT_NAME
        run.font.size = Pt(18)
        run.font.color.rgb = LIGHT_TEXT if is_bullet else DARK_TEXT
        p.space_after = Pt(10)


def generate_presentation(title, slides_json, subtitle=""):
    """Generate a branded PowerPoint presentation.

    Args:
        title: Presentation title for the first slide.
        slides_json: JSON string with slide content.
            Format: [{"title": "Slide Title", "content": "Slide body text"}, ...]
            Content supports newlines and bullet points (lines starting with - or *).
        subtitle: Optional subtitle for the title slide.

    Returns:
        Path to the generated .pptx file.
    """
    prs = Presentation()
    prs.slide_width = SLIDE_WIDTH
    prs.slide_height = SLIDE_HEIGHT

    _build_title_slide(prs, title, subtitle)

    slides = json.loads(slides_json)
    for slide_data in slides:
        _build_content_slide(prs, slide_data["title"], slide_data["content"])

    output_path = f"{title.replace(' ', '_').replace('/', '_')}.pptx"
    prs.save(output_path)
    return output_path


if __name__ == "__main__":
    parser = argparse.ArgumentParser()
    parser.add_argument("title")
    parser.add_argument("slides_json")
    parser.add_argument("--subtitle", default="")
    args = parser.parse_args()
    result = generate_presentation(args.title, args.slides_json, args.subtitle)
    print(f"Presentation saved to: {result}")
Tool code requirements:
- Use
.pyfor a single tool, or.zipif you want to upload more than one tool at once - The tool name must match the primary function name (for example,
generate_presentation) - Maximum file size: 20 MB for the uploaded
.pyor.zipfile - A
.zipfile becomes a single tool unless you select Unzip file on server, which instead creates one tool per top-level entry in the archive
You can save your code as a .py file to upload, or paste it directly into the tool creation form in the next step.
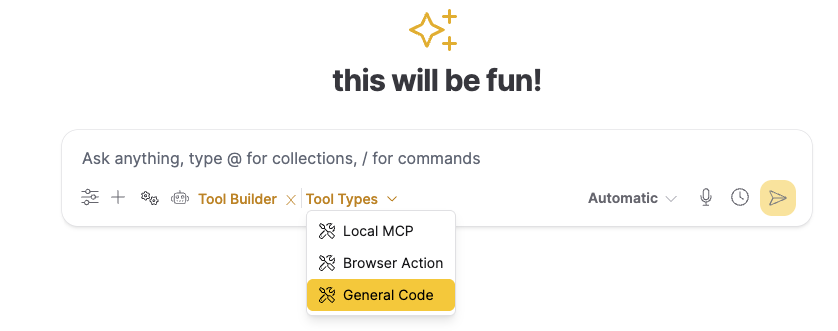
If you don't want to write the code yourself, you can use the Tool Builder agent. Start a chat, select Tool Builder from the agent selector, pick General Code as the tool type, and describe what you want the tool to do. The agent generates the Python code for you.
Step 1: Open the general code tool dialog
To access the tool creation form:
-
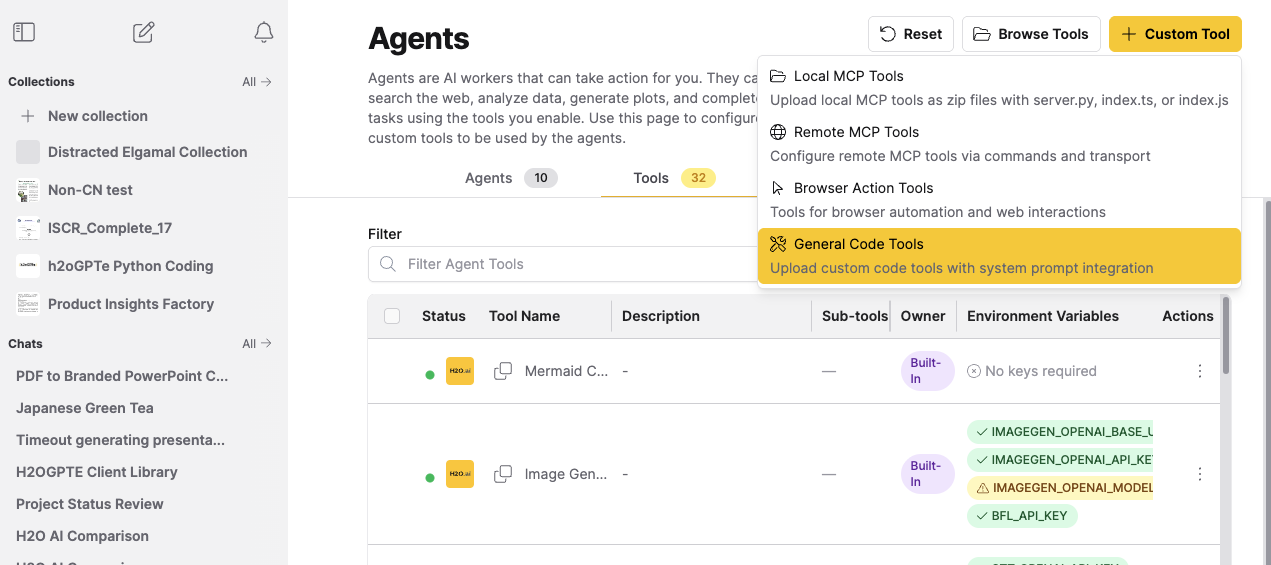
In the Enterprise h2oGPTe navigation menu, click Agents.
-
Click the Tools tab.
-
Click + Custom Tool and select General Code Tools.
In version 1.6, this button is labeled + New Tool instead of + Custom Tool.
This opens the Upload General Code Tool dialog where you configure and upload your tool.
Step 2: Upload the tool
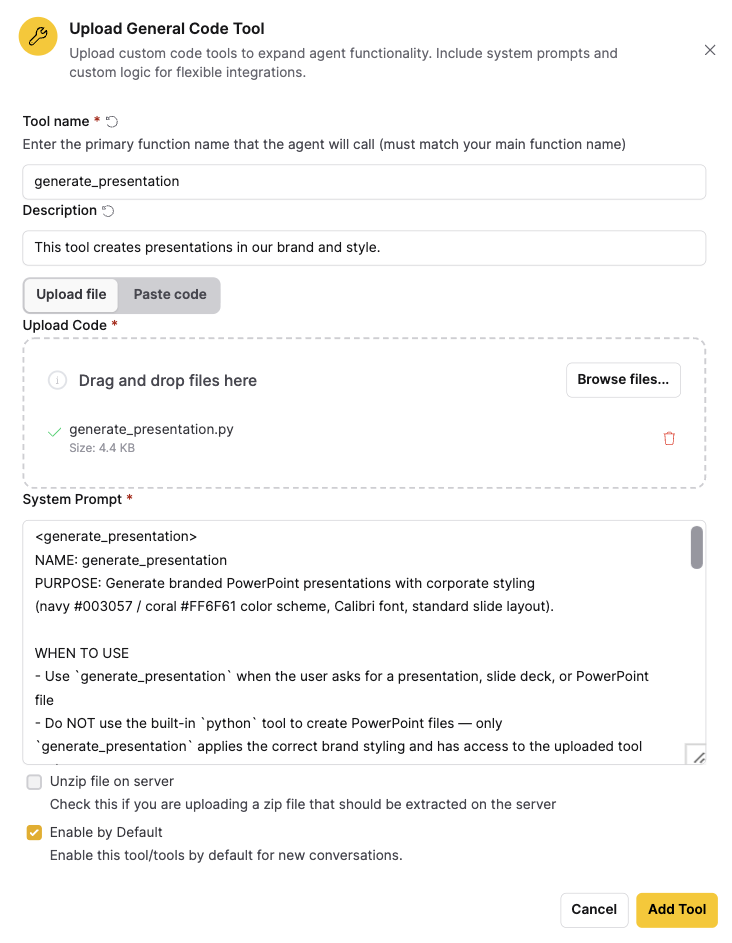
In the Upload General Code Tool dialog, fill in the following fields:
-
Enter a Tool name that matches your primary function name (for example,
generate_presentation). If you leave it empty, Enterprise h2oGPTe fills in the filename minus its extension. If that isn't a valid tool name—for example, a filename with hyphens—the field is left empty and you must enter the name yourself. -
Enter a Description that summarizes what the tool does.
-
Upload your Python file or paste the code directly:
- Upload a file: Click the upload area and select your
.pyor.zipfile. Below the upload area, Enterprise h2oGPTe shows this hint:Name the file after the tool (e.g. my_tool.py for my_tool). The generated system prompt imports from the file name, so a different name will not resolve.Selecting or dropping a file also starts drafting a system prompt automatically—see Step 3. - Paste code: Click Paste code and paste your Python code into the text area.
Version 1.6In version 1.6, the Paste code option is not available. Upload your tool as a
.pyor.zipfile. - Upload a file: Click the upload area and select your
-
Review the System prompt, which Enterprise h2oGPTe starts drafting automatically once you upload a file. Edit it, or write one manually (see Step 3).
-
If uploading a
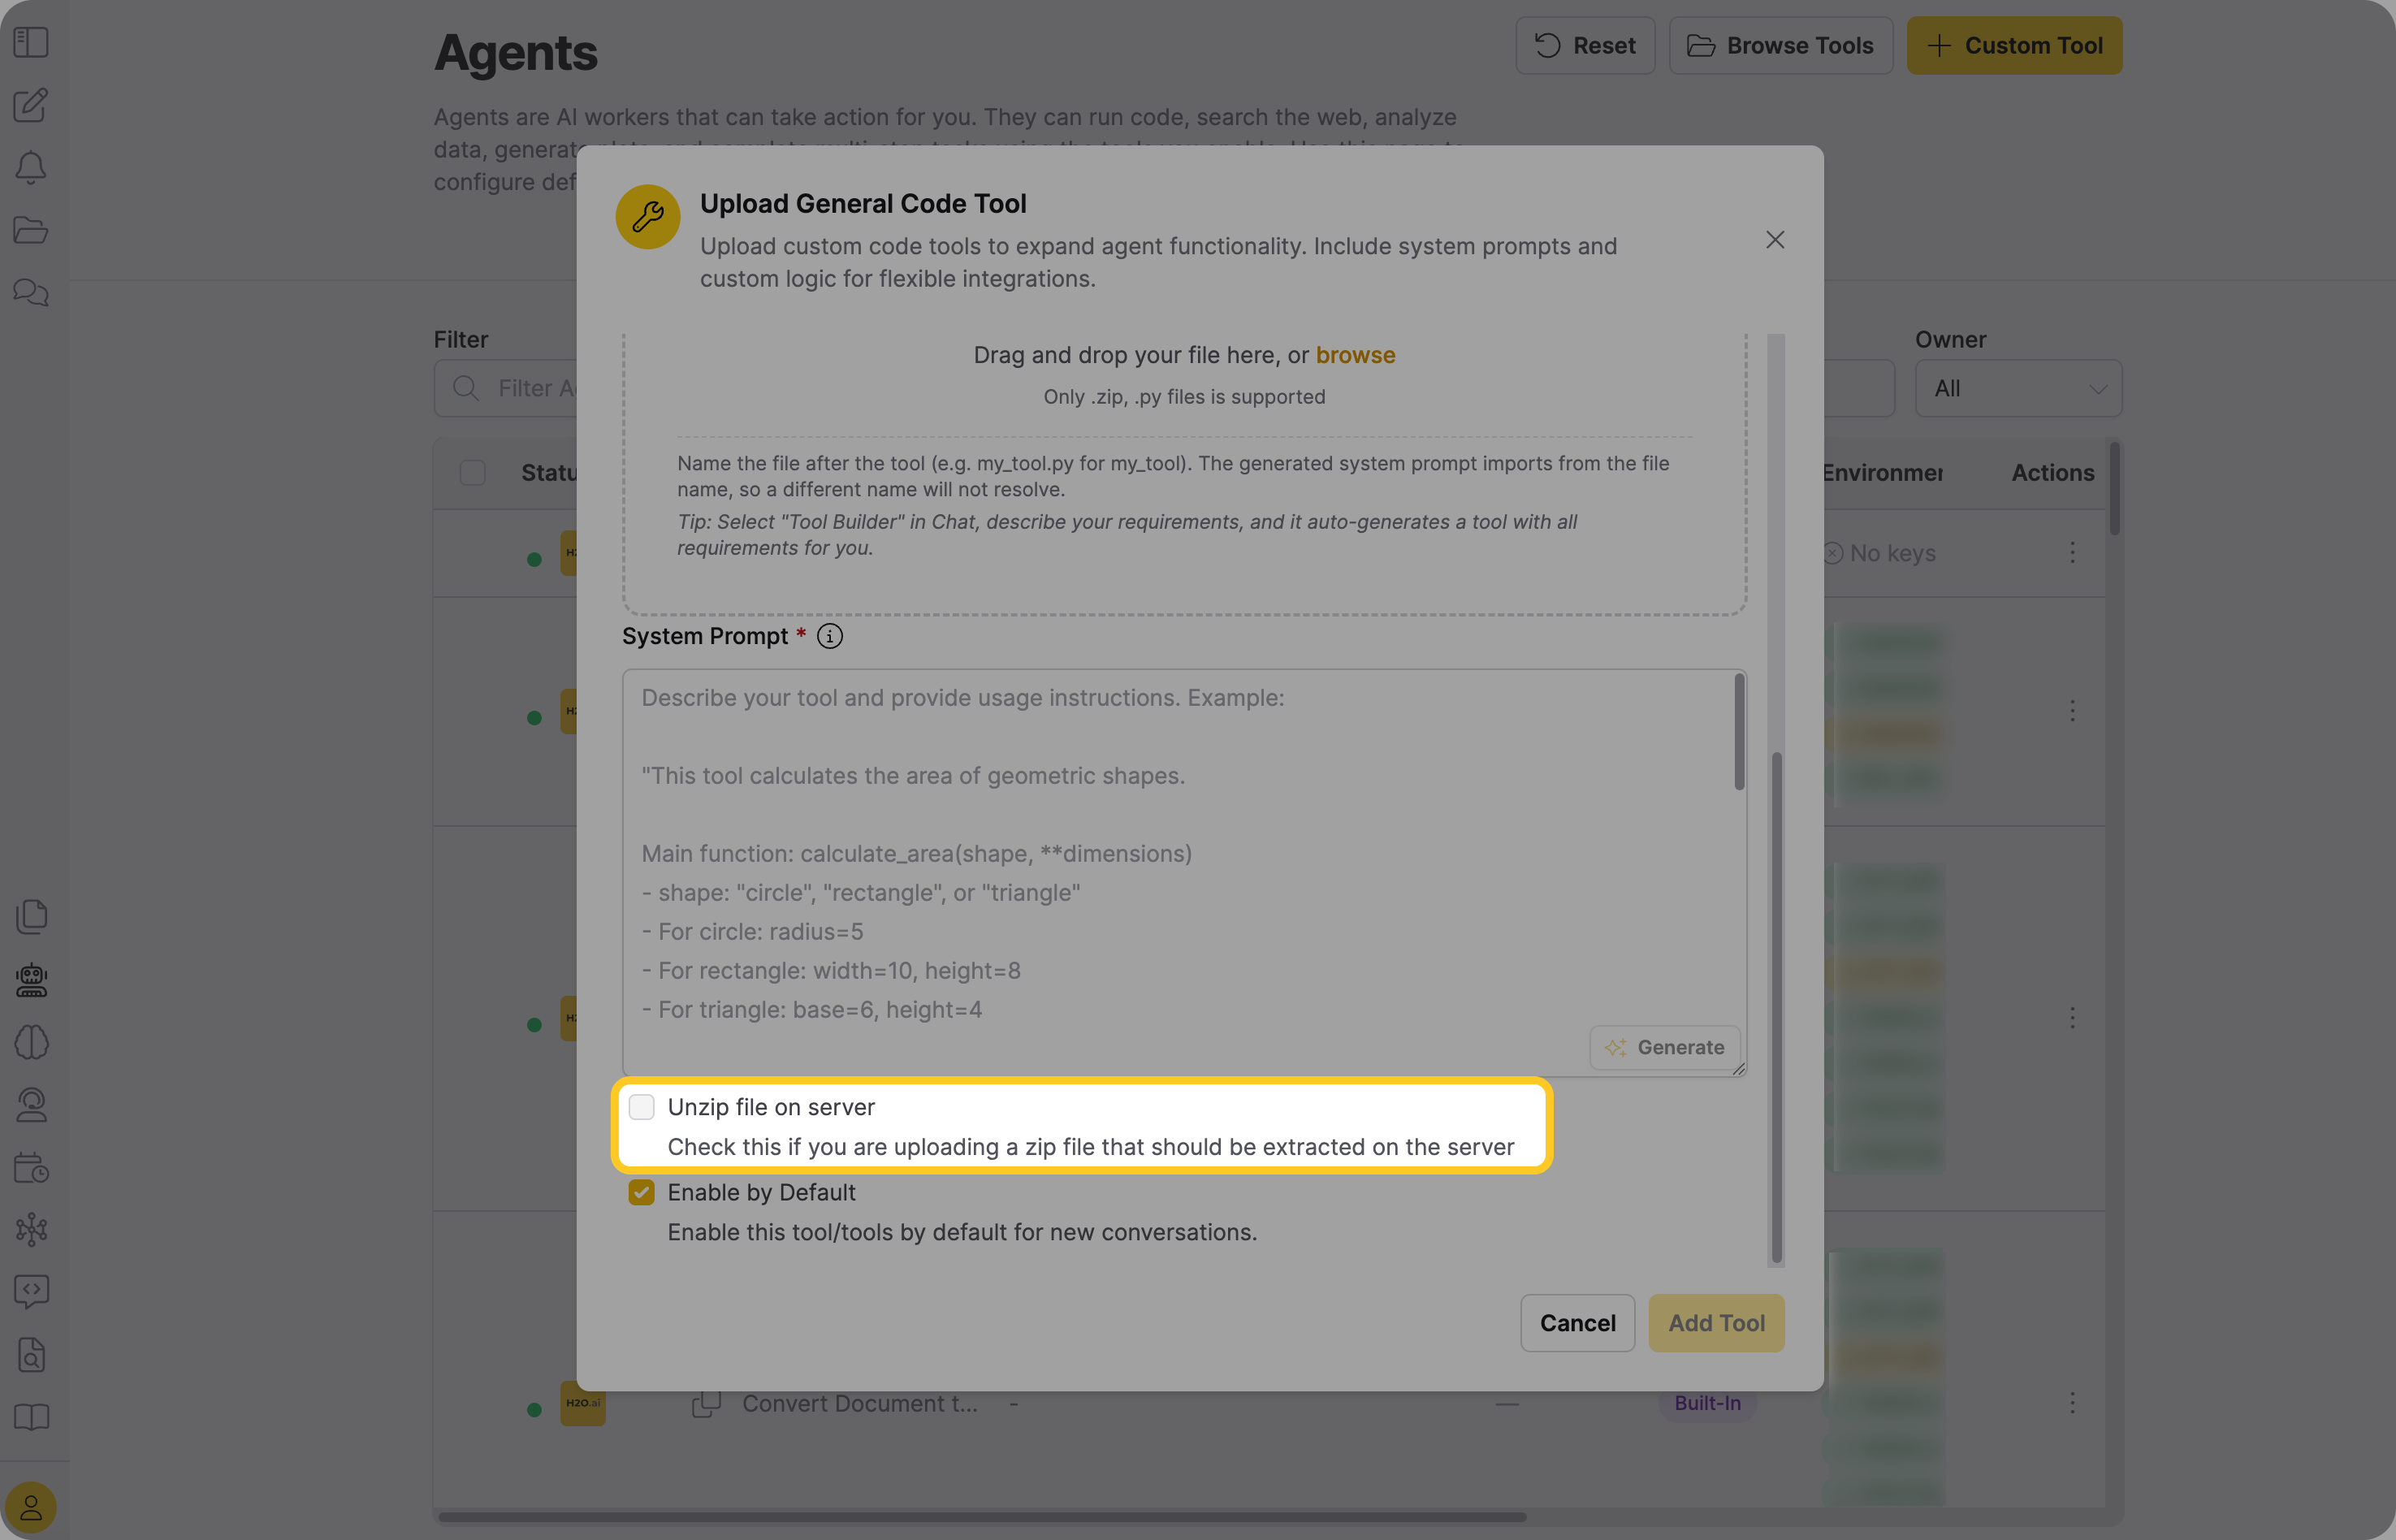
.zipfile, select the Unzip file on server checkbox only if you want each top-level entry in the archive to become its own tool. Leave it unchecked to upload the archive as a single tool. If you select it, the Tool name you entered in step 1 applies to only one file in the archive—Enterprise h2oGPTe names every other file after its own filename without the extension.
-
To make this tool available in all new agent sessions, select the Enable by Default checkbox.
-
Click Add Tool.
Step 3: Write the system prompt
The system prompt tells the agent when to use your tool, what it does, and how to call it. Enterprise h2oGPTe adds this text directly into the agent's context at runtime, so the instructions must be specific and complete.
Enterprise h2oGPTe auto-generates a system prompt from your uploaded file, or you can write one manually.
Auto-generate the system prompt
When you select or drop a .py or .zip file in Upload a file mode, Enterprise h2oGPTe automatically starts drafting a system prompt from it—you don't need to click anything. The Jobs tray opens automatically so you can monitor progress.
Next to the System prompt field, a labeled button reflects the current state:
| Button label | When you see it |
|---|---|
Generate or Regenerate (unavailable, tooltip Upload a file first) | Before you select a file |
| Generate | The System prompt field is empty—after you cancel a generation, after one fails, or after you clear the field |
| Generating… | Generation is running. Click to cancel. |
| Regenerate | The System prompt field has text, whether generated or typed. Click to draft again from the current file—this replaces whatever is in the field. |
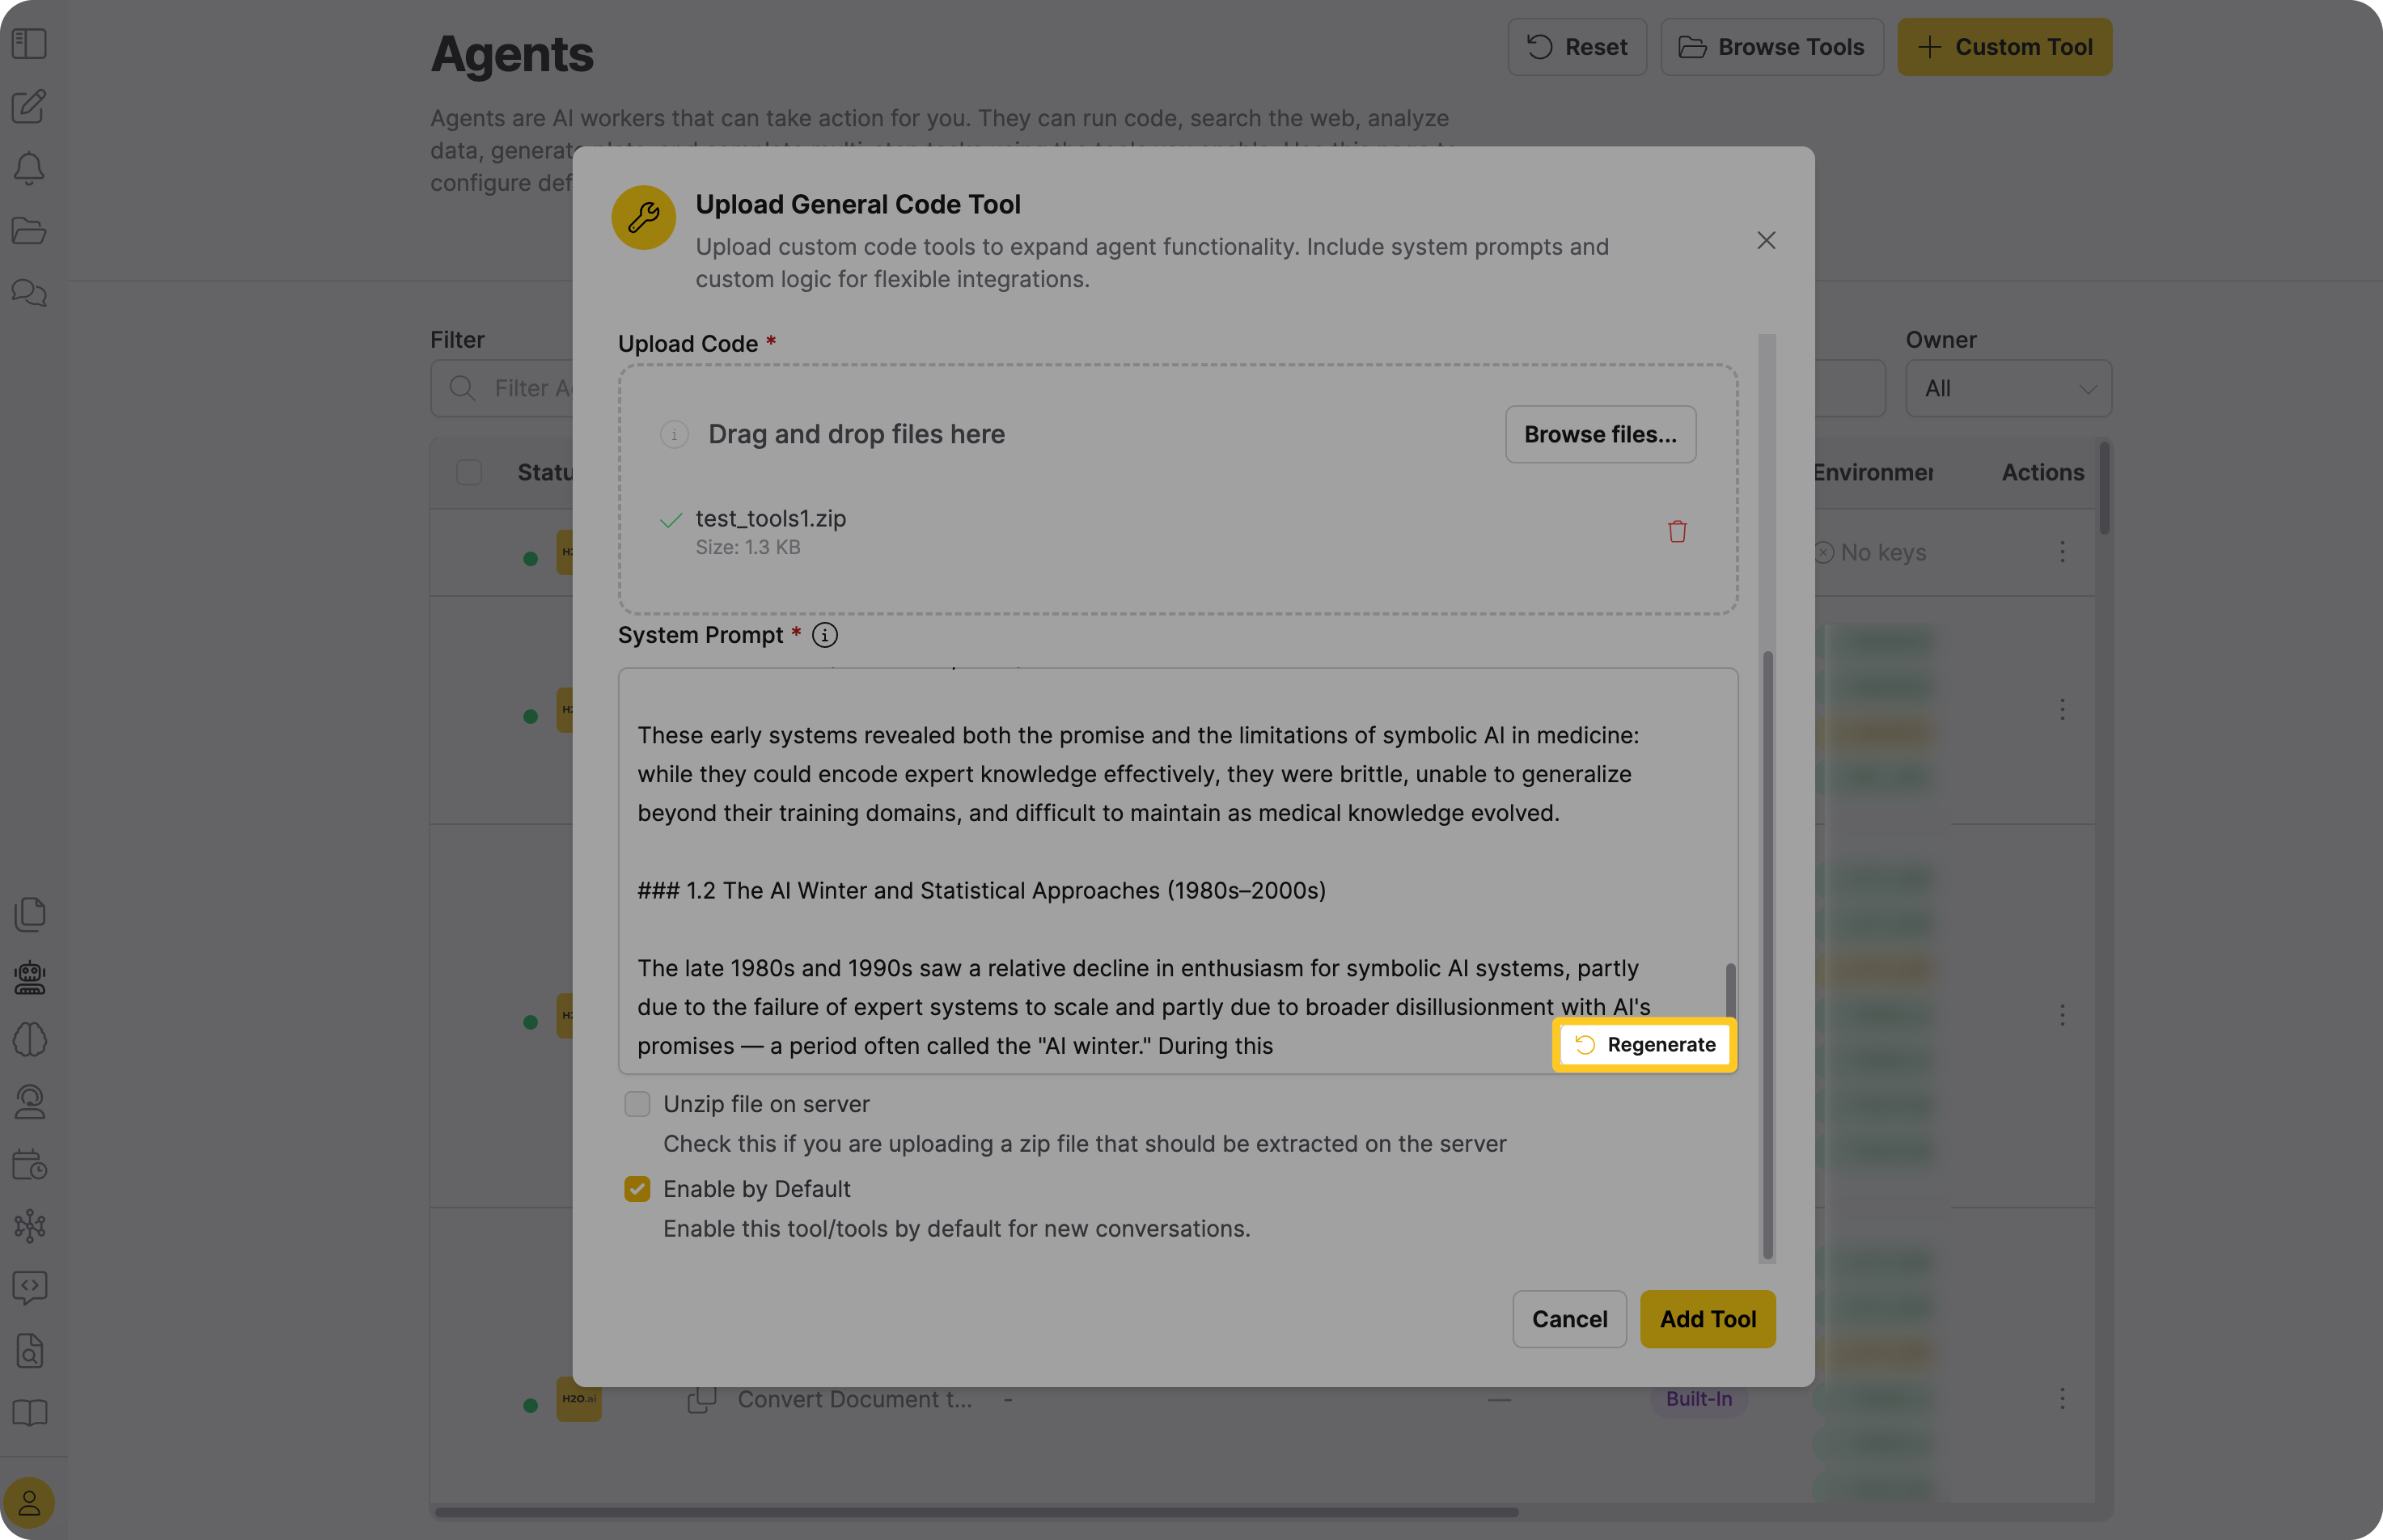
Below the System prompt field, Enterprise h2oGPTe shows this hint: When you upload a file, a system prompt is drafted from it automatically. Review and edit it, or regenerate anytime.
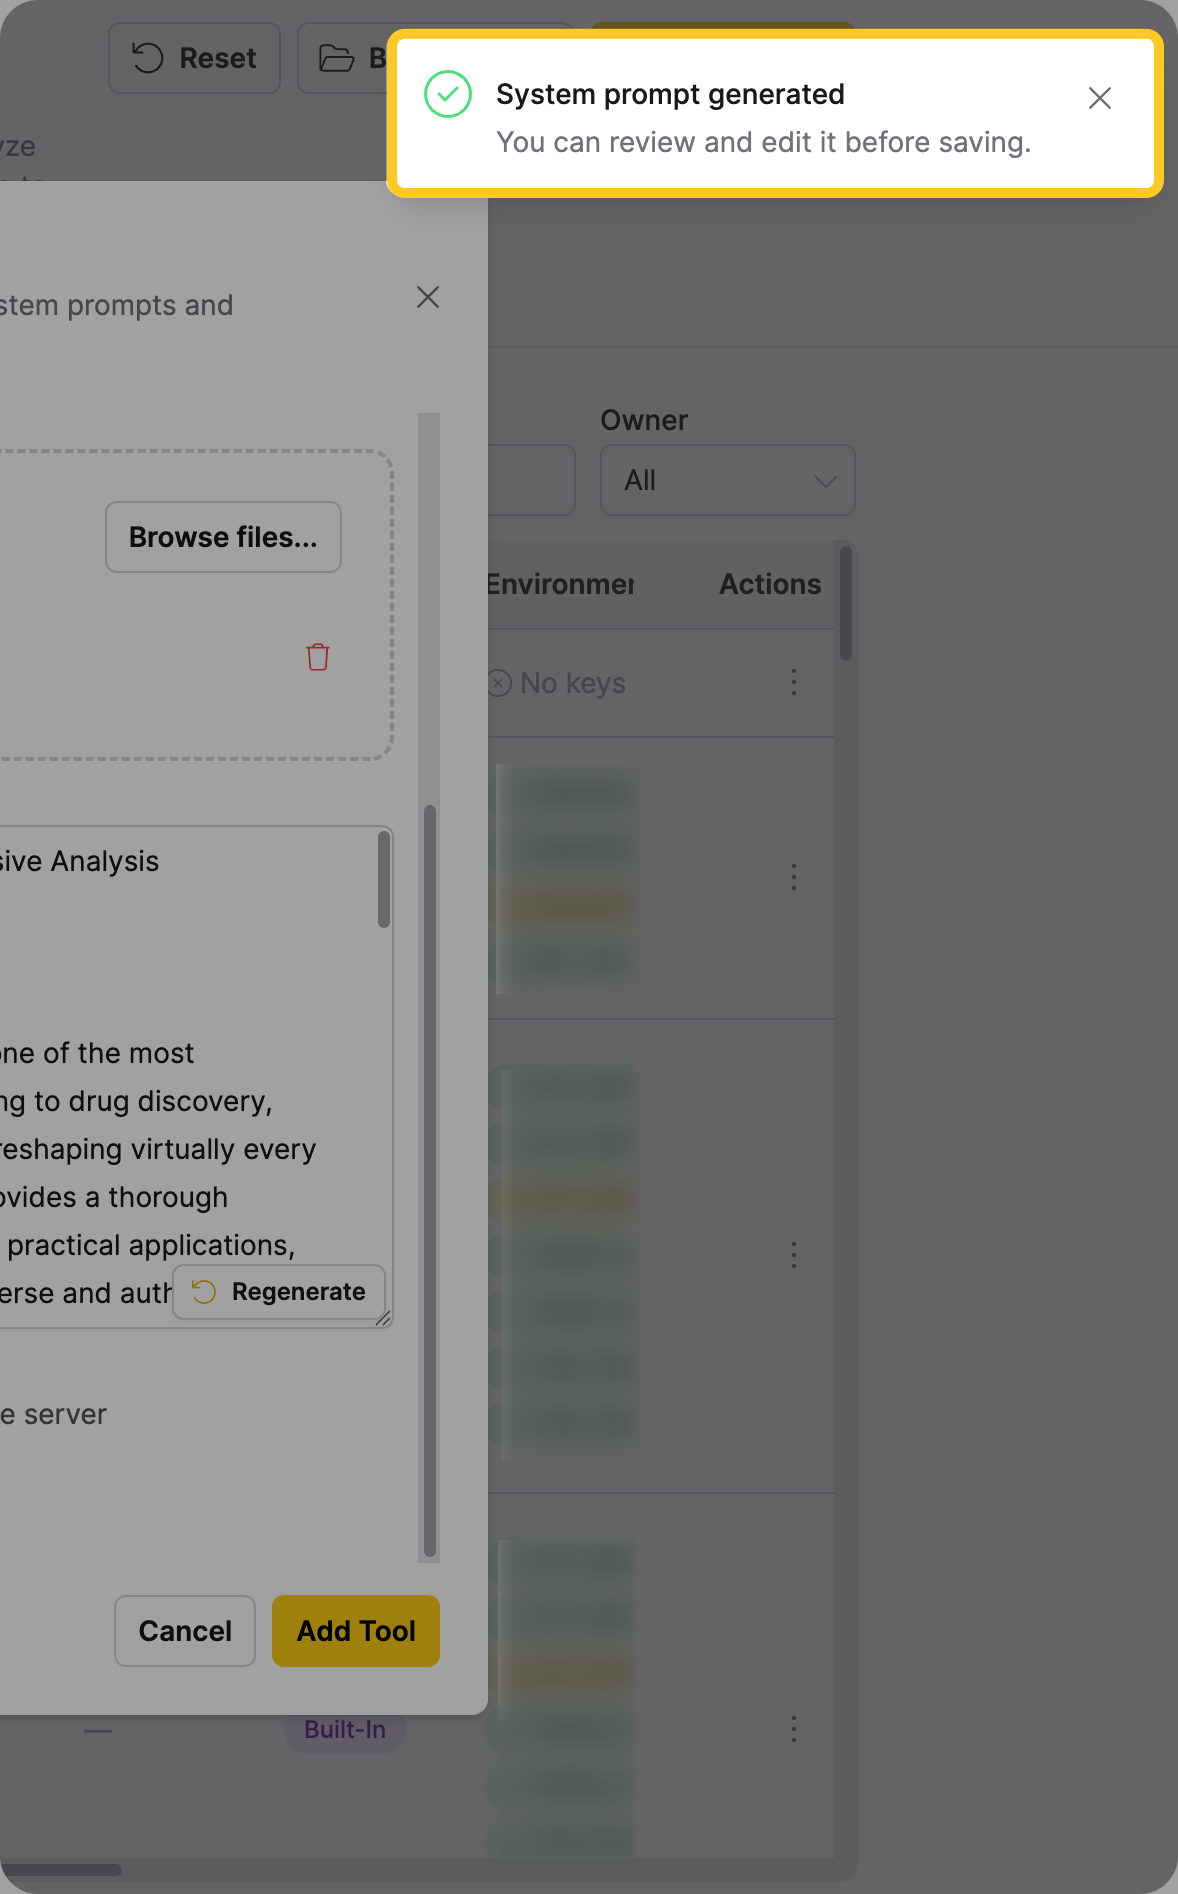
When generation finishes, a System prompt generated notification appears (You can review and edit it before saving.) and the field shows the result.
Auto-generation doesn't start when:
- You're editing an existing tool
- You're using Add files as tools, rather than uploading a single general code tool
- You're using Paste code mode instead of Upload a file
- A generation is already running
- The System prompt field already contains text you typed
If you upload a different file afterward, Enterprise h2oGPTe re-drafts the prompt automatically—unless you've already edited the field, in which case Enterprise h2oGPTe never overwrites your edit. This guarantee covers only edits made before generation starts. If you start typing while Generating… is showing, click the button to cancel first—otherwise the finished draft replaces your text. If you choose a different file while Generating… is showing, the running job keeps using the file it started with. Cancel first, then choose the new file.
Saving the tool requires a system prompt. Add Tool stays unavailable while Generating… is showing. To save sooner, click Generating… to cancel, then write the prompt yourself. A failed generation doesn't fail the upload or lock the form. Enterprise h2oGPTe shows an error notification and leaves the System prompt field empty, so Add Tool stays unavailable until you write a prompt.
Auto-generation is only available when creating a new tool in Upload a file mode. There's no setting to turn it off—the preceding conditions are the only ways to skip it. Generation times out after six minutes.
Treat the generated prompt as a starting point. Review it against the guidance in Write the system prompt manually and fill in anything missing. For example, note when not to use the tool compared to the built-in Python tool, or list required environment variables.
Write the system prompt manually
Write the system prompt as if it is the only documentation the agent will ever see about your tool.
What to include
At minimum, a system prompt should cover:
- When to use it and when not to (compared to the built-in Python tool)
- Function signature: name, arguments with types and allowed values, return value, and any files the tool creates
- Required environment variables (if any), so the user knows which keys to assign to the tool
- A complete code example that the agent can copy and adapt, including the three required header comments (
# execution: true,# filename:,# tool:)
Wrap the prompt in XML tags
Wrap the entire system prompt in XML tags named after your tool (for example, <generate_presentation>...</generate_presentation>). The XML tags create a clear boundary between your tool's instructions and those of other tools in the agent's context. Without them, the agent may mix up instructions when multiple tools are active.
Example system prompt for the PowerPoint generator
The following example shows a complete system prompt for the generate_presentation tool. Copy the entire block into the System prompt input box:
<generate_presentation>
NAME: generate_presentation
PURPOSE: Generate branded PowerPoint presentations with corporate styling
(navy #003057 / coral #FF6F61 color scheme, Calibri font, standard slide layout).

WHEN TO USE
- Use `generate_presentation` when the user asks for a presentation, slide deck, or PowerPoint file
- Do NOT use the built-in `python` tool to create PowerPoint files — only `generate_presentation` applies the correct brand styling and has access to the uploaded tool code
- Convert the user's requested content into well-structured slides with clear titles and bullet points

API
generate_presentation(title, slides_json, subtitle="") -> str
Returns the file path to the generated .pptx file (e.g., "Quarterly_Review.pptx").
The file is written to the current working directory.

Parameters:
  - title (str, required) — presentation title displayed on the title slide
  - slides_json (str, required) — JSON string: [{"title": "Slide Title", "content": "Body text"}].
    Content supports newlines (\n) and bullet points (lines starting with - or *)
  - subtitle (str, optional, default="") — subtitle displayed below the title on the first slide

HOW TO RUN — emit exactly this block (all three comments are required):

```python
# execution: true
# filename: create_presentation.py
# tool: generate_presentation

from generate_presentation import generate_presentation
full_path = generate_presentation(
    title="Quarterly Business Review",
    slides_json='[{"title": "Revenue Summary", "content": "- Total revenue grew 8% YoY\n- Recurring revenue: 72% of total"}, {"title": "Customer Metrics", "content": "- Net new customers: 1,200\n- Churn reduced to 2.1%"}]',
    subtitle="Q3 2025 Results"
)
print(full_path)
```
</generate_presentation>
Required header comments
Every code block in the system prompt must include three header comments. These comments tell Enterprise h2oGPTe how to run the code:
| Comment | Purpose | Example |
|---|---|---|
# execution: true | Marks the block for execution | # execution: true |
# filename: <name>.py | Sets the script filename | # filename: create_presentation.py |
# tool: <tool_name> | Runs the code in your custom tool's environment so it can access the uploaded code and assigned environment variables | # tool: generate_presentation |
All three header comments are required. Without # tool: generate_presentation, the code runs in the default Python environment. The default environment does not have access to your uploaded tool code or its assigned environment variables.
Step 4: Add authentication keys (optional)
If your tool needs API keys or credentials, create an authentication key and assign it to the tool. For step-by-step instructions on creating keys and assigning them, see Managing authentication keys in the Agent tool configuration guide.
Step 5: Test the tool
To verify the tool works as expected, test it in an agent chat session.
-
Go to a collection and start a new chat session.
-
Select an agent type (for example, General).
-
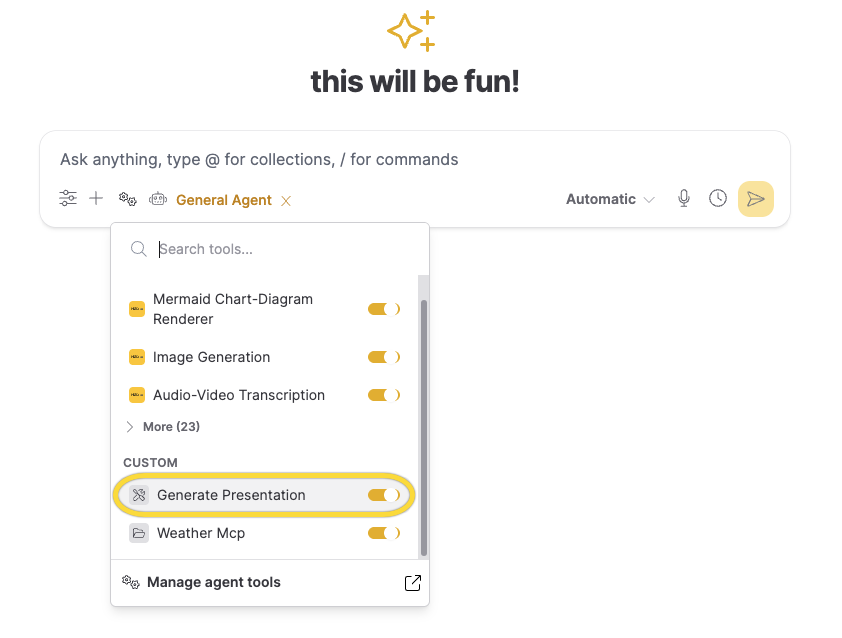
Click the Config button, and confirm your tool is listed under the CUSTOM section.
In version 1.6, click the Agent button on the chat box and select an agent type. Then click Customize to open the Customize chat side dialog. Go to Configuration, scroll down to the Custom Tool section, and confirm your tool is listed and enabled.
- Send a test message to the agent.
Example test messages for the PowerPoint generator:
- "Create a presentation summarizing the key findings from the documents in this collection. Include one slide per major topic."
- "Build a five-slide deck with an executive summary, three detail slides covering the main themes, and a next-steps slide."
- "Generate a PowerPoint from this uploaded report. Use bullet points to highlight the important data points on each slide."
After the agent responds, check the Steps section in the agent response to confirm the tool ran correctly:
- Expand the Steps panel to see the agent's execution trace.
- Verify the agent wrote a code block that imports and calls your tool.
- Confirm the tool executed without errors.
- Check that the
.pptxfile is available for download in the agent response. - Download the file and verify it uses your configured brand colors and fonts.
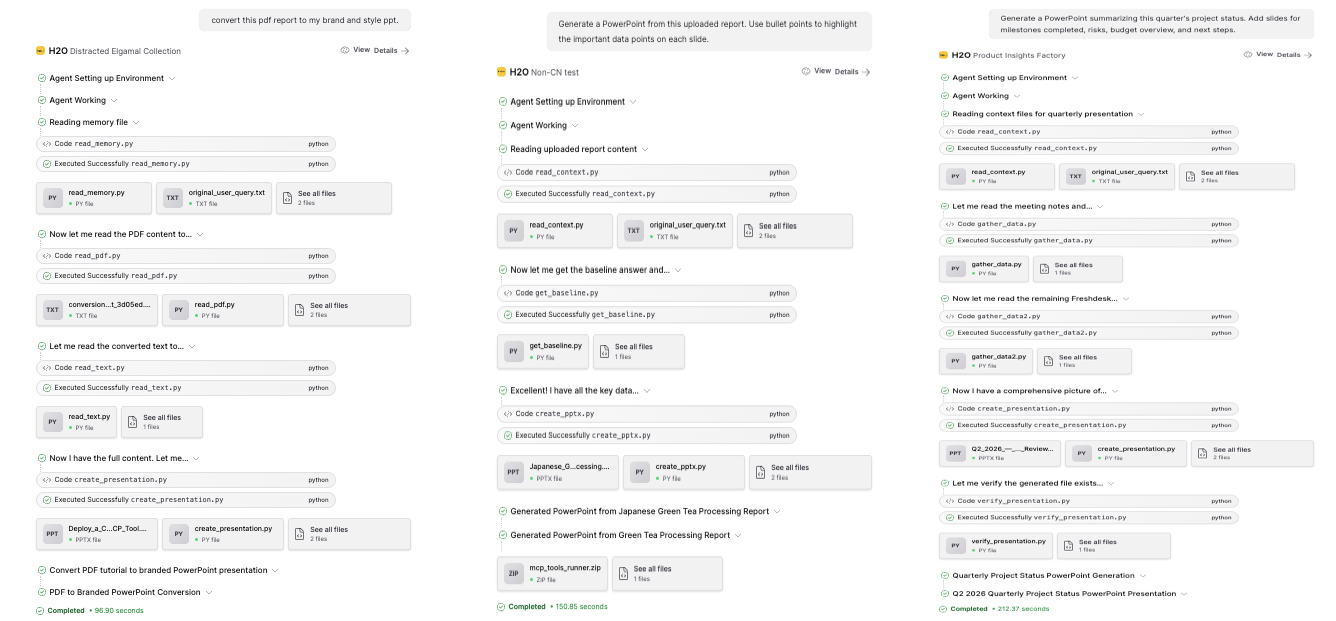
The following is a sample presentation generated using the steps from this guide: Deploy_a_Custom_Agent_with_a_Local_MCP_Tool.pptx.
If the agent does not use your tool, review the system prompt. Make sure it clearly describes when to use the tool and includes a complete code example.
Download a general code tool
Download the source file of a general code tool to retrieve or back up the original code:
- Go to Agents in the main menu.
- Click the Tools tab.
- Find your general code tool in the table.
- Click the actions menu (three dots) for your tool.
- Select Download Tool.
The browser downloads the original Python file (.py) or ZIP archive (.zip) that you uploaded when creating the tool.
You can download only tools that you own. The Download Tool option is available for General Code, Local MCP, and Browser Action tool types.
Next steps
- Follow Tutorial 9: Creating and using a custom agent tool for a hands-on walkthrough with the brand colors example
- Learn about MCP servers for tools with structured input/output schemas
- Review the REST API reference for SDK and cURL examples for the custom tools API
- Explore the Agent tool configuration guide for built-in tool setup
- Submit and view feedback for this page
- Send feedback about Enterprise h2oGPTe to cloud-feedback@h2o.ai