Confluence OAuth setup
Overview
Confluence Cloud OAuth enables users to connect their Atlassian accounts and import documents from Confluence without sharing an API token or a Confluence account's username and password.
For the user steps to import documents, see Import from Confluence. For setting details and configuration through the API or SDK, see Data connectors and OAuth.
Prerequisites
- An Atlassian account with permission to create OAuth 2.0 apps in the Atlassian developer console.
- Organization administrator access in Atlassian Administration, if the organization blocks user-installed apps. See third-party app access.
- Administrator access to Enterprise h2oGPTe.
- Connector linking turned on for the Enterprise h2oGPTe deployment. See Data connectors and OAuth.
- An Enterprise h2oGPTe deployment with a public HTTPS URL.
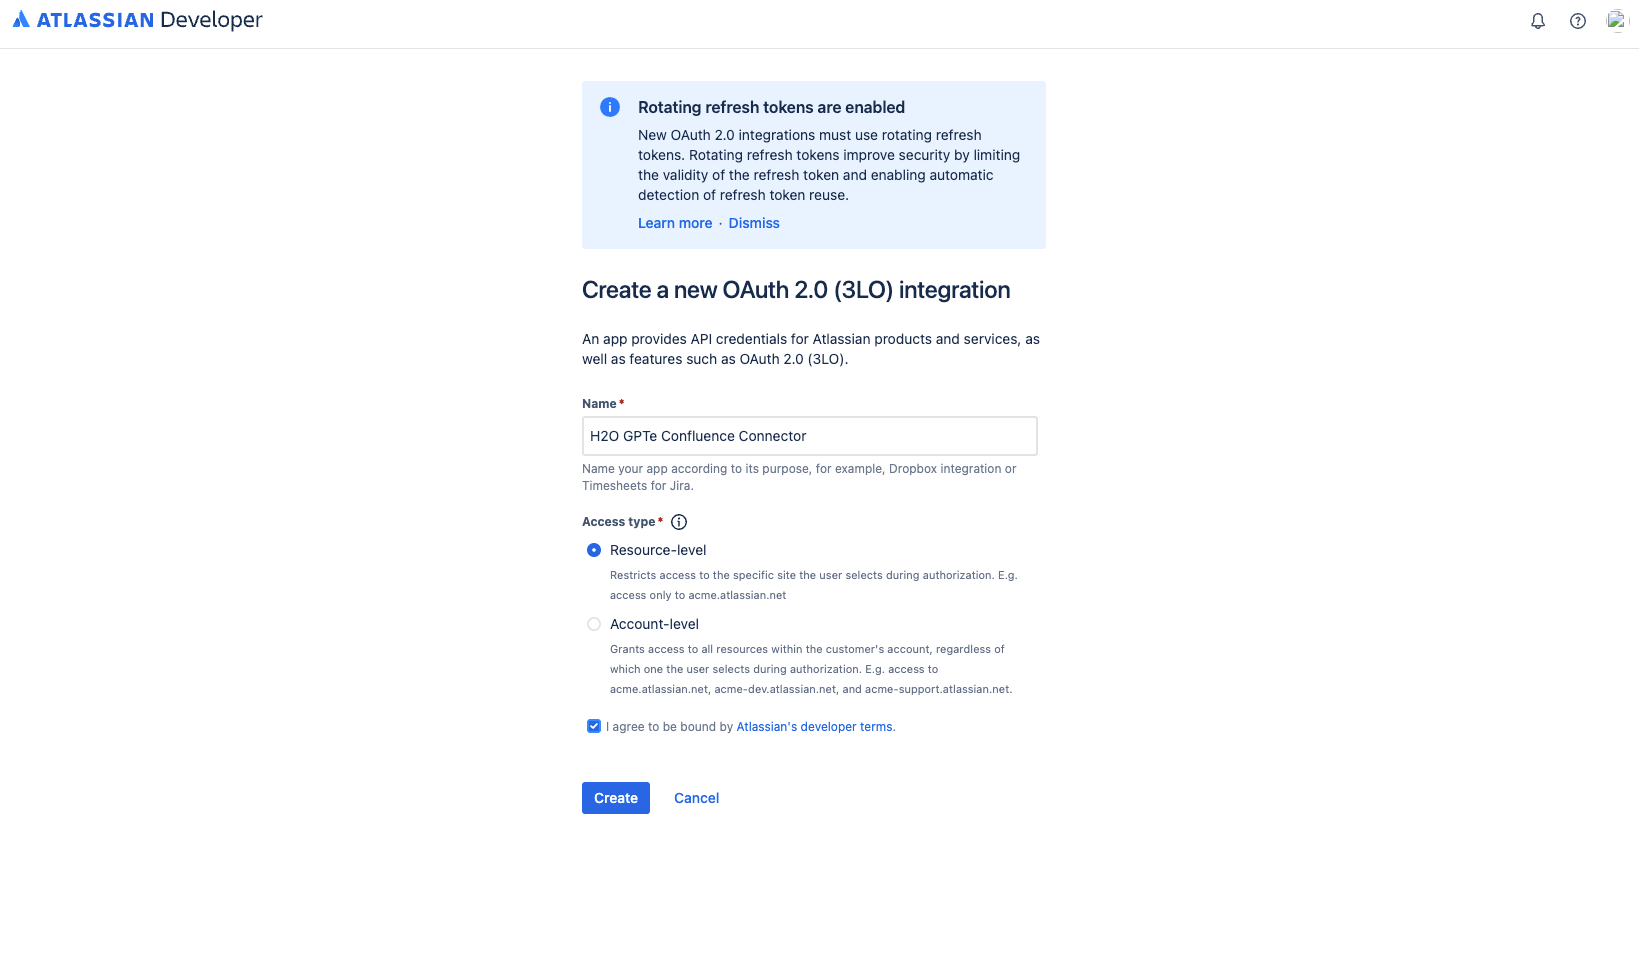
Step 1: Create an OAuth 2.0 (3LO) app
- Sign in to the Atlassian developer console.
- Select Create > OAuth 2.0 integration.
- Enter a name (for example,
H2O GPTe Confluence Connector). - Under Access type, select Resource-level to limit access to the site each user selects during authorization, or Account-level to grant access to every site in the user's account.
- Agree to the developer terms and select Create.
- In the new app, go to Distribution and turn on sharing. Until sharing is on, only your Atlassian account can authorize the app.
Step 2: Add API permissions
The connector needs scopes from two separate APIs in the developer console: the Confluence API (to read content) and the User identity API (to identify the user who authorized the connection).
Confluence API
-
In the app, go to Permissions.
-
Next to Confluence API, select Add.
-
Select Configure for the Confluence API.
-
Select the Granular scopes tab.
-
Select Edit Scopes.
-
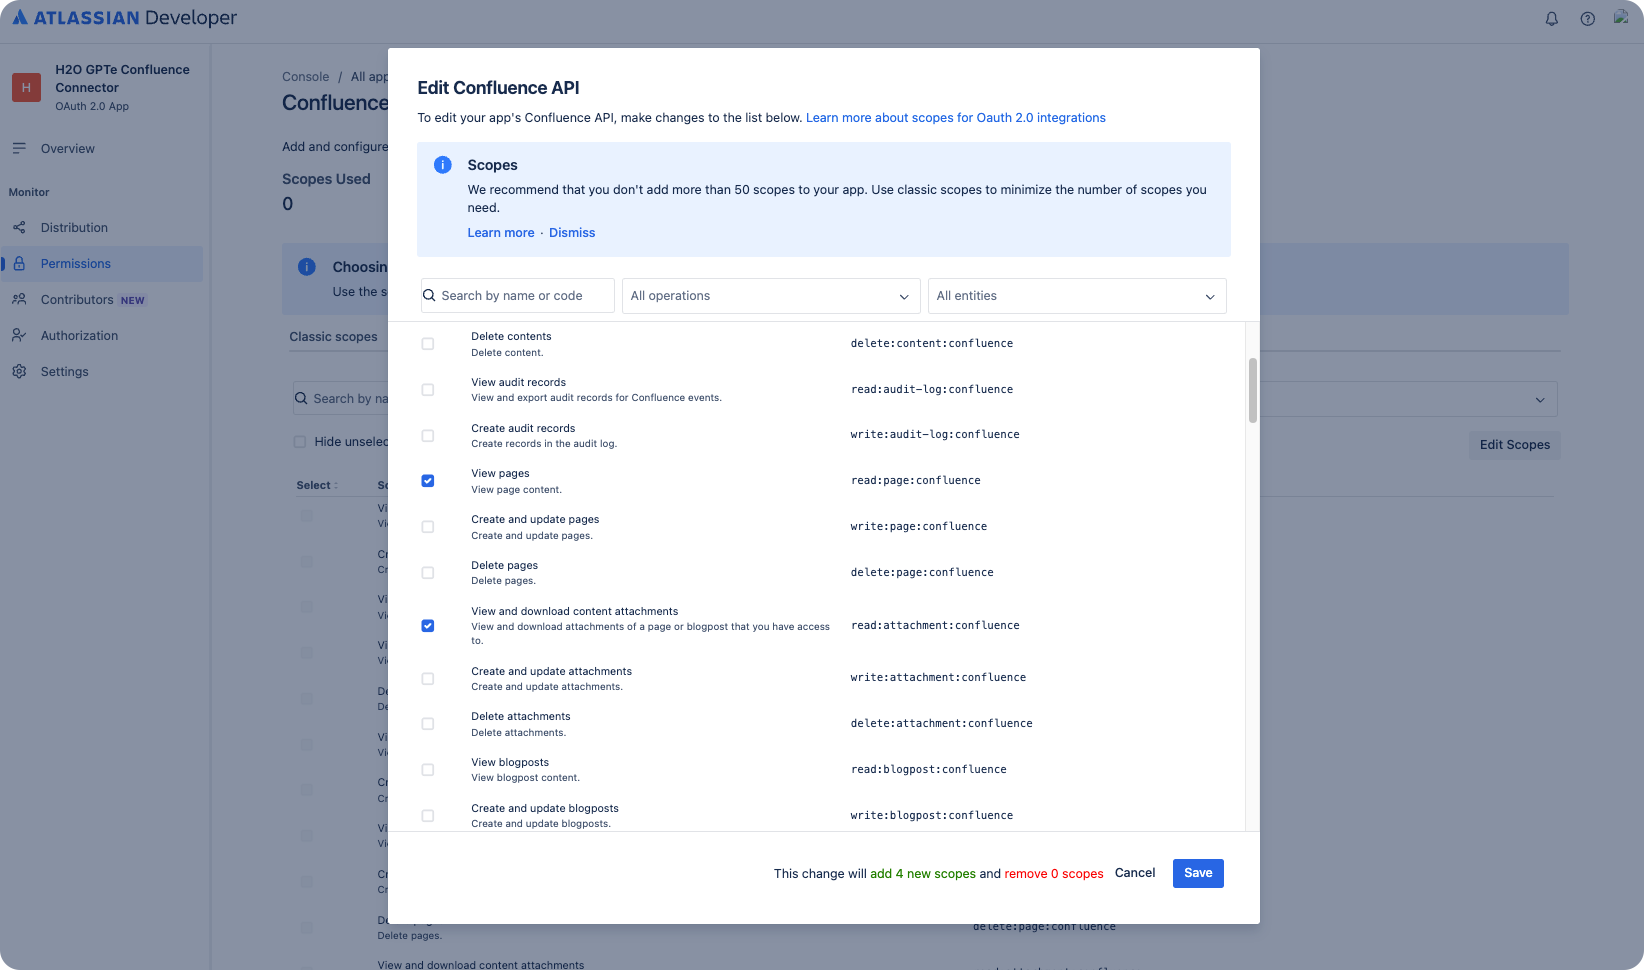
In the Edit Confluence API dialog, select the following scopes:
Scope Purpose read:page:confluenceRead Confluence pages. read:space:confluenceRead Confluence spaces. read:attachment:confluenceRead attachments and embedded images. read:hierarchical-content:confluenceList subpages. -
Select Save.
User identity API
-
In the app, go to Permissions.
-
Next to User identity API, select Add.
-
Select Configure for the User identity API.
-
Select Edit Scopes.
-
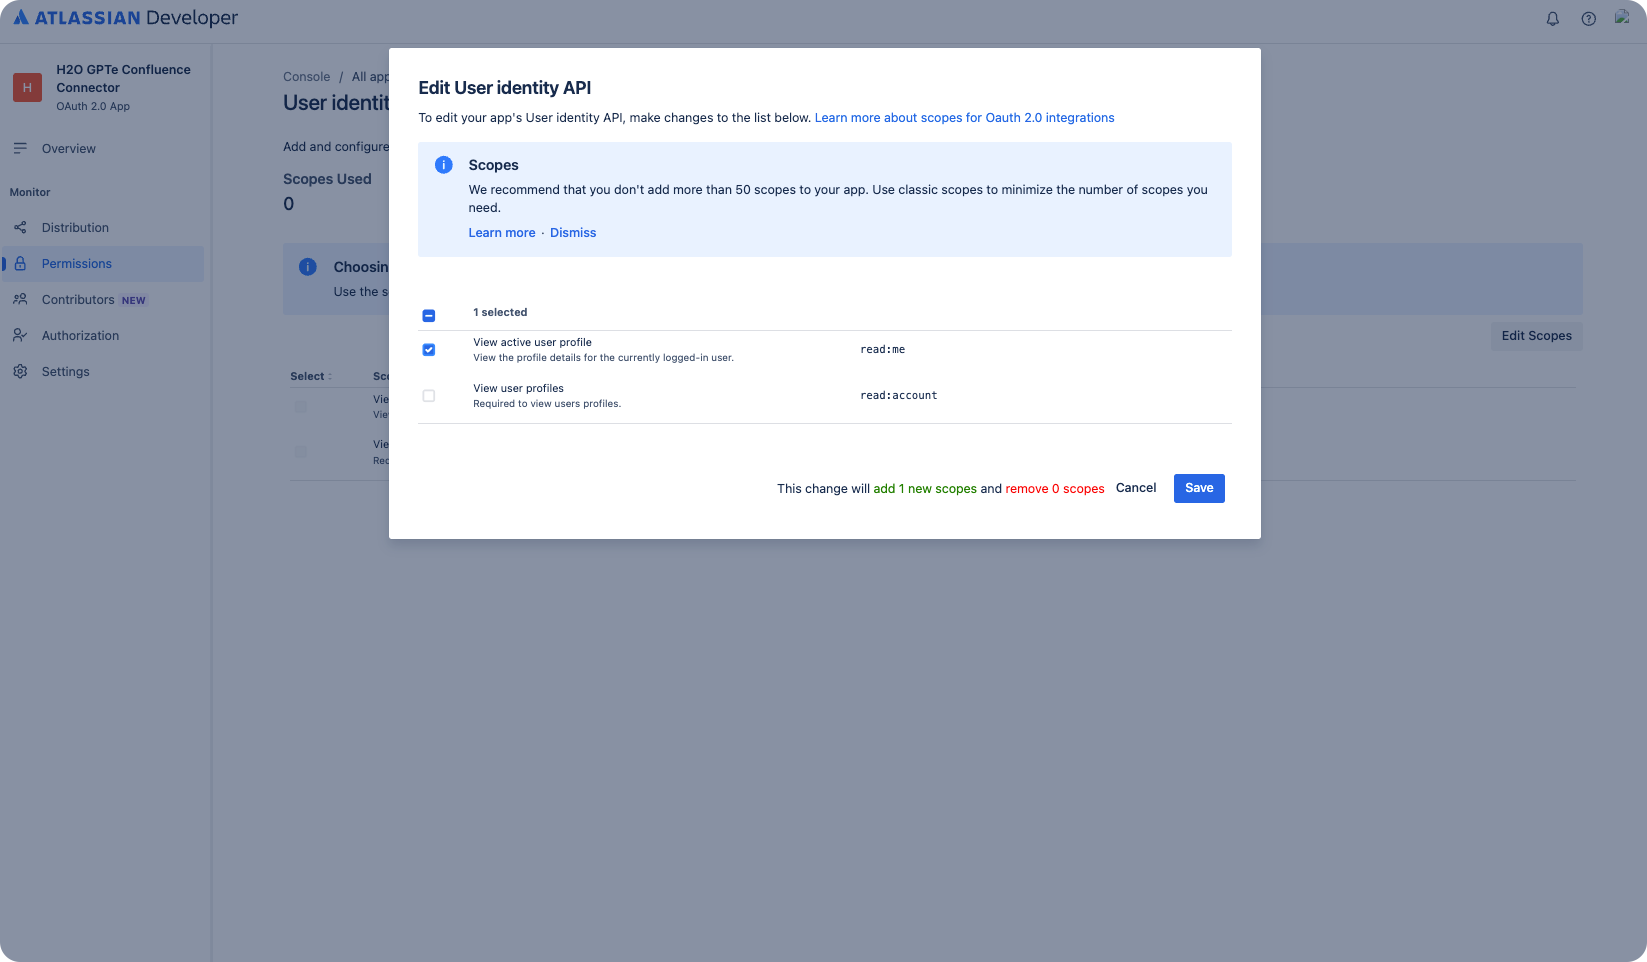
In the Edit User identity API dialog, select the following scope:
Scope Purpose read:meIdentify the Atlassian user who authorized the connection. -
Select Save.
You don't add offline_access in the developer console. Enterprise h2oGPTe requests it when Confluence OAuth Scopes includes it. Without it, users must reconnect each time their access expires.
The scopes you select here, across both APIs, must match Confluence OAuth Scopes in Step 5. If they don't, users see a scope error when they connect.
Step 3: Configure authorization settings
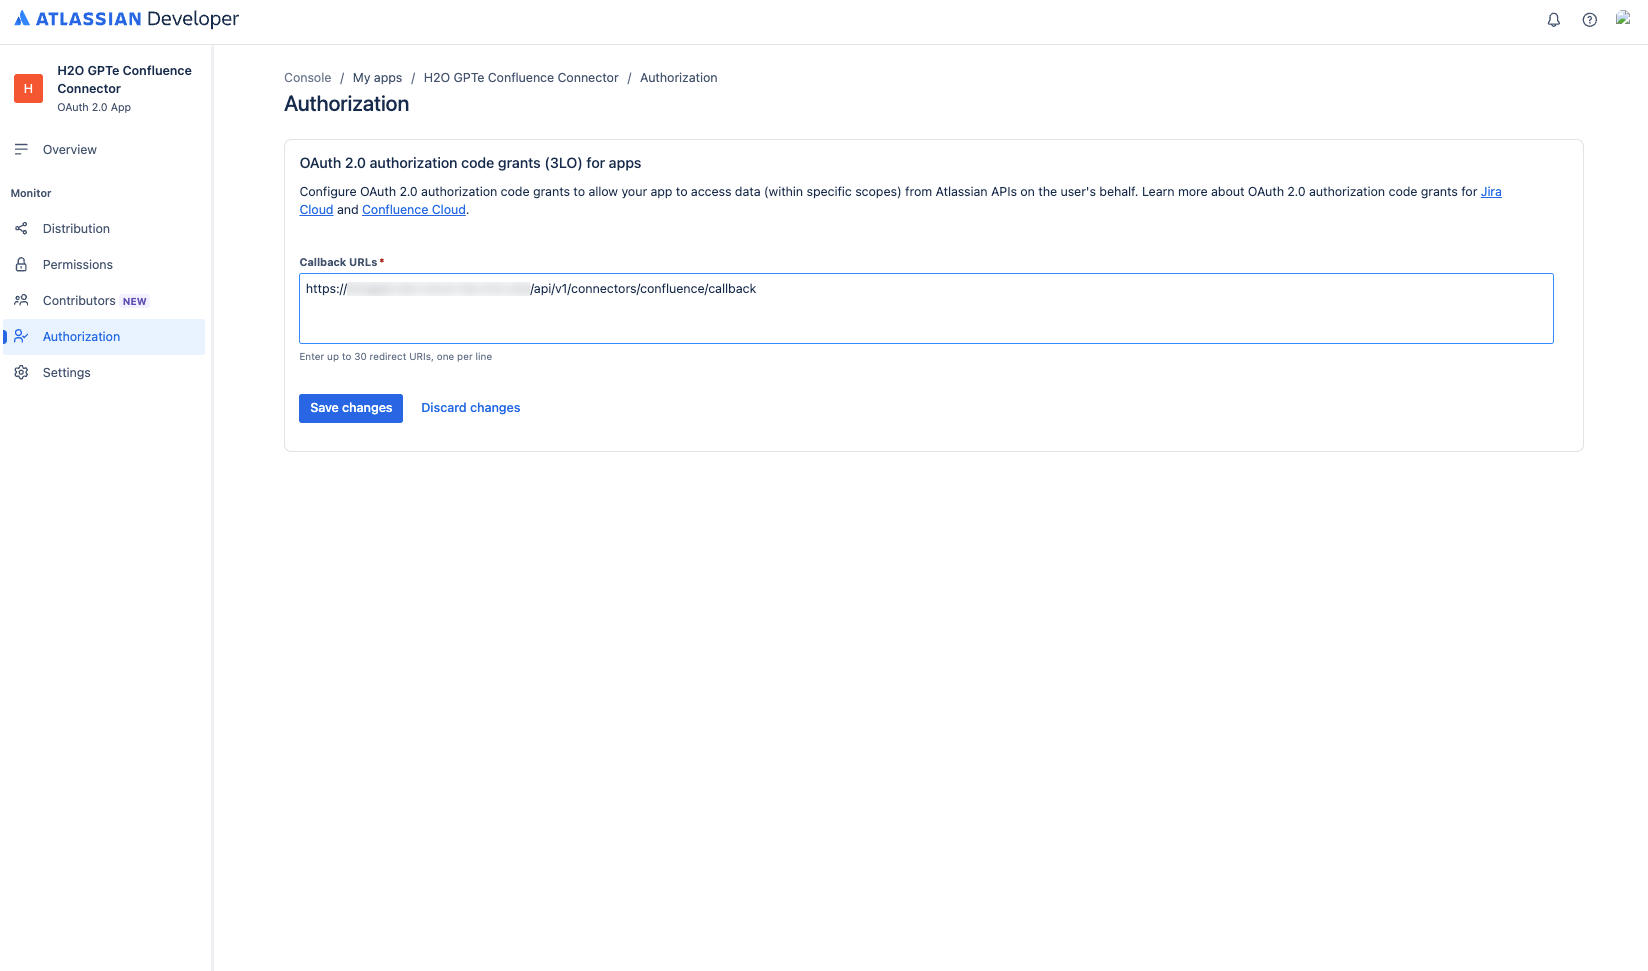
- In the app, go to Authorization.
- Next to OAuth 2.0 (3LO), select Configure.
- In Callback URLs, enter
https://<your-h2ogpte-domain>/api/v1/connectors/confluence/callback. - Select Save changes.
Step 4: Copy the Client ID and Secret
- In the app, go to Settings.
- Copy the Client ID and save it. You enter it in the System Dashboard in Step 5.
- Copy the Secret and save it securely.
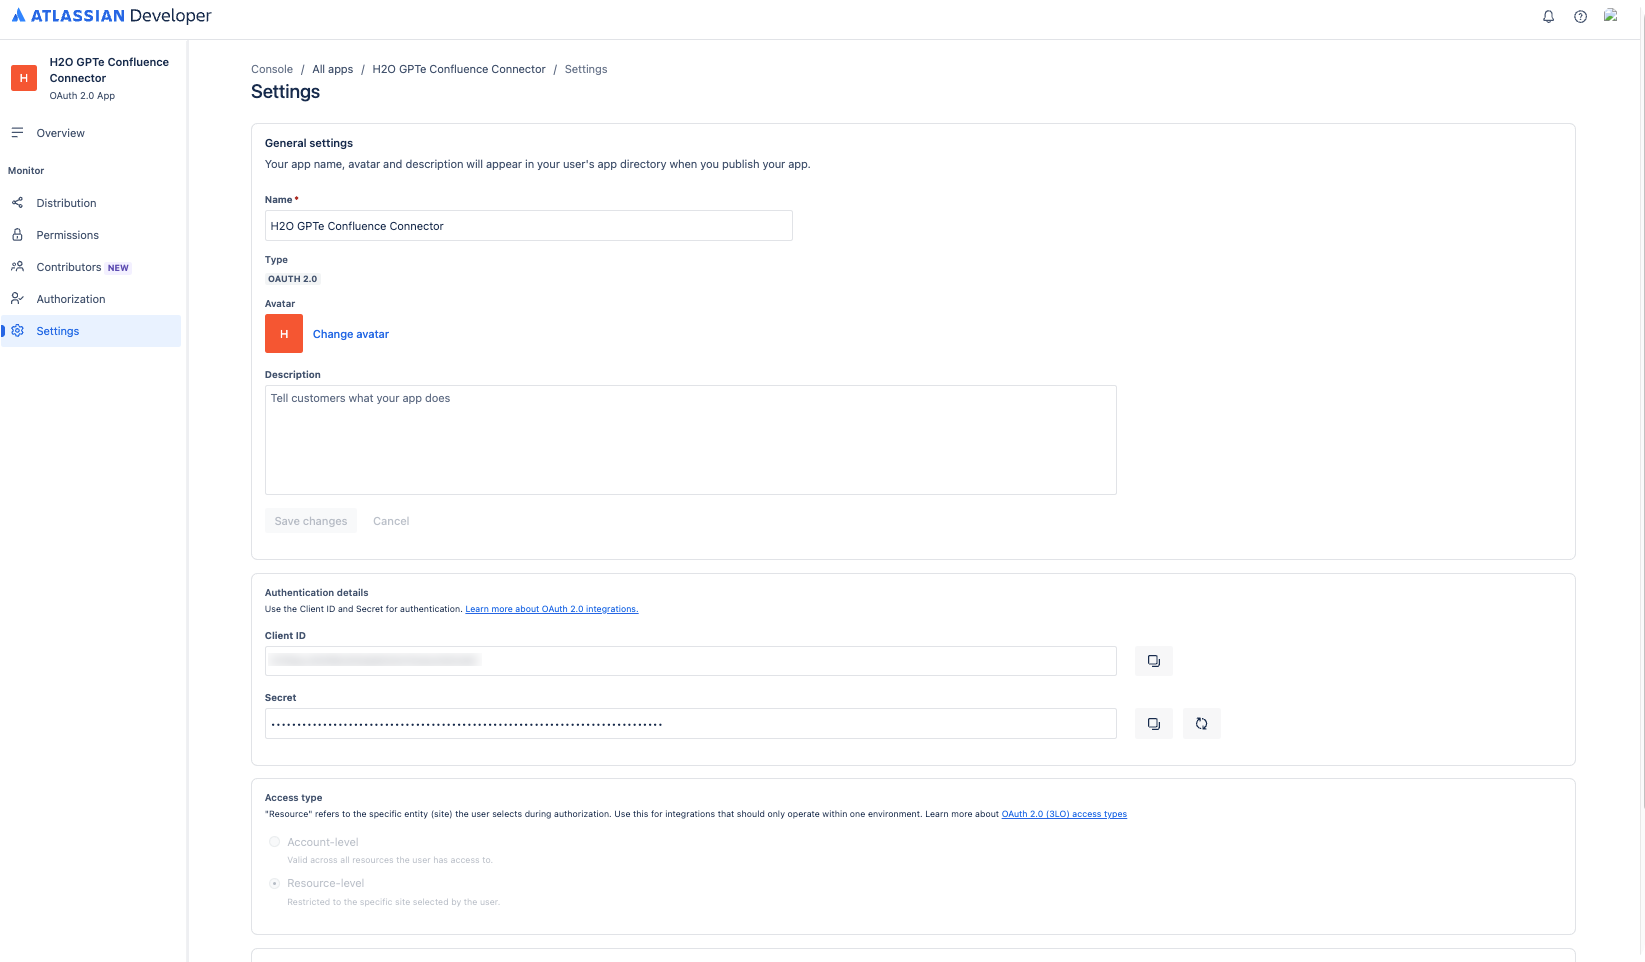
Treat the Secret the same way you would a password. Anyone who has both the Client ID and Secret can impersonate this app.
Step 5: Configure Confluence OAuth in Enterprise h2oGPTe
-
In Enterprise h2oGPTe, click Account Circle.
-
Select System Dashboard.
-
In the Configuration section, click System settings.
-
Scroll down to the OAUTH category.
-
Set the following values:
Setting Value to enter Confluence OAuth Client ID The Client ID from Step 4. Confluence OAuth Client Secret The Secret from Step 4. Stored encrypted. Confluence OAuth Redirect URL The callback URL from Step 3. The value must match exactly. Confluence OAuth Scopes read:me read:space:confluence read:page:confluence read:hierarchical-content:confluence read:attachment:confluence offline_access. Replace any other value in the field.
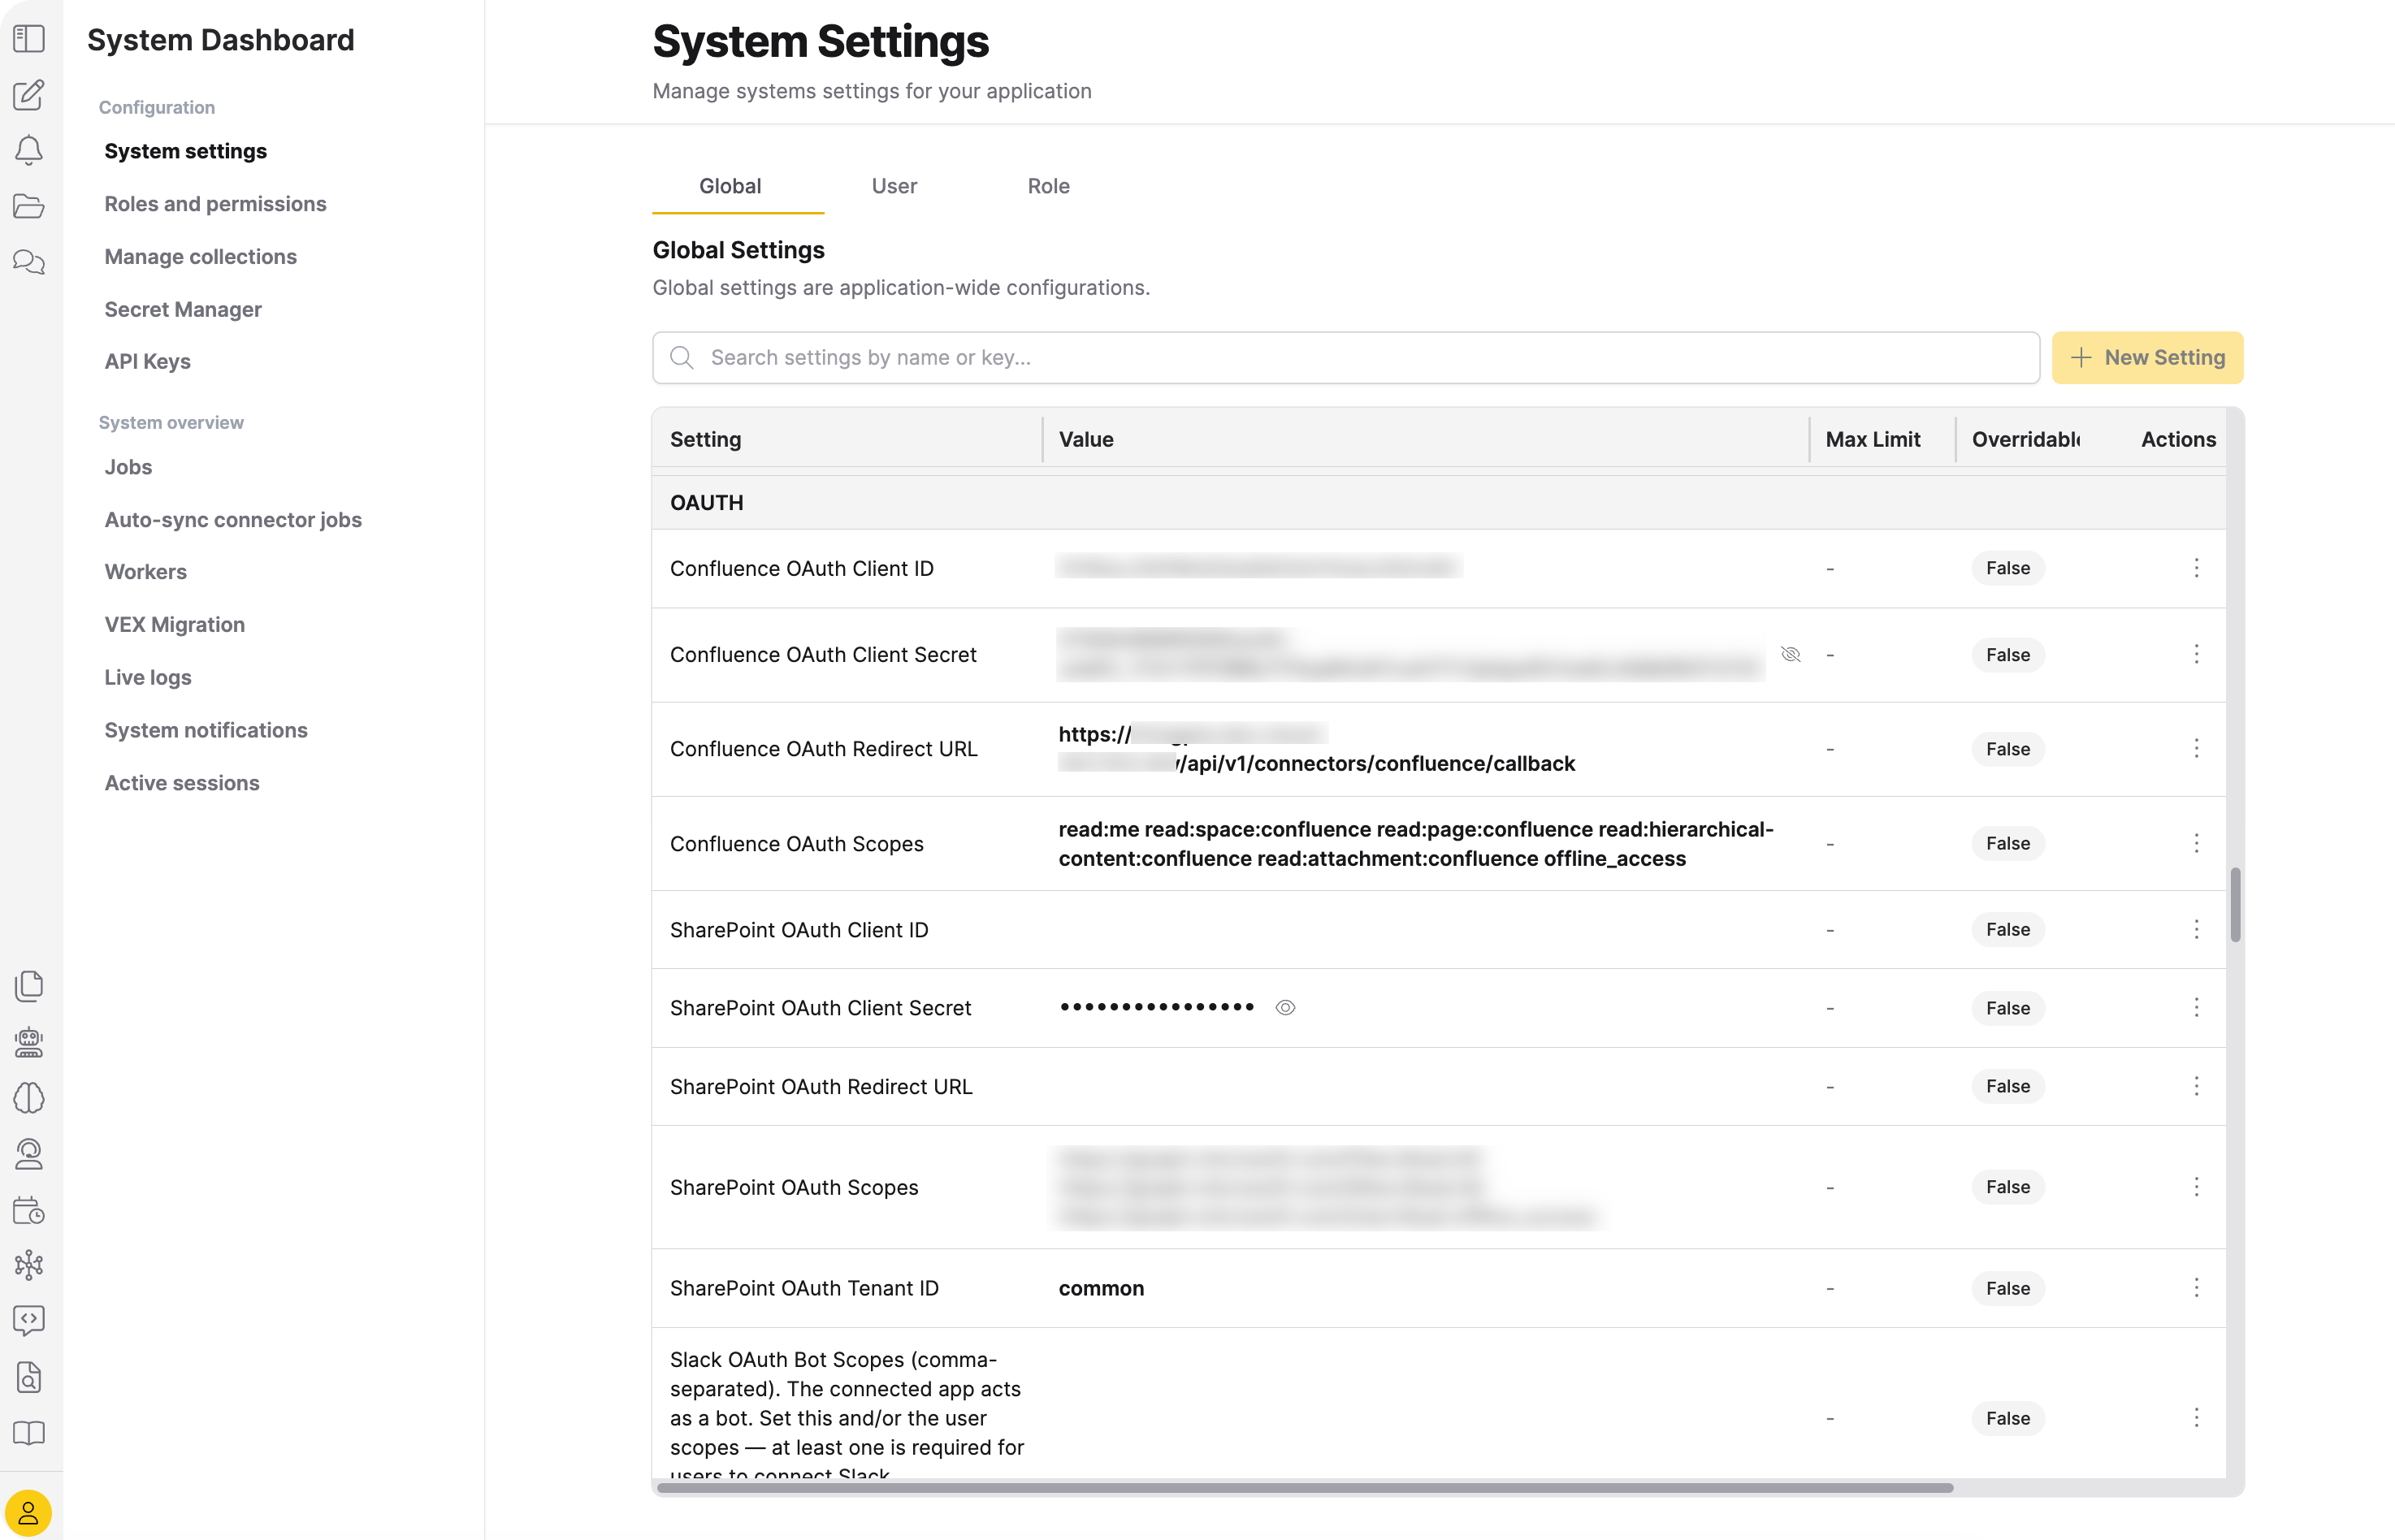
For per-setting details and configuration through the REST API or Python SDK, see Data connectors and OAuth.
Step 6: Get the app approved (if required)
If your Atlassian organization blocks user-installed apps, users see "Your site admin must authorize this app" until an administrator allows it. Ask an Atlassian organization administrator to allow the app from Apps > Sites > your site > Connected apps in Atlassian Administration. Organizations that don't block user-installed apps can skip this step.
Verify the connection
- Click Account Circle, and then select Connectors.
- On the Data Connectors page, find the Confluence card and click Connect.
- Accept the Atlassian consent screen.
The Confluence card then shows Disconnect.
Troubleshooting
Confluence doesn't appear on the Data Connectors page
Cause: Confluence OAuth Client ID is empty in System settings.
Resolution: Set Confluence OAuth Client ID in the OAUTH category of System settings.
Invalid redirect URI
The Atlassian authorization page shows an error that the redirect_uri isn't registered for the client.
Cause: The callback URL in the Atlassian developer console doesn't match the value configured in Enterprise h2oGPTe.
Resolution: Verify that the Confluence OAuth Redirect URL in the System Dashboard exactly matches the Callback URL in the app's Authorization settings. The protocol (https://), domain, and path (/api/v1/connectors/confluence/callback) must all match.
App requires organization approval
Users see "Your site admin must authorize this app" when they try to connect.
Cause: The Atlassian organization restricts which apps users can authorize, and no organization administrator has approved this app yet.
Resolution: Ask an Atlassian organization administrator to approve the app (see Step 6).
Users see a scope or permission error
Cause: The scopes configured on the Atlassian app (Step 2) don't match, or are narrower than, the scopes configured in Confluence OAuth Scopes (Step 5).
Resolution: Confirm that the scopes on the Atlassian app match Confluence OAuth Scopes, except offline_access. To skip a content type, such as attachments, remove its scope from both places.
Token refresh fails or users must reconnect
Cause: The offline_access scope is missing from Confluence OAuth Scopes, or the user revoked access to the app from the Atlassian side.
Resolution:
- Confirm that
offline_accessappears in Confluence OAuth Scopes in the System Dashboard. - Ask the user to reconnect from the Data Connectors page.
Best practices
- Store secrets securely: Use environment-specific credentials and don't commit secret values to version control.
- Request only the scopes you need: Match the scopes on the Atlassian app to what your users actually import (for example, omit
read:attachment:confluenceif you never import attachments or embedded images).
Related topics
- Data connectors and OAuth - Per-setting reference for SharePoint, Confluence, and Snowflake OAuth configuration
- Import from Confluence - End-user workflow for importing Confluence documents into a collection, including API token authentication
- Secret Manager - Store a Confluence username and API token as an alternative to OAuth
- Connectors - Overview of all available data connectors
- Submit and view feedback for this page
- Send feedback about Enterprise h2oGPTe to cloud-feedback@h2o.ai