MOJO quick start
H2O-3 Secure provides the supported, production-grade path for deploying models as MOJOs. Contact enterprise@h2o.ai.
This section describes how to build and implement a MOJO (Model Object, Optimized) to use predictive scoring. Java developers should refer to the Javadoc for more information, including packages.
What is a MOJO?
A MOJO (Model Object, Optimized) is an alternative to H2O's POJO. As with POJOs, H2O allows you to convert models that you build to MOJOs, which can then be deployed for scoring in real time.
Notes:
- MOJOs are supported for Deep Learning, DRF, GBM, GLM, GAM, GLRM, K-Means, PCA, Stacked Ensembles, SVM, Word2vec, Isolation Forest, XGBoost, CoxPH and RuleFit models. All models generated by AutoML are supported.
- MOJOs are only supported for encodings that are either default or
enum. - MOJO predict cannot parse columns enclosed in double quotes (for example, ""2"").
- MOJOs can be used in Java applications and they can also be used in R/Python to generate predictions for data stored in an in-memory R/Python data frame or in a CSV file.
Benefits of MOJOs over POJOs
While POJOs continue to be supported, some customers encountered issues with large POJOs not compiling. (Note that POJOs are not supported for source files larger than 1G.) MOJOs do not have a size restriction and address the size issue by taking the tree out of the POJO and using generic tree-walker code to navigate the model. The resulting executable is much smaller and faster than a POJO.
At large scale, new models are roughly 20-25 times smaller in disk space, 2-3 times faster during "hot" scoring (after JVM is able to optimize the typical execution paths), and 10-40 times faster in "cold" scoring (when the JVM doesn't yet know the execution paths) compared to POJOs. The efficiency gains are larger the bigger the size of the model.
H2O conducted in-house testing using models with 5000 trees of depth 25. At small scale (50 trees / 5 depth), POJOs were found to perform ≈10% faster than MOJOs for binomial and regression models, but 50% slower than MOJOs for multinomial models.
Building a MOJO
MOJOs are built in much the same way as POJOs. The example code below shows how to start H2O, build a model using either R or Python, and then compile and run the MOJO. This example uses GBM, but any supported algorithm can be used to build a model and run the MOJO.
The examples below describe how to start H2O and create a model using R, Python, Java, and Scala. The download_mojo() function saves the model as a zip file. You can unzip the file to view the options used to build the file along with each tree built in the model. Note that each tree file is saved as a binary file type.
Step 1: Build and extract a model
- R
- Python
- Java
- Scala
# 1. Open a terminal window and start R.

# 2. Run the following commands to build a simple GBM model.
library(h2o)
h2o.init(nthreads = -1)
path <- system.file("extdata", "prostate.csv", package="h2o")
h2o_df <- h2o.importFile(path)
h2o_df$CAPSULE <- as.factor(h2o_df$CAPSULE)
model <- h2o.gbm(y = "CAPSULE",
                 x = c("AGE", "RACE", "PSA", "GLEASON"),
                 training_frame = h2o_df,
                 distribution = "bernoulli",
                 ntrees = 100,
                 max_depth = 4,
                 learn_rate = 0.1)

# Download the MOJO and the resulting h2o-genmodel.jar file
# to a new **experiment** folder. Note that the ``h2o-genmodel.jar`` file
# is a library that supports scoring and contains the required readers
# and interpreters. This file is required when MOJO models are deployed
# to production. Be sure to specify the entire path, not just the relative path.
modelfile <- h2o.download_mojo(model, path="~/experiments/", get_genmodel_jar=TRUE)
print("Model saved to " + modelfile)
Model saved to /Users/user/GBM_model_R_1475248925871_74.zip"
# 1. Open a terminal window and start python.

# 2. Run the following commands to build a simple GBM model.
# The model, along with the **h2o-genmodel.jar** file will
# then be downloaded to an **experiment** folder.
import h2o
from h2o.estimators.gbm import H2OGradientBoostingEstimator
h2o.init()
h2o_df = h2o.load_dataset("prostate.csv")
h2o_df["CAPSULE"] = h2o_df["CAPSULE"].asfactor()
model=H2OGradientBoostingEstimator(distribution="bernoulli",
                                   ntrees=100,
                                   max_depth=4,
                                   learn_rate=0.1)
model.train(y="CAPSULE",
            x=["AGE","RACE","PSA","GLEASON"],
            training_frame=h2o_df)

# Download the MOJO and the resulting ``h2o-genmodel.jar`` file
# to a new **experiment** folder. Note that the ``h2o-genmodel.jar`` file
# is a library that supports scoring and contains the required readers
# and interpreters. This file is required when MOJO models are deployed
# to production. Be sure to specify the entire path, not just the relative path.
modelfile = model.download_mojo(path="~/experiment/", get_genmodel_jar=True)
print("Model saved to " + modelfile)
Model saved to /Users/user/GBM_model_python_1475248925871_888.zip
// Compile the source:
javac -classpath ~/h2o/h2o-3.20.0.1/h2o.jar src/h2oDirect/h2oDirect.java

// Execute as a classfile. This also downloads the LoanStats4 demo,
// which trains a GBM model.
Erics-MBP-2:h2oDirect ericgudgion$ java -cp /Users/ericgudgion/NetBeansProjects/h2oDirect/src/:/Users/ericgudgion/h2o/h2o-3.20.0.1/h2o.jar h2oDirect.h2oDirect /Demos/Lending-Club/LoanStats4.csv
...
06-14 20:40:29.420 192.168.1.160:54321   55005  main      INFO: Found XGBoost backend with library: xgboost4j_minimal
06-14 20:40:29.428 192.168.1.160:54321   55005  main      INFO: Your system supports only minimal version of XGBoost (no GPUs, no multithreading)!
06-14 20:40:29.428 192.168.1.160:54321   55005  main      INFO: ----- H2O started  -----
06-14 20:40:29.428 192.168.1.160:54321   55005  main      INFO: Build git branch: rel-wright
...
...
Starting H2O with IP 192.168.1.160:54321
Loading data from file
...
Loaded file /Demos/Lending-Club/LoanStats4.csv size 3986423 Cols:19 Rows:39029
...
Creating GBM Model
Training Model
...
Training Results
Model Metrics Type: Binomial
 Description: N/A
 model id: GBM_model_1529023227180_1
 frame id: dataset-key
 MSE: 0.11255783
 RMSE: 0.3354964
 AUC: 0.82892376
 logloss: 0.36827797
 mean_per_class_error: 0.26371866
 default threshold: 0.261136531829834
...
Model AUC 0.8289237508508612
Model written out as a MOJO to file /Demos/Lending-Club/LoanStats4.csv.zip

// Save as h2oDirect.java
package h2oDirect;

import hex.tree.gbm.GBM;
import hex.tree.gbm.GBMModel;
import hex.tree.gbm.GBMModel.GBMParameters;
import java.io.FileOutputStream;
import java.io.IOException;
import java.net.InetAddress;
import water.Key;
import water.fvec.Frame;
import water.fvec.NFSFileVec;
import water.parser.ParseDataset;
import water.*;


public class h2oDirect {


    /**
     * @param args the command line arguments
     */
    public static void main(String[] args) throws IOException {

      String h2oargs = "-nthreads -1 ";
      H2OApp.main(h2oargs.split(" "));
      System.out.println("Starting H2O with IP "+H2O.getIpPortString());

      H2O.waitForCloudSize(1, 3000);

      System.out.println("Loading data from file ");
      String inputfile = args[0];
      NFSFileVec datafile = NFSFileVec.make(inputfile);
      Frame dataframe = ParseDataset.parse(Key.make("dataset-key") , datafile._key);
      System.out.println("Loaded file "+inputfile+" size "+datafile.byteSize()+" Cols:"+dataframe.numCols()+" Rows:"+dataframe.numRows());


      for (int v=0; v<dataframe.numCols(); v++) {
      System.out.println(dataframe.name(v)+" "+dataframe.vec(v).get_type_str());
      }

      int c = dataframe.find("bad_loan");

      dataframe.replace(c, dataframe.vec(c).toCategoricalVec());


      // drop the id and member_id columns from model
      dataframe.remove(dataframe.find("id"));
      dataframe.remove(dataframe.find("member_id"));

      System.out.println("Creating GBM Model");

      GBMParameters modelparms = new GBMParameters();
      modelparms._train = dataframe._key;
      modelparms._response_column = "bad_loan";

      System.out.println("Training Model");
      GBM model = new GBM(modelparms);
      GBMModel gbm = model.trainModel().get();

      System.out.println("Training Results");
      System.out.println(gbm._output);
      System.out.println("Model AUC "+gbm.auc());


      String outputfile = inputfile+".zip";
      FileOutputStream modeloutput = new FileOutputStream(outputfile);
      gbm.getMojo().writeTo(modeloutput);
      modeloutput.close();
      System.out.println("Model written out as a MOJO to file "+outputfile);

      System.out.println("H2O shutdown....");
      H2O.shutdown(0);

    }

}
import water.rapids.ast.prims.advmath.AstCorrelation

object RandomForestFileInput {

  import water.H2O
  import water.H2OApp
  import water.fvec.Vec
  import water.fvec.NFSFileVec
  import water.fvec._

  import hex.tree.drf.DRF
  import hex.tree.drf.DRFModel
  import hex.tree.drf.DRFModel.DRFParameters
  import water.parser.ParseDataset
  import water.Key
  import water.Futures
  import water._

  import scala.io.Source
  import scala.reflect._

  import java.io.FileOutputStream
  import java.io.FileWriter

     def main(args: Array[String]): Unit = {
      println("H2O Random Forest FileInput example\n")

      if (args.length==0) {
        println("Input file missing, please pass datafile as the first parameter")
        return
      }

      // Start H2O instance and wait for 3 seconds for instance to complete startup
      println("Starting H2O")
      val h2oargs = "-nthreads -1 -quiet"

      H2OApp.main(h2oargs.split(" "))
      H2O.waitForCloudSize(1, 3000)

      println("H2O available")

      // Load datafile passed as first parameter and print the size of the file as confirmation
      println("Loading data from file ")
      val inputfile = args(0)
      val parmsfile = args(1)
      def ignore: Boolean = System.getProperty("ignore","false").toBoolean

      val datafile = NFSFileVec.make(inputfile)
      val dataframe = ParseDataset.parse(Key.make("dataset-key") , datafile._key)
      println("Loaded file "+inputfile+" size "+datafile.byteSize()+" Cols:"+dataframe.numCols()+" Rows:"+dataframe.numRows())

      println(dataframe.anyVec().get_type_str)

      for (v <- 0 to dataframe.numCols()-1) {
        println(dataframe.name(v))
      }

      val c = dataframe.find("bad_loan")
      dataframe.replace(c, dataframe.vecs()(c).toCategoricalVec())

      // drop the id and member_id columns from model
      dataframe.remove(dataframe.find("id"))
      dataframe.remove(dataframe.find("member_id"))


      // set Random Forest parameters
      println("creating model parameters")
      var modelparams = new DRFParameters()
      var fields = modelparams.getClass.getFields

      for (line <- Source.fromFile(parmsfile).getLines) {
          println("Reading parameter from file: "+line)
          var linedata = line.split(" ")


         for(v <- fields){
           if ( v.getName.matches(linedata(0))) {
             val method1 = v.getDeclaringClass.getDeclaredField(linedata(0) )
             method1.setAccessible(true)
             println("Found "+linedata(0)+" Var "+v+" Accessable "+method1.isAccessible()+" Type "+method1.getType )
             v.setAccessible(true)
             v.setInt(modelparams, linedata(1).toInt)
           }
         }
      }


      // hard coded values
      modelparams._train = dataframe._key
      modelparams._response_column = "bad_loan"

       if (ignore) {
         println("Adding fields to ignore from file "+parmsfile+"FieldtoIgnore")
         var ignoreNames = new Array[String](dataframe.numCols())
         var in=0
         for (line <- Source.fromFile(parmsfile+"FieldtoIgnore").getLines) {
           ignoreNames(in) = line
           in+=1
         }
         modelparams._ignored_columns=ignoreNames
       }


      println("Parameters set ")

      // train model
      println("Starting training")
      var job: DRF = new DRF(modelparams)
      var model: DRFModel = job.trainModel().get()

      println("Training completed")

      // training metrics
      println(model._output.toString())
      println("Model AUC: "+model.auc())
      println(model._output._variable_importances)

      // If you want to look at variables that are important and then model on them
      // the following will write them out, then use only those in other model training
      // handy when you have a thousand columns but want to train on only the important ones.
      // Then before calling the model... call modelparams._ignored_columns= Array("inq_last_6mths")
      // FileWriter

       if (ignore) {
         val file = new FileOutputStream(parmsfile + "FieldtoIgnore")

         var n = 0
         var in = 0
         var ignoreNames = new Array[String](dataframe.numCols())
         val fieldnames = model._output._varimp._names
         println("Fields to add to _ignored_columns field")
         for (i <- model._output._varimp.scaled_values()) {
           if (i < 0.3) {
             println(n + " = " + fieldnames(n) + " = " + i)
             Console.withOut(file) {
               println(fieldnames(n))
             }
             ignoreNames(in) = fieldnames(n)
             in += 1
           }
           n += 1
         }
         println("Drop these:")
         for (i <- 0 to in) {
           println(fieldnames(i))
         }
         file.close()
         println()
       }

      // save model
      var outputfile = inputfile+"_model_pojo.txt"
      var modeloutput: FileOutputStream = new FileOutputStream(outputfile)
      println("Saving model to "+outputfile)
      model.toJava(modeloutput, false, true)
      modeloutput.close()

      outputfile = inputfile+"_model_jason.txt"
      modeloutput = new FileOutputStream(outputfile)
      println("Saving Jason to "+outputfile)
      Console.withOut(modeloutput) {  println(model.toJsonString()) }
      modeloutput.close()

      outputfile = inputfile+"_model_mojo.zip"
      modeloutput = new FileOutputStream(outputfile)
      println("Saving MOJO to "+outputfile)
      model.getMojo.writeTo(modeloutput)
      modeloutput.close()

       println(models: hex.ensemble.StackedEnsemble )

      println("Completed")
      H2O.shutdown(0)

  }
}
Step 2: Compile and run the MOJO
-
Open a new terminal window and change directories to the experiment folder:
$ cd experiment -
Create your main program in the experiment folder by creating a new file called main.java (for example, using "vim main.java"). Include the following contents. Note that this file references the GBM model created above using R.
import java.io.*;import hex.genmodel.easy.RowData;import hex.genmodel.easy.EasyPredictModelWrapper;import hex.genmodel.easy.prediction.*;import hex.genmodel.MojoModel;public class main {public static void main(String[] args) throws Exception {EasyPredictModelWrapper model = new EasyPredictModelWrapper(MojoModel.load("GBM_model_R_1475248925871_74.zip"));RowData row = new RowData();row.put("AGE", "68");row.put("RACE", "2");row.put("DCAPS", "2");row.put("VOL", "0");row.put("GLEASON", "6");BinomialModelPrediction p = model.predictBinomial(row);System.out.println("Has penetrated the prostatic capsule (1=yes; 0=no): " + p.label);System.out.print("Class probabilities: ");for (int i = 0; i < p.classProbabilities.length; i++) {if (i > 0) {System.out.print(",");}System.out.print(p.classProbabilities[i]);}System.out.println("");}}
GBM and DRF return classProbabilities, but not all MOJOs will return a classProbabilities field. Refer to the ModelPrediction definition for each algorithm to find the correct fields to access. This is available in the H2O-3 OSS GitHub repo at: https://github.com/h2oai/h2o-3/tree/master/h2o-genmodel/src/main/java/hex/genmodel/easy/prediction. You can also view the hex.genmodel.easy.prediction classes in the Javadoc.
In addition to classProbabilities, you can choose to generate additional leafNodeAssignments (GBM, DRF, Isolation Forest and XGBoost) and contributions (GBM, DRF and XGBoost) fields. The leafNodeAssignments field will show the decision path through each tree. The contributions field will provide Shapley contributions. Note that these fields may slow down the MOJO as they add computation. Below is the Java code showing how to return both the leaf node assignments and the contributions:
import java.io.*;
import hex.genmodel.easy.RowData;
import hex.genmodel.easy.EasyPredictModelWrapper;
import hex.genmodel.easy.prediction.*;
import hex.genmodel.MojoModel;

public class main {
  public static void main(String[] args) throws Exception {
    EasyPredictModelWrapper.Config config = new EasyPredictModelWrapper.Config()
       .setModel(MojoModel.load("GBM_model_R_1475248925871_74.zip"))
       .setEnableLeafAssignment(true)
       .setEnableContributions(true);
    EasyPredictModelWrapper model = new EasyPredictModelWrapper(config);

    RowData row = new RowData();
    row.put("AGE", "68");
    row.put("RACE", "2");
    row.put("DCAPS", "2");
    row.put("VOL", "0");
    row.put("GLEASON", "6");

    BinomialModelPrediction p = model.predictBinomial(row);
    System.out.println("Has penetrated the prostatic capsule (1=yes; 0=no): " + p.label);
    System.out.print("Class probabilities: ");
    for (int i = 0; i < p.classProbabilities.length; i++) {
      if (i > 0) {
        System.out.print(",");
      }
      System.out.print(p.classProbabilities[i]);
    }

    System.out.println("Leaf node assignments: ");
    for (int i=0; i < p.leafNodeAssignments.length; i++) {
      if (i > 0) {
        System.out.print(p.leafNodeAssignments[i]);
      }
    }
    System.out.println("");

    System.out.println("Shapley contributions: ");
    for (int i=0; i < p.contributions.length; i++) {
      if (i > 0) {
        System.out.print(", ");
      }
      System.out.print(model.getContributionNames()[i] + ": " + p.contributions[i]);
    }
    System.out.println("");
  }
}
For GLRM, the returned field is the X coefficients for the archetypes by default. In addition to that, you can choose to generate the reconstructed data row as well. Again, this may slow down the MOJO due to added computation. Below is the Java code showing how to obtain both the X factors and the reconstructed data after you have generated the GLRM MOJO:
import java.io.*;
import hex.genmodel.easy.RowData;
import hex.genmodel.easy.EasyPredictModelWrapper;
import hex.genmodel.easy.prediction.*;
import hex.genmodel.MojoModel;

public class main {
  public static void main(String[] args) throws Exception {
  EasyPredictModelWrapper.Config config = new EasyPredictModelWrapper.Config().setModel(MojoModel.load("GLRM_model_python_1530295749484_1.zip")).setEnableGLRMReconstrut(true);
  EasyPredictModelWrapper model = new EasyPredictModelWrapper(config);

  RowData row = new RowData();
  row.put("CAPSULE", "0");
  row.put("AGE", "68");
  row.put("RACE", "2");
  row.put("DPROS", "4");
  row.put("DCAPS", "2");
  row.put("PSA", "31.9");
  row.put("VOL", "0");
  row.put("GLEASON", "6");

  DimReductionModelPrediction p = model.predictDimReduction(row);
  String[] colnames = model.m.getNames();
  System.out.println("X coefficients for input row: ");
  for (int i = 0; i < p.dimensions.length; i++) {
    if (i > 0) {
      System.out.println(",");
    }
    System.out.print("Arch "+i+" coefficient: "+p.dimensions[i]);
  }
  System.out.println("");
  System.out.println("Reconstructed input row: ");
  for (int i = 0; i < p.reconstructed.length; i++) {
    if (i > 0) {
      System.out.println(",");
    }
    System.out.print(colnames[i]+": "+p.reconstructed[i]);
  }
  System.out.println("");
}
-
Compile in terminal window 2.
$ javac -cp h2o-genmodel.jar -J-Xms2g -J-XX:MaxPermSize=128m main.java -
Run in terminal window 2.
# Linux and OS X users$ java -cp .:h2o-genmodel.jar main# Windows users$ java -cp .;h2o-genmodel.jar main
The following output displays:
Has penetrated the prostatic capsule (1 yes; 0 no): 0
Class probabilities: 0.8059929056296662,0.19400709437033375
If you have chosen to enable leaf node assignments, you will also see 100 leaf node assignments for your data row:
Has penetrated the prostatic capsule (1 yes; 0 no): 0
Class probabilities: 0.8059929056296662,0.19400709437033375
Leaf node assignments:   RRRR,RRR,RRRR,RRR,RRL,RRRR,RLRR,RRR,RRR,RRR,RLRR,...
For the GLRM MOJO, after running the Java code, you will see the following:
X coefficients for input row:
Arch 0 coefficient: -0.5930494611027051,
Arch 1 coefficient: 1.0459847877909487,
Arch 2 coefficient: 0.5849220609025815
Reconstructed input row:
CAPSULE: 0.5204822003860688,
AGE: 10.520294102886806,
RACE: 4.1422863477607645,
DPROS: 2.970424071063664,
DCAPS: 6.361196172145799,
PSA: 1.905415090602722,
VOL: 0.7123169431687857,
GLEASON: 6.625024806196047
Viewing a MOJO model
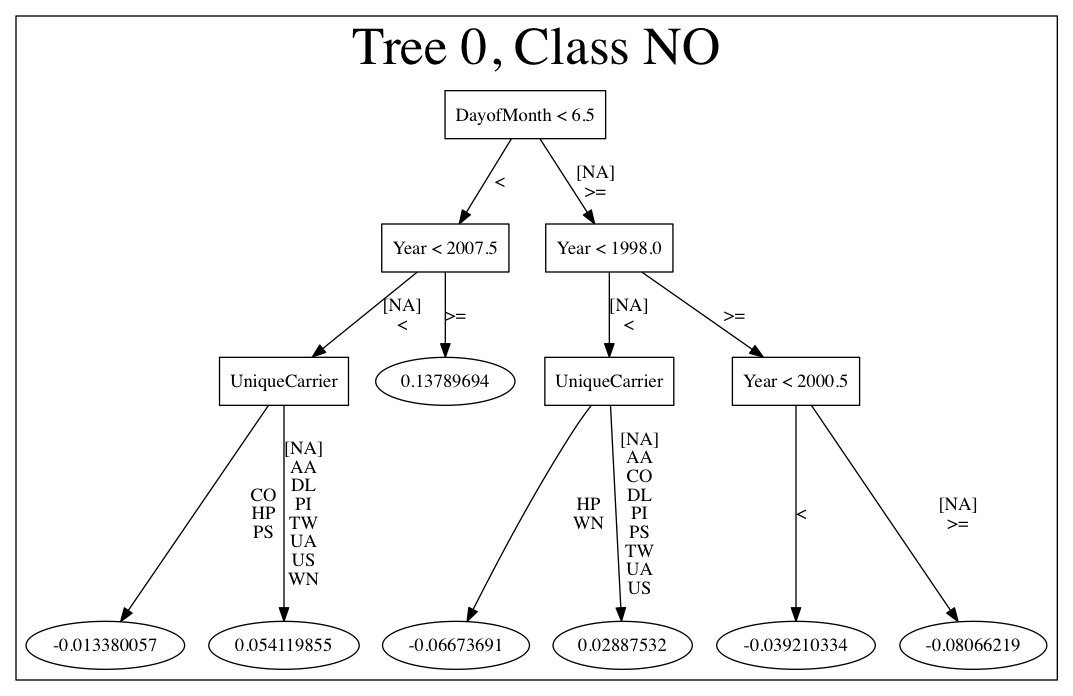
Use the PrintMojo tool to generate a graphical representation of the MOJO. PrintMojo is a java tool for converting binary MOJO files into human viewable graphs. This tool is packaged with H2O and produces an output that "dot" (which is part of Graphviz) can turn into an image. (See the Graphviz home page for more information.)
Here is an example output for a GBM model:
The following options can be specified with PrintMojo:
--input(or-i): Required. Specify the MOJO file name--output(or-o): Optionally specify the output file name. This is taken as a directory name in the case of .png format and multiple trees to visualize. This defaults to stdout.--format: Optionally specify the output format. Available formats include dot (default), json, raw, and png. Note that for .png output, Java 8 is the minimum Java requirement.--tree: Optionally specify the tree number to print. This defaults to all trees.--levels: Optionally specify the number of categorical levels per edge to print. This defaults to 10.--title: Optionally force the title of the tree graph.--detail: Specifies to print additional information such as node numbers.--decimalplaces(or-d): Allows you to control the number of decimal points shown for numbers.--fontsize(or-f): Controls the font size. The default font size is 14. When using this option, be careful not to choose a font size that is so large that you cannot see your whole tree. We recommend using a font size no larger than 20.--internal: Optional. Internal H2O representation of the decision tree (splits etc.). This is used for generating the Graphviz format.
Note: For categorical responses, a forest of all available classes is displayed. For binomial, only one tree for one is built by default. Some algorithms (DRF) offer the option to build both trees. In case of binomial response, if it is required to display the other class, changing the domain order of response variable during training phase is an option.
The following code snippet shows how to download a MOJO and run the PrintMojo tool from the command line to make a .png file. Note that this requires that Graphviz is installed.
- R
- Python
library(h2o)
h2o.init()
df <- h2o.importFile("http://s3.amazonaws.com/h2o-public-test-data/smalldata/airlines/allyears2k_headers.zip")
model <- h2o.gbm(model_id = "model",
                training_frame = df,
                x = c("Year", "Month", "DayofMonth", "DayOfWeek", "UniqueCarrier"),
                y = "IsDepDelayed",
                max_depth = 3,
                ntrees = 5)
h2o.download_mojo(model, getwd(), FALSE)

# In another terminal window, download and extract the
# H2O-3 Secure release. Contact enterprise@h2o.ai for the download link.
cd ~/Downloads
unzip h2o-<version>.zip
cd h2o-<version>

# Run the PrintMojo tool from the command line.
# This requires that graphviz is installed.
brew install graphviz # if not already installed
java -cp h2o.jar hex.genmodel.tools.PrintMojo --tree 0 -i "path/to/model.zip" -o model.gv -f 20 -d 3
dot -Tpng model.gv -o model.png
open model.png
import h2o
h2o.init()
from h2o.estimators.gbm import H2OGradientBoostingEstimator
df = h2o.import_file("http://s3.amazonaws.com/h2o-public-test-data/smalldata/airlines/allyears2k_headers.zip")

predictors = ["Year", "Month", "DayofMonth", "DayOfWeek", "UniqueCarrier"]
response = "IsDepDelayed"

model = H2OGradientBoostingEstimator(max_depth=3, ntrees=5)
model.train(x = predictors,
            y = response,
            training_frame = df)
model.download_mojo(path="/path/to/mojo/zip", get_genmodel_jar=False, genmodel_name=genmodel_path)

# In another terminal window, download and extract the
# H2O-3 Secure release. Contact enterprise@h2o.ai for the download link.
cd ~/Downloads
unzip h2o-<version>.zip
cd h2o-<version>

# Run the PrintMojo tool from the command line.
# This requires that graphviz is installed.
brew install graphviz # example for Mac OsX if not already installed
java -cp h2o.jar hex.genmodel.tools.PrintMojo --tree 0 -i "path/to/model.zip" -o model.gv -f 20 -d 3
dot -Tpng model.gv -o model.png
open model.png
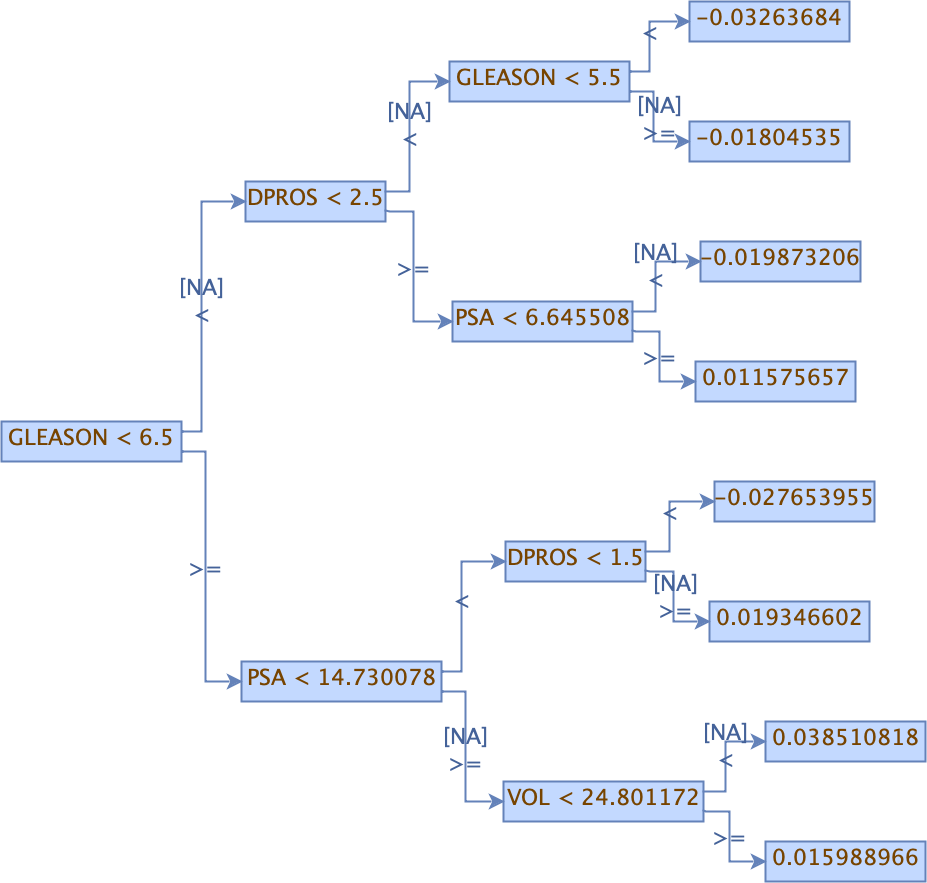
If you cannot install Graphviz on your environment, another option is to produce a picture output directly with PrintMojo. This option requires Java 8 or higher and uses the h2o-genmodel.jar file.
-
Extract h2o-genmodel.jar from the running h2o instance:
# In one terminal window run:java -jar h2o.jar# While still running H2O in the first terminal window,# in the second terminal window run:curl http://localhost:54321/3/h2o-genmodel.jar > h2o-genmodel.jar -
Run the PrintMojo tool on the command line to make a .png file without using Graphviz.
# Download the H2O-3 Secure release (contact enterprise@h2o.ai for the download link)# and run the PrintMojo tool from the command line.java -cp h2o-genmodel.jar hex.genmodel.tools.PrintMojo --tree 0 -i "/path/to/model.zip" -o tree.png --format pngopen tree.png
Printing GBM MOJOs
The print_mojo function allows a model to be converted to machine readable representation: either to JSON for further processing or dot for rendering images.
When running print_mojo, the following can be specified:
mojo_path: The path to the MOJO archive on the user’s local filesystem. This defaults to the user's home directory.format: Specify an output format of eitherjson(default) ordot.tree_index: Specify the index of the tree to print. This can only be used withdotformat.
The output is a string representation of the MOJO in either JSON or dot format.
Note: print_mojo can only be used with the Python client. It is not supported in R.
Example
- Python
import h2o
import json
from h2o.estimators import H2OGradientBoostingEstimator
h2o.init()

# Import the prostate dataset
prostate = h2o.import_file("http://s3.amazonaws.com/h2o-public-test-data/smalldata/prostate/prostate.csv")

# Define the factor and parameters
prostate["CAPSULE"] = prostate["CAPSULE"].asfactor()
ntrees = 20
learning_rate = 0.1
depth = 5
min_rows = 10

# Build & train the GBM model
gbm_h2o = H2OGradientBoostingEstimator(ntrees = ntrees,
                                       learn_rate = learning_rate,
                                       max_depth = depth,
                                       min_rows = min_rows,
                                       distribution = "bernoulli")
gbm_h2o.train(x = list(range(1,prostate.ncol)), y = "CAPSULE", training_frame = prostate)

# Print all
mojo_path = gbm_h2o.download_mojo()
mojo_str = h2o.print_mojo(mojo_path)
mojo_dict = json.loads(mojo_str)
Converting MOJOs to ONNX format
To convert a H2O MOJO into the ONNX format, use the onnxmltools python package. Currently, only a subset of H2O MOJOs can be converted to the ONNX format:
- supported algorithms: GBM
- supports multinomial distribution with 3 or more classes (use binomial otherwise)
- does not support poisson, gamma, or tweedie distributions
- does not support models with categorical splits
For examples and further documentation, check the onnxmltools project on github.
FAQ
- Are MOJOs thread safe?
Yes, all of H2O-3 Secure MOJOs are thread safe.
- Does H2O-3 Secure MOJO have a C++ runtime?
Currently, only GBM has a C++ runtime with C# wrapper for .NET. However, this is not part of the open source offerings and requires a support contract.
- How can I use an XGBoost MOJO with Maven?
If you declare a dependency on h2o-genmodel, then you also have to include the h2o-genmodel-ext-xgboost dependency if you are planning to use XGBoost models. For example:
- Submit and view feedback for this page
- Send feedback about H2O-3 Secure to cloud-feedback@h2o.ai