Create a deployment
You must add model versions to H2O MLOps before deploying them. For more information, see Add models.
Follow these steps to deploy a model version in H2O MLOps:
- In the left navigation panel, click Models.
- Expand the model that includes the version you want to deploy.
- Click the More options menu (⋯) next to the version, then select Deploy version.
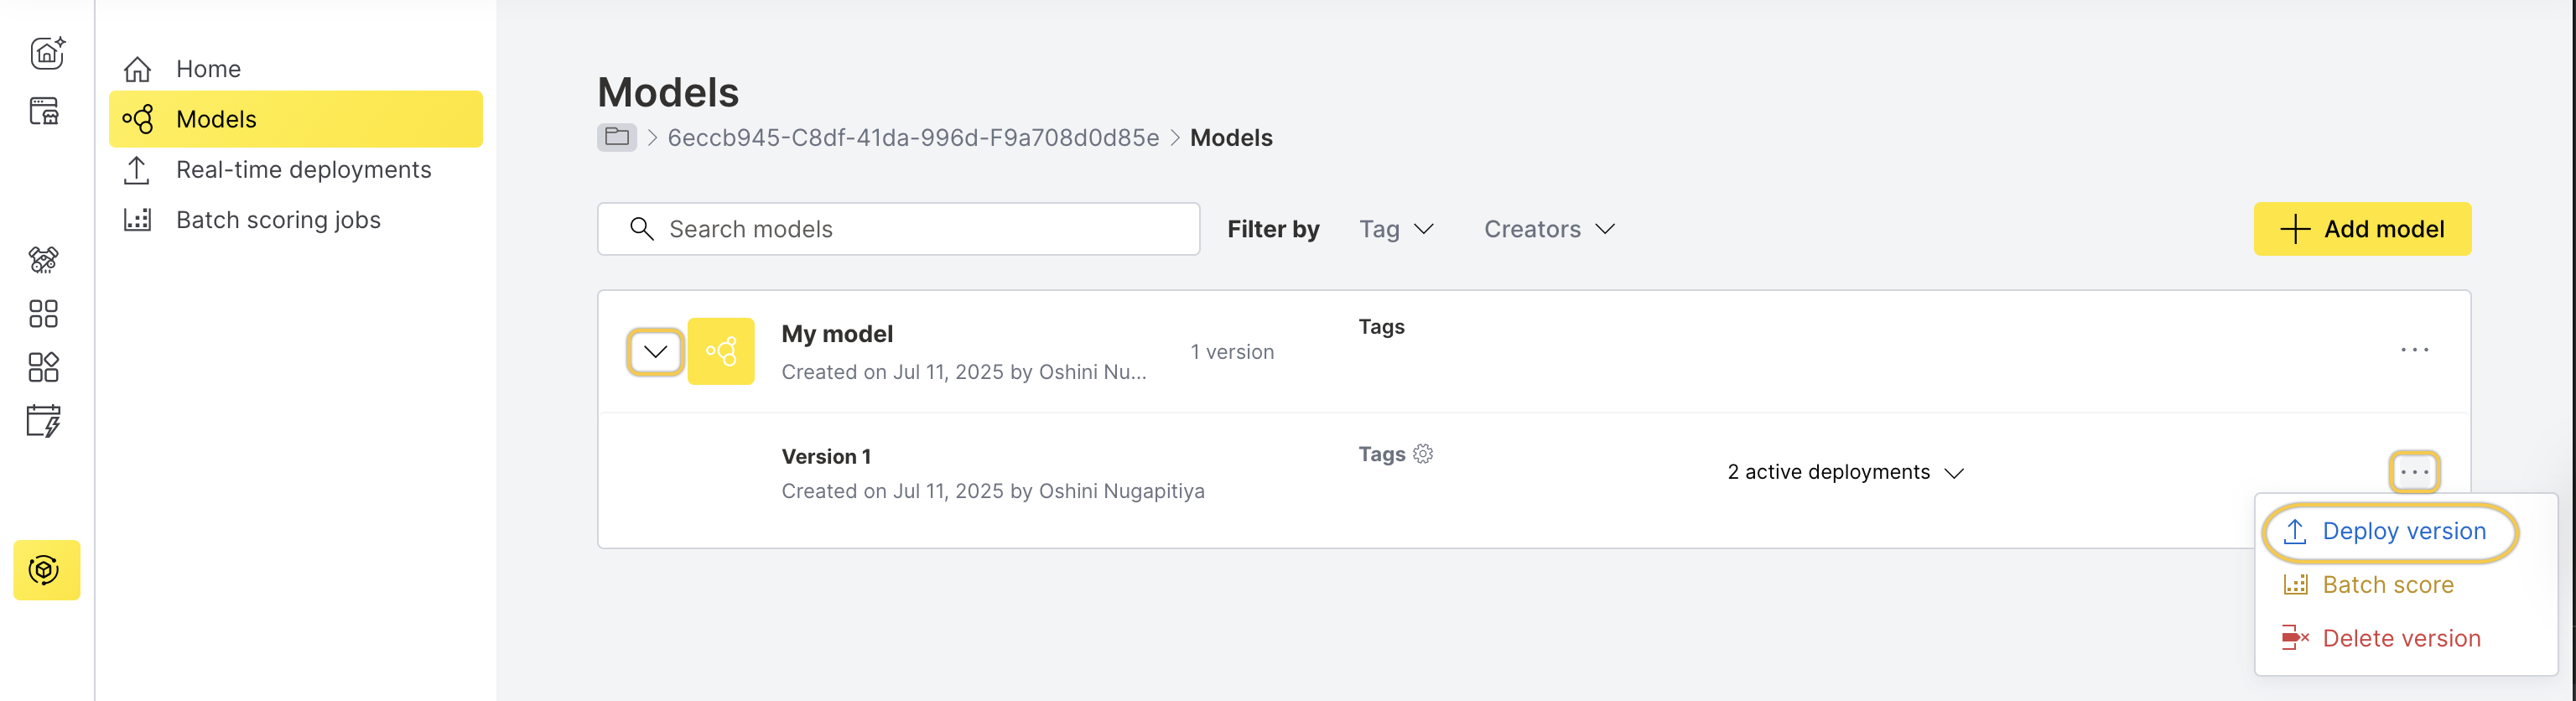
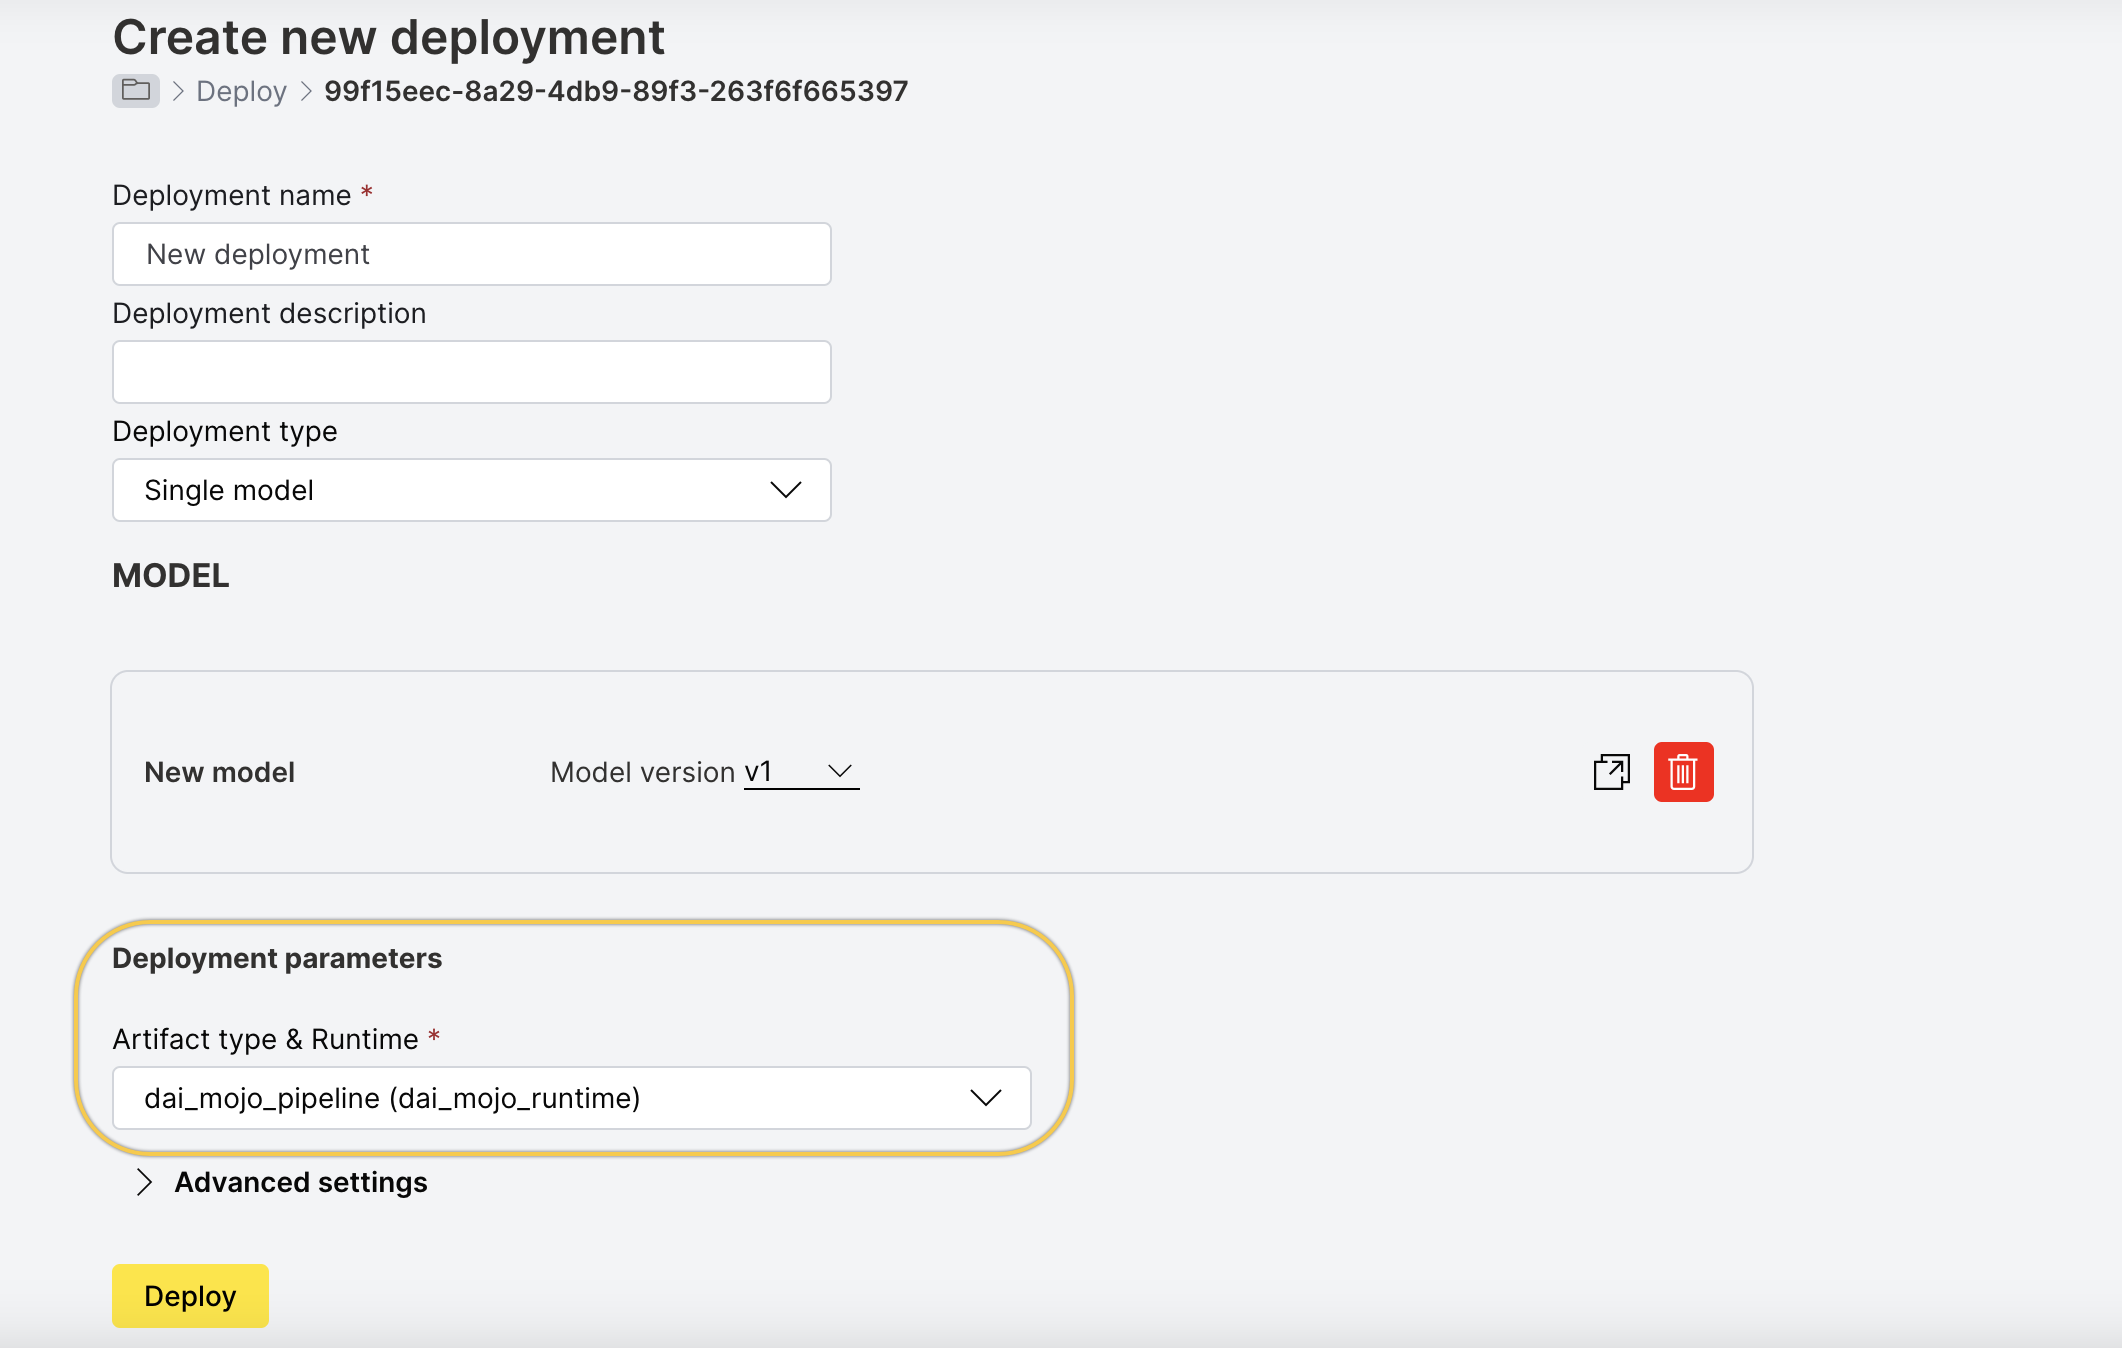
- In the Create new deployment page, specify the following:
-
Enter a name and, optionally, a description for the deployment.
-
Deployment Type:
Specify a deployment type for the deployment. Select one of the following options:
- Single model: Select one model/model version for the deployment.
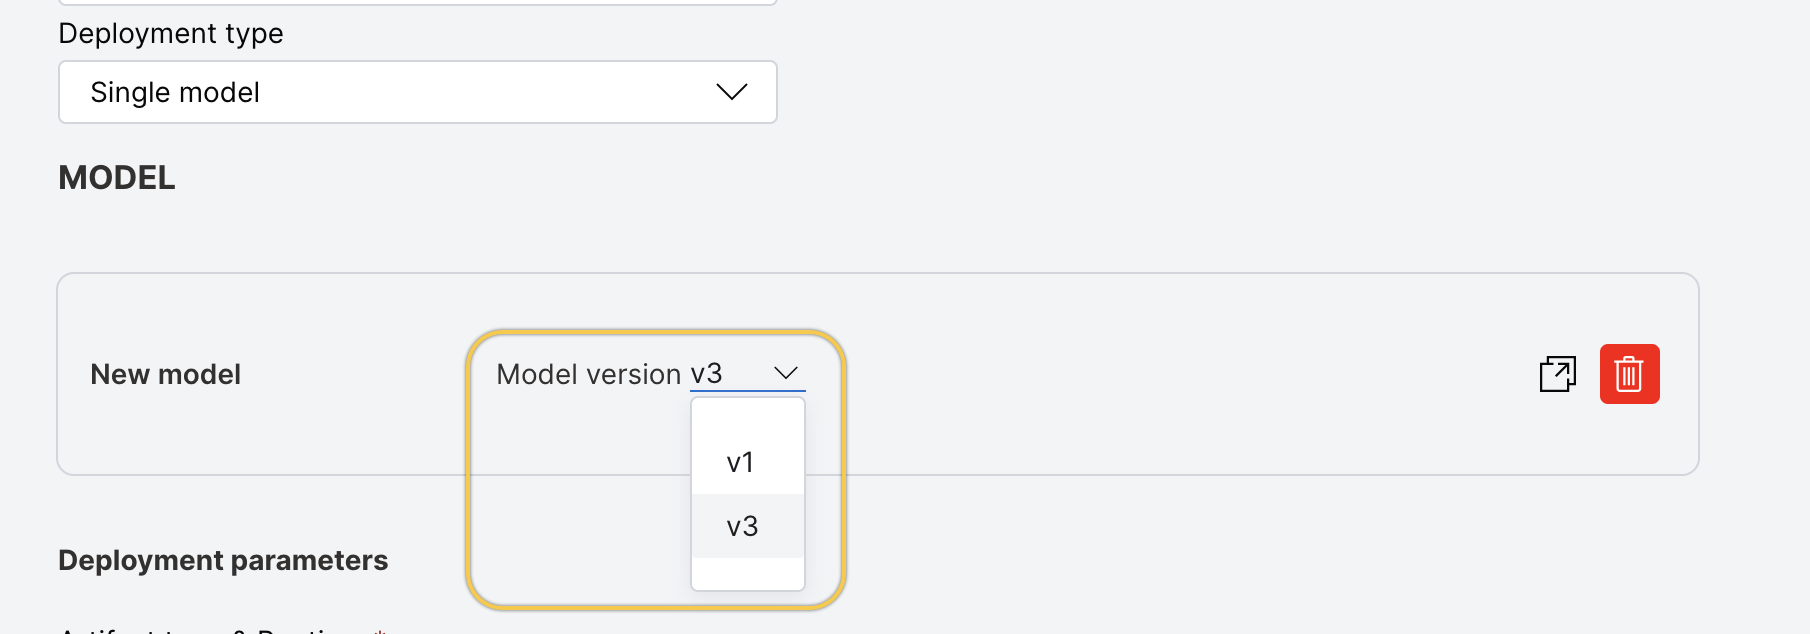
- A/B test: A/B testing in MLOps lets you compare the performance of two or more models. When requests are sent to an A/B deployment, they are directed to the selected models at a specified ratio known as the traffic percentage. For example, if the deployment consists of two models and the traffic percentage is set to 50% / 50%, each model receives half of the total incoming requests. Select two models/model versions, and then configure the traffic (that is, request percentage allocation) to each model. Note that model monitoring is not available for this deployment mode.
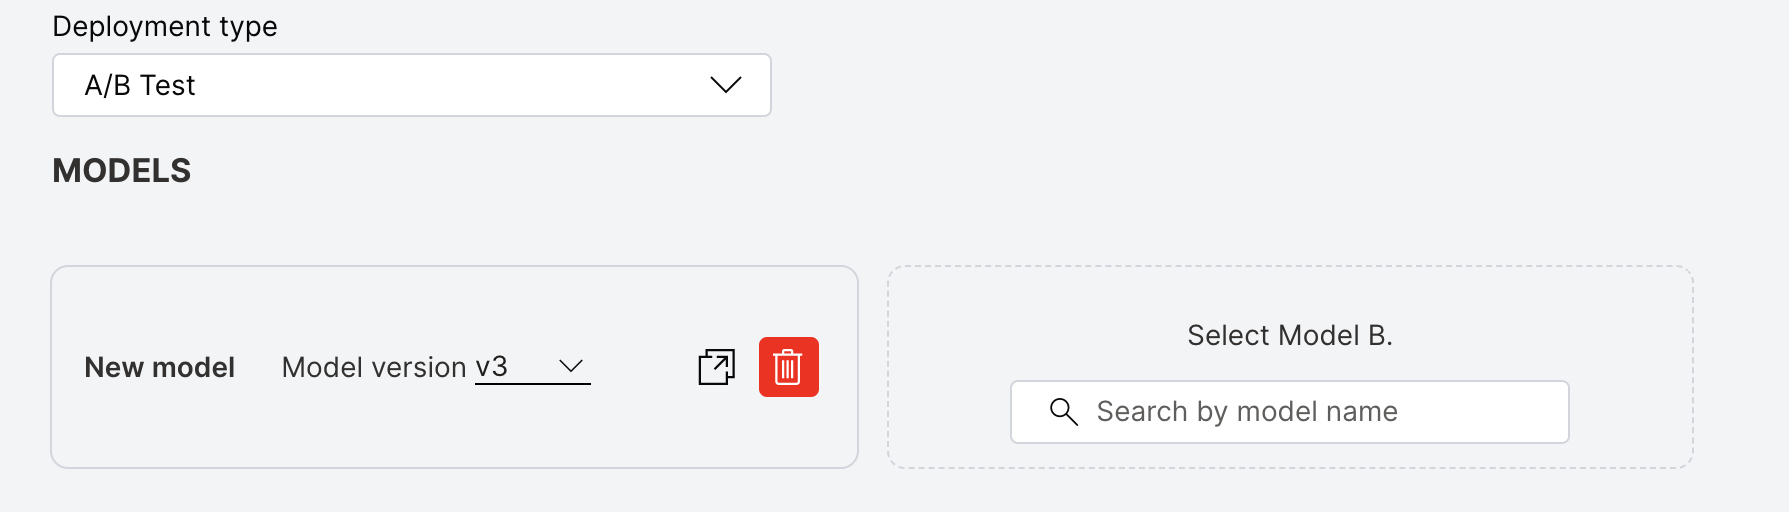
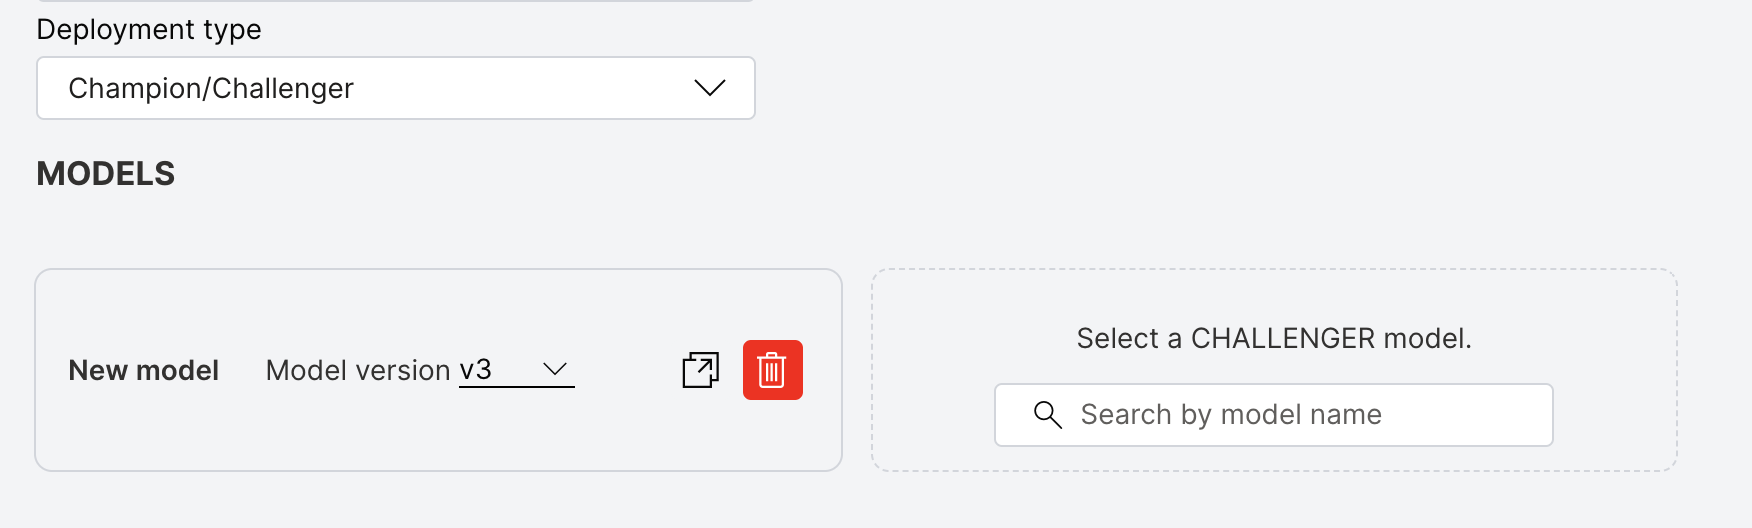
- Champion/challenger: This deployment mode lets you continuously compare your chosen best model (Champion) to a Challenger model. Select a champion and a challenger model. Before creating the deployment, review your selected models and replace them if necessary. Note that model monitoring is not available for this deployment mode.
 note
For A/B test and champion/challenger deployments, use two models with the same schema. That is, the models must have identical input and output column names and data types.
- Single model: Select one model/model version for the deployment.
-
Artifact type and runtime: Select an artifact type and runtime for the deployment. (Note: For more information on scoring runtimes in H2O MLOps, see Scoring runtimes.) Each entry in the Artifact Type and Runtime drop-down represents an artifact that is linked to the selected model and is deployable by MLOps. Note that admins have the option to configure and add additional runtimes.
-
- Click Deploy.
Advanced settings
This section describes various advanced settings that you can configure for your deployment. To expand the Advanced settings section, click the > expander arrow in the Create new deployment page.
Kubernetes options
Each of the following Kubernetes (K8s) options (resource requests, limits) are applied on a per-replica basis.
Replicas (optional)
Specify the number of static replicas of the model you want to deploy. This is the number of concurrent pods (instances of the model) that are deployed. Deploying multiple replicas enables the model to handle more simultaneous scoring requests.
Specifying multiple replicas is useful for load balancing and achieving high availability for scoring tasks. For H2O MLOps version 0.65 and later, set replicas to zero to scale down the deployment. In versions prior to 0.65, set the number of replicas to -1 to achieve the same effect.
Each of the following Kubernetes options (resource requests, limits) are applied on a per-replica basis.
Resource requests and limits (optional)
Use resource requests to specify the expected memory or CPU usage for a model. Resource limits define the maximum usage allowed. This helps Kubernetes manage scheduling and prevent resource overuse.
-
Requests: Resource requests determine the amount of resources the deployment asks Kubernetes to provide it. For example, if a replica requests 256Mi of memory, Kubernetes schedules the deployment on any node that has enough memory available to satisfy the stated requirement.
-
Limits: Resource limits determine the maximum amount of resources that are available to a deployment. If a deployment exceeds a limit on the amount of memory allocated to it, the deployment is restarted. Note that the deployment does not restart if it exceeds a CPU limit.
By default, the Kubernetes resource requests and limits fields are automatically populated based on the selected runtime and artifact type.
Additional fields for any existing custom resources that have been set up by an admin in your Kubernetes cluster can be added by clicking the + button.
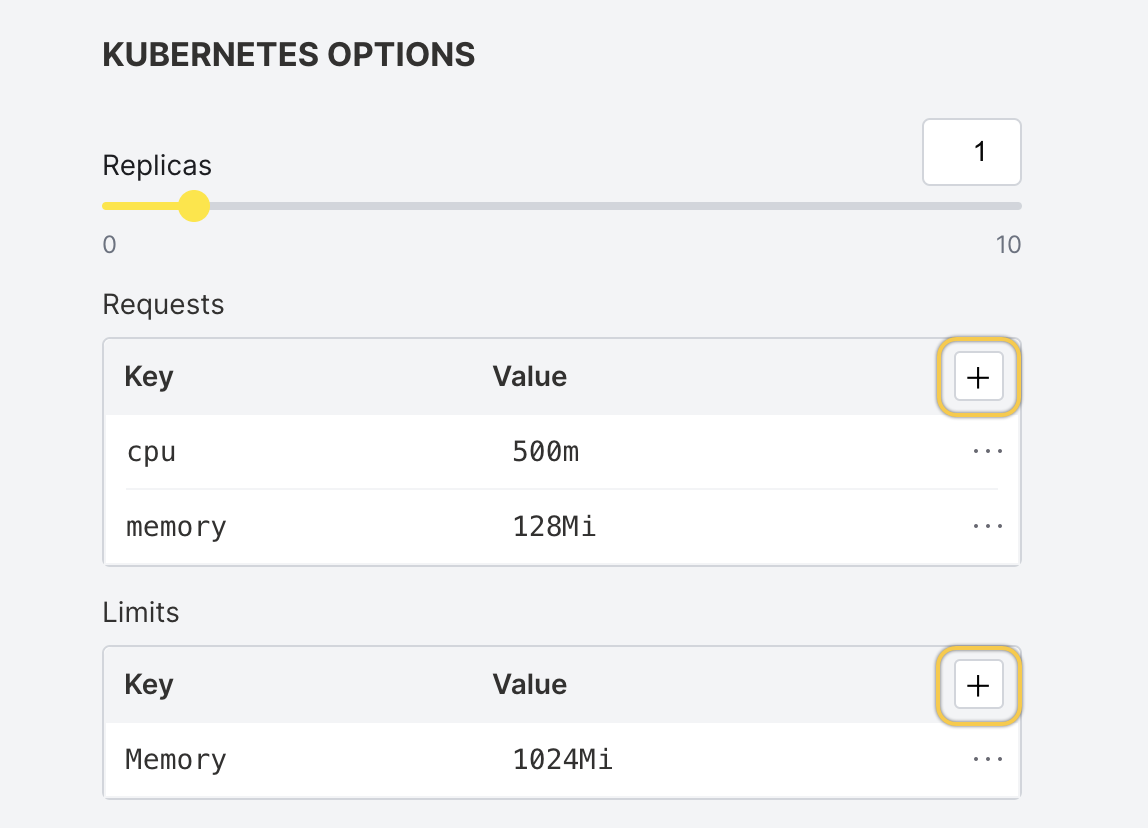
- The resource requests and limits fields must be defined using the quantity suffixes used in Kubernetes. The default values for Memory and CPU requests are 256Mi and 100m respectively. For more information, see Resource units in Kubernetes.
- By default, resources are not limited.
- When specifying custom resources, if Kubernetes is not able to satisfy the stated custom value(s), then the pod cannot be scheduled.
- You can use the H2O MLOps Python client to update the Kubernetes resources and replicas of a deployment after it's created. Use this to scale resources up for performance or down for cost. To do this, call the
updatefunction on theMLOpsScoringDeploymentinstance with updatedkubernetes_options. - For more information on resource requests and limits in Kubernetes, see Resource Management for Pods and Containers.
- For more information about Pod Disruption Budget (PDB), see Pod Disruption Budget (PDB).
Enable or turn off model monitoring
To enable or turn off the model monitoring option, click the Enable Monitoring toggle. By default, the model monitoring option is turned off. If model monitoring is enabled, scoring data is saved.
Endpoint security
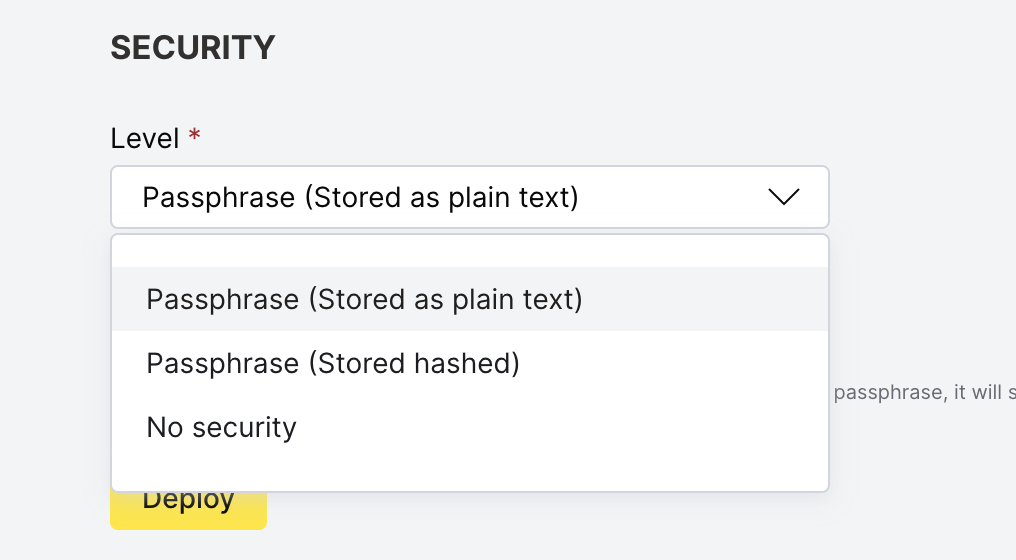
Select one of the following levels of endpoint security.
The default security option can be configured at securityOptions.default in the values.yaml file (charts/mlops/values.yaml). By default, this is set to Passphrase (stored as plain text).
-
No security - To skip configuration of endpoint security, select this option.
-
Passphrase (Stored as plain text) - The passphrase is stored in plain text in the database. If this option is selected, the passphrase is visible in the UI after the model is deployed.
-
Passphrase (Stored hashed) - The passphrase is stored as a hashed value in the database. If this option is selected, the passphrase is not visible in the UI after the model is deployed.
-
To support this option during deployment creation and update, add
PASSPHRASE_HASH_TYPE_PBKDF2undersecurityOptions.activatedin thevalues.yamlfile (charts/mlops/values.yaml).securityOptions:activated:- .......- "PASSPHRASE_HASH_TYPE_PBKDF2"- .......
-
-
Token Authentication - Supports multiple different OIDC token issuers. Note that this option requires the following additional configuration when deploying the H2O MLOps:
-
To support this option during deployment creation and update, update
securityOptions.activatedin thevalues.yamlfile (charts/mlops/values.yaml) to include the valueAUTHORIZATION_PROTOCOL_OIDCin the list:securityOptions:activated:- .......- "AUTHORIZATION_PROTOCOL_OIDC"- .......noteThis option requires configuring
config.deploymentServer.proxy.config.security.oidcIssuersin thevalues.yamlfile. See the Azure AD OIDC setup example.
-
Example: Azure AD OIDC setup
Enabling Azure AD (Microsoft Entra ID) as an OIDC provider for H2O MLOps scoring endpoints involves three roles:
| Role | Responsibility |
|---|---|
| Azure AD administrator | Register the app, expose an API, set the token version, and optionally create a client secret. |
| H2O MLOps administrator (H2O) | Configure mlops-proxy with the OIDC issuer in the Helm chart. H2O applies this configuration; you provide the tenant ID and client ID. |
| Developer | Generate a token and pass it as a Bearer token to the scoring endpoint. |
Azure AD administrator
The Azure AD administrator completes the following steps in the Azure Portal to register the app and prepare it to issue tokens that mlops-proxy can verify.
Prerequisites:
- An Azure AD tenant with administrator access.
- An app registration for
mlops-proxy, or an existing one you can edit.
1. Register the app
- In the Azure Portal, go to App registrations and click New registration.
- Enter a name (for example,
mlops-proxy). - Set Supported account types to match your needs. Single tenant is typical.
- Leave Redirect URI blank. Service-to-service flows do not need one.
- Click Register.
Record the Application (client) ID from the overview page. You need it for the remaining steps.
2. Expose an API
- In the app registration, go to Expose an API.
- Set the Application ID URI to
api://<client-id>. - Add a scope:
- Scope name:
access(or any name of your choice). - Who can consent: Admins and users.
- Scope name:
- Click Save.
3. Set the access token version to v2
You must complete this step. Without it, Azure AD issues v1.0 tokens even when callers use the v2.0 endpoint, and signature verification fails against the v2.0 JWKS.
- In the app registration, go to Manifest.
- Change
"accessTokenAcceptedVersion": nullto"accessTokenAcceptedVersion": 2. - Click Save.
4. (Optional) Create a client secret
Create a client secret only if you plan to generate tokens using the client-credentials flow (service-to-service). For user-based testing with the Azure CLI, skip this step.
- In the app registration, go to Certificates & secrets and click New client secret.
- Set an expiry and click Add.
- Copy the Value immediately. Azure does not display it again.
Provide your tenant ID, client ID, and optionally the client secret to your H2O MLOps administrator.
H2O MLOps administrator
H2O applies this configuration to your environment. Provide your tenant ID and client ID from the preceding registration steps to your H2O contact to have the Helm chart updated.
5. Configure mlops-proxy
The following shows the relevant section of the H2O MLOps Helm chart values.yaml file:
config:
  deploymentServer:
    proxy:
      config:
        security:
          oidcIssuers:
            - url: "https://login.microsoftonline.com/<tenant-id>/v2.0"
              idClaim: "sub"
              inferAlgFromKey: true
| Field | Value |
|---|---|
url | https://login.microsoftonline.com/<tenant-id>/v2.0. You must include the /v2.0 suffix. |
idClaim | Required. The token claim used to identify the caller. Use sub (opaque per-app user ID), oid (Azure AD object ID), or email. The deployer rejects configurations that omit this field. |
inferAlgFromKey | Required for Azure AD. The default (false) causes signature verification to fail because Azure AD's JWKS response omits the alg field. |
mlops-proxy discovers the JWKS URI automatically from https://login.microsoftonline.com/<tenant-id>/v2.0/.well-known/openid-configuration. You do not need to configure JWKS endpoints or keys manually.
Developer
After the Azure AD administrator registers the app and H2O configures mlops-proxy, generate a token and use it to score against the endpoint. This applies to any client (Python, REST, or cURL) that scores against a deployment secured with the OIDC_AUTH option.
1. Generate a token
Choose one of the following methods, depending on whether you are testing as a user or as a service principal.
Azure CLI (user-based): sign in to the tenant where the app registration lives, then request a token for the mlops-proxy app. You do not need a client secret:
Client credentials (service-to-service): if you created a client secret, request a token using the client-credentials flow:
Azure AD access tokens expire after approximately one hour. For long-running automation, re-request the token before it expires or use a token provider that refreshes automatically.
2. Verify the token
Before scoring, decode the token at jwt.io and confirm the following values. Since mlops-proxy enforces only the signature and expiry, these checks help rule out a token issued for the wrong audience or endpoint:
| Claim | Expected value |
|---|---|
ver | 2.0 |
iss | https://login.microsoftonline.com/<tenant-id>/v2.0 |
aud | api://<client-id> for the client-credentials flow shown in this example. Some interactive flows issue the bare <client-id> form instead. |
nonce (token header) | Must be absent. |
If nonce is present in the token header, the token is a Microsoft Graph or Azure Resource Manager token that external services cannot verify.
3. Score with the token
Pass the token as a Bearer header to the scoring endpoint:
When using the H2O MLOps Python client, pass the token as the auth_value argument to the deployment scorer. For more information, see Deployment scorer.
Driverless AI deployment wizard
The following steps describe how you can create H2O MLOps deployments directly from the completed experiment page in H2O Driverless AI.
To use this deployment option, set h2o_mlops_ui_url in the Driverless AI config.toml file.
-
On the completed experiment page, click Deploy.
-
Click the H2O MLOps button. This action results in one of the following outcomes:
-
The experiment belongs to one Project: Driverless AI opens the Project detail page in the H2O MLOps app.
-
The experiment belongs to more than one Project: Select a Project to go to in the H2O MLOps app, or create a new Project for the experiment. To create one, enter a name and description for it. After Driverless AI creates the Project and links the experiment, click Go to MLOps page to open the Project detail page in the H2O MLOps app.
-
The experiment doesn't belong to any Project: Select a Project to link the experiment to, or create a new Project and link the experiment to it.
-
Deploy natural language processing models
H2O MLOps supports the deployment of Driverless AI and MLflow natural language processing (NLP) models.
Driverless AI
To deploy a Driverless AI NLP model, refer to the following steps:
-
In Driverless AI, pick a text dataset such as the Amazon Fine Food Reviews dataset or Airline Twitter Sentiment dataset.
-
Train a Driverless AI model with the NLP-specific steps in NLP in Driverless AI.
-
Link the NLP experiment to an MLOps project. For more information, see the Driverless AI documentation on linking experiments.
-
Deploy as either a MOJO or a Python scoring pipeline. A model that uses PyTorch or TensorFlow might not support the MOJO.
-
H2O MLOps shows the scoring endpoint URL for the deployment. To test it with
curl, send a request like the following:curl -X POST -H "Content-Type: application/json" -d @- <SCORING_ENDPOINT_URL> << EOF{"fields": ["Description","Summary"],"rows": [["text","text"]]}EOFExample response:
{"fields":["PositiveReview.0","PositiveReview.1"],"id":"1c2ec2f0-74c7-11ec-ad8e-3ee53b9e28aa","score":[["0.24813014","0.75186986"]]}
MLflow
To deploy an MLflow NLP model, refer to the following steps:
-
Train your model.
-
Wrap the model in an MLflow model. For an example that wraps a text classifier as a custom Python model, see Third-party model frameworks through MLflow.
-
Upload the model to H2O MLOps and deploy it. For more information, see Add models.
Processing deployments
A processing deployment serves an MLflow pyfunc model that calls another deployment's scoring endpoint and processes the result. Use one to add custom logic before or after other H2O MLOps deployments, or to chain deployments together.
The following example converts the probability output of a deployed credit card default model into a True or False result at a threshold of 0.3. Import the libraries it uses:
import mlflow
import pandas
import requests
import typing
Create the processing model
Define helper functions that send a DataFrame to a scoring endpoint and return the scores as a DataFrame:
def convert_scores_to_pandas(
    scores_json: typing.Dict[str, typing.Any],
) -> pandas.DataFrame:
    return pandas.DataFrame(
        data=scores_json["score"], columns=scores_json["fields"]
    ).astype(float, errors="ignore")

def score_to_json(
    pdf: pandas.DataFrame,
    score_url: str,
    score_passphrase: typing.Optional[str],
    include_fields_in_output: typing.Optional[typing.List[str]]
) -> typing.Dict[str, typing.Any]:
    payload = dict(
        fields=list(pdf.columns),
        rows=pdf.fillna("").astype(str).to_dict("split")["data"],
    )
    if include_fields_in_output:
        payload["includeFieldsInOutput"] = include_fields_in_output
    result = requests.post(
        url=score_url, json=payload, headers={"Authorization": f"Bearer {score_passphrase}"}
    )
    result.raise_for_status()
    return result.json()

def score_to_pandas(
    pdf: pandas.DataFrame,
    score_url: str,
    score_passphrase: typing.Optional[str],
    include_fields_in_output: typing.Optional[typing.List[str]]
) -> typing.Dict[str, typing.Any]:
    scores_json = score_to_json(
        pdf, score_url, score_passphrase, include_fields_in_output
    )
    return convert_scores_to_pandas(scores_json)
Define the processing model. Its predict method scores the input against the model deployment, then applies the threshold to the result. Replace <your-mlops-domain>, <model-deployment-id>, and <model-deployment-passphrase> with the values for the deployment you want to process:
class CCProcessor(mlflow.pyfunc.PythonModel):
    """Converts output to binary result based on threshold."""

    def predict(self, context, model_input) -> pandas.DataFrame:
        target_column = "default payment next month"
        id_column = "ID"
        threshold = 0.3

        scores_dataframe = score_to_pandas(
            model_input,
            score_url="https://<your-mlops-domain>/<model-deployment-id>/model/score",
            score_passphrase="<model-deployment-passphrase>",
            include_fields_in_output=[id_column]
        )

        processed_dataframe = pandas.DataFrame()
        processed_dataframe[id_column] = scores_dataframe[id_column].astype(int)
        processed_dataframe[
            f"{target_column} | threshold={threshold}"
        ] = scores_dataframe[f"{target_column}.1"] > threshold
        return processed_dataframe
Test the predict method on the first 10 rows of the credit card dataset you used to train the deployed model. Replace creditcard.csv with the path to your copy:
x = pandas.read_csv("creditcard.csv")[:10]
y = CCProcessor().predict(context=None, model_input=x)
y
Output:
| ID | default payment next month | threshold=0.3 | |
|---|---|---|
| 0 | 1 | True |
| 1 | 2 | True |
| 2 | 3 | False |
| 3 | 4 | False |
| 4 | 5 | False |
| 5 | 6 | False |
| 6 | 7 | False |
| 7 | 8 | False |
| 8 | 9 | True |
| 9 | 10 | False |
Infer the model signature from the test input and output. H2O MLOps rejects an MLflow model without a signature when you upload it:
model_signature = mlflow.models.signature.infer_signature(x,y)
model_signature
Output:
inputs:
  ['ID': long, 'LIMIT_BAL': long, 'SEX': long, 'EDUCATION': long, 'MARRIAGE': long, 'AGE': long, 'PAY_0': long, 'PAY_2': long, 'PAY_3': long, 'PAY_4': long, 'PAY_5': long, 'PAY_6': long, 'BILL_AMT1': long, 'BILL_AMT2': long, 'BILL_AMT3': long, 'BILL_AMT4': long, 'BILL_AMT5': long, 'BILL_AMT6': long, 'PAY_AMT1': long, 'PAY_AMT2': long, 'PAY_AMT3': long, 'PAY_AMT4': long, 'PAY_AMT5': long, 'PAY_AMT6': long, 'default payment next month': long]
outputs:
  ['ID': long, 'default payment next month | threshold=0.3': boolean]
Save the processing model:
model_path = "processor"

mlflow.pyfunc.save_model(
    path=model_path,
    python_model=CCProcessor(),
    signature=model_signature,
)
Confirm that MLflow can load the saved model and score with it:
model = mlflow.pyfunc.load_model(model_path)
print(model.metadata.get_input_schema())
print(model.metadata.get_output_schema())
model.predict(x)
Output:
['ID': long, 'LIMIT_BAL': long, 'SEX': long, 'EDUCATION': long, 'MARRIAGE': long, 'AGE': long, 'PAY_0': long, 'PAY_2': long, 'PAY_3': long, 'PAY_4': long, 'PAY_5': long, 'PAY_6': long, 'BILL_AMT1': long, 'BILL_AMT2': long, 'BILL_AMT3': long, 'BILL_AMT4': long, 'BILL_AMT5': long, 'BILL_AMT6': long, 'PAY_AMT1': long, 'PAY_AMT2': long, 'PAY_AMT3': long, 'PAY_AMT4': long, 'PAY_AMT5': long, 'PAY_AMT6': long, 'default payment next month': long]
['ID': long, 'default payment next month | threshold=0.3': boolean]
| ID | default payment next month | threshold=0.3 | |
|---|---|---|
| 0 | 1 | True |
| 1 | 2 | True |
| 2 | 3 | False |
| 3 | 4 | False |
| 4 | 5 | False |
| 5 | 6 | False |
| 6 | 7 | False |
| 7 | 8 | False |
| 8 | 9 | True |
| 9 | 10 | False |
Create processor_mlflow.zip from the saved model:
import shutil

zip_path = shutil.make_archive(
    "processor_mlflow", "zip", "processor"
)
Upload processor_mlflow.zip to H2O MLOps and deploy it. For more information, see Add models.
Score the deployments
The following examples assume you deployed processor_mlflow.zip in H2O MLOps. Each subsection scores the test DataFrame x from the previous section.
Score the model deployment
Score x against the model deployment directly. The response contains the raw class probabilities:
result = requests.post(
    url="https://<your-mlops-domain>/<model-deployment-id>/model/score",
    json=dict(
        fields=list(x.columns),
        rows=x.fillna("").astype(str).to_dict("split")["data"],
    ),
    headers={"Authorization": "Bearer <model-deployment-passphrase>"}
)
result.raise_for_status()
result.json()
Output:
{'fields': ['default payment next month.0', 'default payment next month.1'],
 'id': '29644d94-69ce-11ed-8dd0-42a220533d6d',
 'score': [['0.5026670558588076', '0.4973329441411924'],
  ['0.5757092185564415', '0.4242907814435585'],
  ['0.7779584616197291', '0.22204153838027083'],
  ['0.7571721069431696', '0.24282789305683036'],
  ['0.8100351192319214', '0.1899648807680786'],
  ['0.7414997325267836', '0.25850026747321647'],
  ['0.8639312267025963', '0.13606877329740377'],
  ['0.7468108781657142', '0.25318912183428577'],
  ['0.6648249807372442', '0.3351750192627559'],
  ['0.7785471596551806', '0.22145284034481938']]}
Score the processing deployment
View the output schema of the processing deployment:
requests.get(
    "https://<your-mlops-domain>/<processing-deployment-id>/model/schema"
).json()["schema"]["outputFields"]
Output:
[{'name': 'ID', 'dataType': 'Int64'},
 {'name': 'default payment next month | threshold=0.3', 'dataType': 'Bool'}]
Score x against the processing deployment. The response contains True or False for each ID:
result = requests.post(
    url="https://<your-mlops-domain>/<processing-deployment-id>/model/score",
    json=dict(
        fields=list(x.columns),
        rows=x.fillna("").astype(str).to_dict("split")["data"],
    )
)
result.raise_for_status()
result.json()
Output:
{'fields': ['ID', 'default payment next month | threshold=0.3'],
 'id': '3ee67d43-5219-48dc-a02f-cea2b4e5c49d',
 'score': [['1', 'True'],
  ['2', 'True'],
  ['3', 'False'],
  ['4', 'False'],
  ['5', 'False'],
  ['6', 'False'],
  ['7', 'False'],
  ['8', 'False'],
  ['9', 'True'],
  ['10', 'False']]}
- Submit and view feedback for this page
- Send feedback about H2O MLOps to cloud-feedback@h2o.ai