Custom Individual Recipe
The following sections describe Driverless AI’s Individual Recipe feature.
Understanding the Individual Recipe
In Driverless AI, every completed experiment automatically generates Python code for the experiment that corresponds to the individual(s) used to build the final model. You can edit this auto-generated Python code offline and upload it as a recipe, or edit and save it using the built-in custom recipe management editor. This feature gives you code-first access to a significant portion of DAI’s internal transformer and model generation process.
The Individual Recipe contains information about model type, model hyperparameters, data science types for input features, transformers used, and transformer parameters. (Examples of data science types include categorical, text, time series, and numeric data. Raw data types refer to basic data types like integers, booleans, and strings, which are commonly used in programming languages.) It is an object that is evolved by mutation within the context of DAI’s genetic algorithm. The Individual Recipe can be used in DAI’s Expert Settings with the Include specific individuals parameter.
This feature is supported for experiments made using DAI 1.7.2 and later.
Using custom individuals
A custom individual can be run as is, evolved alongside other models or individuals, or frozen to be included as is during the final evolution stage alongside other models from the experiment.
As is: To ensemble the custom individuals as they are, set enable_genetic_algorithm to off. Note that to get reproducible results, set reproducibility to on and make sure that the same accuracy knob settings are selected (as accuracy settings affects the internal cross validation fold data assignment).
Evolve alongside other models or individuals: This is the default behavior where a custom individual behaves like a standard internal DAI individual, which has its features and model hyperparameters mutated during the genetic algorithm process as per the experiment settings.
Frozen individuals: By default, a custom individual behaves like a standard internal DAI individual, which has its features and model hyperparameters mutated during evolution. To disable the mutation of features and model hyperparameters and “freeze” a custom individual during the DAI genetic evolution process, set
self.paramsvalues (in the code):self.params = {'prob_perturb_xgb': 0, 'prob_add_genes': 0, 'prob_prune_genes': 0, 'prob_prune_by_features': 0, 'prob_addbest_genes': 0, 'prob_prune_by_features': 0}
If all individuals in an experiment are frozen, then no tuning or evolution is performed for them. You can specify the number of such individuals to be included in an ensemble along with any other, by modifying the Ensemble Level for Final Modeling Pipeline expert setting.
Getting the Individual Recipe from experiments
In Driverless AI, every experiment automatically generates editable python code for the best individuals (or models). The following sections describe how to get the Individual Recipe code for a completed experiment.
From a completed experiment: From a completed experiment page, click Tune Experiment > Create Individual Recipe, then select Upload as Custom Recipe. When this option is selected, the Individual Recipe becomes available on the Recipes page and in the Expert Settings under the Include specific individuals setting. You can also select Download to download the Individual Recipe Python file directly to your local file system. You can then add the downloaded Individual Recipe to DAI by clicking Recipes in the main navigation, then clicking Add Custom Recipes > From Computer.

From the Experiments listing page: Click the drop-down button next to the experiment you want to create the Individual Recipe for, and then select Create Individual Recipe.
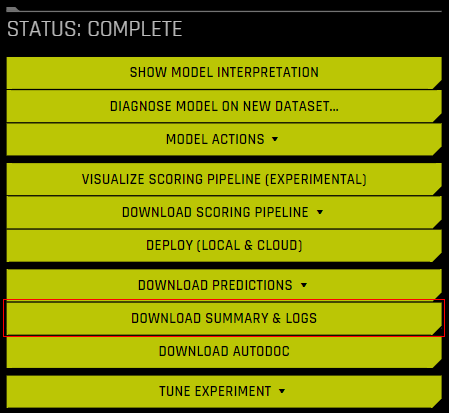
From the Downloaded Summary: The Individual Recipe Python file is included as part of the summary file for every completed experiment. To download the summary file, click the Download Summary & Logs button of any completed experiment. The individual recipe filename is
final_indiv0.py.
Using the Individual Recipe
This section describes how you can use the Individual Recipe to view detailed information about how the final model was built and make fine-tuned adjustments to the model by editing the auto-generated Python code and using the edited Individual Recipe in a new experiment.
Model Transparency
The following functions in the Individual Recipe provide significant transparency for the final model:
The
set_modelfunction lets you view various details about the final model such as model type and the model’s parameters.
# Function to set the model type and its parameters.

def set_model(self):
    self.model_display_name = 'LightGBM'
    self.model_params = {'eval_metric': 'auc', 'objective': 'binary'}
The
set_genesfunction lets you view each feature that is in the model and information about how each feature was transformed.
# Function to set genes / transformers.

   def set_genes(self):
       self.add_transformer('OriginalTransformer', num_cols=['PAY_0'])
Model Control
The set_model function provides information on the algorithm and parameters of the final model. You can make minor modifications to these parameters by editing the self.model_params dictionary. This can be helpful if you want to see whether minor changes to the parameters result in more robust or accurate models or if you are required to change the model parameters for business or regulatory purposes.
Feature Control
Each feature used in the model is listed in the set_genes function, beginning with features that were not engineered and followed by engineered features. The following examples show original and transformed features as they appear in the auto-generated Python code.
The following example provides details on an original feature called Humidity3pm.
Note
Original features are labeled with the value OriginalTransformer in the add_transformer() field.
# Gene Normalized Importance:       1
# Transformed Feature Names and Importances: {'3_Humidity3pm': 1.0}
# Valid parameters: ['num_cols', 'random_state', 'output_features_to_drop', 'labels']
params = {'num_cols': ['Humidity3pm'], 'random_state': 997149340}
self.add_transformer('OriginalTransformer', col_type='numeric', gene_index=3, forced=False, mono=False, **params)
In the following example, the Cross Validation Target Encoding transformer was applied to the WindDir3pm column.
# Gene Normalized Importance: 0.11326
# Transformed Feature Names and Importances: {'18_CVTE:WindDir3pm.0': 0.1132597029209137}
# Valid parameters: ['cat_cols', 'num_folds', 'cv_type', 'inflection_point', 'steepness', 'min_rows', 'multi_class', 'random_state', 'output_features_to_drop', 'labels']
# Allowed parameters and mutations (first mutation in list is default): {'num_folds': [5], 'random_state': [42], 'cv_type': ['KFold'], 'inflection_point': [10, 20, 100], 'steepness': [3, 1, 5, 10], 'min_rows': [10, None, 20, 100], 'multi_class': [False]}
params = {'cat_cols': ['WindDir3pm'],
            'cv_type': 'KFold',
            'inflection_point': 10,
            'min_rows': 10,
            'multi_class': False,
            'num_folds': 5,
            'random_state': 997149344,
            'steepness': 3}
self.add_transformer('CVTargetEncodeTransformer', col_type='categorical', gene_index=18, forced=False, mono=False, **params)
You may want to delete features, add new features, or modify existing features. The following sections describe how to perform these actions using the Individual Recipe.
Adding features
During the experiment, Driverless AI uses a Genetic Algorithm to determine which features to drop from the model. However, your use case may require you to force a column to be used by the model. The following steps describe how to force in a numeric column that was dropped by Driverless AI:
Copy an
OriginalTransformerfeature that is already in the code and paste it below.Specify the column you want to force in with the
num_colsfield. In the example below, Driverless AI droppedYearsSinceLastPromotion, so anOriginalTransformerexample that was already present was copied and the value fornum_colswas edited.To ensure that the model uses the feature, set
forced=True.Change the
gene_indexto a value that is not used .
Note
The
gene_indexof each feature must be a unique value. Thegene_indexof the features in the code starts at 0 and increases sequentially. Ensure that your new feature has agene_indexthat is not the same as any other gene in the code.
The following is an example of how the final code appears:
params = {'num_cols': ['YearsSinceLastPromotion'], 'random_state': 730763716}
self.add_transformer('OriginalTransformer', col_type='numeric', gene_index=100, forced=True, mono=False, **params)
Deleting features
The Experiment Setup page contains a Dropped Columns setting that lets you drop columns from an experiment so that they are not used by any model. However, you may still want to use a column when Driverless AI engineers the column in a manner that is not ideal for your particular use case. In this scenario, you can delete the unwanted feature from the Individual Recipe code.
Modifying features
Driverless AI automatically creates engineered features that have a list of editable parameters that are specific to the transformer. Because these are internal parameters, contacting support@h2o.ai is recommended when modifying these parameters.
The following are two common use cases for modifying specific features in the Individual Recipe code:
Forcing features into a model: To force in a specific feature and ensure that it is not pruned, set
forced=True.Enforcing monotonicity: To enforce monotonicity for a specific feature, set
mono=True.
Note
You can also set
monoto 1, -1, or 0 to enforce monotonicity in a specific direction.
Using the edited Individual Recipe in a new experiment
The following steps describe how to use an edited Individual Recipe in a new experiment from the built-in custom recipe management editor.
On the Custom Recipes page, click the Individual Recipe you want to edit.
Use the built-in recipe editor to make changes to the Individual Recipe.
Click Save as New Recipe and Activate.
Click More Actions > Use in New Experiment.
Including specific individuals in an experiment
The downloaded individual recipe (zip or Python file) can be directly uploaded from the computer via the expert settings when creating a new experiment.
You can also perform the following steps to include an Individual Recipe that has already been uploaded by using the Include specific individuals expert setting.
On the Experiment Setup page, click Expert Settings. The Expert Settings window is displayed.
Click the Recipes tab, then click Select Values for the Include specific individuals expert setting.
Select the custom individuals you want to include in the experiment, then click Done.
In the Expert Settings window, click Save. The experiment preview updates to reflect the inclusion of the selected custom individuals.
Individual Recipe Example
This section contains a list of minimum required parameters for a custom Individual Recipe, as well as an example of a custom Individual Recipe using the Credit Card dataset.
Note
For more Individual Recipe examples, see the Driverless AI recipes GitHub repository.
Minimum required parameters
The following is a list of the minimum required parameters for a custom Individual Recipe:
Model type: Specify the model type. For example:
self.model_display_name = 'LightGBM'
Model parameters: Specify the parameters of the model. For example:
self.model_params = {'eval_metric': 'auc', 'objective': 'binary'}
Genome: Specify all valid parameters for genes. For example:
def set_genes(self):
    params = {'num_cols': ['PAY_0'], 'random_state': 159699540}
    self.add_transformer('OriginalTransformer', **params)
Note
For information on Driverless AI’s implementation of the genetic algorithm, see Genetic Algorithm in Driverless AI.
Sample Individual Recipe
The following is an example of a custom Individual Recipe using the Credit Card dataset.
Note
The following example does not contain all available parameters for custom Individual Recipes. For an example Individual Recipe that features all available parameters, see creditcard.py from the official Driverless AI recipes GitHub repository.
from h2oaicore.ga import CustomIndividual

# Custom wrapper class used to construct the DAI Individual.
# Contains information related to model type, model parameters,
# feature types, and feature parameters.

class IndivCCsimple(CustomIndividual):

    # Function to set the model type and its parameters.

    def set_model(self):
        self.model_display_name = 'LightGBM'
        self.model_params = {'eval_metric': 'auc', 'objective': 'binary'}

    # Function to set genes / transformers.

    def set_genes(self):
        self.add_transformer('OriginalTransformer', num_cols=['PAY_0'])