Create a new H2O Engine
This guide walks you through creating a new H2O Engine via the H2O AI Cloud web interface.
What is H2O-3?
H2O-3 is an open-source machine learning platform that provides:
- Distributed machine learning algorithms
- AutoML capabilities for automated model building
- Support for popular algorithms (GLM, Random Forest, GBM, Deep Learning, etc.)
- Integration with R, Python, and other programming languages
- Scalable data processing and model training
- Model deployment and serving capabilities
- Interactive web-based Flow interface for data science workflows
For more information about H2O capabilities, features, and use cases, see the official H2O documentation.
Prerequisites
Before creating an H2O Engine, ensure you have:
- Access to H2O AI Cloud web UI. See Access AI Engines for details.
- Appropriate permissions allocated to your workspace. You need at least the H2O Engine User role (
enginemanager-h2o-engine-user) assigned in the target workspace. See RBAC roles and permissions for the full role breakdown and Engine profile security configuration for how administrators configure profiles and versions. - (Optional) Resource requirements: H2O engines can be configured for various workloads. Consider your data size and computational needs when configuring resources.
Create a new H2O Engine
To set up an H2O Engine using the H2O Cloud user interface, follow these steps:
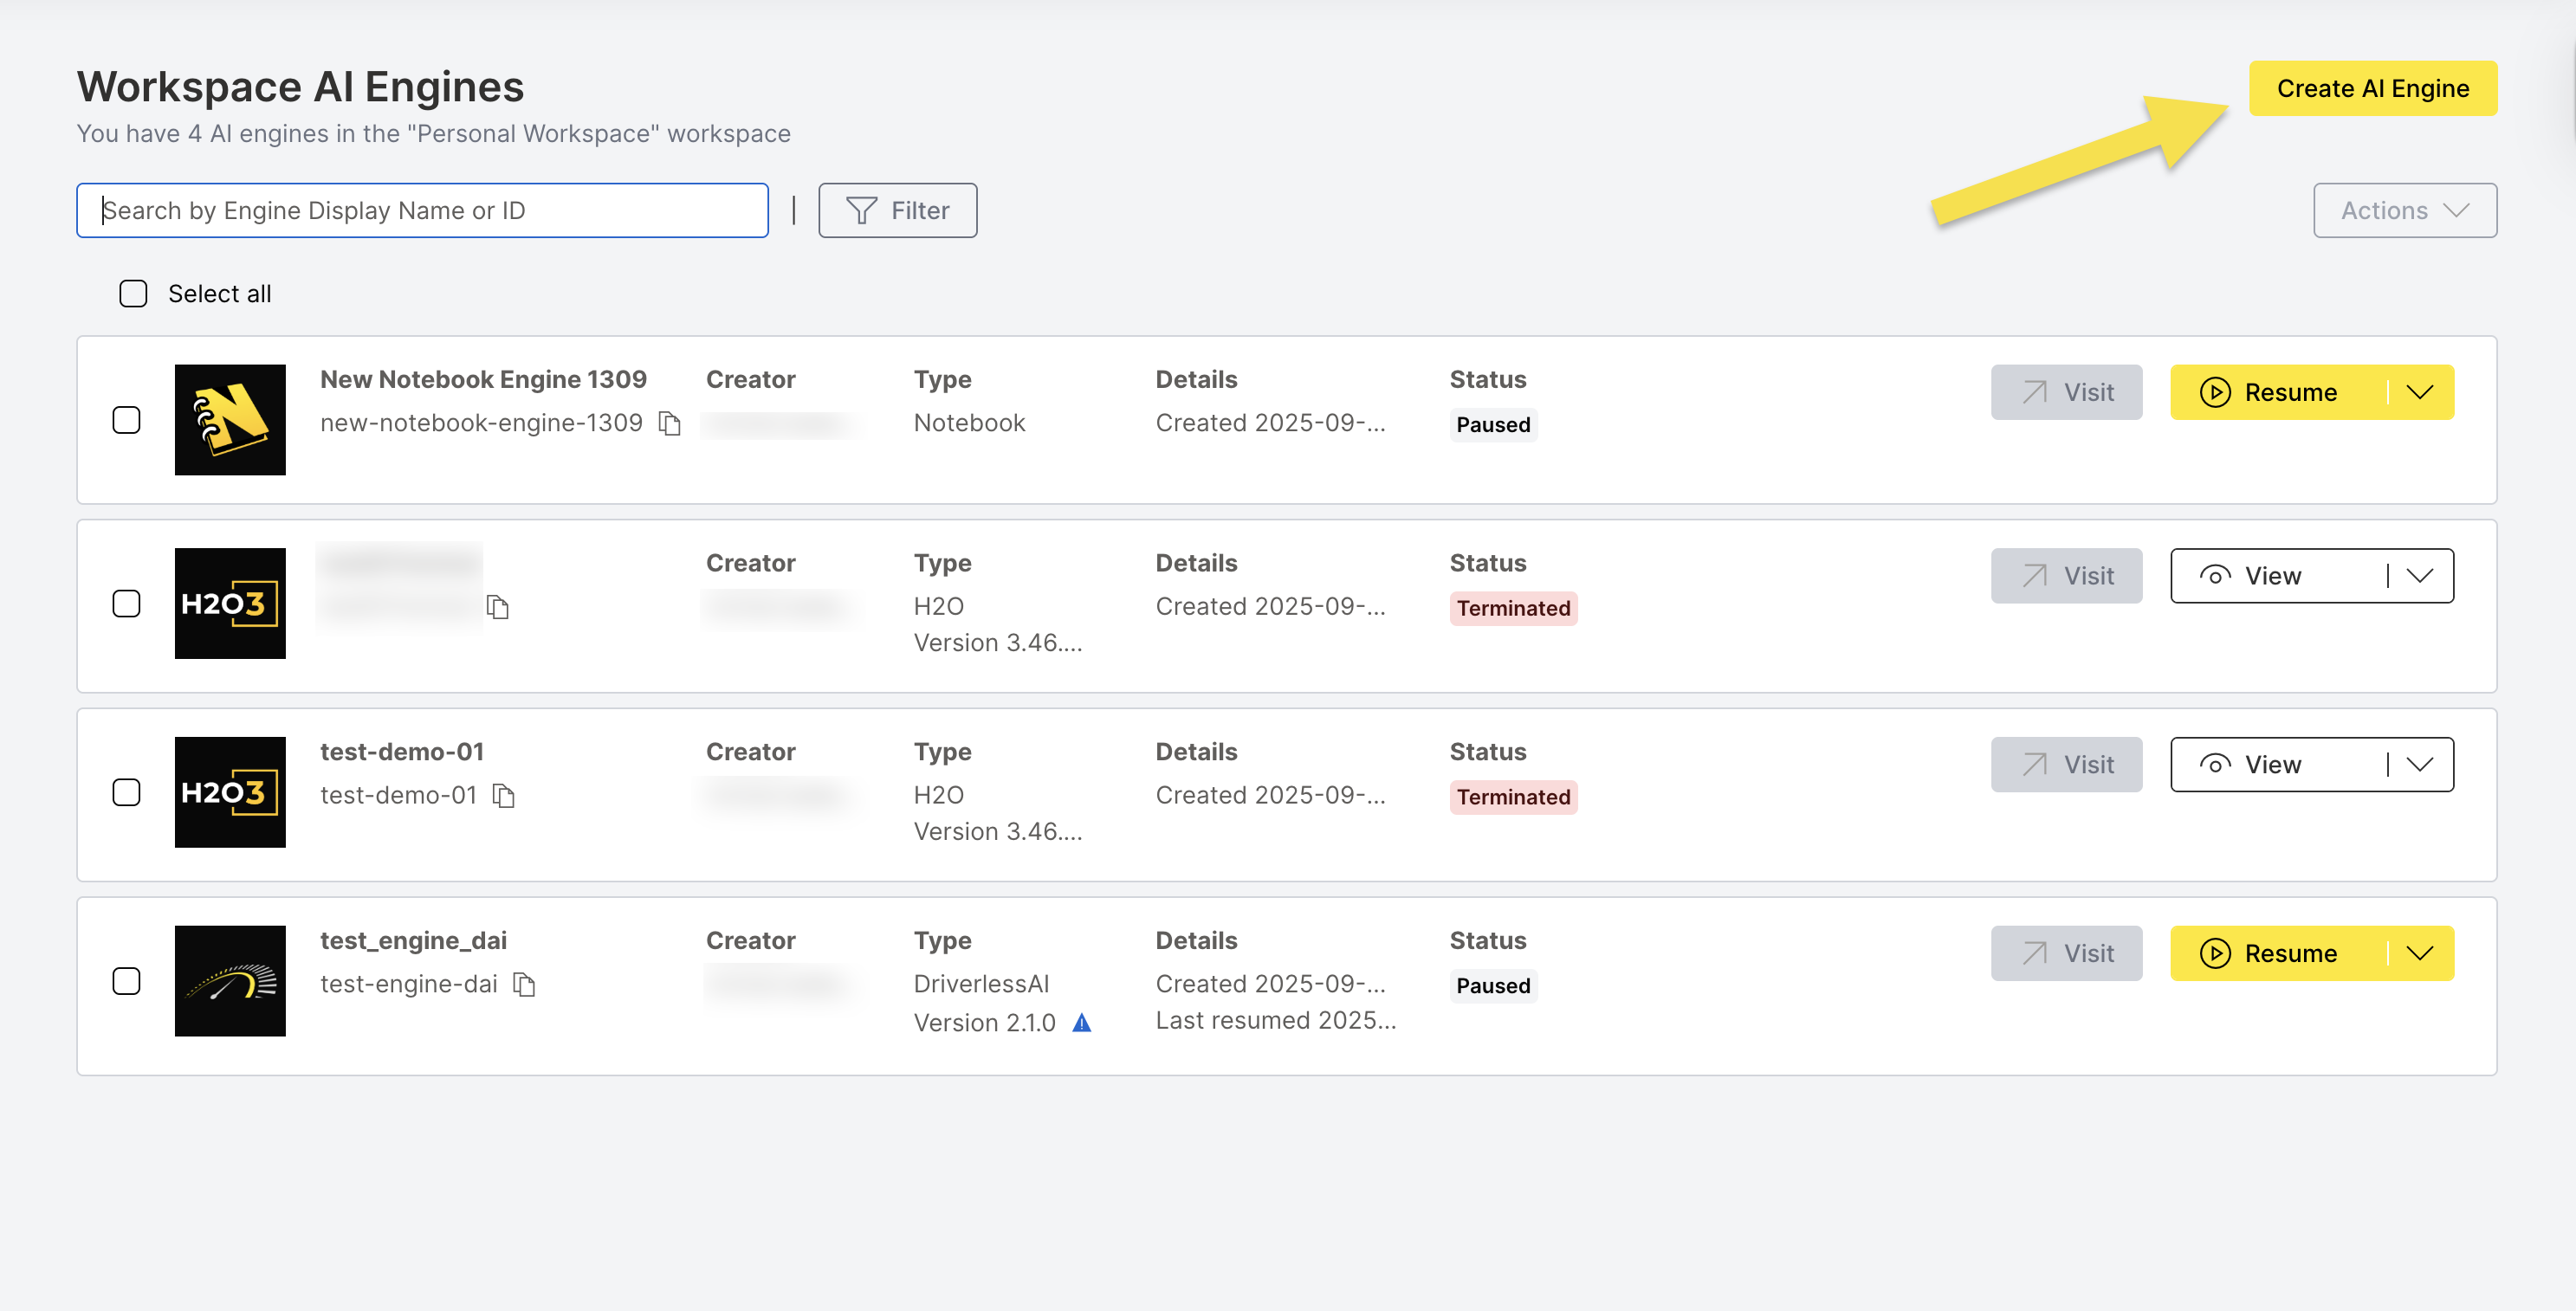
Step 1: Navigate to Create AI Engine
On the AI Engines page, click Create AI Engine.
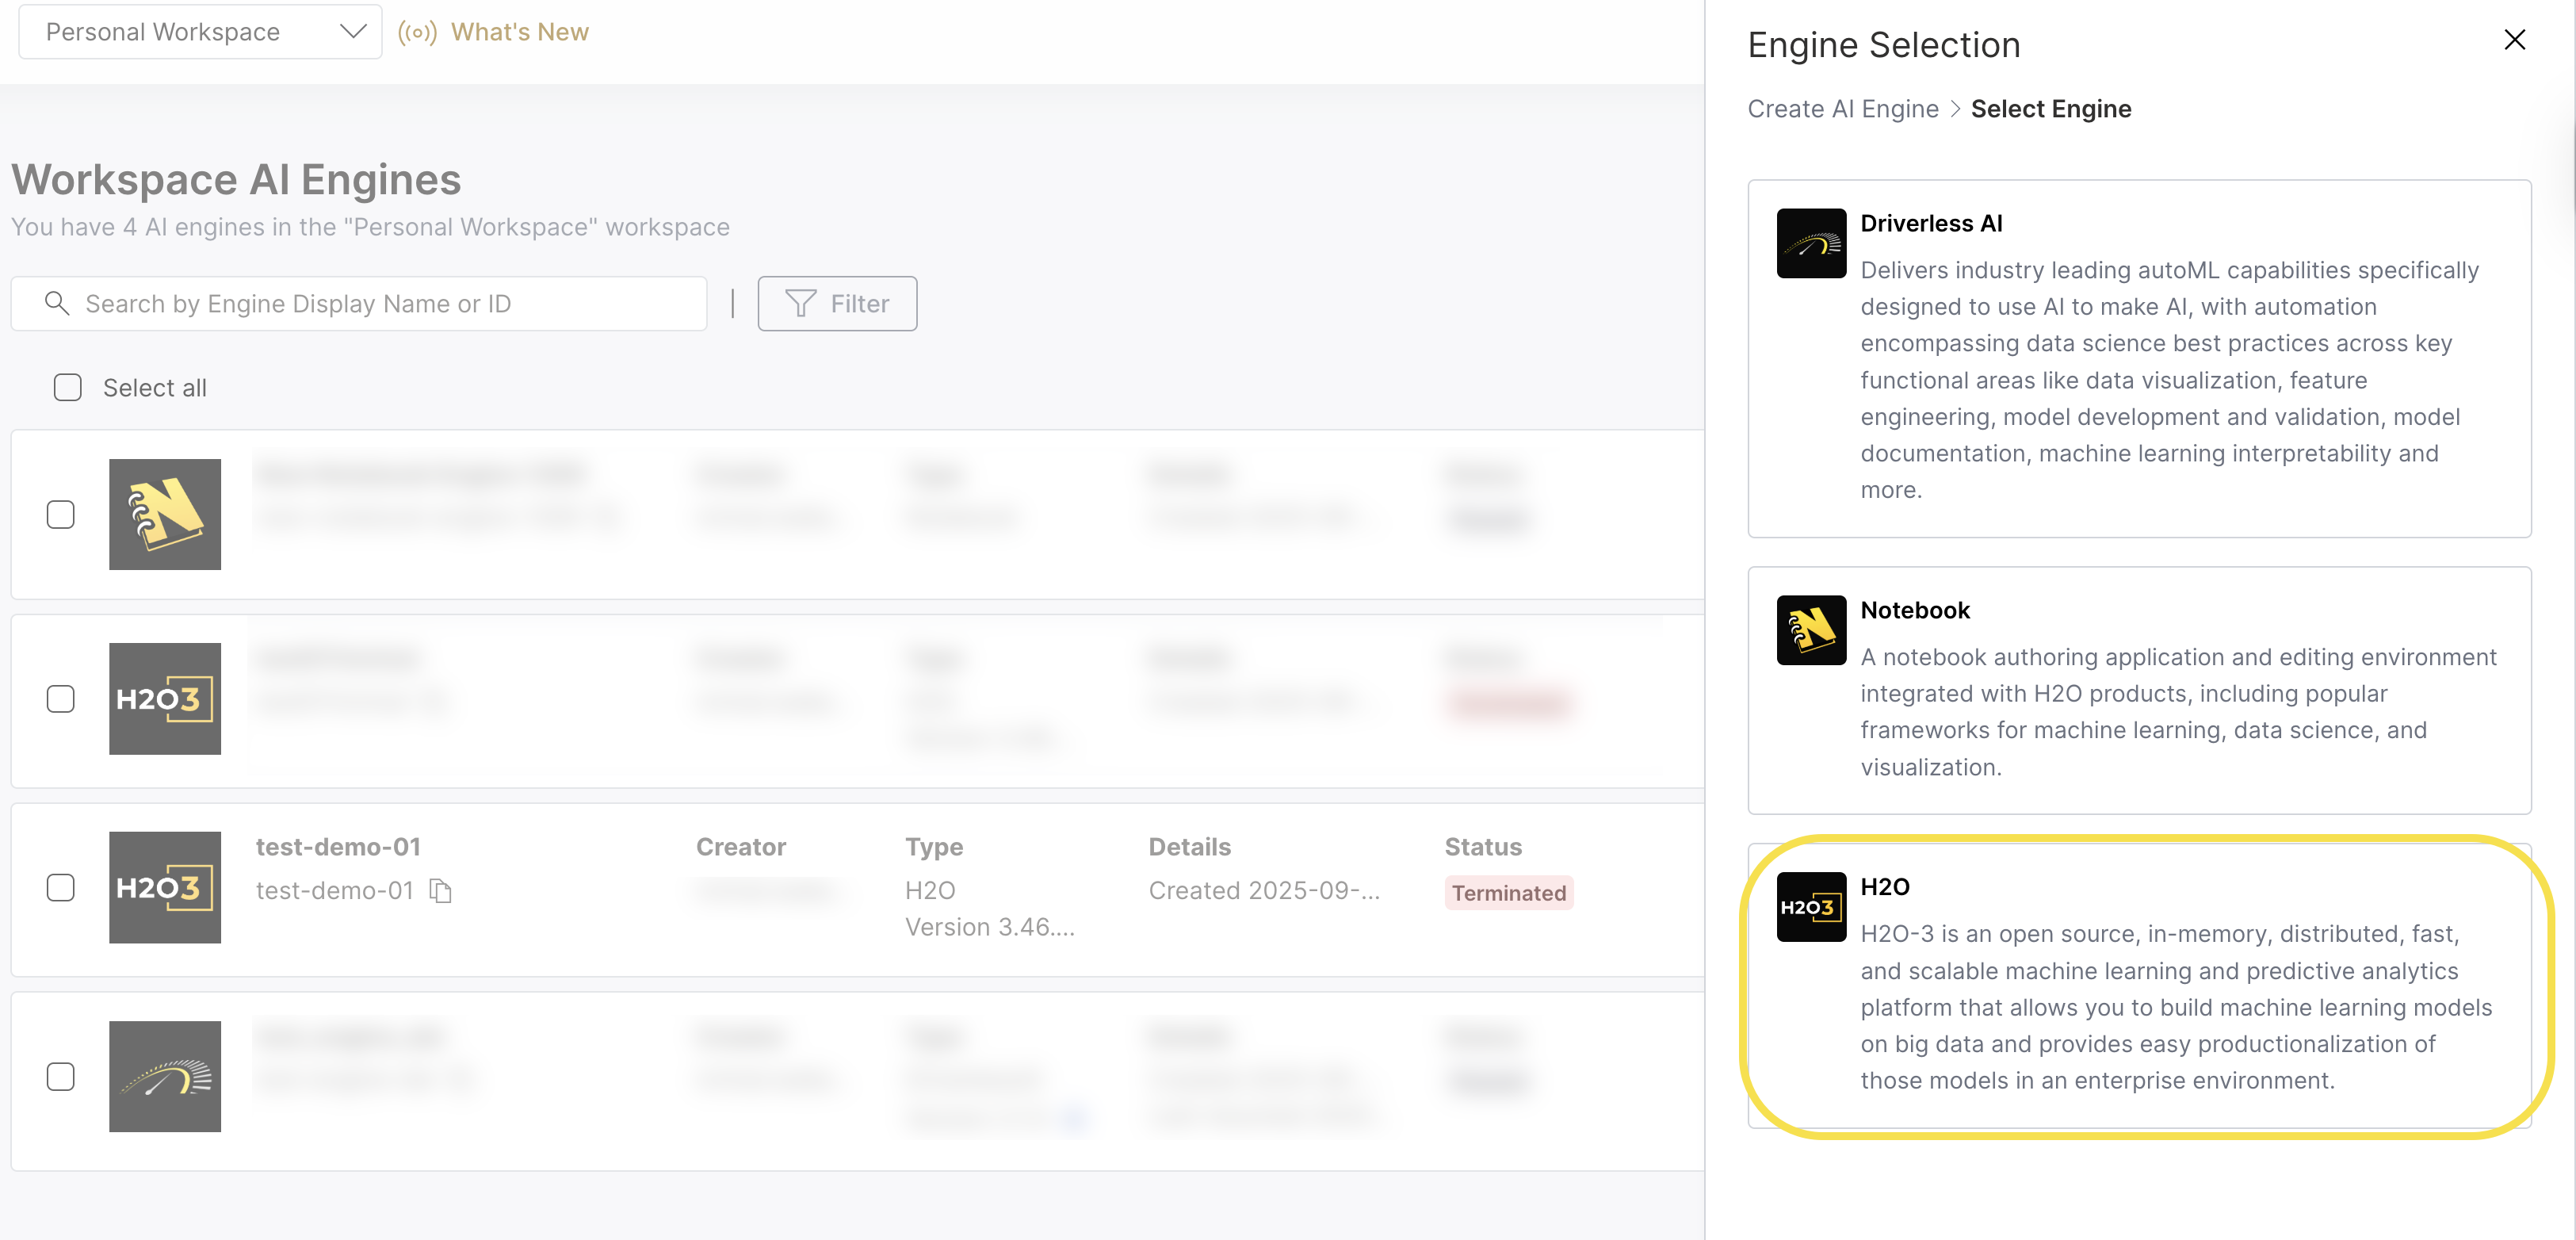
Step 2: Select Engine Type
On the Engine Selection tab, select H2O.
Step 3: Configure Engine Details
On the Create AI Engine > Select Engine > Engine Configuration page, provide the following information:
Display Name: Enter a descriptive name for your H2O engine.
Engine ID: The system automatically generates a unique ID based on your display name. However, it is recommended to use a secure ID for your use case. Click the Edit (Pencil icon) icon to customize it.
Profile: Select a Profile from the dropdown. The profile determines the allowed ranges for CPU, GPU, memory, node count, and timeout settings. For more information, see H2O Engine profiles.
Dataset Parameters: Configure dataset-specific parameters from the dropdown. Options in dropdown include:
- Custom for Raw Data
- Custom for Compressed Data
- This can be set to "Not set" for general use cases.
Version: Select the H2O version from the dropdown. The latest version is recommended unless you have specific requirements.
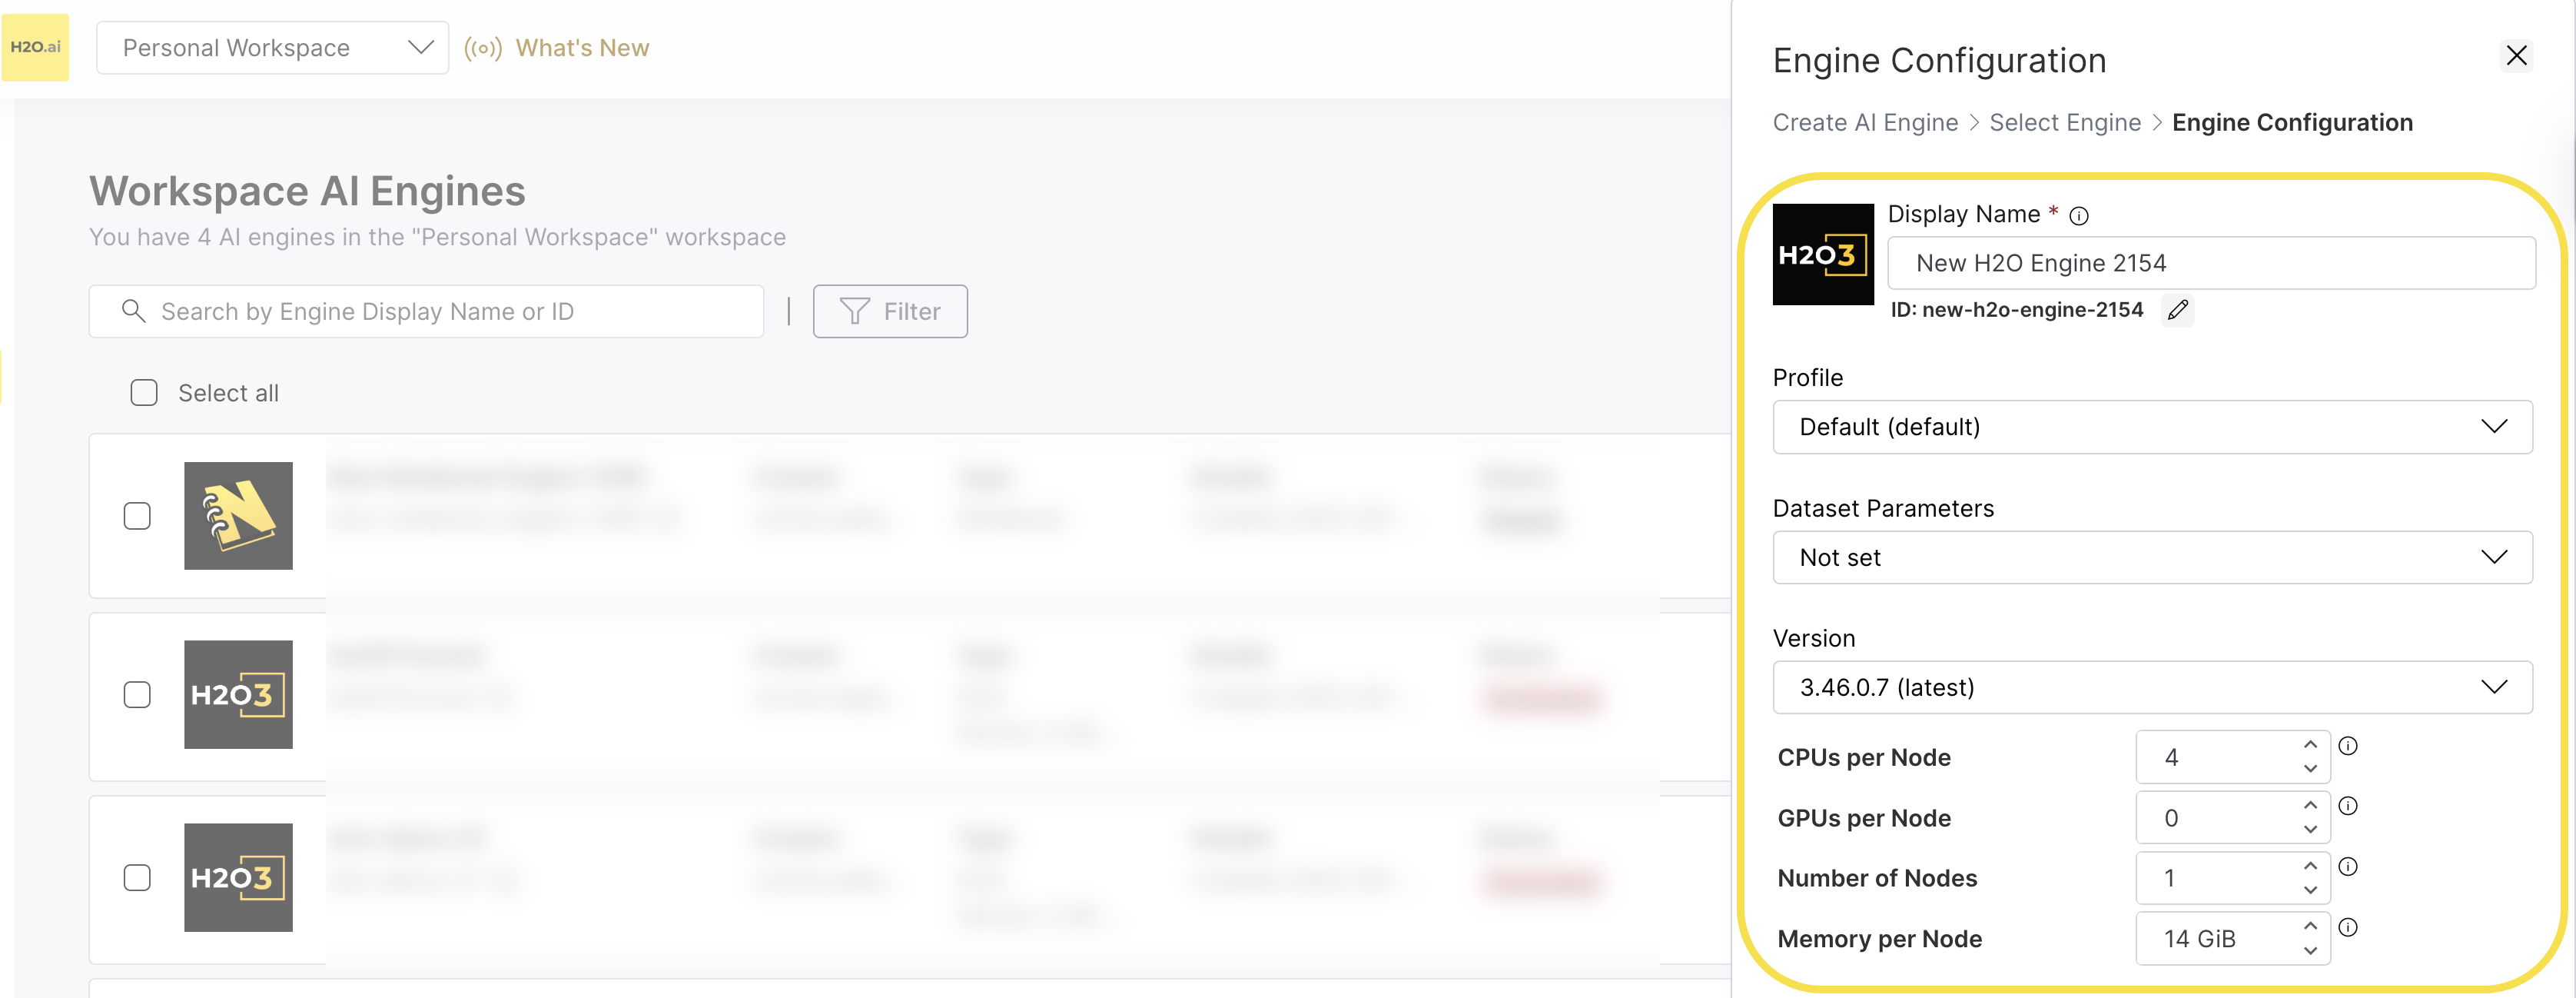
Display Name:
- Can include special characters and alphanumeric characters
- Character limit: 63 characters
- Use a clear, descriptive name for easy identification
Engine ID:
- Must start with a lowercase letter
- Must end with a lowercase letter or digit
- Can contain only lowercase letters, digits, or dashes (-)
- Min length: 1 char, Max length: 63 chars
- Cannot start or end with a dash (-)
Step 4: Configure Resources
Configure the computational resources for your H2O engine:
- CPUs per Node: Set the number of CPU units per node
- GPUs per Node: Configure GPU units per node if needed
- Number of Nodes: Configure the number of H2O nodes for distributed processing
- Memory per Node: Allocate memory in GiB per node
- The default values and range for CPU, GPU, Memory, and Node Count are set by administrators. Contact your administrator or the H2O support team for more details.
- H2O supports distributed processing across multiple nodes for large-scale machine learning tasks.
- Resource allocation is calculated per node, so total resources = per-node values × number of nodes.
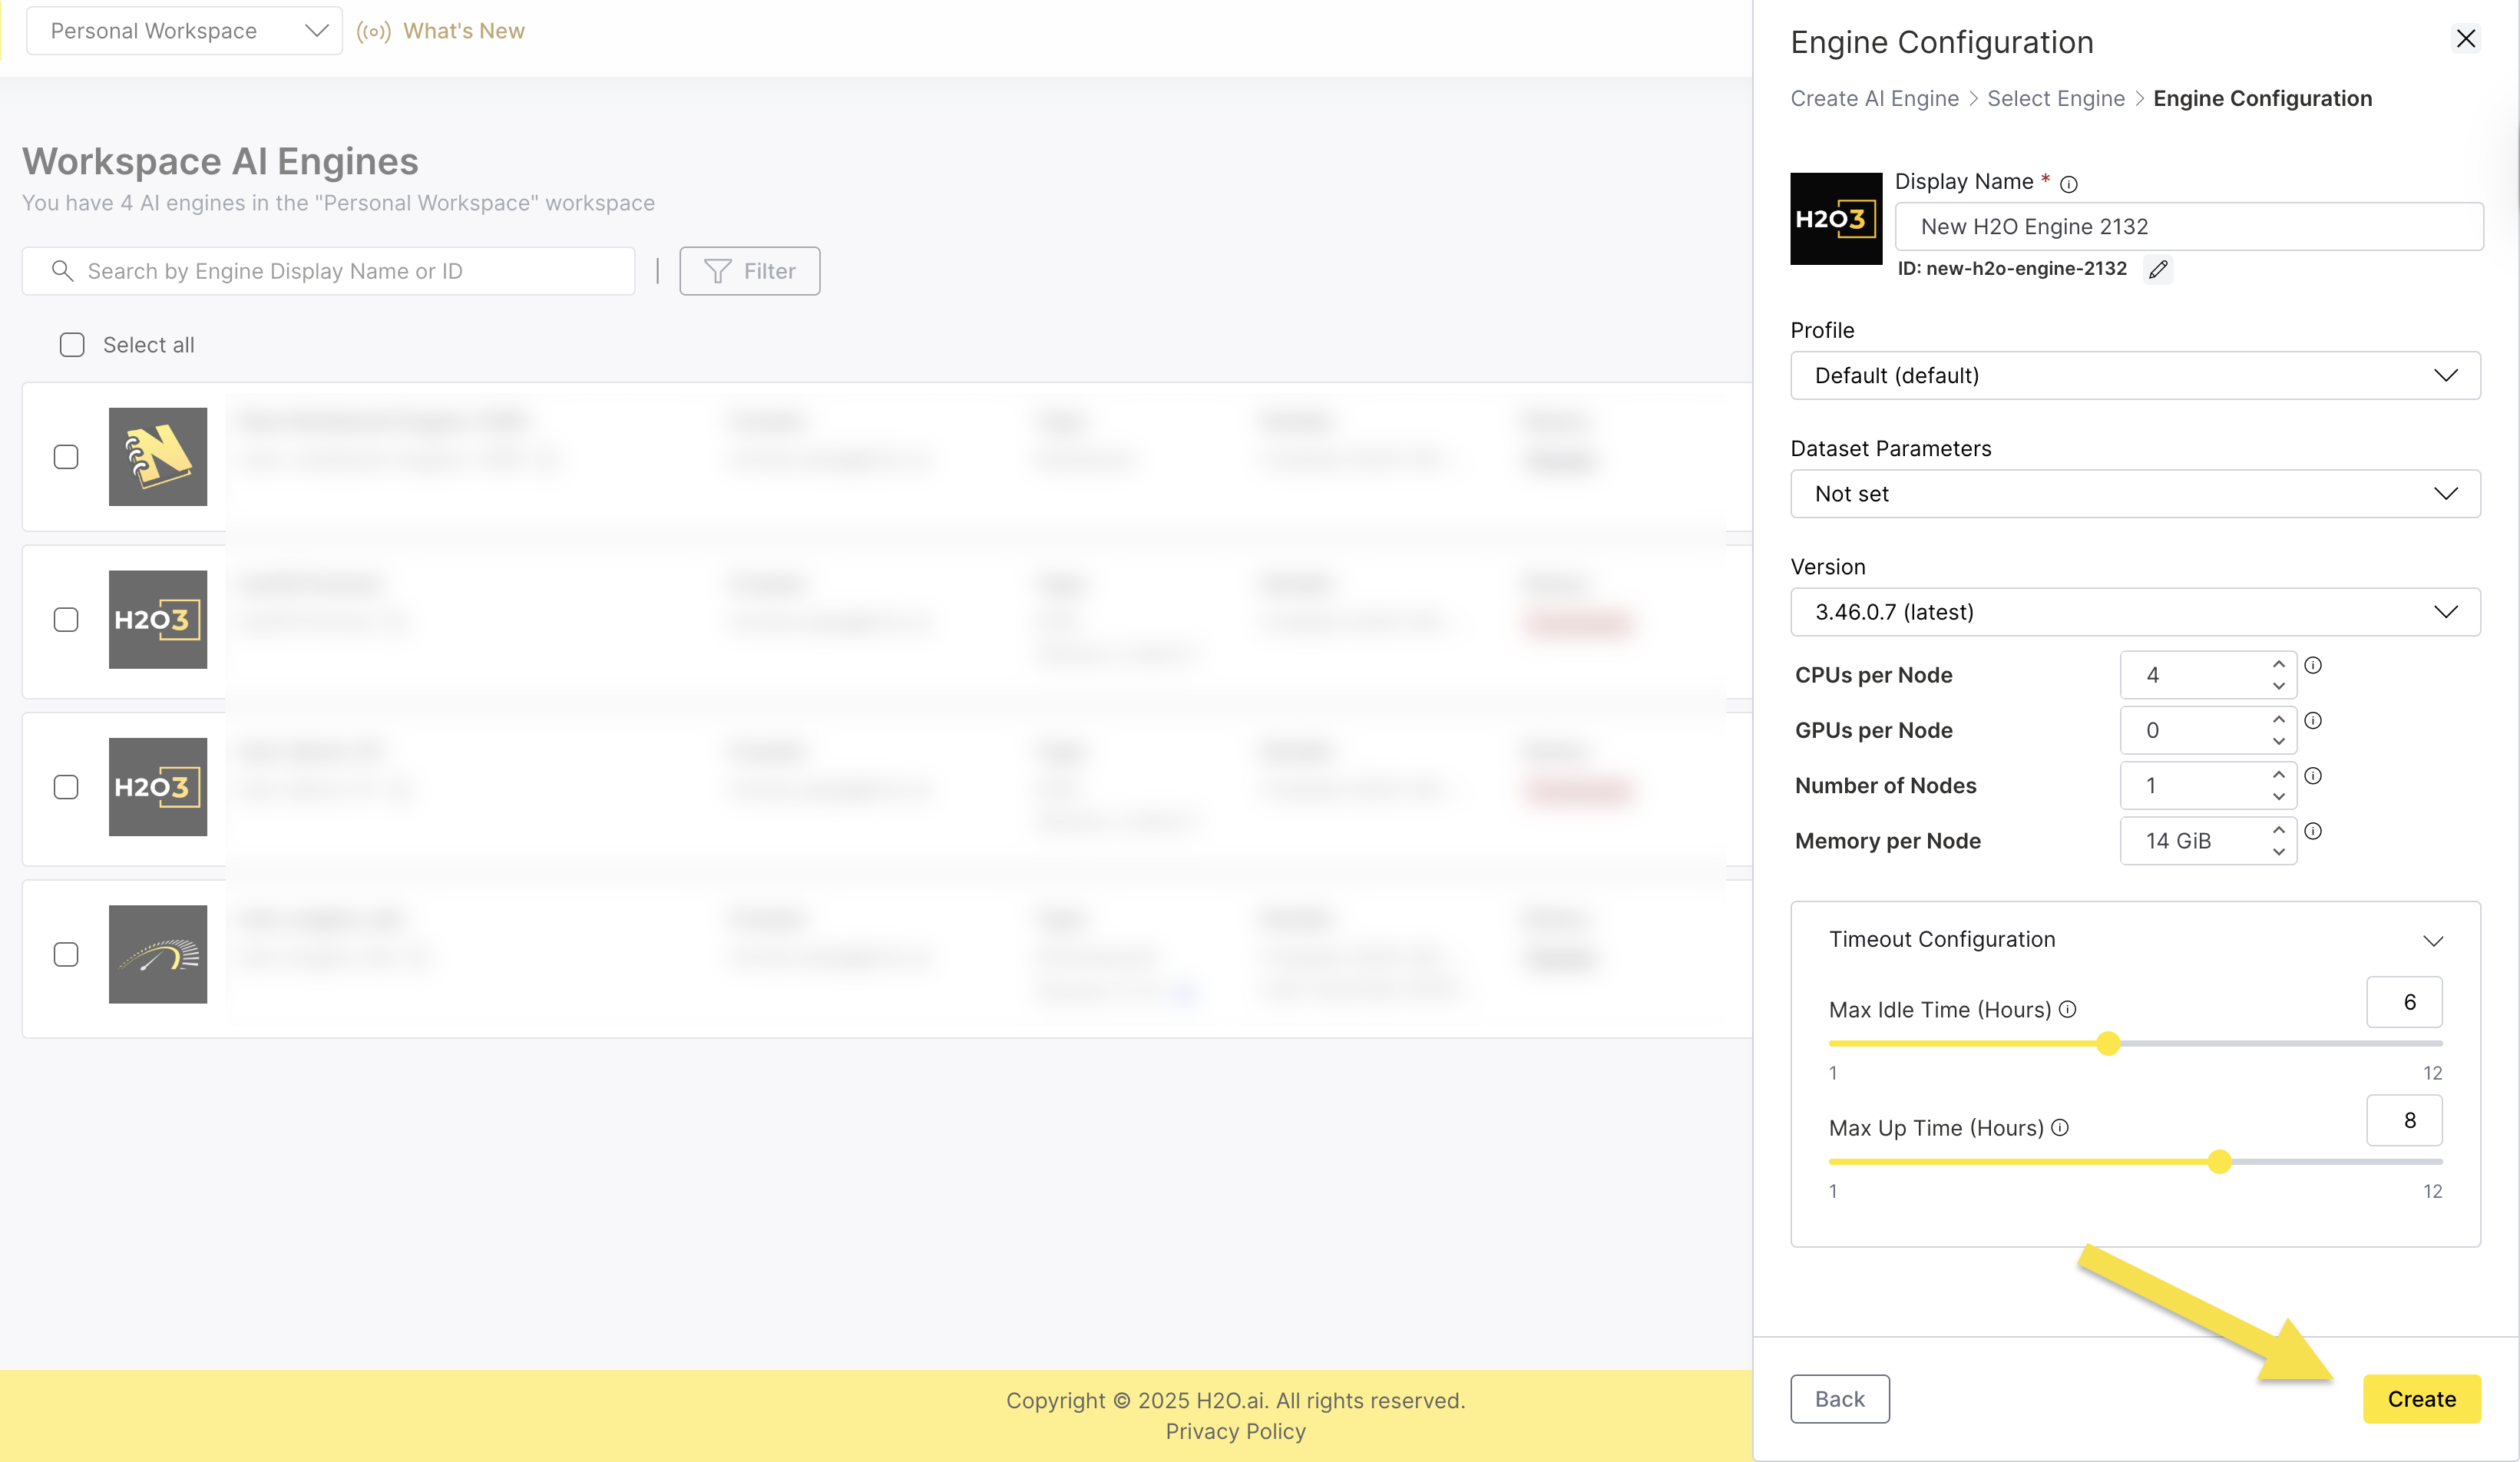
Step 5: Configure Timeout Settings
Expand the Timeout Configuration section to set:
- Max Idle Time (Hours): Set how long the engine can be idle before automatically pausing.
- Max Up Time (Hours): Set the maximum duration an engine can run before automatically terminating.
- Set appropriate idle time based on your usage patterns
- Consider cost optimization vs. convenience
- Longer idle times reduce restart overhead but increase costs
- For H2O engines, consider the time needed for model training and data processing
Step 6: Create the Engine
- Review all your configuration settings.
- Click Create to create the H2O engine.
- The engine will be provisioned and appear in your AI Engines list.
- Submit and view feedback for this page
- Send feedback about AI Engine Manager to cloud-feedback@h2o.ai