在 Google Compute Engine 上的 Docker 容器中安装并运行
本节介绍如何在 Google Compute 环境中使用 Docker 容器来 从头开始 安装并运行 Driverless AI。
此安装假设您已有 Google Cloud Platform 帐户。如果您还没有帐户,可前往 https://console.cloud.google.com/getting-started 创建帐户。此外,请参阅 Google 的 机器类型文档 ,了解关于 Google Compute 机器类型的信息。
点击 此处 观看安装视频 。请注意,此视频中的某些图像可能因版本而异,但安装步骤仍相同。
开始前
如果您是首次尝试使用 GCP 并且刚刚创建了帐户,请检查您的 Google Compute Engine (GCE) 资源配额限制。默认情况下,GCP 最多分配 8 个 GPU,也可不分配 GPU。您可以更改这些设置以匹配配额限制,或者您可以从 GCP 请求更多资源。请参阅 https://cloud.google.com/compute/quotas,了解更多信息,包括关于如何检查配额及请求额外配额的信息。
安装步骤
在浏览器中,前往 https://console.cloud.google.com/ 登录至 Google Compute Engine 控制台。
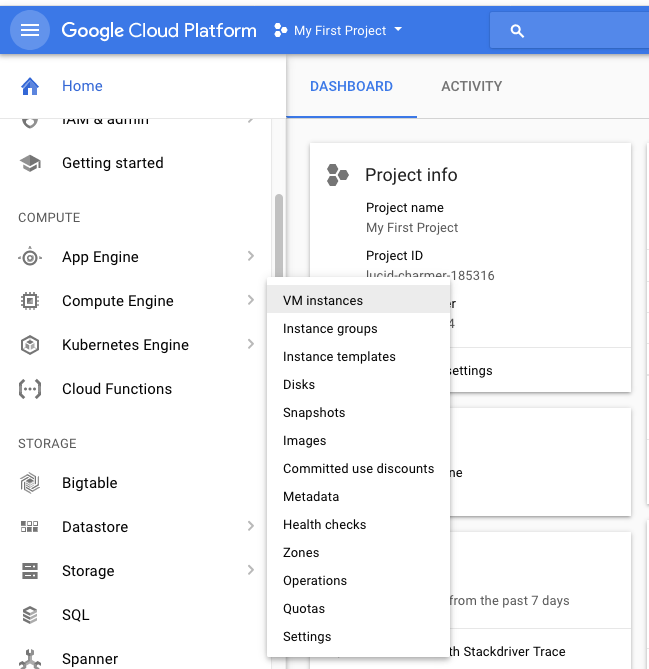
在左侧导航面板中,选择 Compute Engine > 虚拟机实例 。
点击 创建实例 。

请至少指定以下设置:
此实例的唯一名称。
所需的 区域 。请注意,并非所有区域和用户帐户均能选择带有 GPU 实例的区域。请参阅以下内容,了解如何添加 GPU:https://cloud.google.com/compute/docs/gpus/。
受支持的操作系统,例如 Ubuntu 16.04。务必也并将操作系统映像的磁盘大小增加至 64 GB。
完成后,在表单底部点击 创建 。此操作将创建新的虚拟机实例。

创建用于 Driverless AI 的防火墙规则。在 Google Cloud Platform 左侧导航面板中,选择 VPC 网络 > 防火墙规则 。指定以下设置:
指定此实例的唯一名称和说明。
将 目标 下拉框更改为 此网络中的所有实例 。
将 源 IP 范围 指定为
0.0.0.0/0。在 协议和端口 下,选择 指定的协议和端口 并输入以下内容:
tcp:12345.完成后,在表单底部点击 创建 。

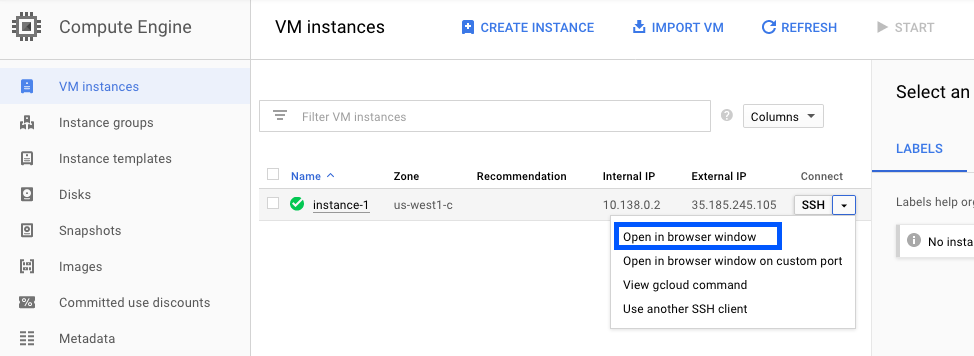
在虚拟机实例页面,通过在 SSH 下拉框中选择 在浏览器窗口打开,以使用 SSH 连接至新建虚拟机实例。
H2O 为您提供可在虚拟机实例中运行的脚本。在虚拟机实例中打开一个编辑器(例如,vi)。复制下方脚本之一(取决于是运行 GPU 还是 CPU)。将脚本保存为 install.sh 。
# SCRIPT FOR GPUs ONLY
apt-get -y update
apt-get -y --no-install-recommends install \
  curl \
  apt-utils \
  python-software-properties \
  software-properties-common

add-apt-repository -y ppa:graphics-drivers/ppa
add-apt-repository -y "deb [arch=amd64] https://download.docker.com/linux/ubuntu $(lsb_release -cs) stable"
curl -fsSL https://download.docker.com/linux/ubuntu/gpg | apt-key add -

apt-get update
apt-get install -y \
  nvidia-384 \
  nvidia-modprobe \
  docker-ce

curl -s -L https://nvidia.github.io/nvidia-docker/gpgkey | \
  sudo apt-key add -
distribution=$(. /etc/os-release;echo $ID$VERSION_ID)
curl -s -L https://nvidia.github.io/nvidia-docker/$distribution/nvidia-docker.list | \
  sudo tee /etc/apt/sources.list.d/nvidia-docker.list
sudo apt-get update

# Install nvidia-docker2 and reload the Docker daemon configuration
sudo apt-get install -y nvidia-docker2
# SCRIPT FOR CPUs ONLY apt-get -y update apt-get -y --no-install-recommends install \ curl \ apt-utils \ python-software-properties \ software-properties-common add-apt-repository -y "deb [arch=amd64] https://download.docker.com/linux/ubuntu $(lsb_release -cs) stable" curl -fsSL https://download.docker.com/linux/ubuntu/gpg | apt-key add - apt-get update apt-get install -y docker-ce
输入以下命令以运行安装脚本。
chmod +x install.sh
sudo ./install.sh
在您的用户文件夹中,以用户身份创建以下目录。
mkdir ~/tmp
mkdir ~/log
mkdir ~/data
mkdir ~/scripts
mkdir ~/license
mkdir ~/demo
mkdir -p ~/jupyter/notebooks
将您的 Google Compute 用户名添加至 Docker 容器。
sudo usermod -aG docker <username>
重启系统以启用 NVIDIA 驱动程序。
sudo reboot
从 https://www.h2o.ai/download/ 检索 Driverless AI Docker 映像。
加载 Driverless AI Docker 映像。以下示例展示如何加载 Driverless AI。将 VERSION 替换为您的映像。
sudo docker load < dai-docker-centos7-x86_64-1.10.1.2.tar.gz
如果您是运行 CPU,则可跳过此步骤。否则,您必须启用 GPU 的持久模式。请注意,每次重启后需执行此操作。更多信息,请参阅:http://docs.nvidia.com/deploy/driver-persistence/index.html。
sudo nvidia-smi -pm 1
启动 Driverless AI Docker 映像,并将下方标签替换为映像标签。根据您所安装的版本,使用
docker run --runtime=nvidia(>= Docker 19.03) 或nvidia-docker(< Docker 19.03) 命令。请参阅 数据连接器,了解如何将 GCS 和 GBQ 数据连接器添加至您的 Driverless AI 实例。
请注意:可使用
docker version来检查您使用的 Docker 版本。# Start the Driverless AI Docker image docker run --runtime=nvidia \ --pid=host \ --init \ --rm \ --shm-size=256m \ -u `id -u`:`id -g` \ -p 12345:12345 \ -v `pwd`/data:/data \ -v `pwd`/log:/log \ -v `pwd`/license:/license \ -v `pwd`/tmp:/tmp \ h2oai/dai-centos7-x86_64:1.10.1-cuda11.2.2.xx# Start the Driverless AI Docker image nvidia-docker run \ --pid=host \ --init \ --rm \ --shm-size=256m \ -u `id -u`:`id -g` \ -p 12345:12345 \ -v `pwd`/data:/data \ -v `pwd`/log:/log \ -v `pwd`/license:/license \ -v `pwd`/tmp:/tmp \ h2oai/dai-centos7-x86_64:1.10.1-cuda11.2.2.xxDriverless AI 将开始运行:
--------------------------------
Welcome to H2O.ai's Driverless AI
---------------------------------

- Put data in the volume mounted at /data
- Logs are written to the volume mounted at /log/20180606-044258
- Connect to Driverless AI on port 12345 inside the container
- Connect to Jupyter notebook on port 8888 inside the container
使用浏览器连接至 Driverless AI:
http://Your-Driverless-AI-Host-Machine:12345
终止 GCE 实例
即使关闭门户网站,Google Compute Engine 实例仍将继续运行。您可以使用以下方法终止实例:
在浏览器中终止
在“虚拟机实例”页面上,点击您想要终止的虚拟机实例。
在页面顶部点击 终止 。
此时将显示一个确认页面。点击 终止 以终止此实例。
在终端终止
使用 SSH 连接至正在运行 Driverless AI 的计算机,然后运行:
h2oai stop
升级 Driverless AI
本节提供了用于升级 Docker 容器内已安装的各版本 Driverless AI 的说明。这些步骤将确保现有实验被保存。
警告:实验、MLI 和 MOJO 驻留在 Driverless AI 临时目录中,在升级 Driverless AI 时不会自动升级。
升级前构建 MLI 模型
升级前构建 MOJO 管道。
升级前停止 Driverless AI 并备份 Driverless AI tmp 目录。
如果在升级 Driverless AI 前未在务必模型上构建 MLI,则升级后将不能在该模型上查看 MLI。升级前,请务必在您想要在未来版本中继续进行解释的模型上运行 MLI 作业。如果当前版本的解释模型列表中含有此 MLI 作业,则在升级后将保留。
如果在升级 Driverless AI 前未在模型上构建 MOJO 管道,则升级后将不能在该模型上构建 MOJO 管道。升级前,请务必在所需的全部模型上构建 MOJO 管道,然后备份 Driverless AI tmp 目录。
请注意:如果 Driverless AI 仍在运行,需将其停止。
要求
我们建议在您的主机环境中安装 NVIDIA 驱动程序 >= 471.68 (仅 GPU),以便在所有架构上获得无缝体验,包括 Ampere 架构。Driverless AI 自带 GPU 的 CUDA 11.2.2,但是主机环境中必须有驱动程序。
前往 NVIDIA download driver,获取最新的 NVIDIA Tesla A/T/V/P/K 系列驱动程序。关于 CUDA 工具包和驱动程序最低版本要求及 CUDA 工具包和相应的驱动程序版本的参考,请参见 here .
升级步骤
使用 SSH 连接到运行 Driverless AI 的主机 IP 地址。
在主机上设置相应 Driverless AI 版本的目录:
# Set up directory with the version name
mkdir dai-1.10.1.2

# cd into the new directory
cd dai-1.10.1.2
从 https://www.h2o.ai/download/ 检索 Driverless AI 软件包,并将该软件包添加到新目录中。
在新目录内加载 Driverless AI Docker 映像:
# Load the Driverless AI docker image
docker load < dai-docker-centos7-x86_64-1.10.1.2.tar.gz
将之前 Driverless AI 目录的数据、日志、许可证和临时目录复制到新的 Driverless AI 目录中:
# Copy the data, log, license, and tmp directories on the host machine
cp -a dai_rel_1.4.2/data dai-1.10.1.2/data
cp -a dai_rel_1.4.2/log dai-1.10.1.2/log
cp -a dai_rel_1.4.2/license dai-1.10.1.2/license
cp -a dai_rel_1.4.2/tmp dai-1.10.1.2/tmp
此时,您之前版本的实验将在 Docker 容器内可见。
使用
docker images,找到新的映像标签。启动 Driverless AI Docker 映像。
通过浏览器访问 http://Your-Driverless-AI-Host-Machine:12345,连接至 Driverless AI。