Enterprise h2oGPTe assistant
Notebook Engine includes an AI assistant powered by Enterprise h2oGPTe, the enterprise generative AI platform of H2O.ai. The assistant runs in a side panel next to your notebook, where it answers questions, explains and writes code, and, with your approval, edits and runs cells for you.
Because the assistant reads your notebook and sends its contents to h2oGPTe, read What the assistant can see before you use it with sensitive data.
Prerequisites
Before you use the Enterprise h2oGPTe assistant, make sure you have the following:
- A running Notebook Engine that you can open: In the AI Engines list, click Visit on your engine to open its JupyterLab interface. For more information, see Access Your Notebook Engine.
- A Notebook Engine image that includes the assistant: In JupyterLab, look for the h2oGPTe tab in the right sidebar. If the tab isn't there, ask your administrator for suitable permissions.
- An engine that isn't shared: On the Engine Details panel, check that Shared is turned off. Shared shows the current setting rather than the value at the last resume, so also check that Last Resumed At is later than the time you changed it. To turn sharing off, pause the engine, clear the Shared toggle, and resume the engine. For more information, see View Engine Configuration, Step 5: Configure Shared Access, and Edit a Notebook Engine.
- Enterprise h2oGPTe available in your H2O AI Cloud environment: Your administrator controls this. If the h2oGPTe tab appears but the panel reports that h2oGPTe isn't available, see Troubleshooting.
Notebook Engine connects you to h2oGPTe automatically with your H2O AI Cloud account. There are no API keys or URLs to enter.
A shared engine runs without your H2O AI Cloud credentials, so the assistant can't reach h2oGPTe. The h2oGPTe tab still appears, but the panel shows h2oGPTe is not available in this environment — the assistant is disabled here., the same message as an environment where h2oGPTe isn't available. Check this first, because it's the one cause you can resolve yourself.
The credentials are issued when the engine is created and each time it's resumed, so turning Shared off takes effect only after you resume the engine.
Open the assistant
In your Notebook Engine, select the h2oGPTe tab in the JupyterLab right sidebar. The panel opens next to your notebook, and you can resize it.
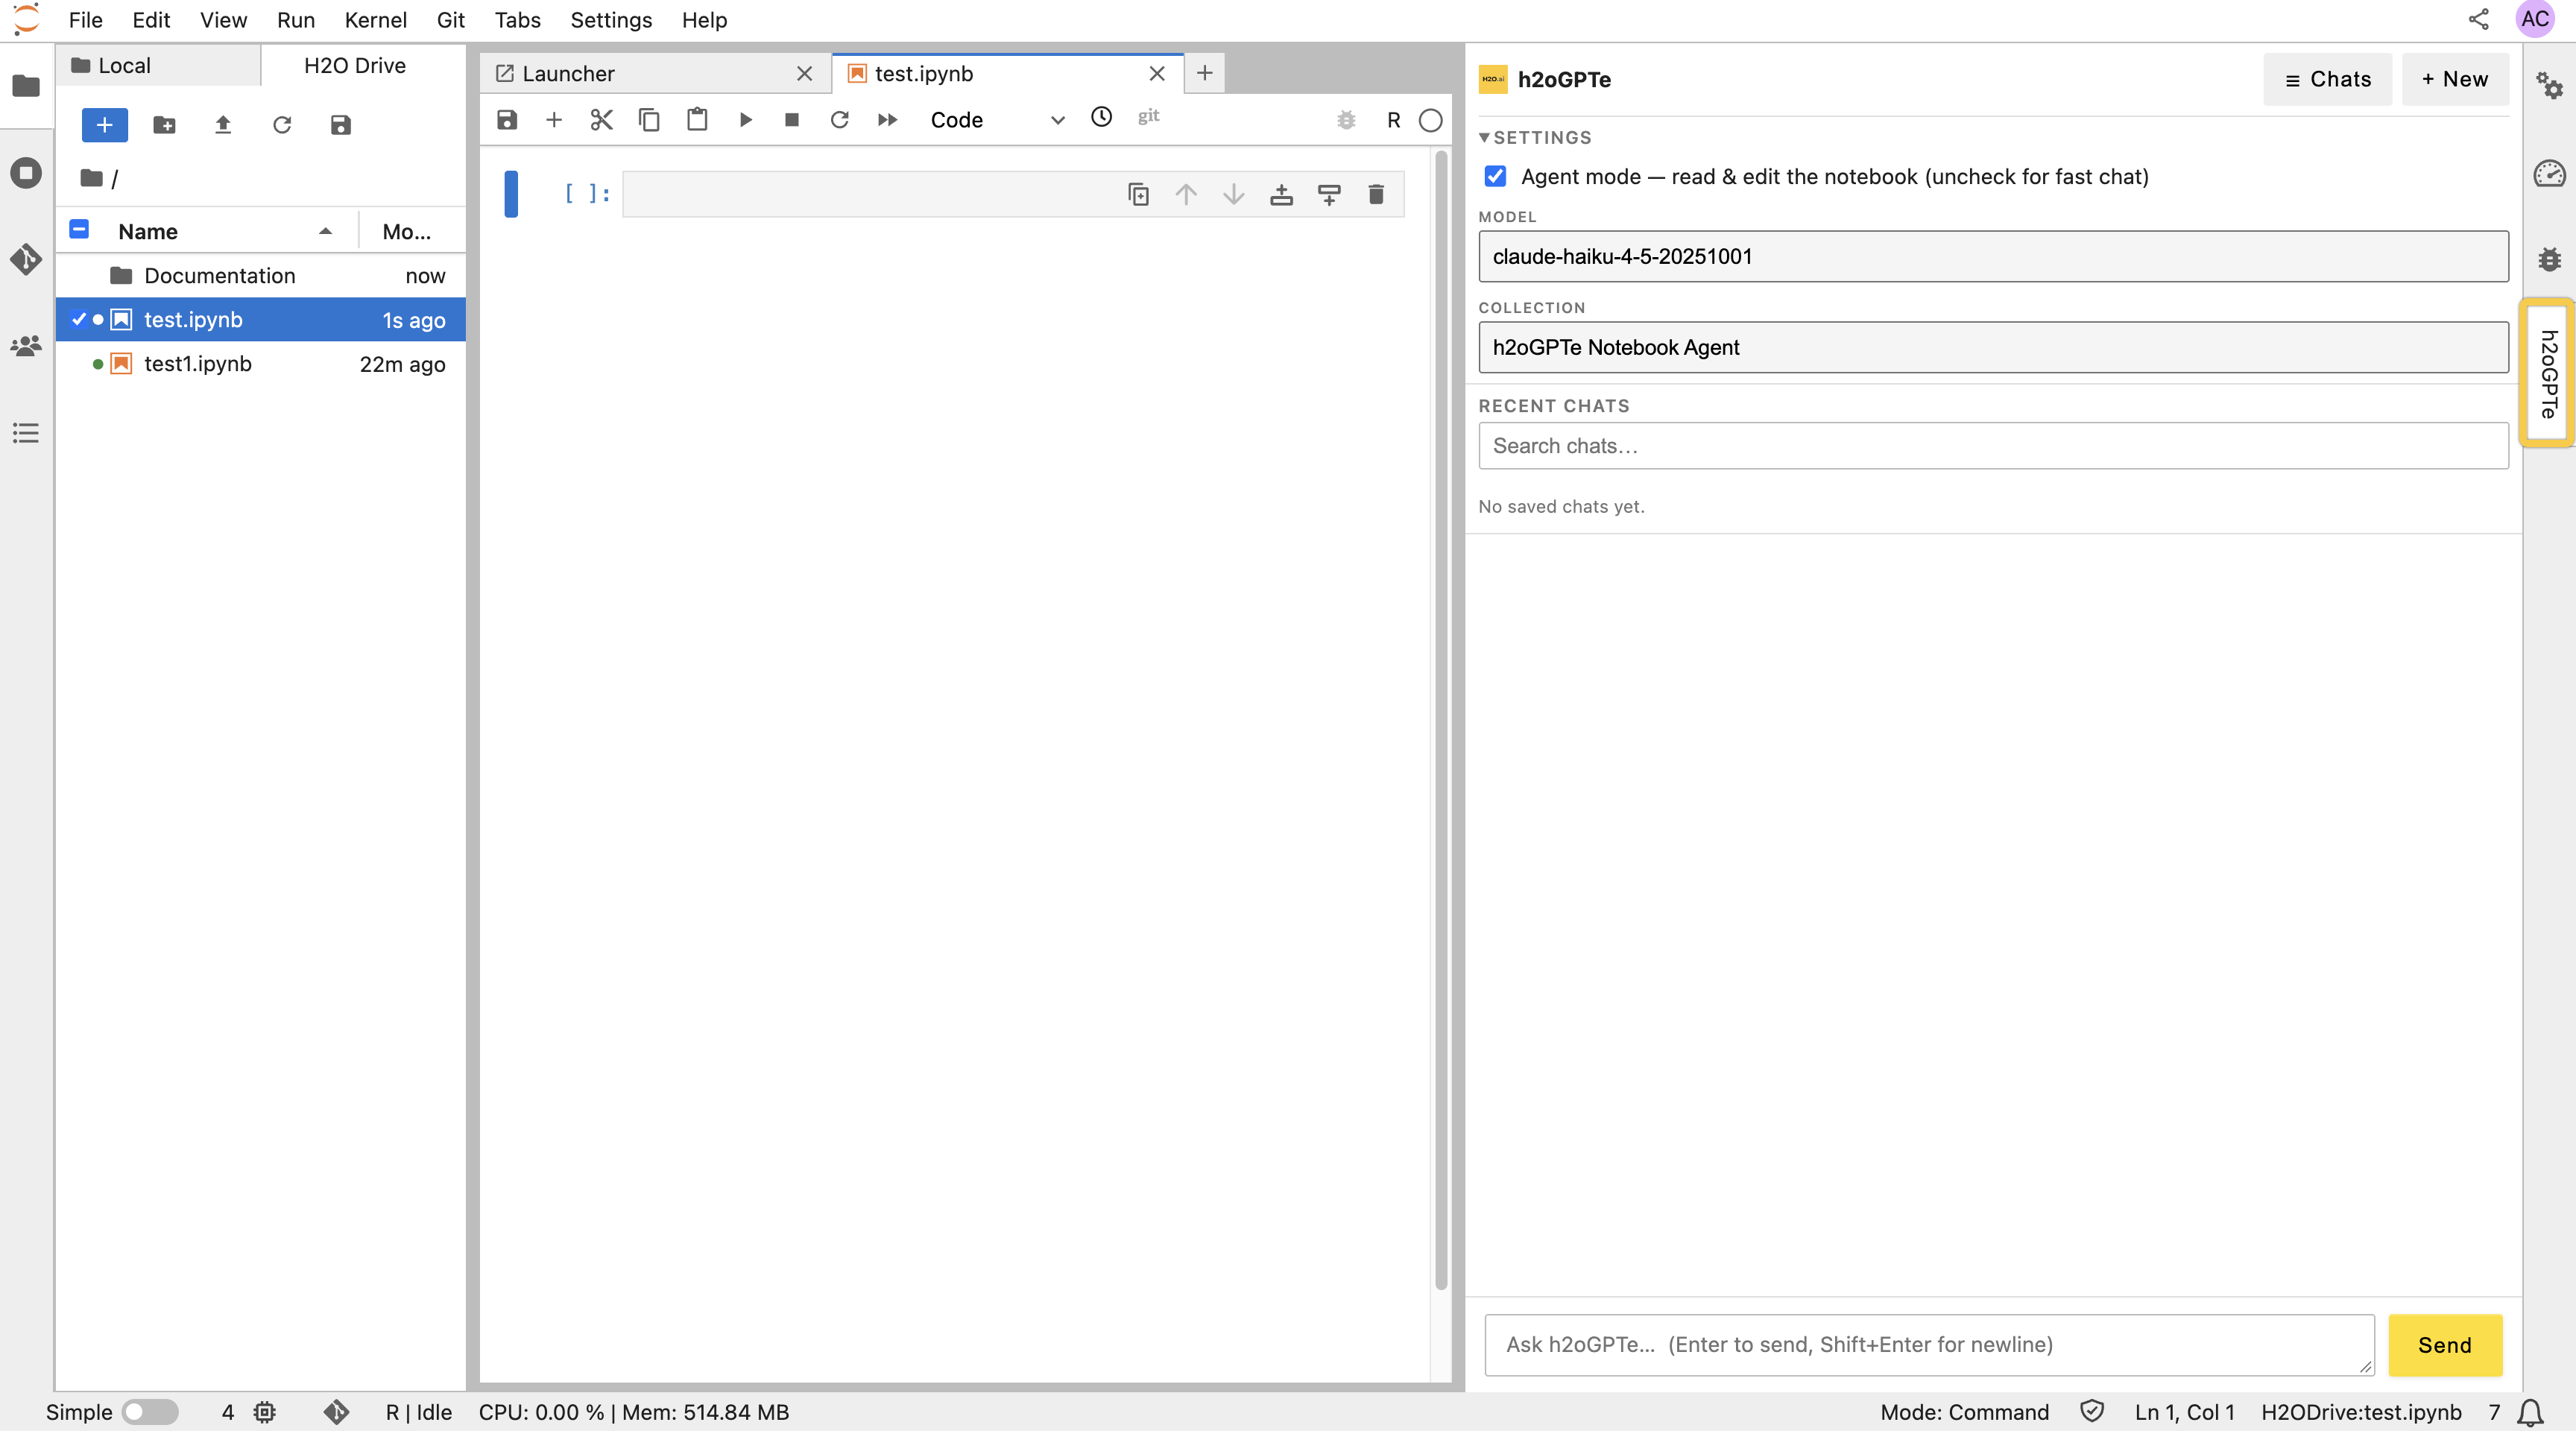
If the panel can't reach h2oGPTe when it starts, it shows h2oGPTe is not available in this environment — the assistant is disabled here., and you can't enter a message until you reload the page. A shared engine produces the same message as an environment without h2oGPTe, so check Prerequisites before you contact your administrator, and see Troubleshooting.
Work with the assistant
Use the assistant as a plain chat for quick questions, or use agent mode to have it work directly on your notebook.
Chat with the assistant
Enter your question in the message box, which shows the placeholder Ask h2oGPTe… (Enter to send, Shift+Enter for newline). Press Enter to send, and Shift+Enter to add a line break.
While a request is in flight, the panel shows an animated indicator and Send becomes Stop. The assistant renders each answer in full when it's ready rather than word by word, with formatting and code blocks you can copy into your notebook.
If the assistant can't reach the chat history of h2oGPTe when the panel starts, it continues in a local session that streams answers as they're generated. The status line then reads Local session (h2oGPTe history unavailable). A local session still sends each request to h2oGPTe — only the conversation isn't stored, and it's lost when you reload the page.
Switch between agent mode and chat mode
- In the panel, expand Settings.
- Select the Agent mode — read & edit the notebook (uncheck for fast chat) checkbox to use agent mode, or clear it to use chat mode.
Agent mode is turned on by default. For the other settings in this section, see Assistant settings.
The following table describes how the assistant behaves in each mode.
| Mode | Behavior |
|---|---|
| Agent mode (checkbox selected) | The assistant reads your active notebook and its cell outputs, and proposes changes to it: inserting cells, editing cells, running them, and attempting to fix errors it finds in the results. If no notebook is open, the assistant can create one. |
| Chat mode (checkbox cleared) | The assistant answers as a plain chat. It doesn't read or change your notebook, but it still sends the kernel environment summary (see What the assistant can see). |
Use agent mode when you want the assistant to work on your notebook. Turn it off for quick questions, or when you don't want the panel to send the cells and outputs of your notebook to h2oGPTe (see What the assistant can see).
The assistant also receives a summary of your kernel environment in both modes, gathered by a silent probe run once per page load in your kernel (see What the assistant can see), so it can tailor the code it writes to the Python version and packages you have. If a request needs a package that isn't installed, the assistant proposes a cell that runs %pip install. The assistant has no operation that restarts your kernel.
Review and apply changes
In agent mode, unless you selected Apply all this session, the assistant asks before it changes your notebook: a confirmation card appears in the chat with the summary Apply N change(s) to the notebook? and a labeled entry for each operation, such as Set source of cell <id> ▶ and run or ▶ Run all cells. What each entry shows depends on the operation:
- An entry that inserts or edits a cell: The code the operation writes. A label ending in
▶ and runalso runs that cell when you apply the change, so check for that suffix before you approve code you haven't read. - An entry that runs a single cell: That cell's current source.
- An entry for an operation that carries no code of its own: Only its label. This covers deleting a cell, running the whole notebook, reading a cell's outputs, clearing all outputs, and creating a notebook, so read what the label names before you apply.
A truncated preview doesn't shorten the operation: Apply applies the full change. To review all of the code first, click Reject and ask the assistant for smaller steps.
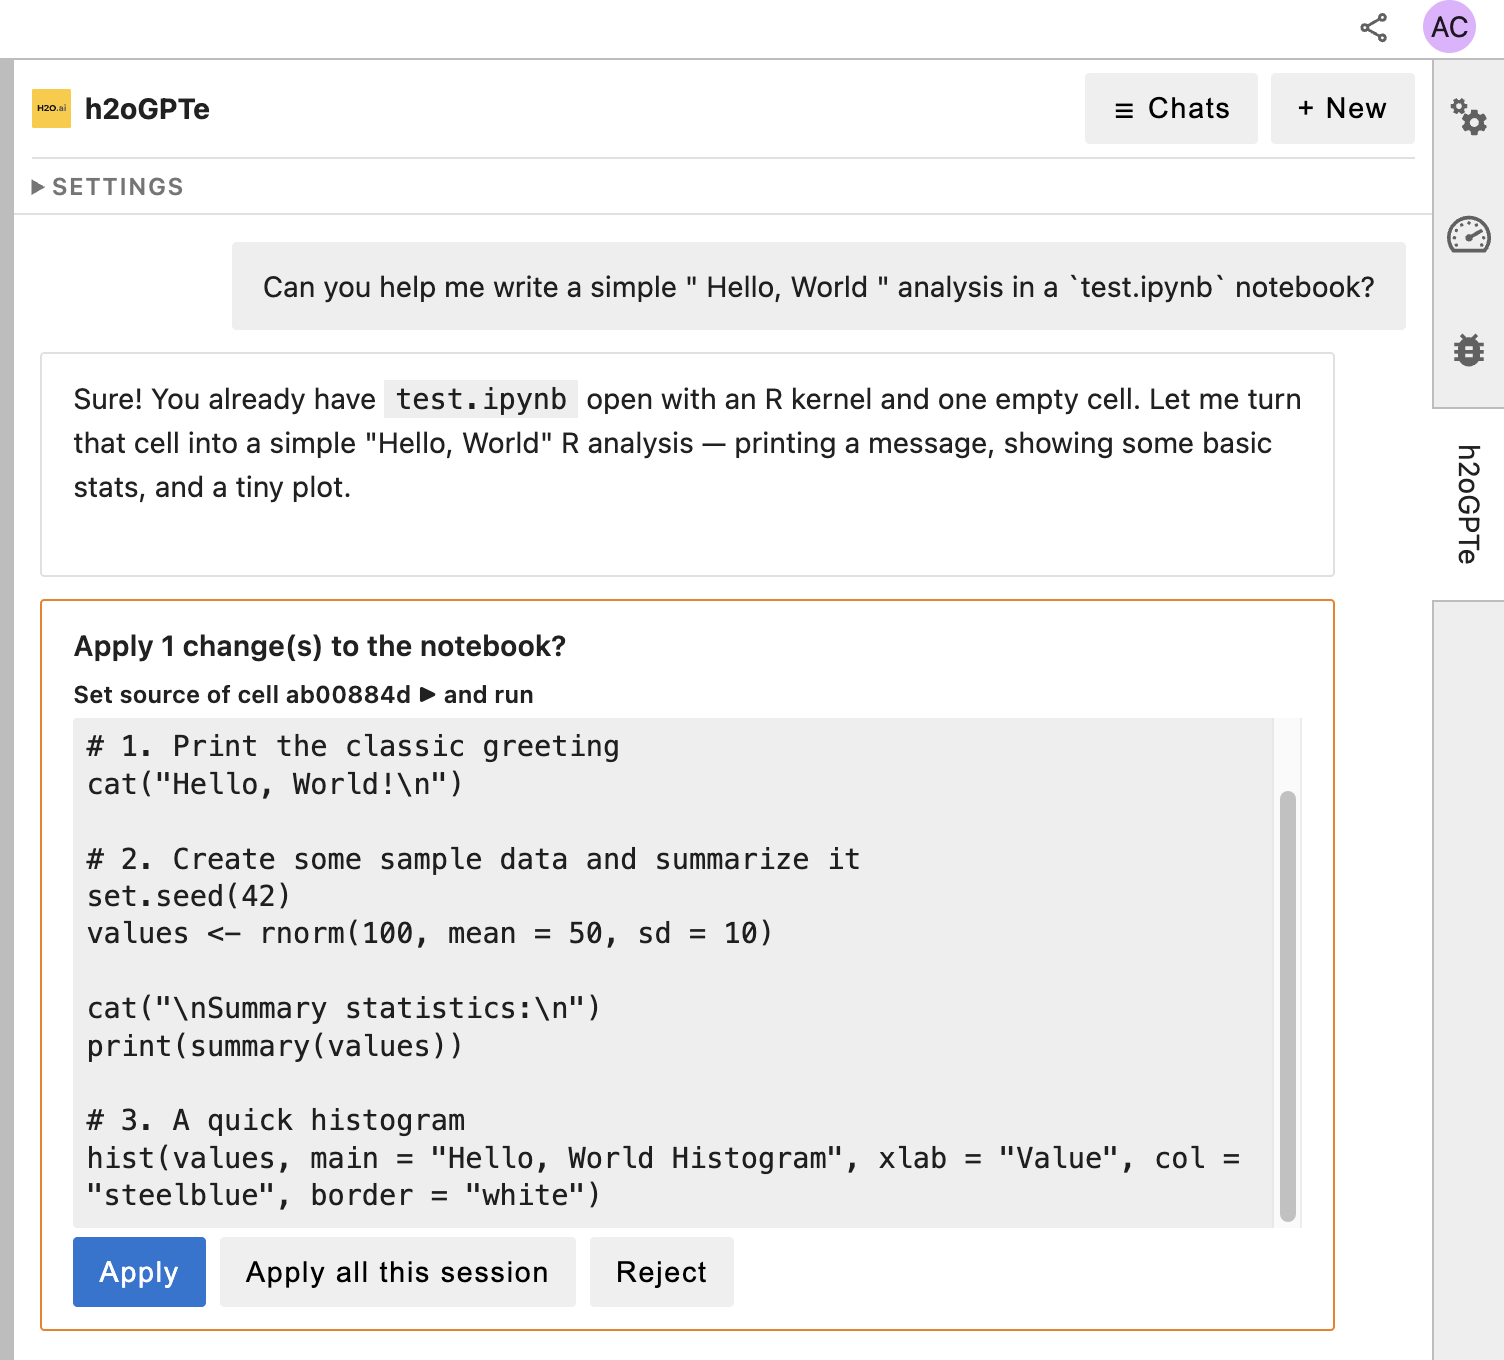
On the confirmation card, click one of the following:
- Apply: Apply this set of changes.
- Apply all this session: Apply this set and every later set without asking again.
- Reject: Discard the proposal. Nothing changes, and the assistant reports
Changes rejected — nothing applied.
When your request calls for it, running cells is one of the operations the confirmation card lists. After applying, the assistant reads the results of the individual cells it ran and attempts to correct the errors it finds in them. A request such as load this CSV and plot the monthly totals produces cells that the assistant writes, runs, and corrects, with the output in your notebook.
The panel then reports Applied N operation(s), and you can expand that line to see what each operation did and the output it returned to the assistant.
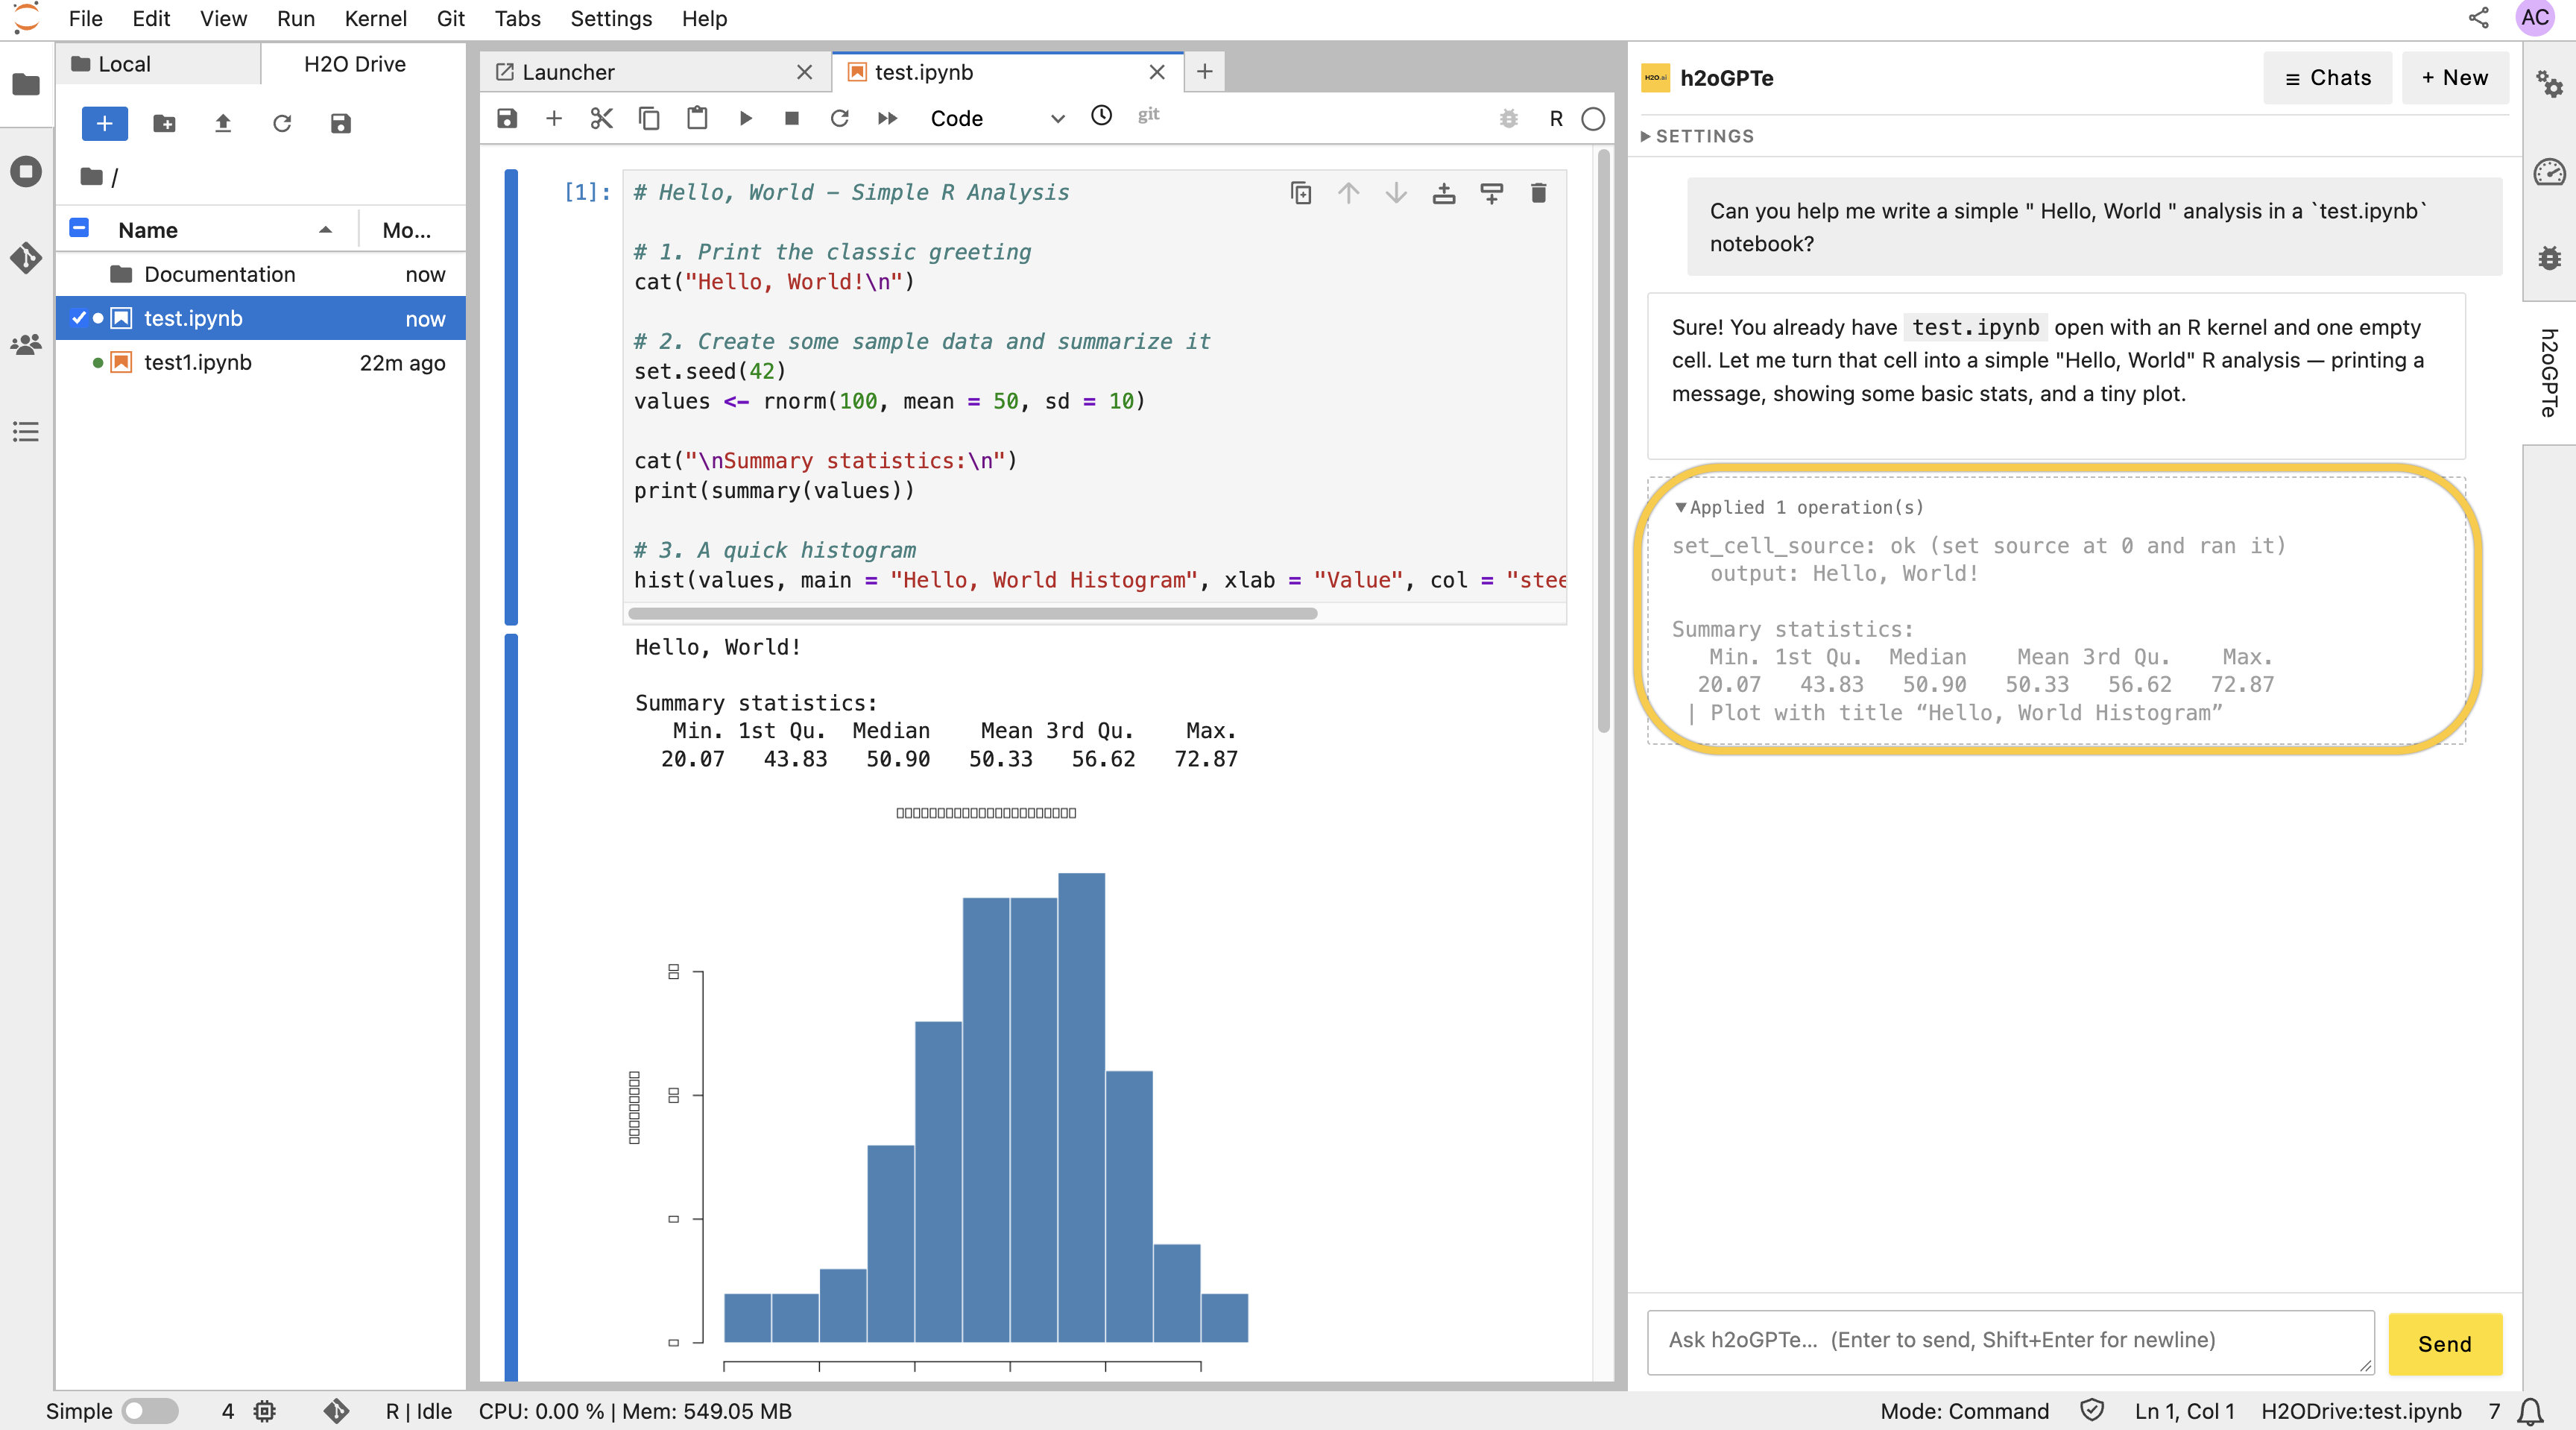
Keep the notebook you want to change active from the moment you send the request until the panel reports the result. Each operation is applied to whichever notebook is active when that operation runs, not to the notebook that was active when you sent the request, so switching notebooks while you wait can send changes to the wrong one.
The assistant can propose code that's incorrect or incomplete even in a notebook you trust, so review each proposal and verify the results. Notebook content also influences what the assistant proposes, so read each confirmation card before you apply it, especially in a notebook from an untrusted source (see What the assistant can see).
Checkpoints exist for notebooks in the local workspace only, so bring a notebook into the local workspace before a large agent task (see H2O Drive integration):
- For a notebook inside an H2O Drive folder, double-click it, which creates a local copy. The local copy overwrites any local file that has the same name, without asking you to confirm.
- For a notebook at the top level of your H2O Drive, right-click it, select Download, and add the downloaded file to the local workspace from the Local tab. If the browser saves the download as
filewith no extension, rename it and restore the.ipynbextension first.
A notebook the assistant creates lands in whichever tab of the Files panel is selected, so select the Local tab before you ask it to create one. A notebook created while the H2O Drive tab is selected has no checkpoints.
For a notebook in the local workspace, save it with File > Save Notebook before you apply a large set of changes, which also creates a checkpoint. To discard applied edits, select File > Revert Notebook to Checkpoint, which restores the notebook to its last checkpoint. A notebook has a single checkpoint: JupyterLab creates it the first time a notebook is opened without one, and replaces it each time you save with File > Save Notebook. Autosave never creates one, so a revert discards everything autosave has written since the checkpoint was taken — which, for a notebook you have never saved yourself, can be far more than the current session's work. The revert dialog reports when the checkpoint was last updated; read that timestamp before you confirm. Anything the code changed outside the notebook, such as files it wrote or packages it installed, isn't reverted.
Apply all this session turns off the confirmation card for every later request in the panel, including requests that delete cells, clear all outputs, or run the whole notebook. Because the assistant applies each operation to whichever notebook is active when that operation runs, this covers every notebook you open for the rest of the session, not only the one you were working on when you clicked it. Starting a new chat, opening a saved chat, or switching collections doesn't reset it. To restore confirmations, reload JupyterLab in your browser.
Clicking Stop ends the exchange with h2oGPTe, and the assistant reports Stopped. It doesn't undo changes that were already applied, it doesn't stop a set of changes that's already being applied, and it doesn't interrupt code that's running in your kernel — use Kernel > Interrupt Kernel for that. While a confirmation card is waiting for an answer, Stop has no visible effect: if you then click Apply, the changes are still applied, and the assistant reports Stopped. only when it starts its next turn. Click Reject to cancel without applying anything.
What the assistant can see
The panel sends no notebook content to h2oGPTe until you send a message. The panel starts as soon as JupyterLab loads, before you select the h2oGPTe tab. At startup, it contacts h2oGPTe for three things only: to load the model list, to list your collections and create the h2oGPTe Notebook Agent collection if it doesn't exist yet, and to load the saved chats in that collection. In agent mode, each request sends the following notebook content to h2oGPTe:
- The file path of the notebook, the kernel name, and the number of cells.
- The type and source of every cell, clipped to 1,500 characters per cell. This covers Markdown and raw cells, not only code cells.
- The current text outputs of every cell, clipped to 600 characters per cell. Only stream text, error names and messages, and plain-text representations are sent. Images and rendered HTML aren't sent. When an output has both an HTML form and a plain-text form, such as a pandas DataFrame, the plain-text form is sent, which for a DataFrame is the data rows.
- The results of any cells the assistant runs, clipped to 500 characters per operation.
Because the assistant can run cells you approve, anything your kernel can read, such as files in the engine, environment variables, or data loaded from connected sources, can appear in those results and be sent to h2oGPTe. Approved code also runs with your platform identity: the engine holds your H2O AI Cloud credentials, and code running in your kernel can use them to call H2O AI Cloud services, such as h2oGPTe and H2O Drive, as you.
A turn is one request-response exchange with h2oGPTe. In agent mode, each turn reads your notebook, acts, and observes the result, and the assistant re-sends the notebook on each turn it takes, so one request can transmit the notebook up to eight times. h2oGPTe holds the conversation server-side and replays earlier turns into each new request, so every notebook snapshot you send stays in the stored transcript until you delete the chat.
In both agent mode and chat mode, the first time you send a message while a notebook with a running kernel is open, the assistant runs one silent probe in your kernel and includes the result in the request. The probe reports the Python version, the operating system and machine architecture, and the list of installed packages. It adds no cell and no output to your notebook, it runs once per JupyterLab page load (reloading the page runs it again), and you can't turn it off.
Turning off agent mode stops the panel from sending the cells and outputs of your notebook. The panel still sends the kernel environment summary, once the probe has run in this page load.
No h2oGPTe API key or token reaches your browser. A proxy inside your engine forwards each request under your own platform identity; the proxy records no prompts or responses.
In agent mode, cell source is transmitted along with outputs: a credential written in any cell — code, Markdown, or raw — is sent to h2oGPTe, and so is a sensitive value a cell prints. Keep secrets out of cell source and load them at runtime instead, for example from environment variables or files. If a cell prints credentials, personal data, or other sensitive values, clear that output before you ask the assistant a question in agent mode.
Notebook content and documents in a grounded collection both influence what the assistant proposes, so a notebook from an untrusted source can steer it. Code you approve runs with your platform identity and can act on H2O AI Cloud services as you. Read each confirmation card before you apply it, and click Apply all this session only for work you're prepared to have applied unreviewed.
Choose a collection
The assistant works from one h2oGPTe collection at a time. You select it from the Collection list in the Settings section of the panel; there's no separate screen for it.
A collection is a set of documents that the assistant can draw on when it answers. Drawing on a collection in this way is called grounding. A collection also stores conversations. For more information, see the Enterprise h2oGPTe documentation.
To ground the assistant in a collection:
- In the panel, expand Settings.
- From the Collection list, select a collection.
The status line confirms with Grounding in "<collection>" ✓ and the assistant starts a new conversation that draws on the documents in that collection. Documents in the collection influence what the assistant proposes, so ground the assistant only in collections you trust (see What the assistant can see).
Selecting a collection also changes where your conversations are stored: every later chat, including the cell source and outputs the assistant sends, is stored in the selected collection. The list can include collections shared with you and public collections, so check whose collection you're selecting before you ground the assistant in one you don't own.
If the Collection list isn't in Settings, the panel didn't reach the collection list in h2oGPTe when it started. The Chats controls are hidden for the same reason, and the status line reads Local session (h2oGPTe history unavailable). Reload the page to try again, and see Troubleshooting.
To add documents to a collection, use h2oGPTe. You can't upload documents from the panel.
Conversations
Where conversations are stored
The assistant stores your conversations in h2oGPTe, not in your engine:
- The assistant stores new chats in a collection named
h2oGPTe Notebook Agent. When JupyterLab loads and h2oGPTe is available, the assistant creates that collection in your h2oGPTe account if it doesn't exist yet, even if you never open the panel. If you select a different collection in Settings, the assistant stores later chats in that collection instead. - The assistant names each chat automatically from the first 60 characters of your first message.
- Each chat sits under your h2oGPTe identity and follows the retention and access rules of your h2oGPTe deployment. For data retention and privacy details, see the Enterprise h2oGPTe documentation.
Manage conversations
Because your conversations live in h2oGPTe, you can reopen them later. Reloading the page clears the panel and starts a new chat rather than reopening the previous one.
The panel provides the following controls:
- + New: Start a new conversation. The previous conversation stays stored.
- Chats: Open the Recent chats list. Select a chat to restore its transcript.
- Search chats…: Filter the loaded chats by name or by the text of the latest message shown under each name.
- Rename (pencil icon) and Delete (cross icon): Rename or delete a conversation with the icon buttons on each row of the Recent chats list. Point to an icon to see its name. Rename opens a box where you enter a new name. Delete asks you to confirm with
Delete "<name>"? This cannot be undone.and then removes the conversation from h2oGPTe.
The list shows up to 50 chats from the selected collection, most recently updated first, and restoring a conversation loads up to 200 of its messages.
Assistant settings
All settings are in the Settings section of the panel.
| Setting | Description | Default |
|---|---|---|
| Agent mode | Whether the assistant reads and edits your notebook, or answers as a plain chat. | On |
| Model | Which h2oGPTe model answers your requests. | The first available model |
| Collection | Which h2oGPTe collection grounds the answers and stores new conversations. | h2oGPTe Notebook Agent |
Settings apply until you reload the page. Reloading returns them to their defaults.
As part of the H2O AI Cloud deployment, your administrator sets whether the assistant is available and which h2oGPTe environment and models it reaches. There's nothing for you to install or authenticate, and there's no user setting that turns the assistant off.
Limitations and troubleshooting
The assistant has limitations that affect what it can do and how far you can trust a result, including a clipped view of your notebook, sets of changes that can be applied in part, and a per-turn time limit. For those, and for the messages you might see, see Enterprise h2oGPTe assistant limitations and Enterprise h2oGPTe assistant troubleshooting.
Related topics
- H2O Drive integration
- Create a new Notebook Engine
- Manage a Notebook Engine
- Notebook Engine profiles
- Enterprise h2oGPTe documentation
- Submit and view feedback for this page
- Send feedback about AI Engine Manager to cloud-feedback@h2o.ai