My AI Engines
This section outlines how Steam runs on H2O AI Hybrid Cloud (HAIC).
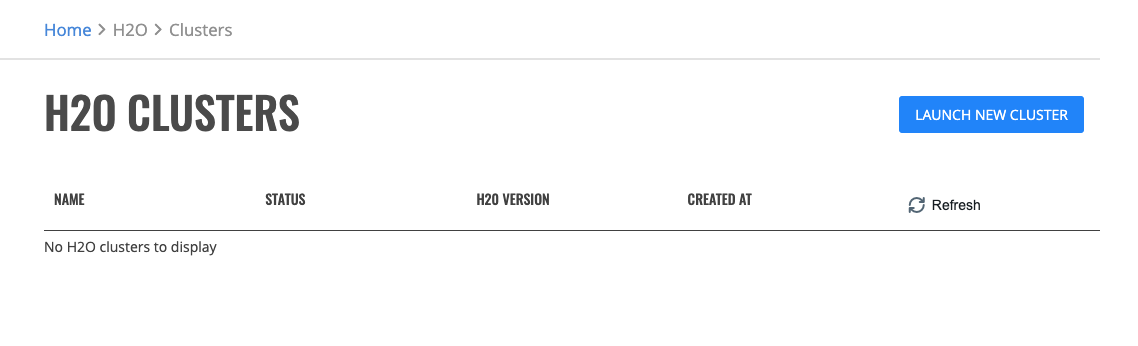
Launching H2O
The H2O page shows clusters created by the current user, the state of the cluster, and the cluster creation date. From this page, you can launch a new H2O cluster, view the details of existing clusters, or delete a cluster.
Note: When Enterprise Steam is started for the first time, no clusters will appear in the UI.
Launch Cluster
Select Launch New Cluster.
Select a Cluster Profile from the dropdown menu to use when setting up the new cluster. Cluster profiles are configured by the Steam administrator and provide the allowed minimum, maximum and default values for each options in a cluster profile.
Configure the new cluster.
Cluster Name: Specify a name for this cluster.
H2O Version: Specify the H2O version to use.
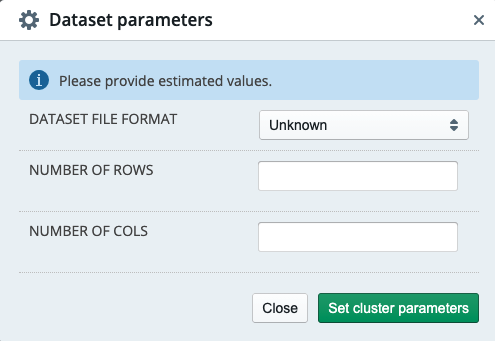
Dataset parameters: Optionally provide estimated dataset parameters described in section below. Cluster parameters will be preset to accommodate your dataset within selected profile limits.
Number of Nodes: Specify the number of nodes.
Number of CPUs: Specify the number of CPUs per node.
Number of GPUs: Specify the number of GPUs per node.
Memory per Node [GB]: Specify the amount of memory per node in GB.
Maximum Idle Time [HRS]: Specify the maximum number of hours that the cluster can be idle before shutting down.
Maximum Uptime [HRS]: Specify the maximum number of hours that the cluster can be running.
Startup Timeout [SEC]: Specify the timeout duration (in seconds) to wait for the cluster to form before failing.
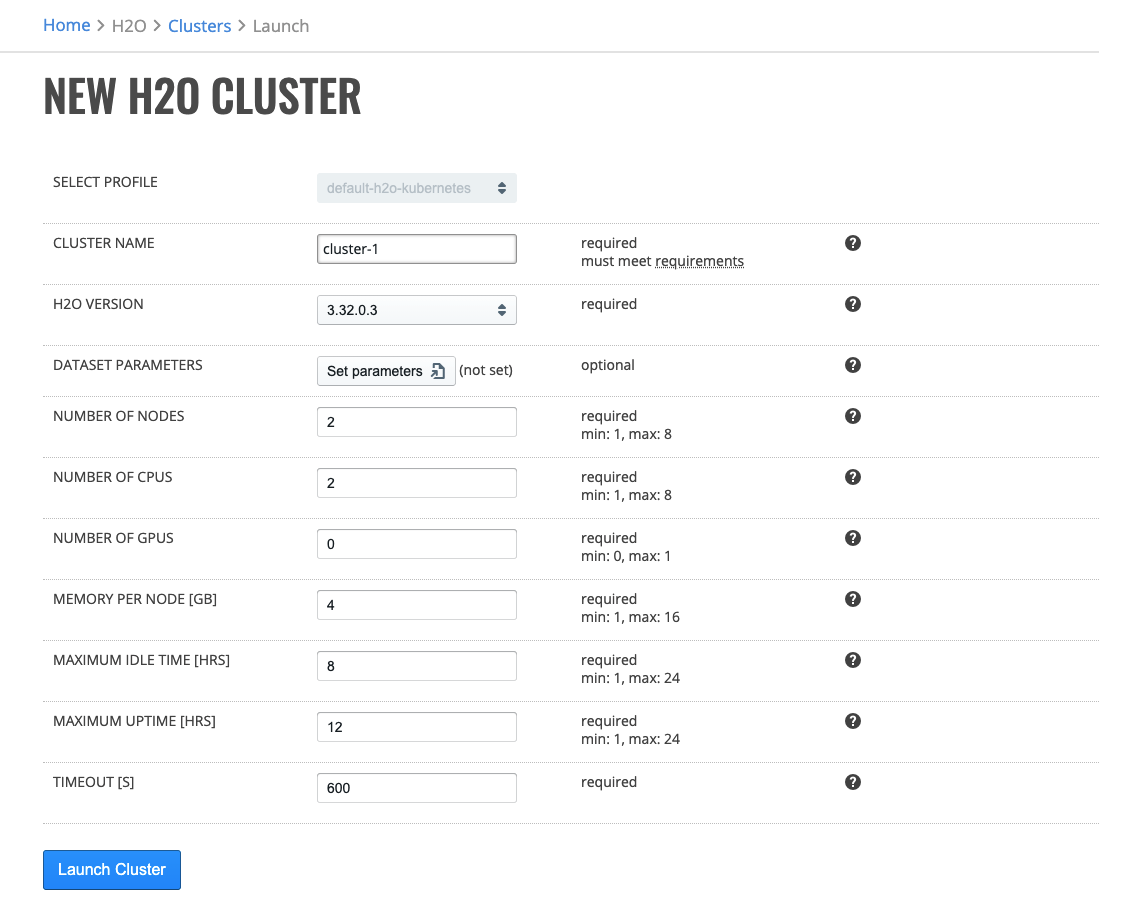
Click the Launch New Cluster button to launch a new cluster.
Upon successful validation of parameters, the cluster will begin starting and you will be taken back to the previous page. It takes up to 5 minutes for the H2O cluster to launch.
Running Cluster
Once the H2O cluster is up and running you can access H2O Flow or manage the cluster through the Actions button.
Accessing H2O Flow
Once the cluster has started you may click on the cluster name. This opens H2O Flow in a new tab.
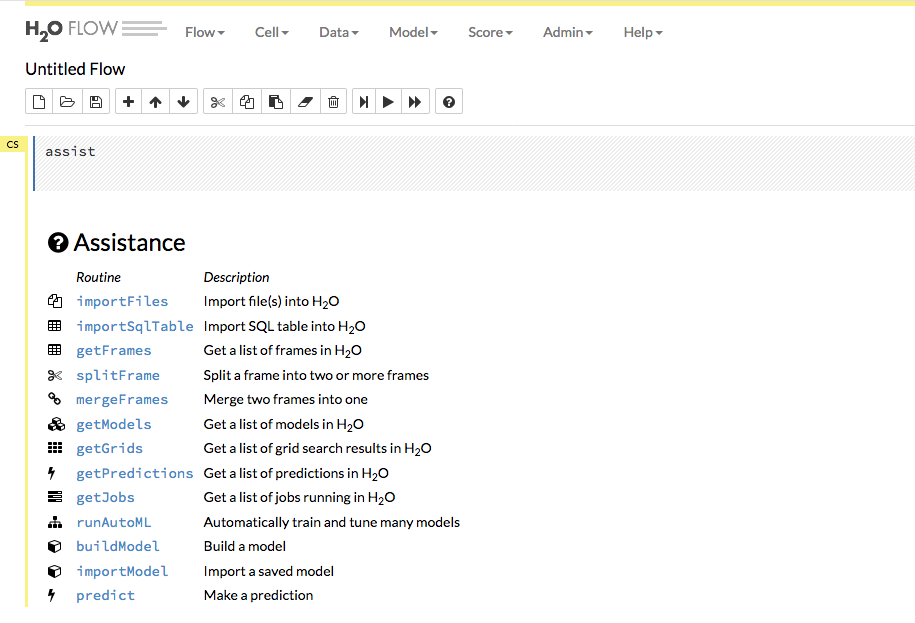
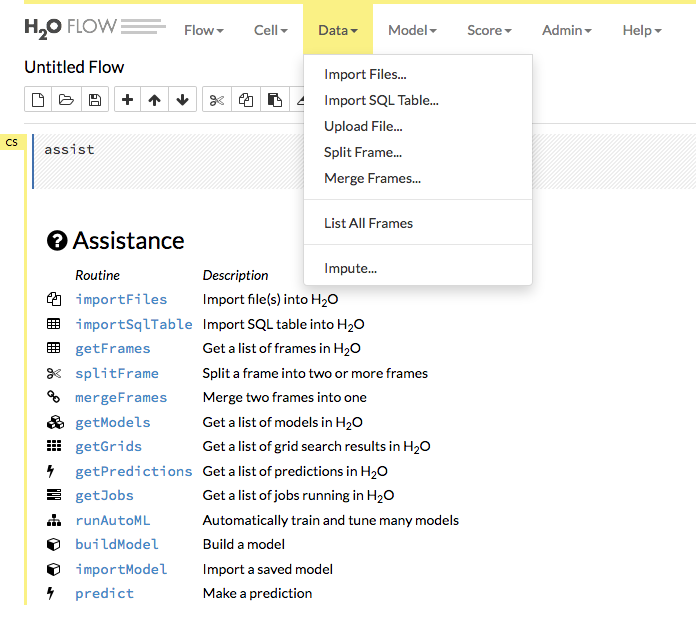
Use the menu items at the top to import/upload your data into Flow and to build and score models.
The Data dropdown allows you to import or upload a dataset, import SQL table, split or merge frames, and impute data.
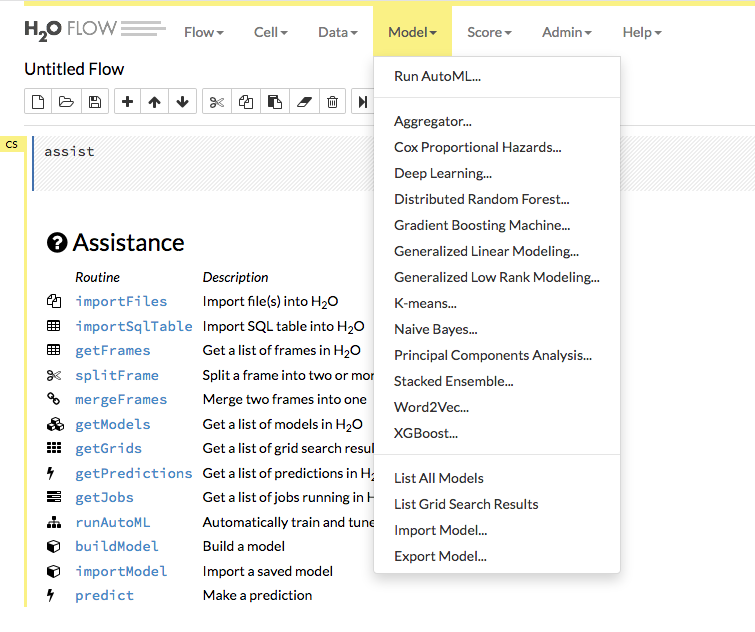
The Model dropdown allows you to select an algorithm and begin building models or to import/export models.
Refer to the H2O Flow documentation for more information on how to use H2O Flow.
Cluster Details
To view the details of a cluster, click the Actions > Detail option.
Cluster Events
To view the events of a cluster, click the Actions > Events option.
Cluster Logs
You can see H2O logs by clicking on the Actions > Logs option. On this page you may download a complete log bundle for troubleshooting.
Terminating Clusters
To stop a Running cluster, click the Actions > Terminate option. When the confirmation window appears, click the Yes, Terminate button to stop the cluster.
Launching Driverless AI
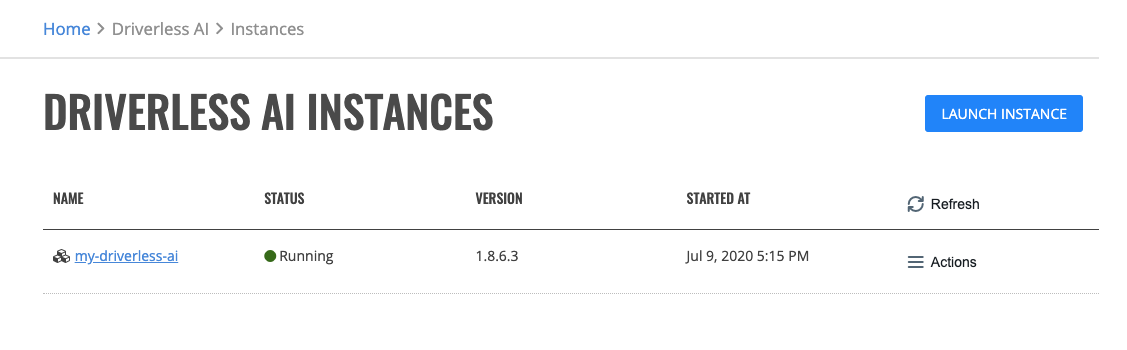
The Driverless AI page shows instances created by the current user, the state of the instance, Driverless AI version and the instance creation date. From this page, you can launch a new Driverless AI instance and manage existing instances.
Launching Instance
Click the Launch Instance button.
Select the profile to associate with this instance.
Specify values for the options below:
Instance Name: Specify a unique name for the Driverless AI instance.
Version: Select the Driverless AI version.
Number of CPUS: Specify the number of CPUs.
Number of GPUS: Specify the number of GPUs.
Memory [GB]: Specify the amount of memory.
Storage [GB]: Specify the amount of storage.
Maximum Idle Time [HRS]: Specify the maximum idle time of the Driverless AI instance. The instance will stop if it is idle for longer than maximum idle time. When the instance stops, it can be started again.
Maximum Uptime [HRS]: Set the duration after which the instance automatically stops. When the instance stops, it can be started again.
Timeout [S]: Specify the number of seconds to wait for the Driverless AI instance instance to come up.
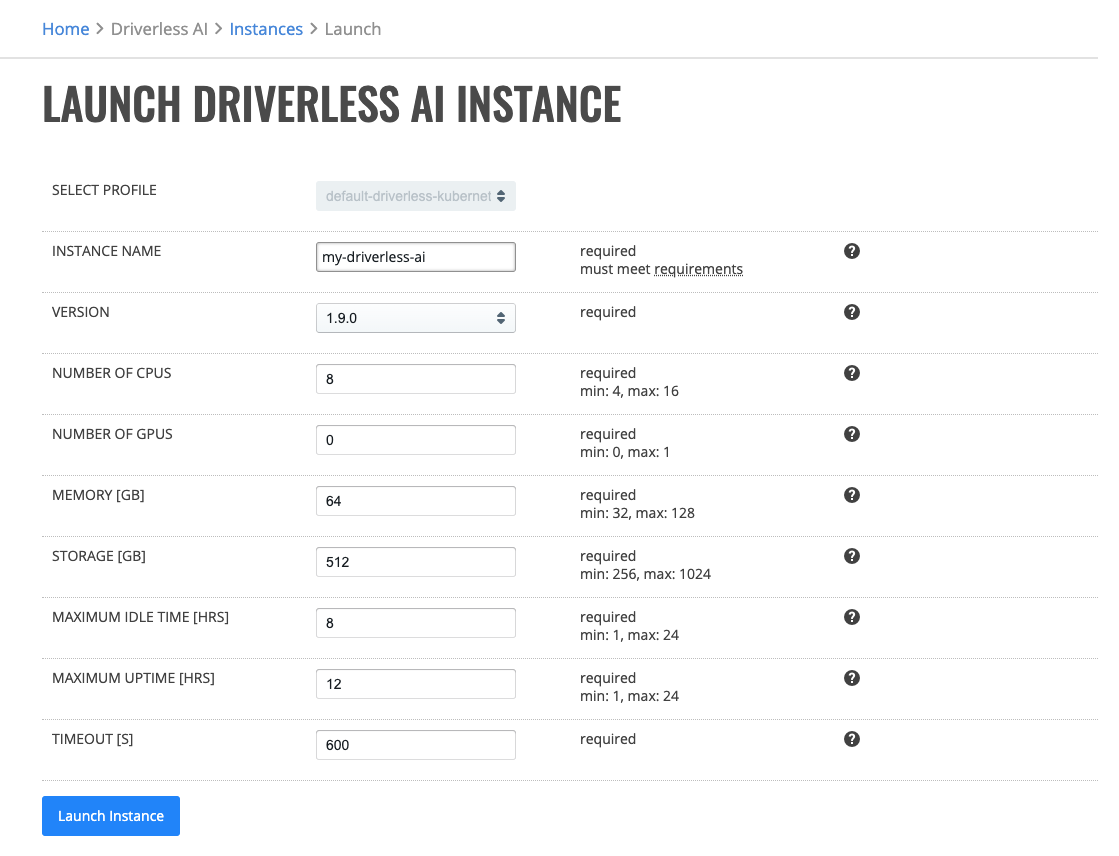
If a selected profile allows you to override specified Driverless AI TOML configuration, you can do so in the last field of the instance launch screen.

Click Launch Instance to create the instance.
Upon successful validation of parameters, the instance will begin starting and you will be taken back to the previous page. It takes up to 5 minutes for Driverless AI instance to launch.
Accessing Driverless AI
After the Driverless AI Instance is launched, to access Driverless AI click the Instance Name. This will open up your Driverless AI instance onto the Datasets page. Refer to the Driverless AI documentation for information on how to use Driverless AI.
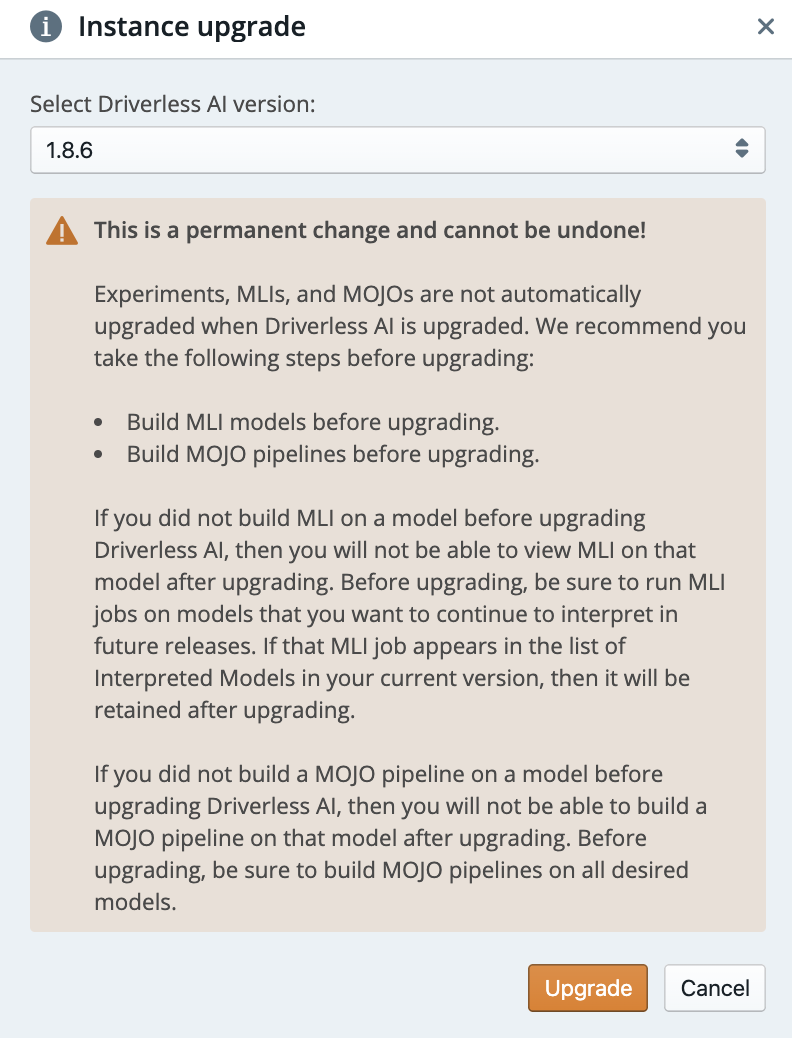
Upgrading Instance
You can upgrade an instance to a newer version of Driverless AI.
Note: The instance must be in a “Stopped” state before you can upgrade.
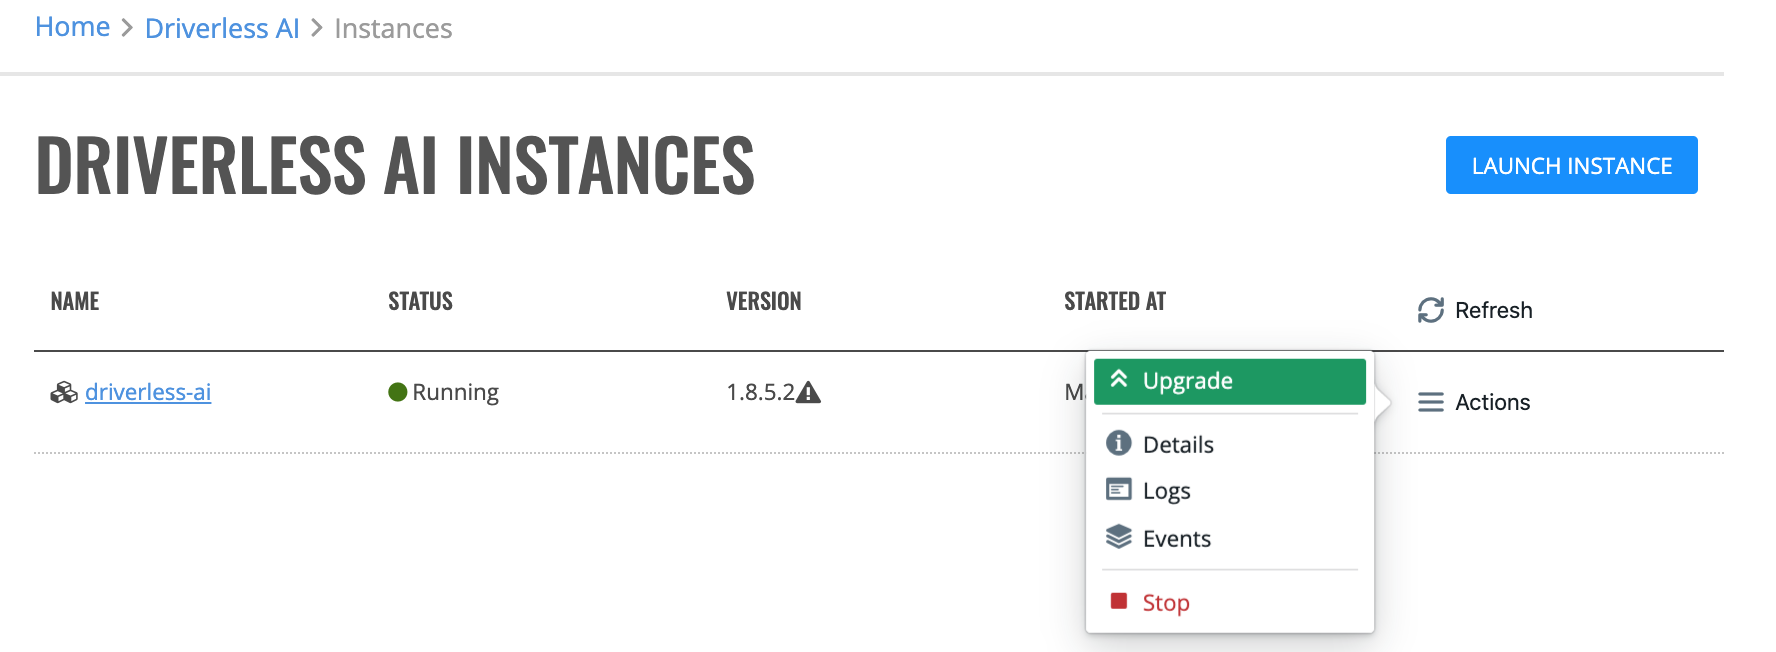
Before you upgrade your instance, a prompt will appear allowing you to select the Driverless AI version to upgrade to. Click the Upgrade button to upgrade the instance.
Instance Details
To view the details of a instance, click the Actions > Detail option.

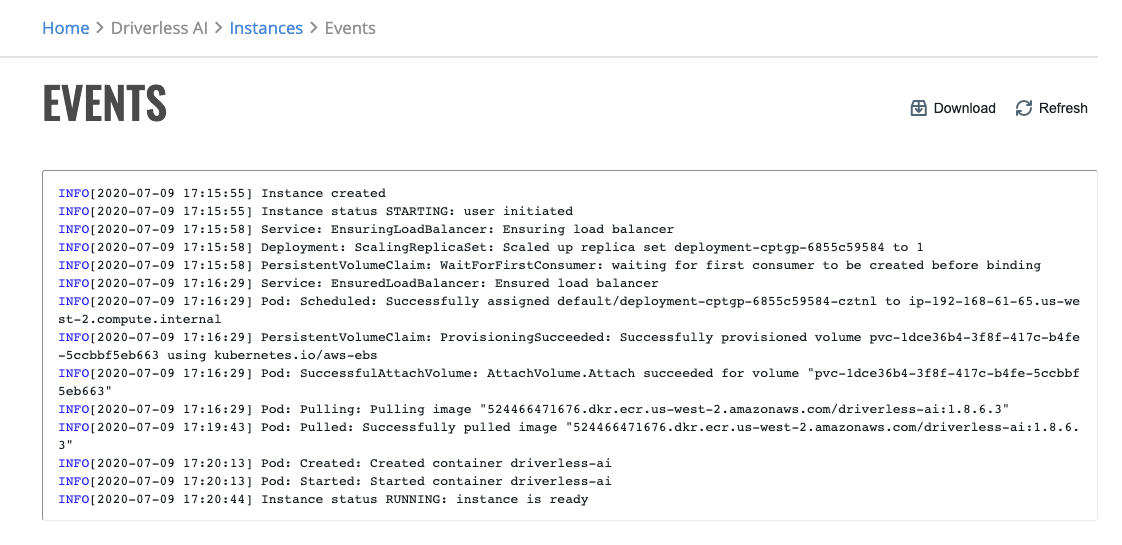
Instance Events
To view the events of a instance, click the Actions > Events option.
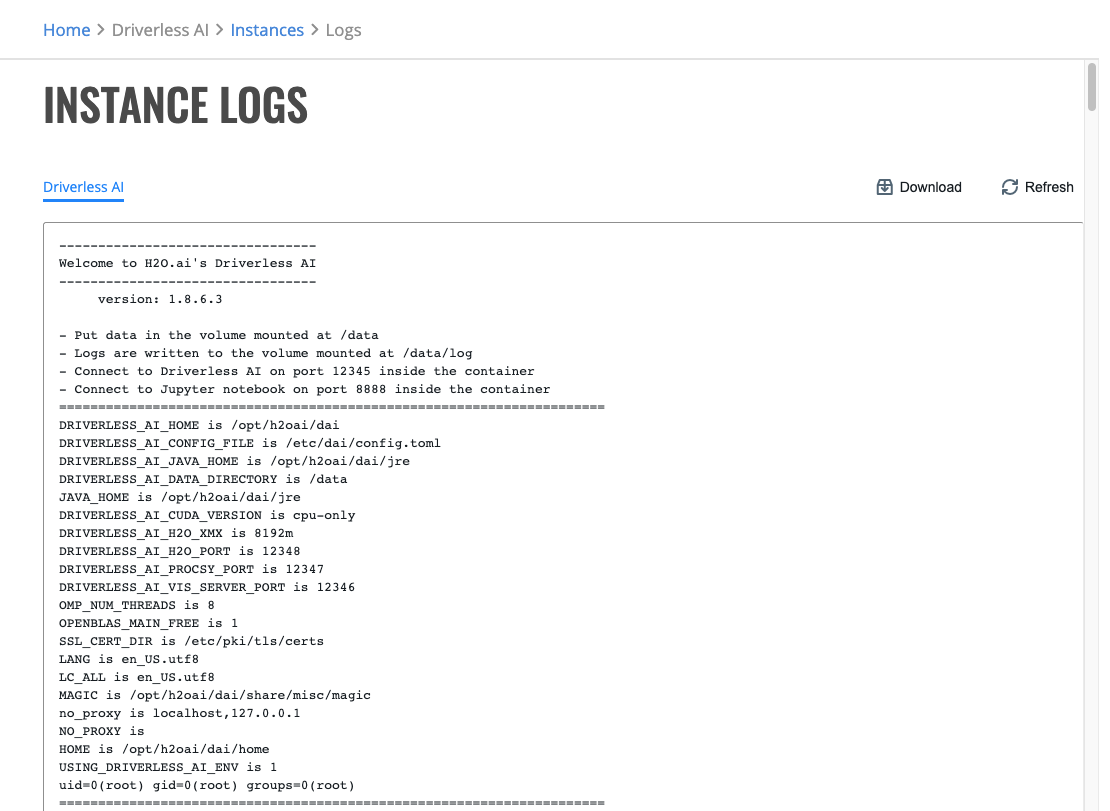
Instance Logs
You can see Driverless AI instance logs by clicking the Actions > Logs option. On this page you may download a complete log bundle for troubleshooting.
Note: Logs are only available for a running Driverless AI Instance.
Stopping Instance
You can stop a Running Driverless AI instance by clicking on Actions > Stop beside the instance that you want to stop.
Marking Instance as Failed
On a rare occasion, an instance might get stuck in a Stopping state due to infrastructure failure. To manually resolve this situation, you can mark instance as Failed with Actions > Mark as failed.
Starting Instance
To start a Stopped Driverless AI instance, click the Actions > Start option. On the restart instance page, click Start Instance to restart the instance. You may change the parameters of the instance.
Note: When restarting a Driverless AI instance, you cannot change the Name, Version, or Storage of the instance.
Terminating Instance
You can terminate a Stopped Driverless AI instance by clicking the Actions > Terminate option. A prompt for terminating the server will appear warning you that terminating the instance will cause you to lose all experiments on that instance. To terminate the instance, click the Yes, Terminate button.
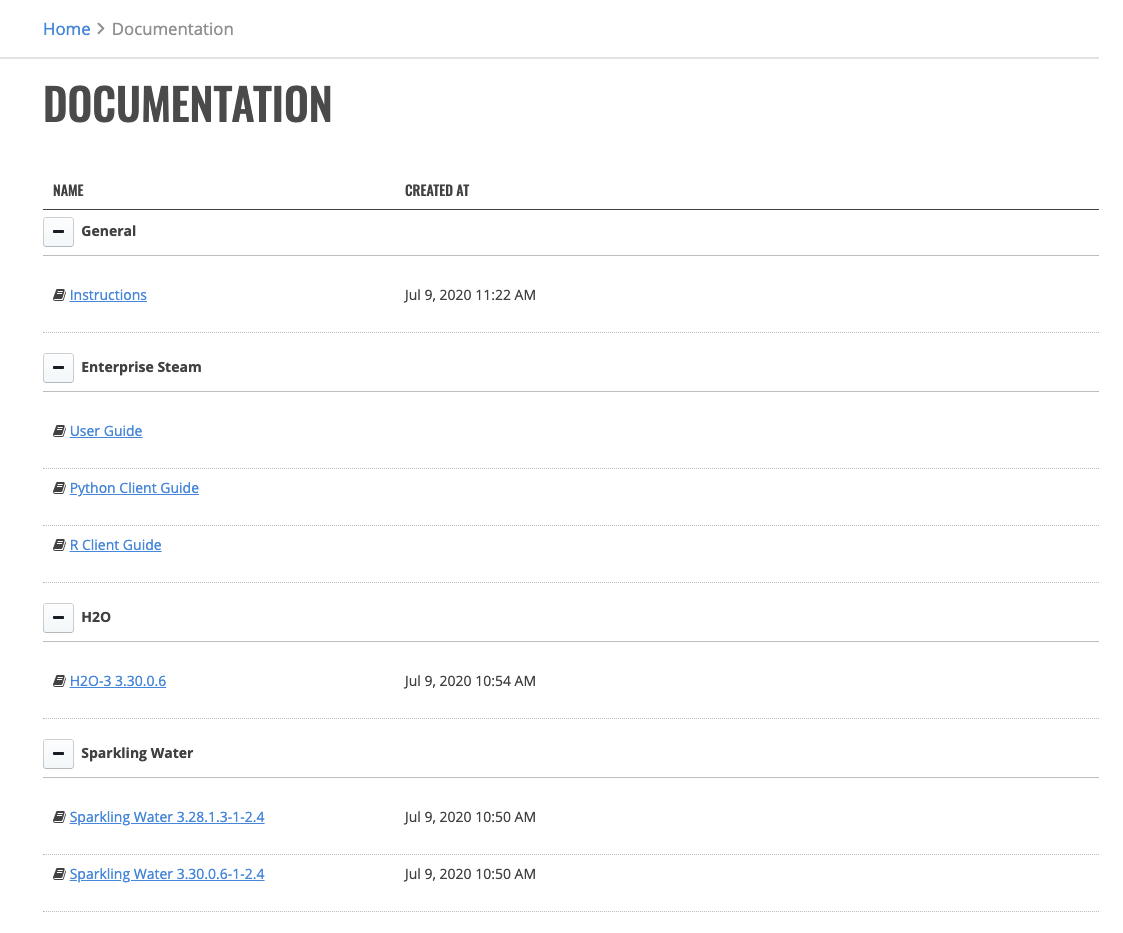
Documentation
This page shows documentation items that are available for all users to read through. Typically the Steam, H2O and Sparkling Water documentation will be available. Contact your Steam administrators if you wish to have more documentation items available.
Configurations
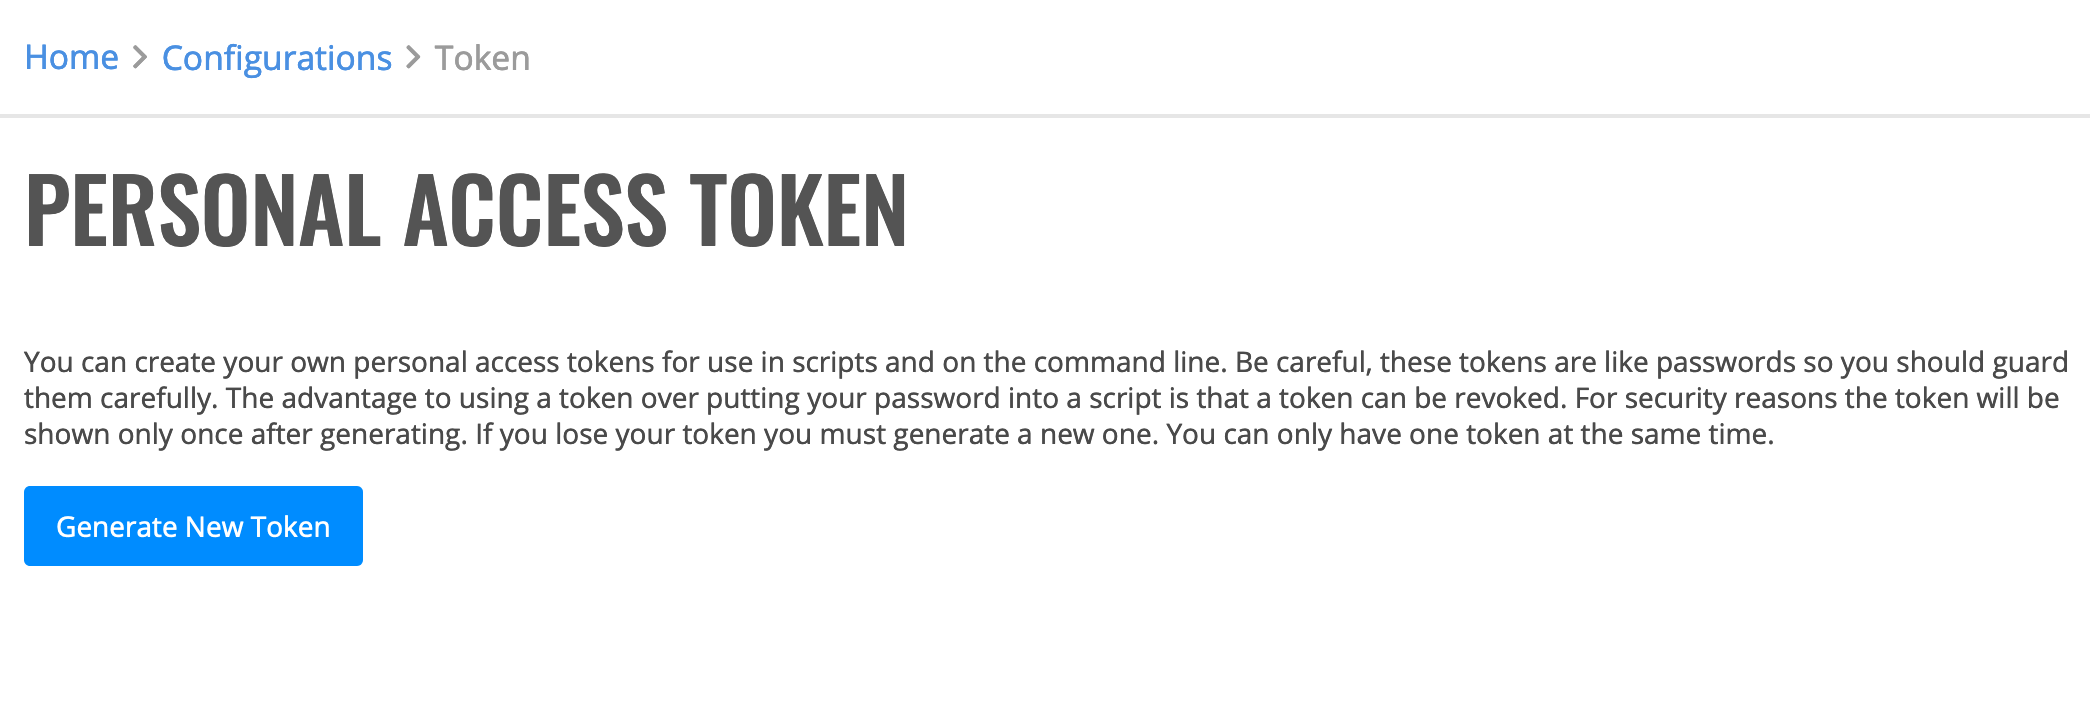
The Configurations page allows you to generate a Personal Access Token.
Personal Access Token
Personal access tokens (PATs) are an alternative to using passwords for authentication to Enterprise Steam when using the API or the command line. Note: Treat your tokens like passwords and keep them secret. When working with the API, use tokens as environment variables instead of hardcoding them into your programs. For security reasons, after you navigate off the page, you will not be able to see the token again. When you generate a new token, any previously issued tokens will be revoked.
Click on Tokens under the API section to open the Personal Access Token page.
Click Generate New Token to generate and retrieve your token.
Python Client
Downloading and Installing
To download the latest stable version of Enterprise Steam, either:
Click Python Client tab to download the latest stable version of Enterprise Steam or
Go to the Enterprise Steam Download page to retrieve the Enterprise Steam Python client and download the Python client for your environment from the Steam API tab.
Navigate to the location where the Python client was downloaded, and install the client using one of the following methods:
pip install h2osteam-1.9.14-py2.py3-none-any.whl
conda install h2osteam-1.9.14-py27_0.tar.bz2
conda install h2osteam-1.9.14-py36_0.tar.bz2
conda install h2osteam-1.9.14-py37_0.tar.bz2
Documentation
Refer to the Enterprise Steam Python Client Documentation to learn more about how to use the Python client, including examples.