Using the H2O command line interface
The h2o command line interface (CLI) is a command line tool for app developers and other users
to interact with the platform.
Configuring the CLI
The following steps describe how to install and configure the h2o CLI to talk to a particular platform deployment.
-
Add the
h2oCLI binary to your $PATH. If you don't know how to do this, contact your support team. -
On macOS and Linux machines, run
chmod +x h2ofrom the terminal to give the CLI permission to run on your machine. Note that if you are using a Windows machine, you can skip this step. -
Configure your CLI by running
h2o config setup. You are prompted to fill in values for the following fields (note that the provided values are for demonstrative purposes only):Endpoint URL: "https://h2o-cloud.example.com"
OIDC URL: "https://auth.example.com"
Client ID: "h2o-cloud-public"
To find the specific values to enter for the preceding fields according to your environment, you can click your username on the top-right corner of the H2O AI Cloud home screen, and then click CLI & API access.
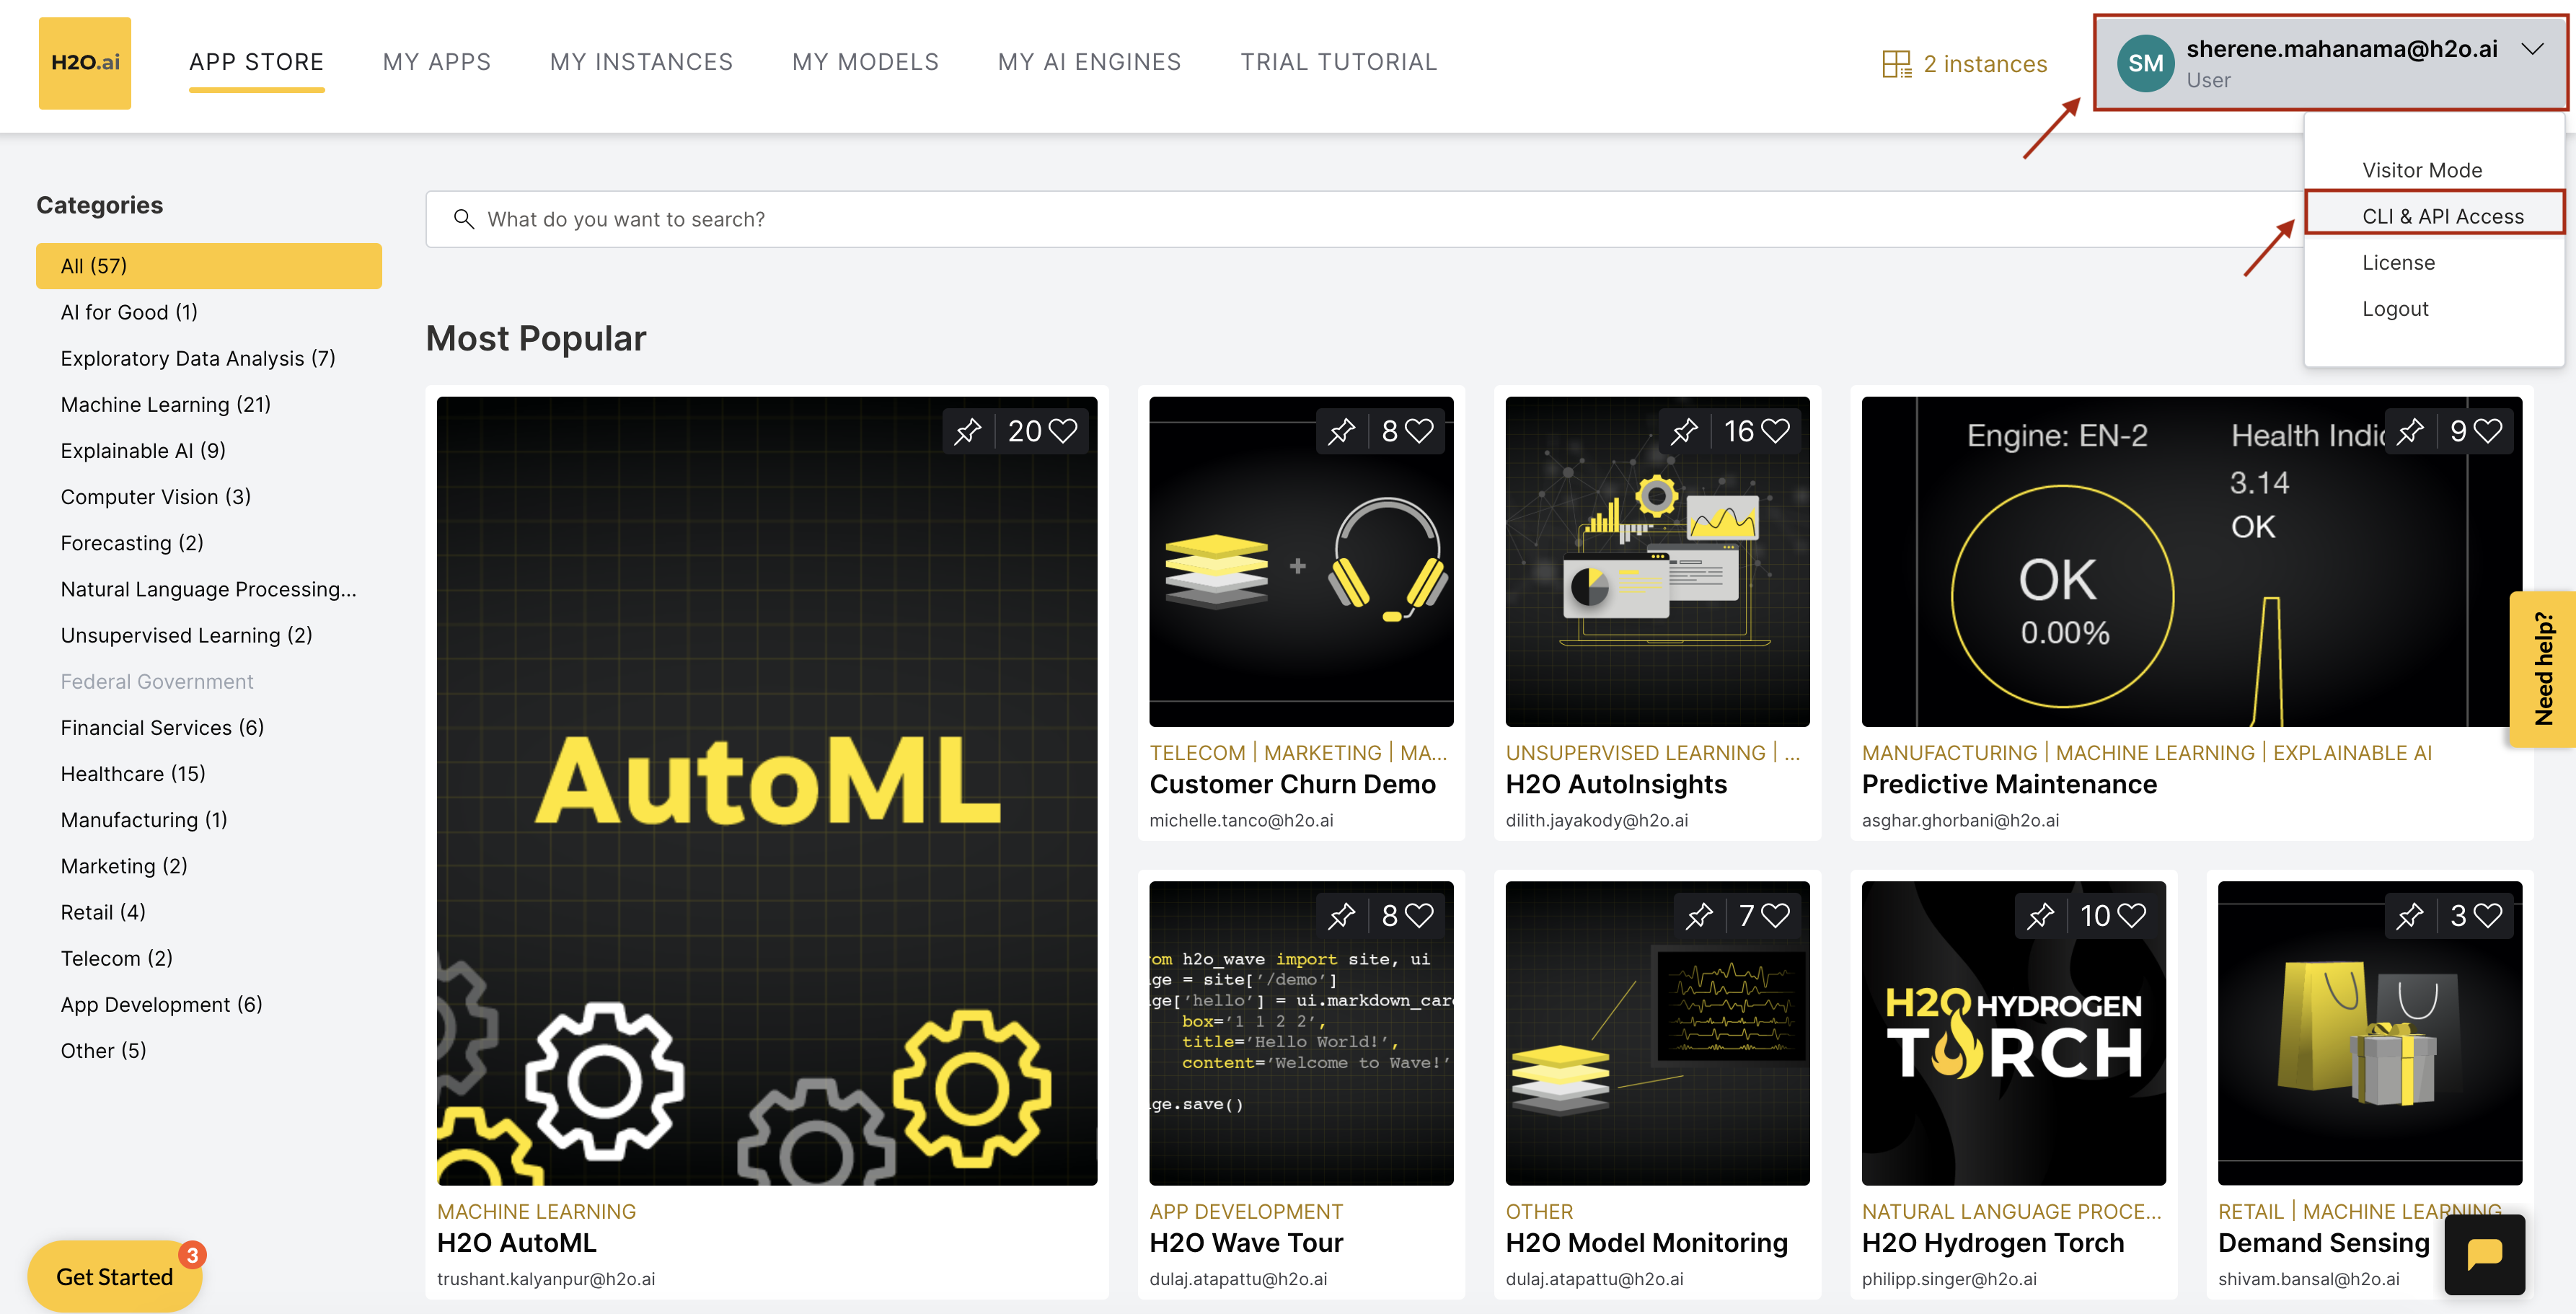
You will see the following screen with the generated values for Endpoint URL, OIDC URL, and Client ID.
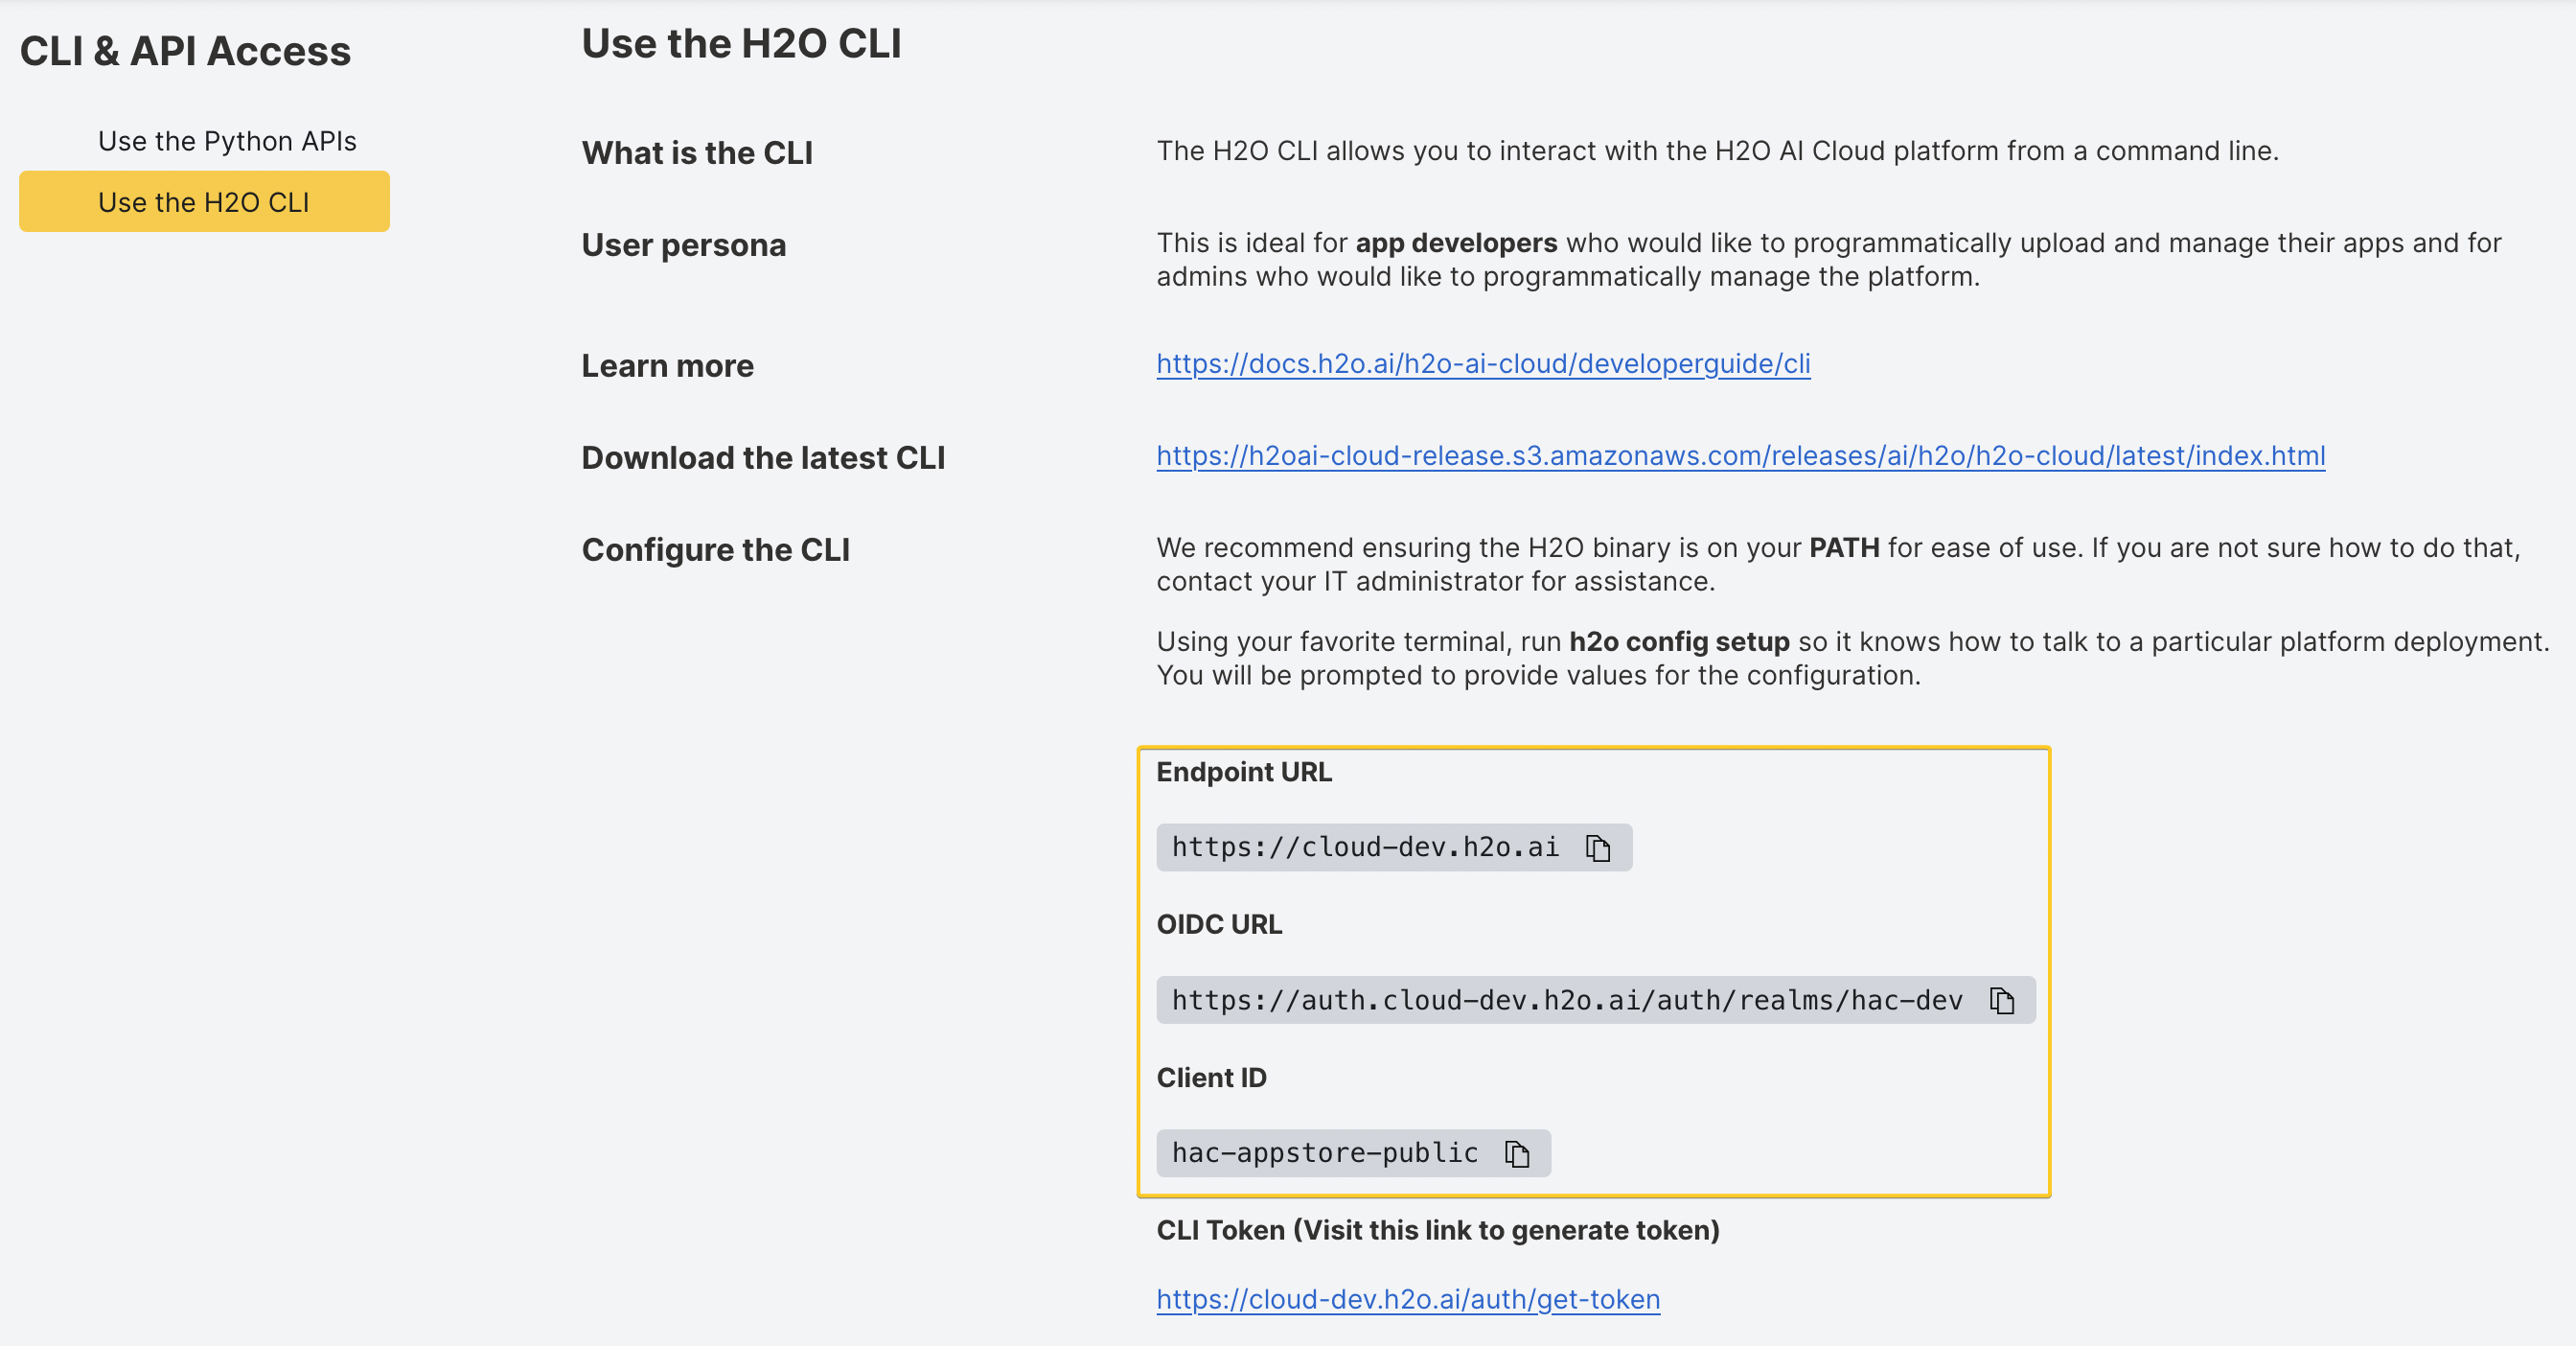
Afterwards, you will be asked to visit the Endpoint URL to retrieve a token and paste that in to complete the configuration.
Getting a new CLI token
You can get a new token without needing to go through the steps of creating an entirely new configuration.
This can be done like this: h2o config update-token.
Using multiple config files
-
You can have as many config files as you wish.
-
When you run
h2o config setup, your config will be saved at~/.h2oai/h2o-cli-config.toml. -
You can have more than one config locally, so you can easily run commands against different environments.
For example, you could have both
h2o-cli-config.tomlas the default which points to your production environment, and then another one calledh2o-cli-config-staging.tomlwhich references a different cloud instance. -
When using the CLI with an alternate config other than the default, start all of your commands with
h2o --conf path/to/config.tomlor define the environment variableH2OCONFIGto let the CLI know which configuration to use.For example, when bundling an app to deploy to a different environment, you can run
h2o --conf ~/.h2oai/h2o-cli-config-staging.toml bundle importorH2OCONFIG=~/.h2oai/h2o-cli-config-staging.toml h2o bundle import. When both theH2OCONFIGenvironment variable and--confarguments are provided, the--confargument take precedence.
Platform token
The h2o platform [token-info, refresh-token, access-token] commands let you access the H2O AI
Cloud platform token.
The platform token allows you to securely authenticate against all the APIs in the H2O AI Cloud, such as Enterprise Steam, Driverless AI, MLOps, AI App Store, Document AI, etc. The platform token is an OpenID Connect (OIDC) refresh token that is used later to obtain API access tokens, which are needed to use these APIs. This lets you securely orchestrate API calls from your local workstation, Jupyter notebooks, or basically anywhere else.
For more details, see API authentication.
The platform token must be enabled in the environment for the following steps to work. If you have issues replicating the following steps, contact your administrator to enable it.
You can obtain a new platform refresh token by following these steps.
$ h2o config update-platform-token
Visit https://your.domain.com/auth/get-platform-token to generate a new token and paste it below:
Token: <REDACTED>
The platform token is then cached in the CLI config file and can be printed via
h2o platform token-info (useful in scripts,
see Using the platform token)
and h2o platform refresh-token or converted to a fresh, short-lived access token
via h2o platform access-token for direct use in requests, such as via curl.
The cached platform refresh token can be updated any time via h2o config update-platform-token,
and it needs to be explicitly refreshed when it expires or is invalidated by the admin (depending on
environment configuration).
In addition to having a valid access token for API requests, you need the following information to connect to each component API:
MLOps: <value of the h2oai-mlops gateway Secret Key>
Steam: <value of the h2oai-steam API Secret Key>
The h2o secret list command will list all the secrets to which the user has access.
To list the secrets with the visibility type ALL_USERS, use the command h2o secret list -v ALL_USERS.
$ h2o secret list
NAME                 	VISIBILITY	PARENT	KEYS
h2oai-mlops          	ALL_USERS 	      	gateway
h2oai-steam          	ALL_USERS 	      	api, public-address
To obtain the value of the h2oai-mlops gateway, run h2o secret get h2oai-mlops -e.
To obtain the value of the h2oai-steam API, run h2o secret get h2oai-steam -e.
Apps
The h2o app [get, list, import, delete, run, update, meta] commands let you see and, when
authorized, manage or run available apps.
Listing existing apps
The h2o app list -a command will list all apps visible to the user.
$ h2o app list -a
ID                                    TITLE                        OWNER            CREATED VISIBILITY    TAGS
abc543210-0000-0000-0000-1234567890ab Peak 0.1.1                   user1@h2o.ai     18d     ALL_USERS     Beta
bcd543210-1111-1111-1111-0123456789ab Tour 0.0.15-20200922162859   user2@h2o.ai     20d     ALL_USERS
...
Launching existing apps
To launch an app, the h2o app run <appId> command can be used to launch a new instance of that app.
The -v flag can be used with app run to specify app instance visibility settings.
$ h2o app run bcd543210-1111-1111-1111-0123456789ab
ID  22222222-3333-4444-5555-666666666666
URL https://22222222-3333-4444-5555-666666666666.cloud.h2o.ai
Retrieving metadata from an app
The h2o app meta <appId> command can be used to retrieve requirements.txt, packages.txt, app.toml and a list of files from an app.
The -t flag can be used with app meta to specify REQUIREMENTS,PACKAGES, FILES, APP.
$ h2o app meta  19b2cc66-e1c3-4cfa-96eb-b00cdc8c0da0
h2o-wave==0.16.0
# Packages
$ h2o app meta 19b2cc66-e1c3-4cfa-96eb-b00cdc8c0da0 -t PACKAGES
java
libavcodec58
# Files
$ h2o app meta 1ed9a149-e6ab-41db-ab4a-a64630ad333a -t FILES
/
LoremIpsum.md
app.toml
lorem.py
requirements.txt
static/
static/icon-example.png
# app.toml
$ h2o app meta f1cea5b0-dfeb-46b2-b538-37d2605cf638 -t APP

[App]
Name = "lorem-ipsum"
Version = "0.0.1"
Title = "Lorem Ipsum"
Description = "Lorem ipsum dolor sit amet, consectetur adipiscing elit. Quisque auctor."
LongDescription = "LoremIpsum.md"
SetupGuide = "setup_guide.txt"

[Runtime]
Module = "lorem"
Inspecting a local app bundle
The h2o app inspect <path> command can be used to retrieve requirements.txt, packages.txt, app.toml and a list of files from an app bundle
The -t flag can be used with app meta to specify REQUIREMENTS,PACKAGES, FILES, APP.
h2o app inspect ai.h2o.test.0.0.1.wave
App Toml    	[App]
              Description = "Test App "
              Name = "ai.h2o.test"
              Title = "Test Title"
              Version = "0.0.1"

              [Runtime]
              Module = "main"

Packages    	(no Packages)
Requirements	h2o-wave

Files       	Name
              /
              README.md
              app.toml
              main.py
              requirements.txt
              static/
              static/icon_model_analyzer.png
Airgapped bundles
Airgapped bundle creating is currently in ALPHA stage, breaking changes to the CLI interface are expected.
The h2o bundle ... command can be used to construct airgapped bundles. The bundle consists of
three components:
- Dockerfile
- used to create docker container containing the app and all its dependencies
- Helm charts
- used to import the app into the App Store during deployment of HAIC
- currently, used mainly by the Replicated installer
.waveapp bundle
All three of them are generated by the CLI. The simplest example of how to generate the bundle would be:
cd /path/to/my-app
h2o bundle \
  --generate-dockerfile \
  --docker-use-buildkit \
  --docker-base-image 524466471676.dkr.ecr.us-east-1.amazonaws.com/q8s/launcher:v0.23.0-gpu38 \
  --generate-helm-charts \
  --helm-chart-version 0.1.0
This command generates:
- Dockerfile in
<APP_NAME>.<APP_VERSION>.Dockerfile<APP_NAME>is set toapp.namefromapp.toml<APP_VERSION>is set toapp.versionfromapp.toml
helm/- directory containing the helm charts for the app registration
- app bundle in
<APP_NAME>.<APP_VERSION>.wave<APP_NAME>is set toapp.namefromapp.toml<APP_VERSION>is set toapp.versionfromapp.toml
BuildKit
Docker BuildKit is enabled when --docker-use-buildkit
is specified. It is recommended to have this enabled as it can lead to shorter build times and
allows use of more advanced features. However, in certain cases, such as old docker version,
BuildKit is not available and it should be disabled (by removing the flag).
OS packages
If additional OS packages are required, they should be specified in packages.txt. This file should
contain newline-separated list of OS packages required by the app. Presence of the file is
discovered automatically, no extra flag is required.
Custom scripts
Custom scripts can be supplied to the h2o bundle command, that are executed during the docker
image build. These scripts are meant to do initialization, such as download of external files.
cd /path/to/my-app
h2o bundle \
  --generate-dockerfile \
  --docker-use-buildkit \
  --docker-base-image 524466471676.dkr.ecr.us-east-1.amazonaws.com/q8s/launcher:v0.23.0-gpu38 \
  --generate-helm-charts \
  --helm-chart-version 0.1.0 \
  --docker-pre-install-script path/to/pre-install.sh \
  --docker-post-install-script path/to/post-install.sh \
- if
--docker-pre-install-scriptis specified, the given script is executed before installing the App requirements - if
--docker-post-install-scriptis specified, the given script is executed at the very end of the docker image build process
Including additional files
In cases when additional files must be copied to the docker image the --docker-include flag can be
used. This flag should point to a file or directory that should be copied to the docker image. This
flag can be specified multiple times.
cd /path/to/my-app
h2o bundle \
  --generate-dockerfile \
  --docker-use-buildkit \
  --docker-base-image 524466471676.dkr.ecr.us-east-1.amazonaws.com/q8s/launcher:v0.23.0-gpu38 \
  --generate-helm-charts \
  --helm-chart-version 0.1.0 \
  --docker-include deps
The command above will create a docker image, that'll contain the deps dir. Directory is placed on
the same relative path (relative to the app) as it has been on the host. Absolute path is considered
internal detail of the implementation.
Specifying custom environment variables
Custom environment variables can be specified using --docker-env. The value of the flag should be
in format MY_VAR=MY_VALUE. This example will set env var MY_VAR to value of MY_VALUE. The
variable name cannot contain = sign, on the otherhand, the value can contain = sign. The flag
can be specified multiple times.
cd /path/to/my-app
h2o bundle \
  --generate-dockerfile \
  --docker-use-buildkit \
  --docker-base-image 524466471676.dkr.ecr.us-east-1.amazonaws.com/q8s/launcher:v0.23.0-gpu38 \
  --generate-helm-charts \
  --helm-chart-version 0.1.0 \
  --docker-env FOO=BAR \
  --docker-env MY_VAR=MY_VALUE
The command above will create a docker image, that contains statements specifying two env vars -
FOO and MY_VAR.
Additional options
All options that can be specified can be discovered using h2o bundle --help.
Publishing an app for others to see and launch
To publish an app to the platform, just run h2o bundle import (or h2o bundle and h2o app import <bundle>)
in your app source directory.
This command will automatically package your current directory into a .wave bundle and import it
into the platform.
If you set the visibility to ALL_USERS (via the -v flag), others will be able use h2o app run
or the H2OAIC App Store to launch the app.
The name-version combination from your app.toml has to be unique and the platform will reject
the request if such combination already exists. Therefore, you need to update the name or version
in app.toml before each consecutive import command.
$ h2o bundle import -v ALL_USERS
ID              bcd543210-1111-1111-1111-0123456789ab
Title           Peak
Version         0.1.2
Created At      2020-10-13 06:28:03.050226 +0000 UTC
Updated At      2020-10-13 06:28:03.050226 +0000 UTC
Owner           user1@h2o.ai
Visibility      ALL_USERS
Description     Forecast of COVID-19 spread
Tags
Running an app under development
For faster development, running the h2o bundle test command in your app source directory will
package your current directory, deploy it and automatically start tailing the logs. On ctrl-c the instance will be terminated and the app will be deleted. The CLI will append a bundle-test suffix to the version in order to ensure resources are cleaned up.
$ h2o bundle test
Waiting for instance to start...

ID 	487e6f42-d5e8-4e05-a835-6d73f1488240
URL	https://487e6f42-d5e8-4e05-a835-6d73f1488240.cloud.h2o.ai

Use the URL above to open the running App Instance.
Terminate the instance and delete the app bundle with ctrl-c.

To continue and view the instance logs, press enter:
Deploying multiple versions of an app during development
To immediately run your current app source in the platform, just run h2o bundle deploy in your app
source directory.
This command will automatically package your current directory into a .wave bundle, import it into
the platform, and run it.
In the output you will be able to find a URL where you can reach the instance, or visit the "My Instances" in the UI.
The CLI will automatically append a suffix to the version in your app.toml so that you can keep
iterating on your app without worrying about version conflicts, just don't forget to clean up old
instances/versions. Unlike h2o bundle test, resource intensive features like resource volume persistence (enabled by setting ResourceVolumeSize) are disabled.
$ h2o bundle deploy
ID              bcd543210-1111-1111-1111-0123456789ab
Title           Peak
Version         0.1.2-20201013062803
Created At      2020-10-13 06:28:03.050226 +0000 UTC
Updated At      2020-10-13 06:28:03.050226 +0000 UTC
Owner           user1@h2o.ai
Visibility      PRIVATE
Description     Forecast of COVID-19 spread
Tags
ID  22222222-3333-4444-5555-666666666666
URL https://22222222-3333-4444-5555-666666666666.cloud.h2o.ai
Running the app in a cloud-like environment locally
To execute your app in an environment equivalent to that of the platform but on your local machine,
just run h2o exec in your app source directory.
This will package the app in a temporary .wave bundle and launch it locally using our platform
docker image.
Note that this requires that you have docker installed and that you have access to the docker image.
Then navigate to http://localhost:10101/<your main route>.
$ h2o exec
{"level":"info","log_level":"debug","url":"file:///wave_bundle/q-peak.0.1.2.wave","app_root":"/app","venv_root":"/resources","server_path":"/wave/wave","py_module":"peak","tmp":"/tmp","startup_server":true,"version":"latest-20200929","time":"2020-10-13T06:42:21Z","message":"configuration"}
{"level":"info","port":":10101","time":"2020-10-13T06:42:21Z","message":"starting launcher server"}
{"level":"info","executable":"/wave/wave","time":"2020-10-13T06:42:21Z","message":"wave executable found"}
...
Updating app visibility
The h2o app update <appId> -v <visbility> command can be used to modify an existing app's visibility.
Authors who publish a new version of an app may want to de-list the old version.
The preferred method to de-list previous versions is to modify the visibility setting to PRIVATE.
In fact, it is not possible to fully delete an app if there are instances running and doing so might
affect them.
Downloading an app
The h2o app download <appID> [<path>] --extract command can be used to download an app. Authors who publish a version of an app may want to download the app bundle. An optional --extract flag will extract the bundle after download. By default the path will be the name.version of the app, if using the extract flag it will extract to a folder with the same name.
The app id can be copied from the App Details, My Apps, or Admin Apps page.
Setting a default launch profile for the app
First run h2o env launch-profiles list to list the available launch profiles. You can then run h2o app set-default-profile <profile-name> to set the default launch profile for a particular app. Alternatively, you can also set the default launch profile while importing the app by running h2o app import --profile <profile-name>.
App instances
The h2o instance [get, list, logs, status, suspend, resume, terminate, update] commands let you see and,
when authorized, manage available app instances.
Getting instance logs
To see logs of a running instance, just run h2o instance logs <instanceId>; use the flag
-f (--follow) to tail the log.
$ h2o instance logs 22222222-3333-4444-5555-666666666666
...
2020/10/27 16:16:34 #
2020/10/27 16:16:34 # ┌─────────────────────────┐
2020/10/27 16:16:34 # │  ┌    ┌ ┌──┐ ┌  ┌ ┌──┐  │ H2O Wave
2020/10/27 16:16:34 # │  │ ┌──┘ │──│ │  │ └┐    │ (version) (build)
2020/10/27 16:16:34 # │  └─┘    ┘  ┘ └──┘  └─┘  │ © 2020 H2O.ai, Inc.
2020/10/27 16:16:34 # └─────────────────────────┘
2020/10/27 16:16:34 #
2020/10/27 16:16:34 # {"address":":10101","t":"listen","webroot":"/wave/www"}
2020/10/27 16:16:34 # {"host":"ws://127.0.0.1:10102","route":"/","t":"relay"}
...
Getting instance status
To see some details about the (K8s) runtime status of a running instance, just run
h2o instance status <instanceId>.
$ h2o instance status 22222222-3333-4444-5555-666666666666
Status       	CrashLoopBackOff
Reason       	Error
Message
Exit Code    	1
Restart Count	1
Last Failure 	<UNKNOWN>
Updating instance visibility
The h2o instance update <instanceId> -v <visbility> command, much like the app version, can be
used to modify an existing running instance's visibility setting.
App tags
The h2o tag [assign, get, list, remove, update] commands let you see and, when authorized, manage
available app tags.
The alias commands let you (if you are an admin) see and manage available aliases. (see Basic concepts for details on Aliases and their attributes).
Secrets
The h2o secret [create, get, delete, update, list] commands let you see and, when authorized,
manage available secrets.
Many commands allow specifying the scope of the secret(s) via the -v and -p options for
the visibility and parent attributes, respectively. The value of parent differs based
on visibility:
PRIVATE: emptyALL_USERS: empty;APP: URN referring to the corresponding app name, in the formatapp:<app name>.
Only admins can currently interact with secrets with visibility APP,
see Authorization.
See Basic concepts for details on Secrets and their attributes.
Creating and updating private secrets
h2o secret [create, update] <secretName> [--from-literal=key=value] [--from-file=key=/path/file]
Where,
<secretName>is the name of the secret--from-literal=key=valuespecifies that the value ofkeyin the secret should bevalue--from-file=key=/path/filespecifies that the value ofkeyin the secret should be the contents of the file at path/path/file
Creates or updates a PRIVATE secret. Based
on Kubernetes Secrets
Secret names have a maximum length of 63 characters and are validated using the following regex
^[a-z0-9]([-a-z0-9]*[a-z0-9])?(\.[a-z0-9]([-a-z0-9]*[a-z0-9])?)*$.
Secret keys have a maximum length of 253 characters and must consist
of alphanumeric characters, -, _ or ..
$ h2o secret create secret-name --from-literal=key=value --from-file=myfile=secret_file.txt
Name      	secret-name
Visibility	PRIVATE
Keys      	key, myfile
Updating a secret will replace the current keys and data stored in the secret.
$ h2o secret update secret-name --from-literal=key=newValue --from-file=myfile=secret_file.txt
Name      	secret-name
Visibility	PRIVATE
Keys      	key, myfile
Creating and updating public and app-scoped secrets
h2o admin secret [create, update] [-v <visibility>] [-p <parent>] <secretName>
Creates or updates (if you are an admin) an ALL_USERS or APP secret, similar to
the section above.
There can be multiple secrets with the same name with different scopes. To avoid ambiguity and choose the specific secret you want to update, h2o admin secret update accepts a visibility flag.
See Secrets for more details on the visibility flag for secrets.
Deleting private secrets
h2o secret delete <secretName>
Where,
<secretName>is the name of the secret
Deletes a PRIVATE secret. Secrets cannot be deleted if they are currently in use by any apps.
Deleting public and app secrets
h2o admin secret delete [-v <visibility>] [-p <parent>] <secretName>
Deletes (if you are an admin) an ALL_USERS or APP secret similar to
the section above. Secrets cannot be deleted if they are currently in
use by any apps.
Listing secrets
h2o secret list [-v <visibility>]
h2o admin secret list [-v <visibility>] [-p <parent>]
Lists existing secrets.
The default visibility for non-admin users is UNSPECIFIED, which will list all secrets the user
has access to;
see Authorization.
secrets attributes.
The default visibility for admins is ALL_USERS.
Tags
The tag commands let you see and manage available tags. See Basic concepts for details on Tags and their attributes.
Listing tags
h2o tag list
Lists relevant details about the current tags.
Getting tag information
h2o tag get <tag id>
Where,
<tag id>is the tag ID (fromadmin tag list)
Displays additional information about a specific tag.
Assigning tags
h2o tag assign <tag id> <app id>
Where,
<tag id>is the tag ID (fromtag listoradmin tag list)<app id>is the application ID (fromapp list,app list -a, oradmin app list)
Assigns a specific tag to a specific version of an application.
Removing tags
h2o tag remove <tag id> <app id>
Where,
<tag id>is the tag ID (fromtag listoradmin tag list)<app id>is the application ID (fromapp list,app list -a, oradmin app list)
Unassigns a specific tag from a specific version of an application.
Updating tags
h2o tag update <tag id> [-n <name> | --name <name>] [-c <color> | --color <color>] [-t <title> | --title <title>] [-d <description> | --description <description>] [-v <visitor role> | --visitor-roles <visitor role>] [-a <visitor admin role> | --admin-roles <visitor admin role>]
Where,
<name>is the canonical name for the tag, to be used in app.toml<visitor role>is the OIDC role a user must have to see apps assigned this tag<visitor admin role>is the OIDC role of users who may assign this tag to apps<title>>is the text that appears on the app card in the web interface<color>is the hex value used to colorize the tag in the web interface
Mutates an existing tag.
Creating a category tag
h2o admin tag create --name <category tag name> --title <category tag title>
Where,
<category tag name>is the canonical name for the tag, to be used in Helm values (values.yamlfile)<category tag title>is the text that appears on the Categories section of the App Store web interface
After creating a new category tag using H2O CLI, add the name of the category tag to the values.yaml file.
categoryTags: ["AI_FOR_GOOD", "EDA", "MACHINE_LEARNING", "EXPLAINABILITY", "COMP_VISION", "FORECASTING", "NLP", "UNSUPERVISED_LEARNING", "FEDGOV", "FINSERV", "HEALTHCARE", "MANUFACTURING", "MARKETING", "RETAIL", "TELECOM", "APP_DEV"]
Tags, including category tags, may only be created by an administrator.
Aliases
h2o admin alias [assign, create, delete, get, list, promote]
The alias commands let you (if you are an admin) see and manage available aliases. See Basic concepts for details on Aliases and their attributes.
Listing aliases
h2o admin alias list
Lists relevant details about the current aliases.
Creating aliases
h2o admin alias create <alias> [<instance id>] [<primary>]
Where,
<alias>is the name of the alias (this is what determines the URL, e.g., aliashelloresults in URLhello.cloud.h2o.ai)<instance id>(optional) is the instance ID of the instance to assign this tag to at create time (frominstance list,instance list -a, oradmin instance list)<primary>(optional) istrueorfalsedepending on whether you want the tag to be marked primary at creation time or not
Creates an alias and (optionally) assigns it to an instance.
$ h2o admin alias create hello
ID         	11111111-2222-3333-4444-555555555555
Alias      	hello
Instance ID	00000000-0000-0000-0000-000000000000
Primary    	false
Created At 	2022-03-02 12:52:08.900656 +0000 UTC
Updated At 	2022-03-02 12:52:08.900656 +0000 UTC
Getting alias information
h2o admin alias get <alias id|name>
Where,
<alias id|name>is the alias name or ID (fromadmin alias list)
Displays additional information about a specific alias.
$ h2o admin alias get hello
ID         	11111111-2222-3333-4444-555555555555
Alias      	hello
Instance ID	00000000-0000-0000-0000-000000000000
Primary    	false
...
Assigning aliases
h2o admin alias assign <alias id|name> [<instance id>] [<primary>]
Where,
<alias id|name>is the alias name or ID (fromadmin alias list)<instance id>(optional) is the instance ID of the instance to assign this tag to (frominstance list,instance list -a, oradmin instance list); if empty, the alias will be unassigned<primary>(optional) istrueorfalsedepending on whether you want the tag to be markedprimaryat assign time or not; this parameter will be ignored if<instance id>is empty.
Assigns an alias to an instance and optionally makes it primary. By default, assigning an alias cleans the primary bit.
$ h2o admin alias assign hello 22222222-3333-4444-5555-666666666666
ID         	11111111-2222-3333-4444-555555555555
Alias      	hello
Instance ID	22222222-3333-4444-5555-666666666666
Primary    	false
...
$ h2o admin alias assign hello 22222222-3333-4444-5555-666666666666 true
ID         	11111111-2222-3333-4444-555555555555
Alias      	hello
Instance ID	22222222-3333-4444-5555-666666666666
Primary    	true
...
$ h2o admin alias assign hello
ID         	11111111-2222-3333-4444-555555555555
Alias      	hello
Instance ID
Primary    	false
...
Note that there can be a slight delay before the change gets propagated.
Promoting aliases to primary
h2o admin alias promote <alias id|name>
Where,
<alias id|name>is the alias name or ID (fromadmin alias list)
Promotes an alias to primary for the corresponding instance.
$ h2o admin alias promote hello
ID         	11111111-2222-3333-4444-555555555555
Alias      	hello
Instance ID	22222222-3333-4444-5555-666666666666
Primary    	true
...
Note that there can be a slight delay before the change gets propagated.
As per Basic concepts,
accessing the instance via other aliases or via its UUID URL will result in a HTTP 302 redirect to the primary alias.
If there was another alias marked primary for the same instance, its primary bit will be unset.
Deleting aliases
h2o admin alias delete <alias id|name>
Where,
<alias id|name>is the alias name or ID (fromadmin alias list)
Deletes an alias.
Note that there can be a slight delay before the change gets propagated.
- Submit and view feedback for this page
- Send feedback about AI App Store to cloud-feedback@h2o.ai