Tutorial 4B: Model deployment to H2O MLOps through the H2O Hydrogen Torch UI
Overview
This tutorial explores one of the options available to deploy a built model. In particular, this tutorial builds an image regression model to explore how you can deploy a model to H2O MLOps through the H2O Hydrogen Torch UI.
Objectives
- Understand how to deploy a built model to H2O MLOps through the H2O Hydrogen Torch UI.
- Learn how to score new data with the deployed model in H2O MLOps.
Prerequisites
- Access to H2O Hydrogen Torch v1.4.0
- Intermediate understanding of H2O MLOps
- Basic understanding of Python and how to run a Python script
- Complete Tutorial 1A: Default hyperparameter values
Step 1: Import dataset
For this tutorial, let's utilize the demo out-of-the-box preprocessed coins_image_regression.zip dataset. The dataset contains a collection of 6,028 images with one or more coins. Each image has been labeled to indicate the sum of its coins. The currency of the coins is the Brazilian Real (R$). Let's import the dataset.
- In the H2O Hydrogen Torch navigation menu, click Import dataset.
- In the File name list, select coins_image_regression.zip.
- Click Continue.
- Click Continue.
- Click Continue.

150_1479430290.jpg
Step 2: Build model
Let's quickly build an image regression model capable of predicting the sum of Brazilian Real (R$) coins in images. After creating the model, we will deploy it to H2O MLOps through the H2O Hydrogen Torch UI.
- In the H2O Hydrogen Torch navigation menu, click Create experiment.
- In the Dataset list, select coins_image_regression.
- In the Experiment name box, enter
tutorial-4b. - Click Run experiment.
Step 3: Deploy model to H2O MLOps through the H2O Hydrogen Torch UI
After a few minutes/seconds, you can deploy the model. To deploy the model to H2O MLOps through the H2O Hydrogen Torch UI, consider the following instructions:
-
In the H2O Hydrogen Torch navigation menu, click View experiments.
-
In the Experiments table, click tutorial-4b.
-
Click the Deployments tab.
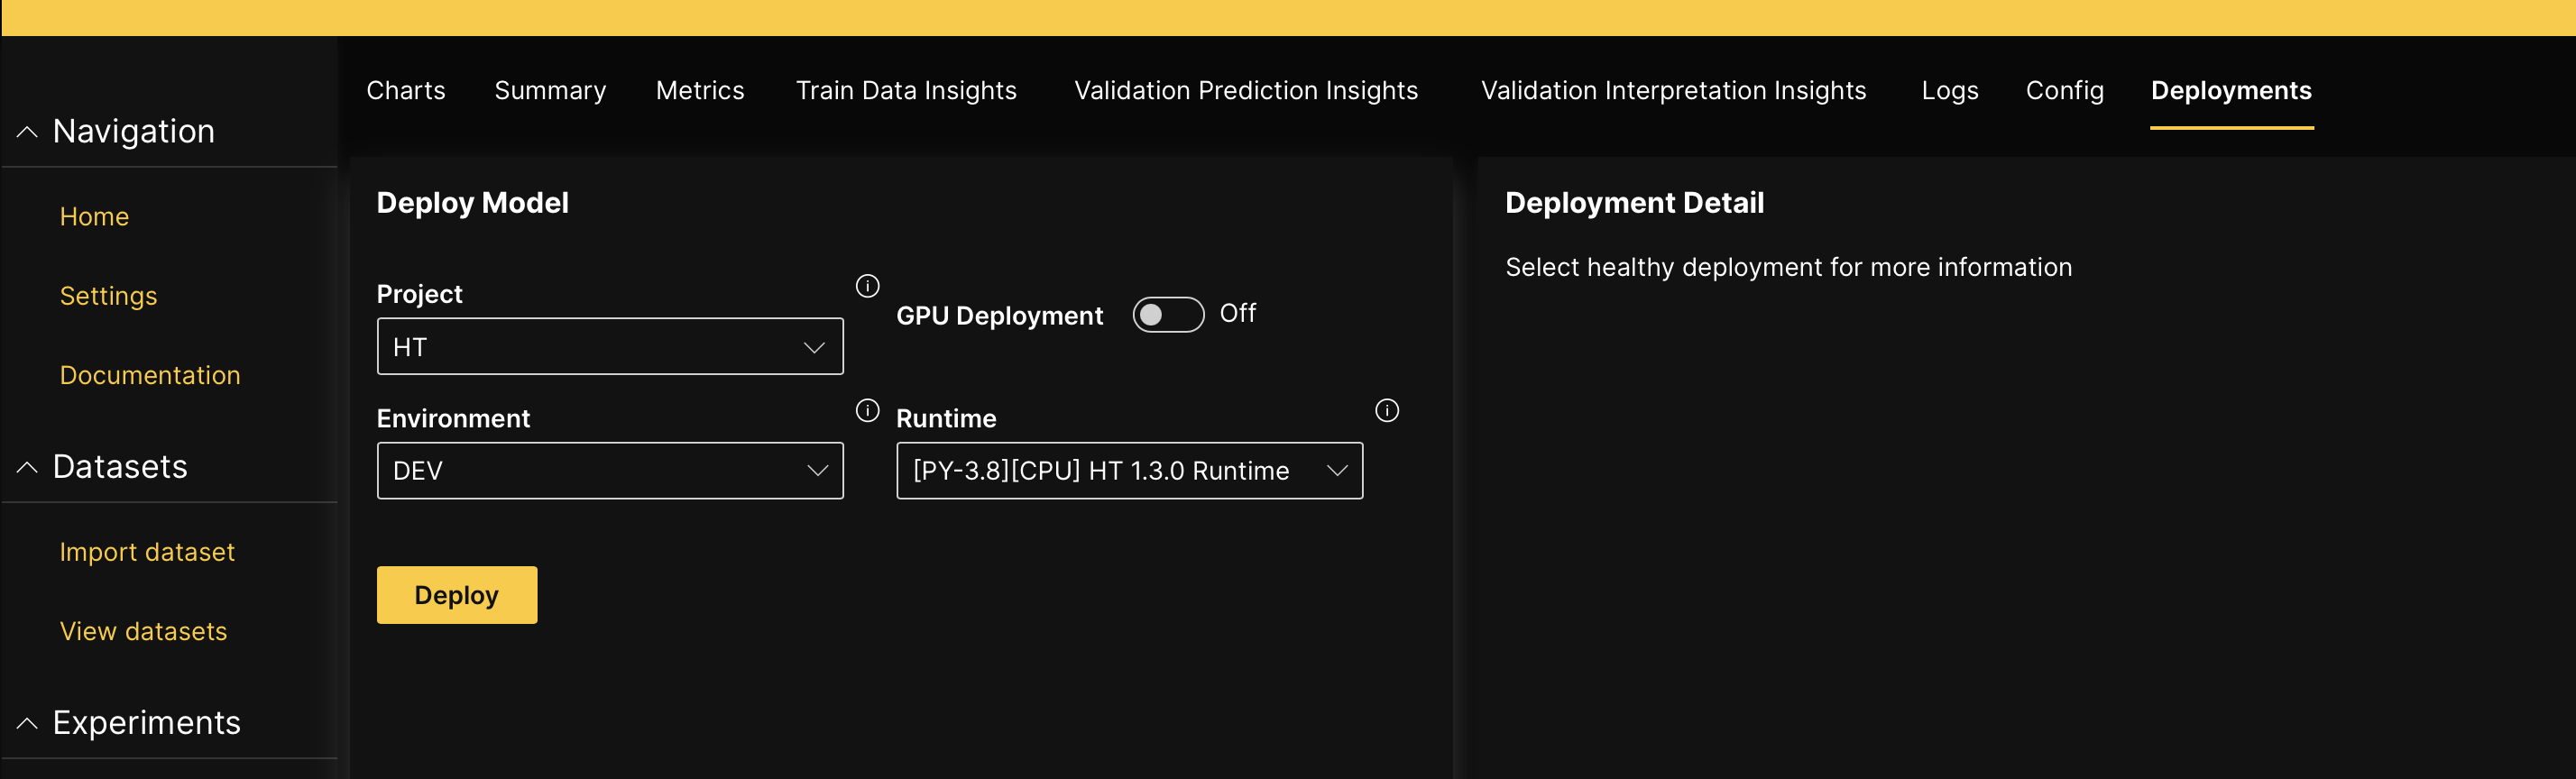
-
In the Project box, enter
tutorial-4b.noteTo deploy the model, you can enter a non-existent project name, which will create a project in H2O MLOps under that name to deploy the model.
-
Click Deploy.
noteH2O Hydrogen Torch deploys the model to your H2O MLOps account within the H2O AI Cloud. You can access your H2O MLOps account through the H2O MLOps legacy UI or the H2O MLOps Wave application.
- To access the H2O MLOps legacy UI in the H2O AI Cloud, click MY MODELS.

- To access the H2O MLOps Wave application, consider the following steps:
- In the H2O AI Cloud navigation menu, click APP STORE.
- In the search bar, enter
H2O MLOps.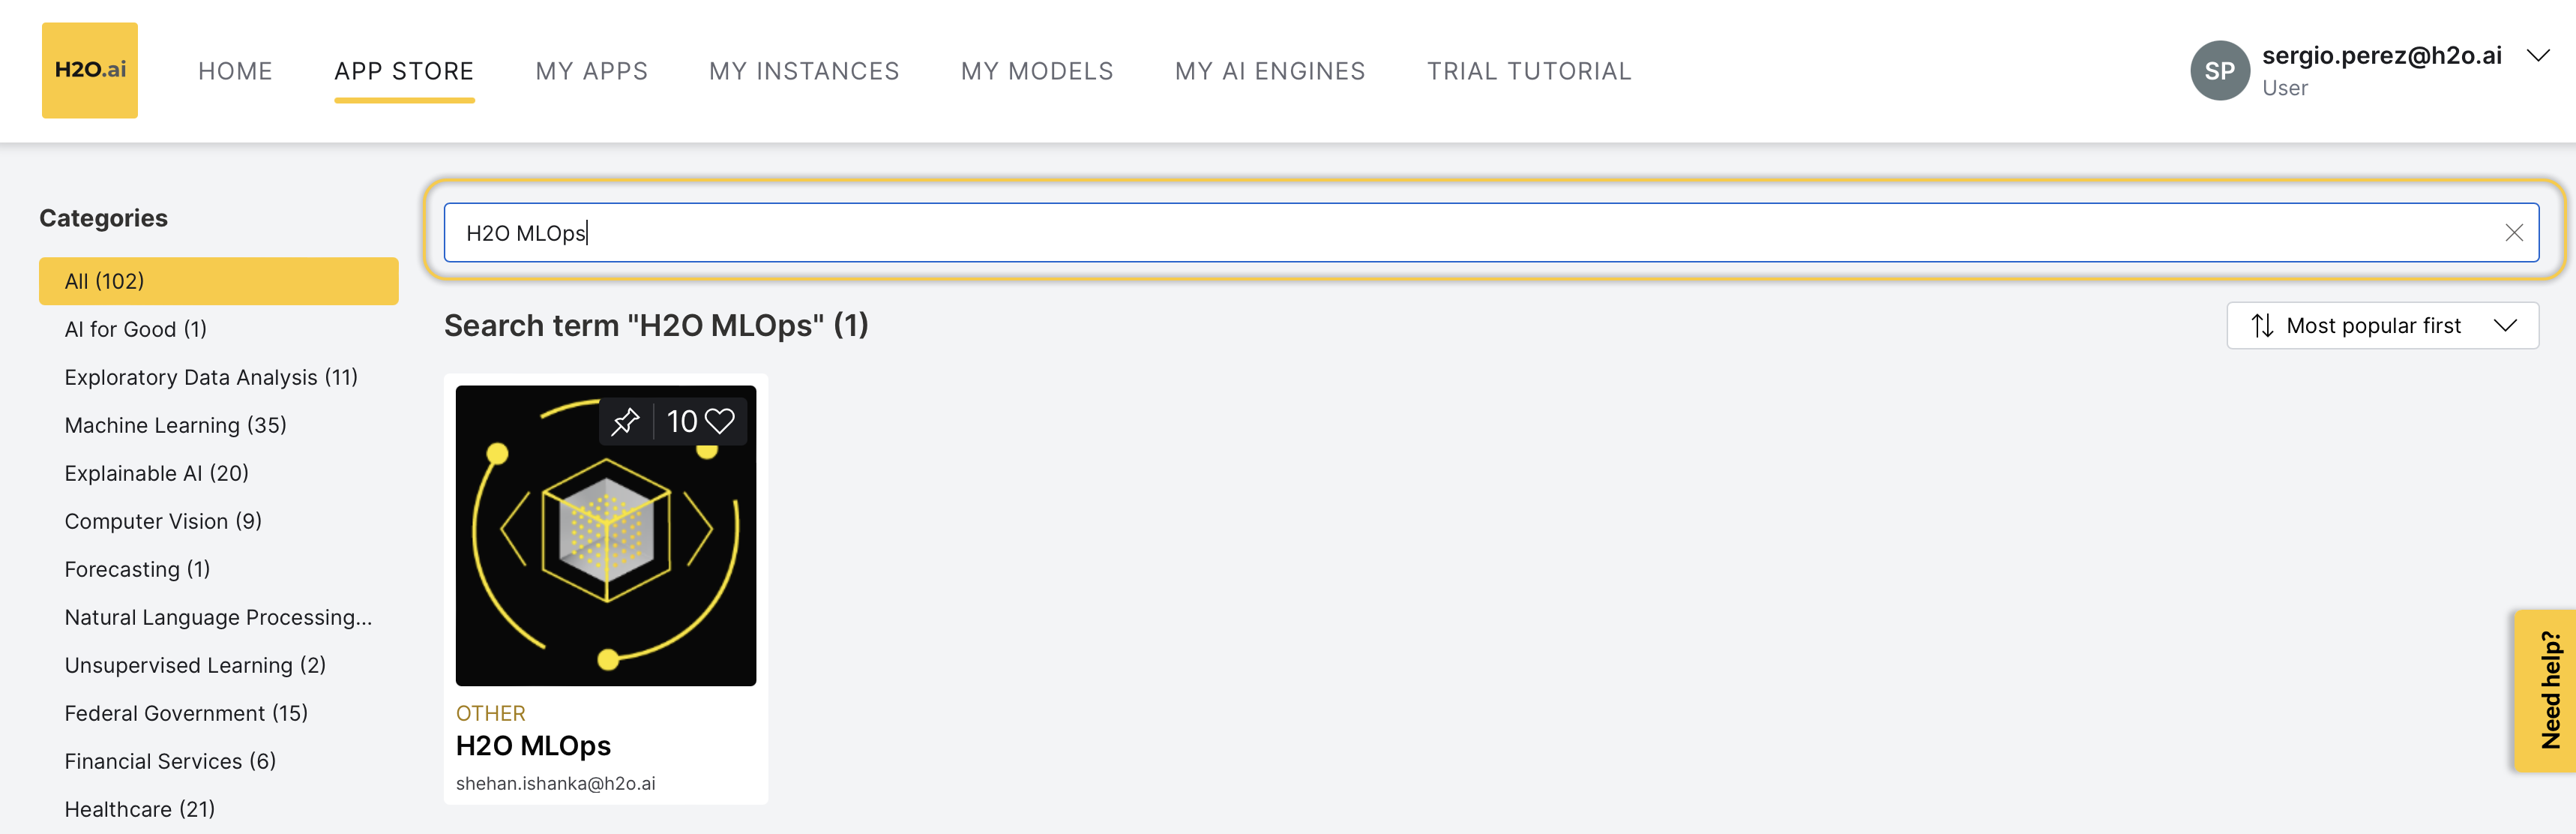
- Click the H2O MLOps tile.
- Click Visit.

- To access the H2O MLOps legacy UI in the H2O AI Cloud, click MY MODELS.
To learn about the H2O MLOps deployment settings, see H2O MLOps deployment settings.
After a few minutes/seconds, the model in the List of deployments table will achieve a HEALTHY status which will mean that the model has been deployed. A HEALTHY status will allow you to view certain deployment pieces of information (for example, the endpoint URL).
To keep track of the status of the deployed model, consider the following step:
- Click Refresh.

Step 4: Score new data
After the model achieves a HEALTHY status, proceed with the next step to view the deployed model's details:
- In the List of deployments table, click *_tutorial-4b_dev.
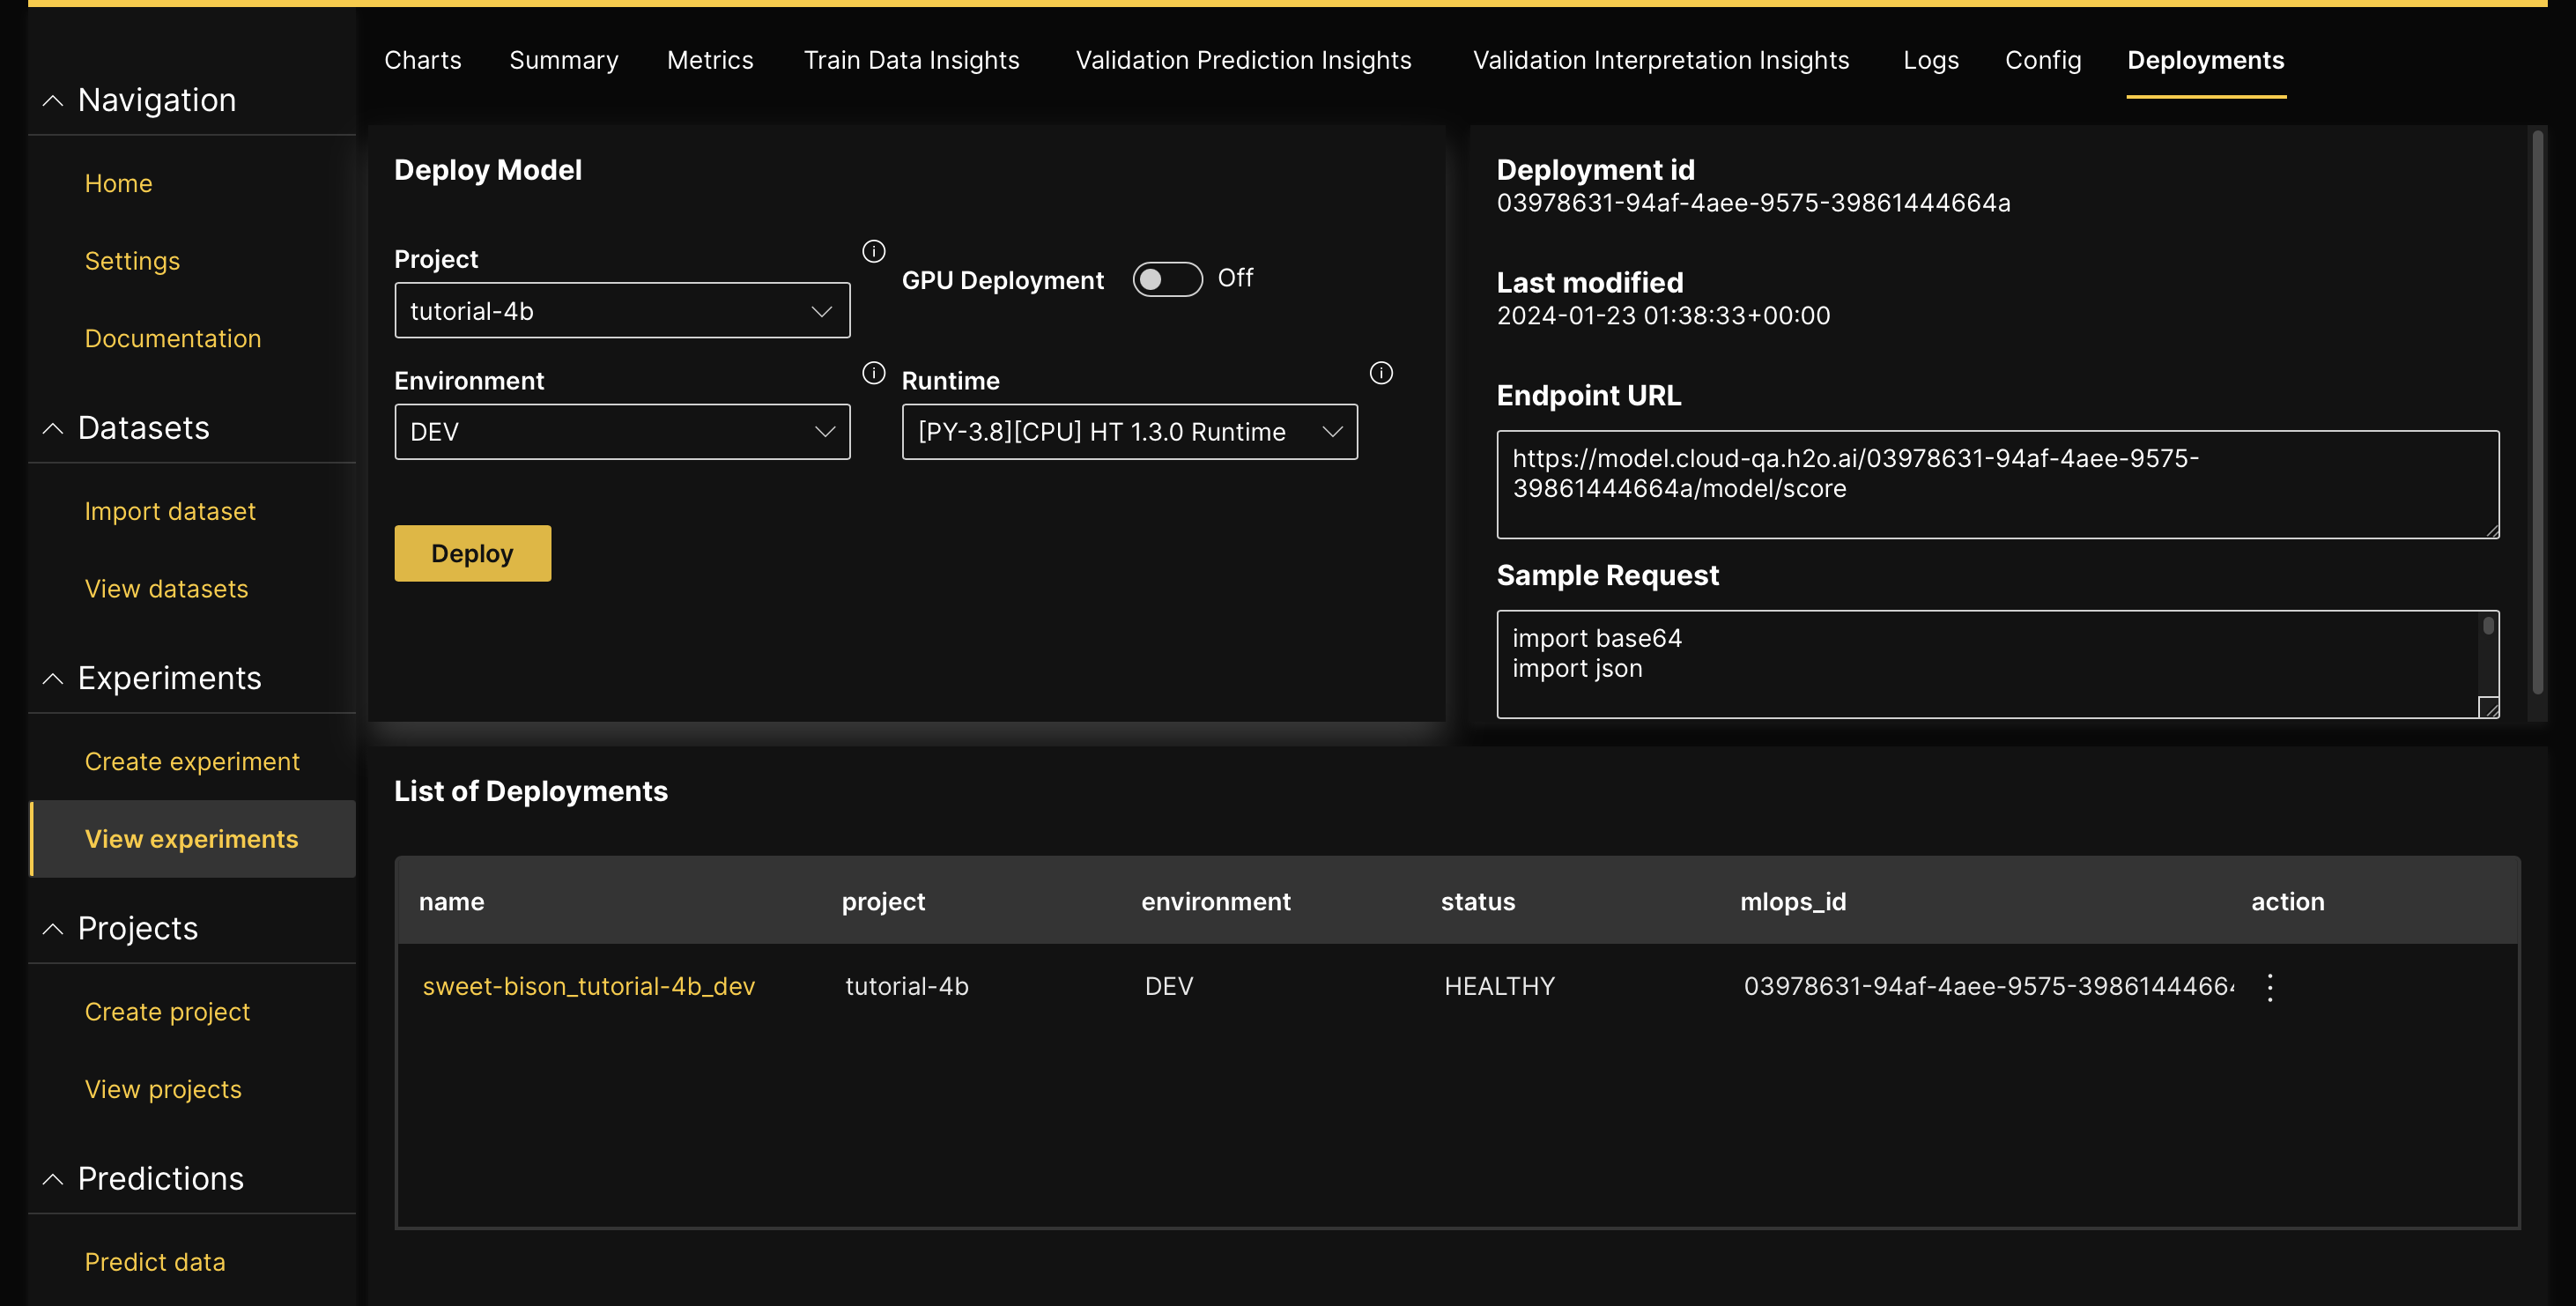
After deploying the model to H2O MLOps, we can use the endpoint URL and sample request (Python script) of the deployed model to score new data. For instance, let's score the following image: 150_1479430290.jpg.
150_1479430290.jpg
- In the Sample request box, copy and save the Python script (a sample request).
 note
noteIn line 8 of the copied sample request, note the deployed model's endpoint URL is already specified (for example,
URL = "https://model.cloud-qa.h2o.ai/0397.........64a/model/score").
Now, modify the Python script (sample request), in particular, modified the following line as stated, and right after, run the script:
- In line 11, specify the path to the 150_1479430290.jpg image.
- For example,
img = cv2.imread("150_1479430290.jpg").
- For example,
After modifying and running the Python script, the response obtained is in a JSON format following the format of the Pickle files discussed in the follwing page: Download a prediction.
If you obtained the following error after running the Python script, you need to reduce the image size: 413 Request Entity Too Large. For example:
img = cv2.imread("150_1479430290.jpg")
img = cv2.resize(img, (200,150)) # From 640x480 to 200x150
For example, scoring the 150_1479430290.jpg image, we receive the following response:
{'predictions': [[143.6985321044922]], 'labels': [['label']]}
Summary
In this tutorial, we learned how to deploy a built model to H2O MLOps through the H2O Hydrogen Torch UI. We also learned how to score new data with the deployed model in H2O MLOPs.
Next
Now that you know how to deploy a built model to H2O MLOps through the H2O Hydrogen Torch UI, consider the following tutorials to learn about the other options to deploy a built model:
- Tutorial 1B: Model deployment in the H2O Hydrogen Torch UI
- Tutorial 2B: Model deployment with a model's H2O MLOps pipeline
- Tutorial 3B: Model deployment with a model's Python scoring pipeline
- Submit and view feedback for this page
- Send feedback about H2O Hydrogen Torch to cloud-feedback@h2o.ai