Deploy a model
Experiments that are imported into MLOps must first be registered before being deployed. For more information, see Model registry.
The following steps describe how to deploy a model version in MLOps.
-
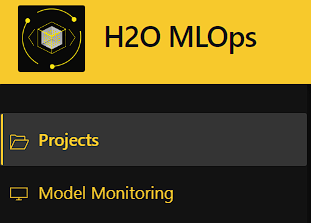
In the main navigation, click Projects. And
-
Select the project that contains the model you want to deploy.
-
On the project page, click the Deployments tab, then click Create Deployment.
-
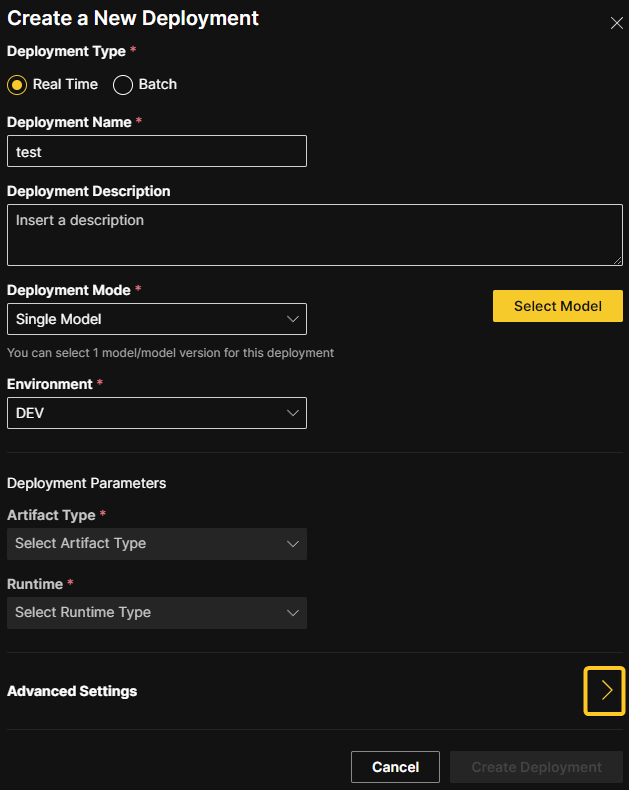
In the Create a new deployment panel, specify the following:
-
Deployment Type: You can choose to deploy a model to score requests in either real time with a REST endpoint or in batches. Note that batch deployments are currently available through H2O eScorer for MOJO artifacts only. H2O eScorer needs to be installed first, and the eScorer Model Registry is separate from the H2O MLOps Model Registry.

-
Enter a name and, optionally, a description for the deployment.

-
Deployment mode: Specify a deployment mode for the deployment. Select one of the following options:
-
Single model: Select one model/model version for the deployment by clicking on the Select Model button.
-
A/B test: A/B testing is a technique that you can use to compare the performance of two or more models. When requests are sent to an A/B deployment, they are directed to the selected models at a specified ratio known as the traffic percentage or traffic allocation. Depending on the specified traffic allocation, the deployment proportionally routes incoming requests to each model for scoring. The response from the scoring endpoint contains the experiment ID of the model that scored the response. Select two models/model versions by clicking on the Select Models button, and then configure the traffic (that is, request percentage allocation) to each model. Note that model monitoring is not available for this deployment mode.
-
Champion/challenger: This deployment mode lets you continuously compare your chosen best model (Champion) to a Challenger model. The Champion and Challenger models both score the request; however, only the champion model's response is returned from the scoring endpoint. Select a champion and challenger model by clicking the Select Models button. Before creating the deployment, review your selected models and replace them if necessary. Note that model monitoring is not available for this deployment mode.
Note: In a future release, monitoring will be supported for multimodal deployments and will let you automatically visualize and compare the predictions generated from each model.

-
-
Select the Environment for the deployment.

-
Artifact type and runtime: Select an artifact type and runtime for the deployment. Each entry in the Artifact Type drop-down represents an artifact that is linked to the selected experiment and is deployable by MLOps. Note that admins have the option to configure and add additional runtimes.
The selection of available runtimes is determined by the artifact type that you specify. The following list provides information on the available options when selecting an artifact type and runtime.
noteSelecting an incorrect runtime causes the deployment to fail.
Artifact type Version Runtime option Notes Driverless AI MOJO pipeline DAI 1.9.3 and later DAI MOJO Scorer (Shapley none)Driverless AI MOJO pipeline DAI 1.10.0 and later DAI MOJO Scorer (Shapley original only)Requires 2x the memory as the Shapley none option. Driverless AI MOJO pipeline DAI 1.9.3 and later DAI MOJO Scorer (Shapley transformed only)Requires 2x the memory as the Shapley none option. Driverless AI MOJO pipeline DAI 1.10.0 and later DAI MOJO Scorer (Shapley all)Requires 3x the memory as the Shapley none option. Driverless AI MOJO pipeline DAI 1.10.0 and later DAI MOJO Scorer (C++ Runtime)Experiment needs to be linked through project. Original Shapley requires DAI 1.10.3 and later. Transformed Shapley requires DAI 1.10.2 and later. Driverless AI Python scoring pipeline DAI 1.9.3 Python Pipeline Scorer [DAI 1.9.3]No longer supported. Driverless AI Python scoring pipeline DAI 1.10.0 and later Python Pipeline Scorer [DAI 1.10.0]andPython Pipeline Scorer [DAI 1.10.4.3]Python pipeline scorer’s version must correspond to the DAI version used to build the model (for example, a model built with DAI 1.10.4.2 must use Python Pipeline Scorer [DAI 1.10.4.2]). H2O-3 MOJO All versions H2O-3 MOJO ScorerMLflow / .pklfileMLflow Model Scorer [Python 3.8]andMLflow Model Scorer [Python 3.9]MLflow Model Scorer’s version must correspond to the Python version used to build the model. For a full list of supported third-party models, see Supported third-party models. noteThe C++ MOJO2 runtime (
DAI MOJO Scorer (C++ Runtime)) accepts a wider range of algorithms DAI may use that the Java runtime does not support, including BERT, GrowNet, and TensorFlow models. If you want to use one of these models, it must be linked from DAI and not be manually uploaded.
-
-
Click Create Deployment.
Advanced settings
This section describes various advanced settings that you can configure for your deployment. To expand the Advanced settings section, click the > expander arrow in the Create a new deployment panel.
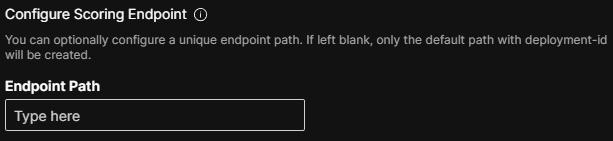
Configure scoring endpoint
Optionally specify an endpoint path to use as a REST endpoint for your deployment. You can use this feature to specify a unique alias for the deployment scoring endpoint so that, for example, you can maintain a static endpoint for a downstream application. Note that this is an endpoint alias that you can update or remove from the deployment. To add additional endpoints, remove endpoints, and update existing endpoints to point to a different deployment, use the H2O MLOps Python client. For more information, see Configure scoring endpoints with the H2O MLOps Python client.
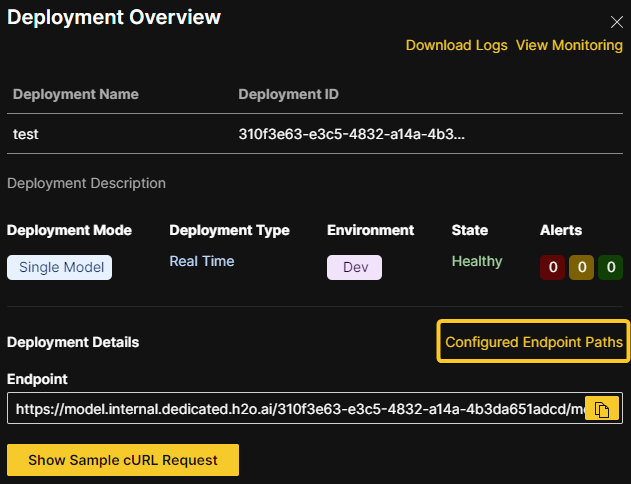
View configurable endpoints
To view the configurable endpoints associated with a deployment, click Configured Endpoint Paths in the Deployment Overview panel.
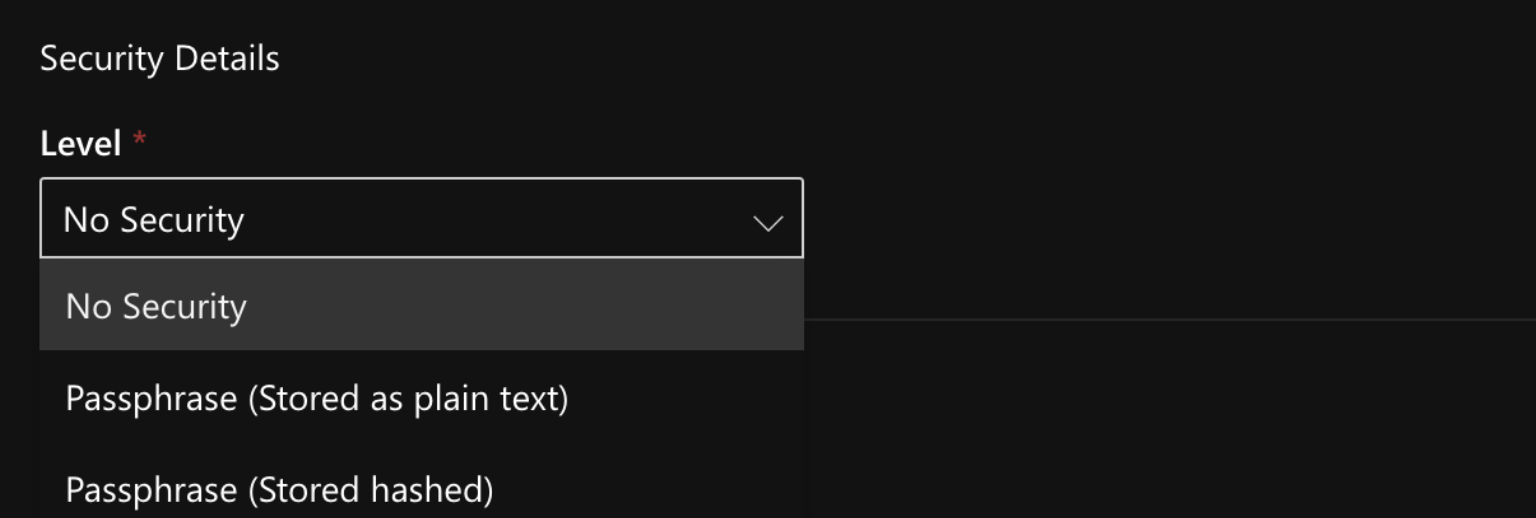
Endpoint security
Select one of the following levels of endpoint security.
-
No security (Default) - To skip configuration of endpoint security, select this option.
-
Passphrase (Stored as plain text) - The provided passphrase is stored in plain text in the database. If this option is selected, the passphrase is visible in the UI after the model is deployed.
-
Passphrase (Stored hashed) - The provided passphrase is stored as a hashed value in the database. If this option is selected, the passphrase is not visible in the UI after the model is deployed.
Kubernetes options
Each of the following Kubernetes options (resource requests, limits, node affinity, and toleration) are applied on a per-replica basis.
- Replicas (optional): Specify the number of static replicas of the model you want to create. You can specify up to five replicas. Specifying multiple replicas is useful for load balancing and achieving high availability for scoring tasks.
Each of the following Kubernetes options (resource requests, limits, node affinity, and toleration) are applied on a per-replica basis.

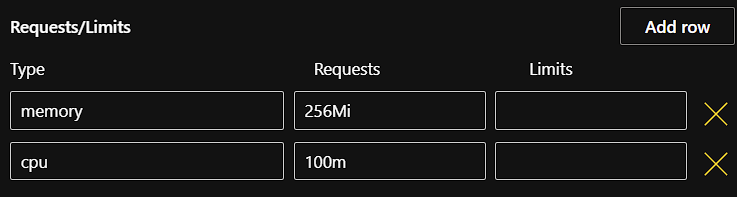
- Resource requests and limits (optional): You can control the amount of resources an MLOps deployment uses with resource requests and limits.
Resource requests determine the amount of resources the deployment asks Kubernetes to provide it. For example, if a replica requests 256Mi of memory, Kubernetes schedules the deployment on any node that has enough memory available to satisfy the stated requirement.
Resource limits determine the maximum amount of resources that are available to a deployment. If a deployment exceeds a limit on the amount of memory allocated to it, the deployment is restarted. Note that the deployment does not restart if it exceeds a CPU limit.
Additional fields for any existing custom resources that have been set up by an admin in your Kubernetes cluster can be added by clicking the Add row button.
- The resource requests and limits fields must be defined using the quantity suffixes used in Kubernetes. The default values for Memory and CPU requests are 256Mi and 100m respectively. For more information, see Resource units in Kubernetes.
- By default, resources are not limited.
- When specifying custom resources, if Kubernetes is not able to satisfy the stated custom value(s), then the pod cannot be scheduled.
- You can use the H2O MLOps Python client to update the Kubernetes resources and replicas of a deployment after creating it. For more information, see Scaling deployment Kubernetes resources post-deployment.
- For more information on resource requests and limits in Kubernetes, see Resource Management for Pods and Containers.
-
Node affinity (optional): Specify a node affinity for the deployment. Note that admins have the ability to customize how node affinity is set up. For more information on node affinity, see Configuring node affinity and toleration and the official Kubernetes documentation on node affinity.
-
Toleration (optional): Specify a toleration for the scorer (pod). Note that admins have the ability to customize how toleration is set up. For more information on toleration, see Configuring node affinity and toleration and the official Kubernetes documentation on taints and tolerations.

Deploy to H2O MLOps from H2O Driverless AI
The following steps describe how you can create H2O MLOps deployments directly from the completed experiment page in H2O Driverless AI (DAI) by using the DAI deployment wizard.
-
To use this deployment option, you must specify
h2o_mlops_ui_urlin the DAIconfig.tomlfile. -
This section assumes that you have a completed experiment available in H2O Driverless AI to deploy to H2O MLOps. For information on how to run an experiment in DAI, refer to the section on running experiments in the Driverless AI user guide.
-
On the completed experiment page, click Deploy. The Driverless AI deployment wizard is displayed.
-
Click the H2O MLOps button. This action results in one of the following outcomes:
-
The experiment is assigned to a single Project: You are redirected to the Project detail page in the H2O MLOps app.
-
The experiment is assigned to multiple Projects: Select a project to go to in the H2O MLOps app. Alternatively, create a new Project to assign the experiment to. If you choose to create a new Project, you are prompted to enter a name and description for the Project. Once the new Project has been created and the experiment has been linked to it, you can click the Go to MLOps page button to navigate to the Project detail page in the H2O MLOps app.
-
The experiment isn't assigned to any Project: Select a Project to link the experiment to. Alternatively, create a new Project and link the experiment to it.
-
Deploying NLP models
H2O MLOps supports the deployment of Driverless AI and MLflow natural language processing (NLP) models.
Driverless AI
To deploy a Driverless AI NLP model, refer to the following steps:
-
In Driverless AI, pick a text dataset such as the Amazon Fine Food Reviews dataset or Airline Twitter Sentiment dataset.
-
Train a DAI model following the NLP-specific steps described in the documentation on NLP experiments in DAI.
-
Link the NLP experiment to an MLOps project. For more information, see the Driverless AI documentation on linking experiments.
-
Deploy as either a MOJO or a Python scoring pipeline. Note that using PyTorch or TensorFlow may make the MOJO unsupported.
-
The scorer is available at the endpoint URL provided by MLOps. You can use
curlto test the endpoint. To see how this might look, refer to the following example request:ububtu@ubuntu:/home/ubuntu$ curl -X POST -H "Content-Type: application/json" -d @- DEPLOYMENT_ENDPOINT_URL << EOF
> {
> "fields": [
> "Description",
> "Summary"
> ],
> "rows": [
> [
> "text",
> "text"
> ]
> ]
> }
> EOF
{"fields":["PositiveReview.0","PositiveReview.1"],"id":"1c2ec2f0-74c7-11ec-ad8e-3ee53b9e28aa","score":[["0.24813014","0.75186986"]]}nick@NPng-P5550:~/h2oworkspace/mlops-byom-images/python-scorer$
MLflow
To deploy an MLflow NLP model, refer to the following steps:
-
Train your model.
-
Wrap the model in an MLflow model. For more information, see the example on uploading an MLflow custom Python model.
-
Upload and deploy the model using MLOps. For more information, see Adding experiments and Deploying a model.
- Submit and view feedback for this page
- Send feedback about H2O MLOps to cloud-feedback@h2o.ai