Tutorial 2A: Model tuning with grid search
This tutorial will explore how grid search (a feature of H2O Hydrogen Torch) can improve a built model in H2O Hydrogen Torch. Accordingly, in this tutorial, we will build and improve with grid search, an image metric learning model capable of establishing similarity or dissimilarity between images of bicycles.
Completing this tutorial should improve your understanding of how grid search can:
- Tune and improve models built in H2O Hydrogen Torch
- Expedite and eliminate the repetitive process of starting several models with different hyperparameter values
- Transform built models in H2O Hydrogen Torch from a good to a state-of-the-art model
Prerequisites
- Basic knowledge about neural network training
- Complete Tutorial 1A: Default hyperparameter values (start your first experiment)
Step 1: Import and explore dataset
We will use the preprocessed Stanford bicycle image metric learning dataset for this tutorial. The dataset contains 8,313 images of bicycles marked with their class ID. Let's import the preprocessed dataset.
- In the H2O Hydrogen Torch navigation menu, click Import dataset.
- In the File name list, select bicycle_image_metric_learning.zip.
- Click Continue.
- Again, click Continue.
- Again, click Continue.
Now, let's quickly explore the dataset.
- In the H2O Hydrogen Torch navigation menu, click View datasets.
- In the datasets table, click bicycle_image_metric_learning.
- Click the Sample train visualization tab.
In the Sample train visualization tab, we can observe several rows with bicycle images with the same class ID.

Step 2: Build model
Now that we better understand the dataset for our image metric learning model, let's build the model using default hyperparameter values.
- In the H2O Hydrogen Torch navigation menu, click Create experiment.
- In the Dataset list, select bicycle_image_metric_learning.
- In the Experiment name box, enter
tutorial-2a. - Click Run experiment.
Note
The default model scorer is the Mean Average Precision (mAP). For our model purposes, we want a validation metric value closer to 1 (indicating a perfect ability of the model to establish similarity and dissimilarity between bicycle images).
From this point, your model's metrics might differ from those discussed here.
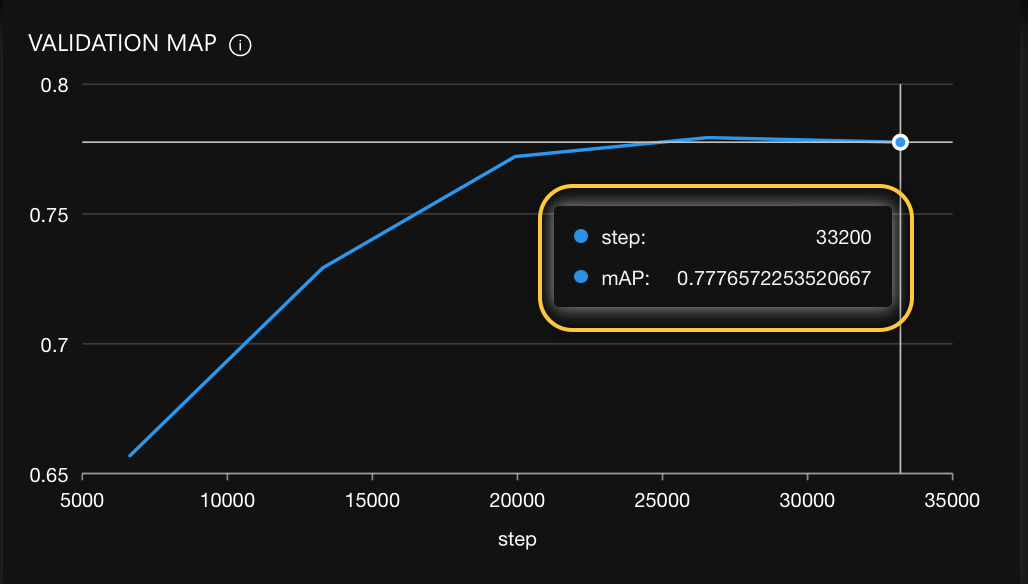
After running the model with default hyperparameter values, we obtained the following final mAP score:
Now that we have discovered the impact of default hyperparameter values, let's explore specific values we can tune to improve our model's mAP and transform our build model from a good to a state-of-the-art model.
Step 3: Identify hyperparameters to tune
There's no apparent order in which model builders should tune hyperparameters when improving a model. However, it is common practice within the field to start tuning important hyperparameters. For example, the backbone of a model is considered the most important hyperparameter as it selects different pre-trained models. We usually identify promising models to work on as we tune the backbone.
It is important to note that it is beneficial to tune other hyperparameters when tuning a particular hyperparameter. For example, if we tune the backbone, we usually want to tune the learning rate hyperparameter as different backbones may work better with varying learning rates. Therefore, it is helpful to tune the backbone and learning rate simultaneously.
Considering the above, let's improve our built model, but first, let's quickly explore grid search.
Step 4: Grid search
Improving a model requires creating several models with certain hyperparameters tuned in the hopes of discovering (reaching) the best state-of-the-art model.
With H2O Hydrogen Torch, we can start multiple models rapidly with grid search (a feature of H2O Hydrogen Torch).
Grid search enables you to select several values for certain hyperparameters referred to as grid search hyperparameters.
Initiating an experiment with grid search results in several experiments where each started experiment through grid search represents one of the combinations of the selected grid search hyperparameter values. After all grid search experiments are completed, you can compare and identify ideal hyperparameter values for your experiment (model).
Step 5: Rebuild model
Stemming from our built model, and with what we discussed in step 3 and 4, let's rebuild (improve) the model by tuning the backbone (architecture) as the first step in improving the model.
In particular, for the architecture settings, let's select several embedding sizes and backbones. As mentioned above, it's typical also to change the learning rate. Different architectures work differently with varying learning rates so we will select several learning rates. The hope here is to explore various backbone architectures, embedding sizes, and learning rates to compare and decide what works best.
- In the H2O Hydrogen Torch navigation menu, click Create experiment.
- In the Problem type list, select From experiment.
- In the Experiment list, select tutorial-2a.
Before assigning multiple values to specific grid search hyperparameters, we need to enable grid search.
- In the Grid search list, select Custom grid.
Note
- Custom grid: H2O Hydrogen Torch enables grid search, where you can manually select several values for grid search hyperparameters.
- Gird search has multiple grid search modes. To learn about all grid search modes, see Grid search.
By default, H2O Hydrogen Torch displays specific (not all) settings for an image metric learning experiment. For purposes of this tutorial, let's display all available settings.
- In the Experience level list, select Master.
Note
To learn more about the Experience level setting, see Experience levels.
Now, let's assign multiple values to specific grid search hyperparameters.
- In the Embedding size (grid search) list, only select 256 and 1024 (deselect 512).
Note
We selected values between the already selected value to amplify our discovery process for the appropriate embedding size for this model.
- In the Backbone (grid search) list, enter
tf_efficientnet_b5_nsandresnet18(deselect tf_efficientnet_b0_ns).NoteThe intuition here is that larger backbone architectures can improve the model; to validate such intuition, we selected larger backbone architectures from the one used in the built experiment (model).
- In the Learning rate (grid search) list, also select 0.0005 and 0.01 (deselect 0.001).
Note
We selected values between the already selected value to amplify our discovery process for the appropriate learning rate for the image metric learning model.
- Click Run experiment.
Caution
- H2O Hydrogen Torch will start 8 experiments (models). If you don't want to wait, proceed with this tutorial. If you decide to run all eight experiments, note that your eight model metrics might differ from those discussed in this tutorial.
- An instance of H2O Hydrogen Torch runs with 1 GPU by default unless configured differently by your admin: contact your admin if you need more resources. Further GPUs (resources) can decrease the time you wait for experiments to complete (multi GPU training).
Step 6. Explore new best-rebuilt model
Now that H2O Hydrogen Torch has completed all-new models let's identify the model (experiment) with the best mAP.
By observing the completed experiments, we can conclude that the following experiment obtained the best mAP (0.8083) compared to the other experiments: tutorial-2a.1_backbone_tf_efficientnet_b5_ns_embedding_size_1024_learning_rate_0.0005.
Our original model obtained an mAP value of 0.7777 while our new best-rebuilt model obtained a 0.8002 mAP.
Original model (0.7777 ):

New best-rebuilt model (0.8083):

By reading the experiment name or by looking at the Config tab, we can know that the experiment used:
- Backbone: tf_efficientnet_b5_ns
- Embedding size: 1024
- Learning rate: 0.0005
In consideration of the above, we can assume/conclude the following:
- A bigger backbone architecture and embedding size improves the model.
- A higher learning rate improves the model.
Step 7: Best experiment settings
To further improve our initial built model, we can take the settings of the new best build model and continue tuning the same or other hyperparameters. To rebuild the model with the new best experiment settings, consider the following instructions:
- In the experiments table, locate the experiment (row) with the best mAP value.
Note
In this case, the best experiment will be the following:
tutorial-2a.1_backbone_tf_efficientnet_b5_ns_embedding_size_1024_learning_rate_0.0005. - Click the row's Kebab menu.
- Select New experiment
- Tune hyperparameters.
- Click Run experiment.
You can repeat the above steps to tune a model further and achieve or approximate the desired validation metric.
Summary
In this tutorial, we learned how to improve a built model using grid search in H2O Hydrogen Torch. Mainly, we built an image metric learning model capable of establishing similarity or dissimilarity between images of bicycles. While building and improving the model, we discover that the H2O Hydrogen Torch default hyperparameter values are good for generating good models and a great starting point for obtaining state-of-the-art models. Towards the end of the tutorial, we discovered how grid search enables the discovery of appropriate hyperparameter values for a specific model.
Next
Once you have trained or improved your model, you can deploy the model into production. H2O Hydrogen Torch supports three ways to deploy a built model. You can deploy a model using the H2O Hydrogen Torch user interface (UI), a model's Python scoring pipeline, and a model's H2O MLOps pipeline.
- Tutorial 1B: Model deployment through the H2O Hydrogen Torch UI
- Tutorial 2B: Model deployment with a model's H2O MLOps pipeline
- Tutorial 3B: Model deployment with a model's Python scoring pipeline
- Submit and view feedback for this page
- Send feedback about H2O Hydrogen Torch to cloud-feedback@h2o.ai