Tutorial 1A: Introduction to H2O Document AI - Publisher
This tutorial will walk you through the basics of H2O Document AI - Publisher and will follow the recommended beginner workflow. For this tutorial, we will be building a Token Labeling model (which focuses on labeling your files' tokens).
Prerequisites
- A copy of this zip file containing medical referral documents that you will be using in this tutorial
- A copy of this medical referral file to submit to your published pipeline
- An understanding of the recommended beginner workflow page
Step 1: Creating the project
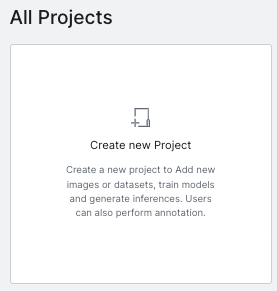
Start by creating a new project. Click the “Create new Project” button on H2O Document AI - Publisher’s homepage.
This takes you to the Create a Project panel.
- Provide
Docs_Tutorialas your project name - (Optional) Provide
This Project will be for the tutorial.as the description - Add the zip file
5pdfs-clean-documents.zipwhich contains the set of documents, PDFs, and images you will work with - Click Create project.

Project main page
After creating your new project, you will be taken to your project's main page. Your project will now also be accessible from the left navigation bar. From your project’s main page, you can see each available page: Document sets, Annotation sets, Models, and Jobs. Published Pipelines is only accessible from the left navigation bar.
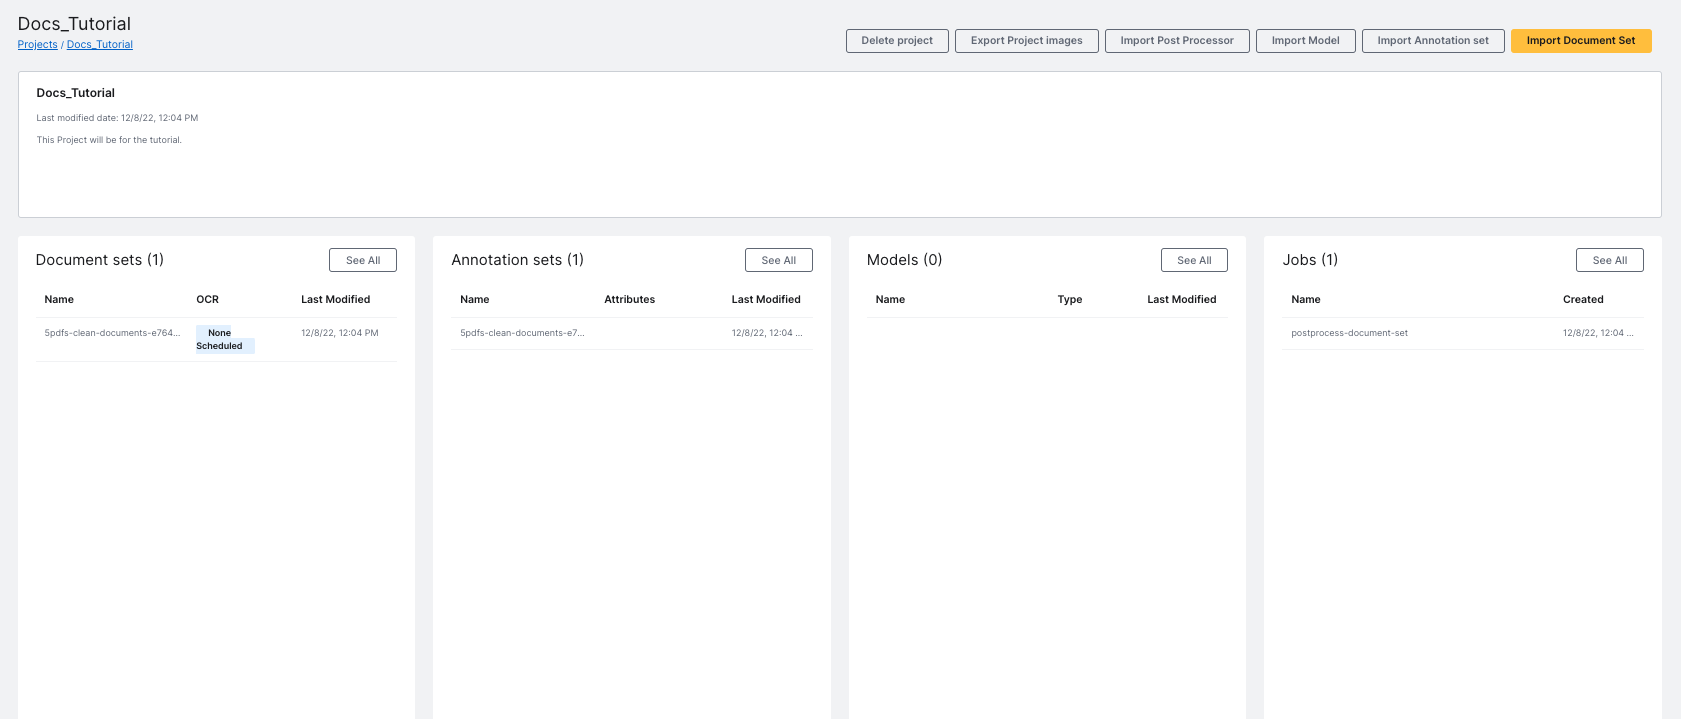
You can access these pages in two ways:
- clicking the page name on the left navigation bar
- clicking “See All” on the desired panel from the project’s main page
Your uploaded files will appear on the Document sets page and the Annotation sets page. You can see these files from the project’s main page or by going directly into the Document sets or Annotation sets page.
Step 2: Running OCR
Navigate to the Document sets page. You will now run optimal character recognition (OCR) on your files. This lets you extract the tokens from your files.
Click on the checkbox next to the files you uploaded. Selecting this checkbox will make the OCR button available in the upper navigation bar.
Click OCR.

On the OCR launch page:
- Select
bestfor the OCR method - Provide
Tutorial_OCRas the Result name - (Optional) Provide
Running OCR on the 5 imported PDFs.as the description - Click OCR

When your OCR job is finished running, you can access your tokens from the Annotation sets folder. It will have the attributes text and confidence attached to its file.
Step 3: Annotating your files
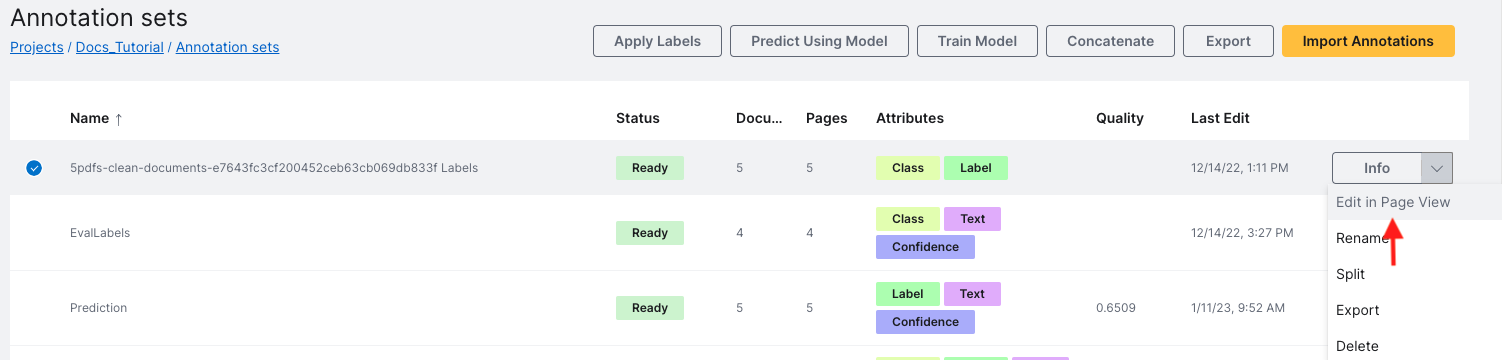
Navigate to the Annotation sets page. Your two annotation sets should be the OCR tokens set you just created and the blank labeling set that got uploaded to this page when you created your project.
Find your blank annotation set. Go to the end of its row and click the drop-down arrow next to the Info button. Then, click Edit in Page View from the drop-down options.
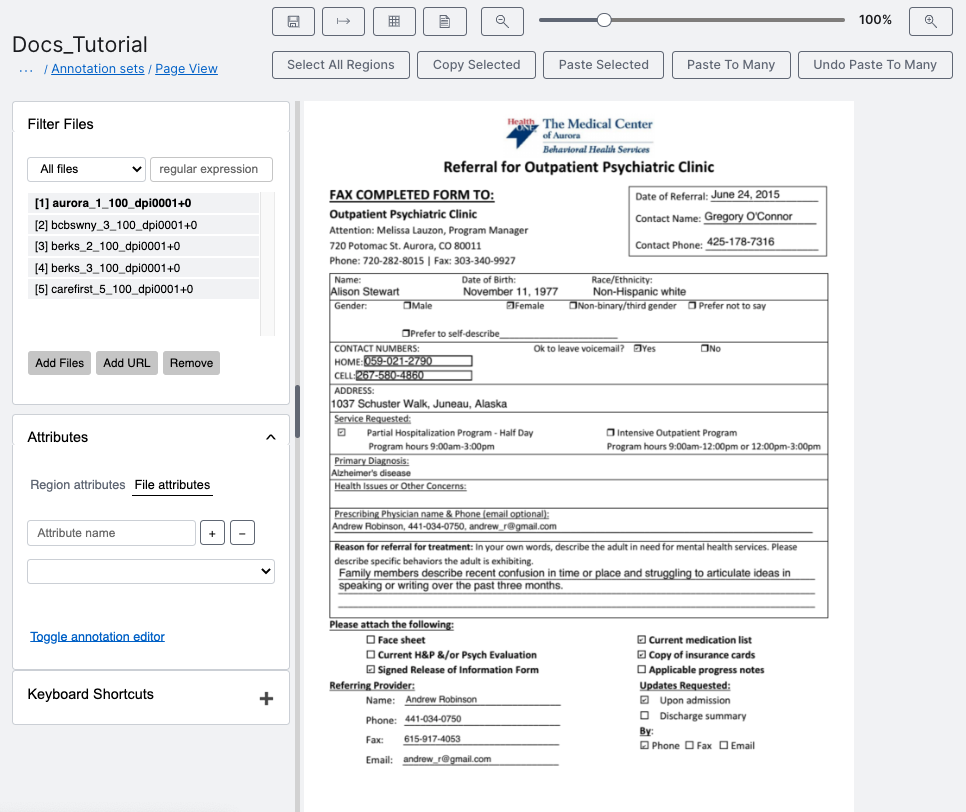
This will take you to the annotations page. Here, you can provide labeled regions to your files and classify what type of page each file in your set is.
Creating labels for your files will be time consuming.
Creating region attributes
The following steps describe how to add a new attribute.
- In the Attributes box, ensure that Region attributes is selected.
- In the Attribute name field, enter "label" and click the + button to add the new attribute. (Note: For this step, the name of attribute must be set to "label" in order for H2O Document AI to work correctly.)
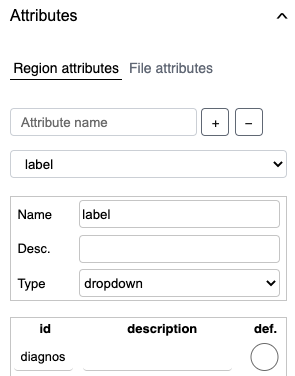
Create option ids
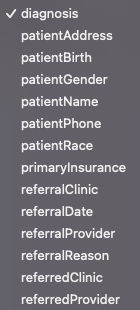
You can now create the option ids (that is, the labels that can be assigned to regions when annotating documents) you want to use to label your files. For this tutorial, select dropdown as the Type, and then enter the option ids you want to use. In this tutorial, the following labels are used:
You can set one of these ids as your default value ("def."). This means that when you start assigning these ids to regions, that id will be the first choice provided.
Applying bounding boxes
To create a labeling region on your image, left-click and hold from one corner of the area you want bounded and drag to the opposite corner. Release the left-click to create the bounding box.
While the box is still highlighted, select the region id from the drop down menu on the annotation editor.

Create regions on all five documents using the option ids as guidance for what needs labeled. After creating each bounding box, select the option id that fits that region. Each page should have a handful of labeled regions.
After you have created all of your regions and labeled them, save your work by clicking the save button on the top tool bar.
Step 4: Applying labels
Navigate back to the Annotation sets page. You can see your labeled set has the label attribute now. Combining that with your token set (which has the text attribute) will give you a file that has both the label and text attributes. You need both of these attributes to create a TokenLabeling model.
Click Apply Labels in the upper navigation bar. We will now combine the information we extracted from OCR and created in Edit in Page View by applying labels to our tokens.

On the Apply Labels launch page:
- Select
Tutorial_OCRfor your text annotation set - Select
5pdfs-clean-documents Labelsfor your labeled annotation set - Provide
TutorialLabelingas the name - (Optional) Provide
Running Apply Labels using the tokens in Tutorial_OCR and the labels created on 5pdfs_clean_documentsas the description - Select Assume there are no labels in the labels page for what to do when the labels page is missing
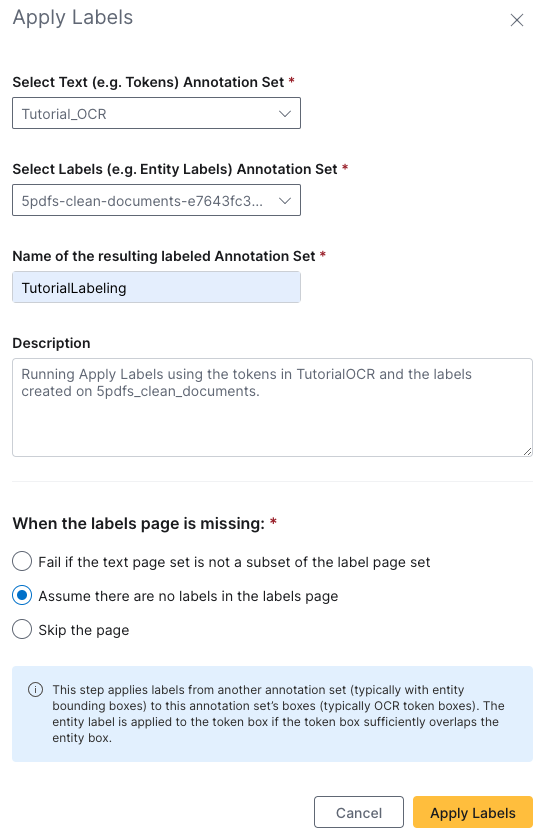
The labeled token set will appear on your Annotation sets page when the job is finished running.
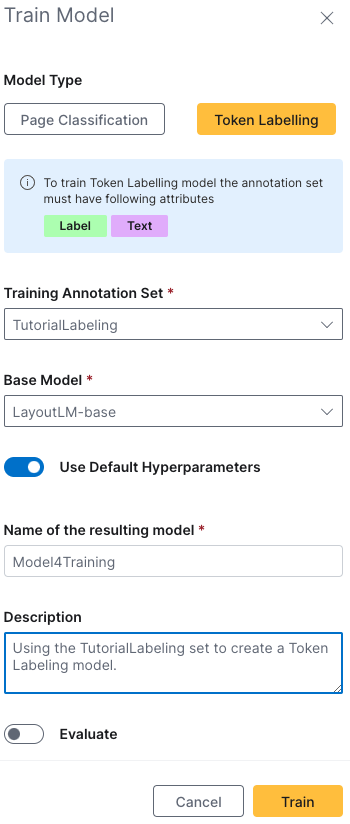
Step 5: Training your Token Labeling model
Now that you have a set with both the text and label attributes, you can build a Token Labeling model!
On the Annotation sets page, select the check box next to your Labeled Tokens set. Click Train Model.

On the Train Model launch page:
- Select Token Labeling as your model type
- Ensure that
TutorialLabelingis set as your training annotation set - Provide
Model4Tutorialas the name - (Optional) Provide
Using the TutorialLabeling set to create a Token Labeling modelas te description - Toggle Evaluate off since we have no validation set
- Click Train
Once your model training job has finished running, your model will be available on the Models page.
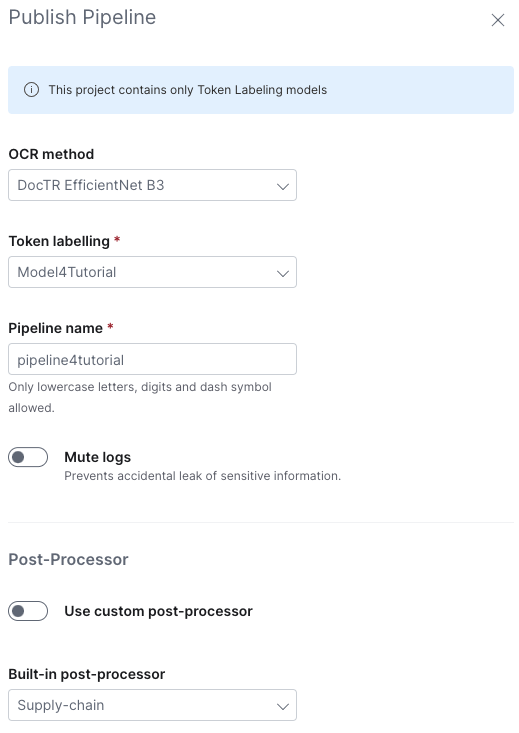
Step 6: Publishing a pipeline with your token labelling model
Navigate to the Published Pipelines page. You can now publish a scoring pipeline using the token labeling model you built.
Click Publish Pipeline in the upper navigation bar.

On the Publish Pipeline launch page:
- Select DocTR EfficientNet B3 as the OCR method you want your pipeline to use
- Select your token labeling model
- Provide
pipeline4tutorialas the name for your Pipeline - Select Supply-chain as the built-in post-processor
- Keep the rest of the default values
- Click Publish

When your pipeline has finished publishing you will be able to access the scoring URL if you want to use the bulk scorer. Otherwise, you can submit new, uniquely named documents directly to the pipeline in the UI by clicking on the Submit Document button at the end of the pipeline row.
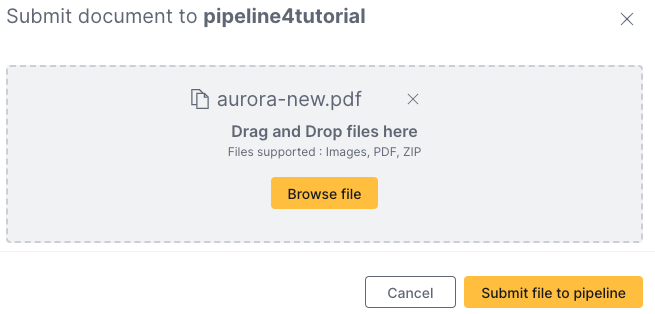
Submitting a new file to be scored
Try submitting your extra medical referral document to your published pipeline. Click Submit document to submit a new document to be scored.

On the submit document panel:
- Add the
aurora-new.pdf - Click Submit file to pipeline
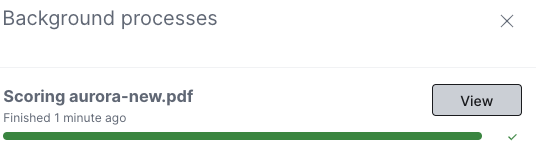
Your file will be scored by your pipeline. To access your results:
- Click the background processes bell icon
 on the top banner next to your account name
 - Click View next to the Scoring
aurora-new.pdffinished process
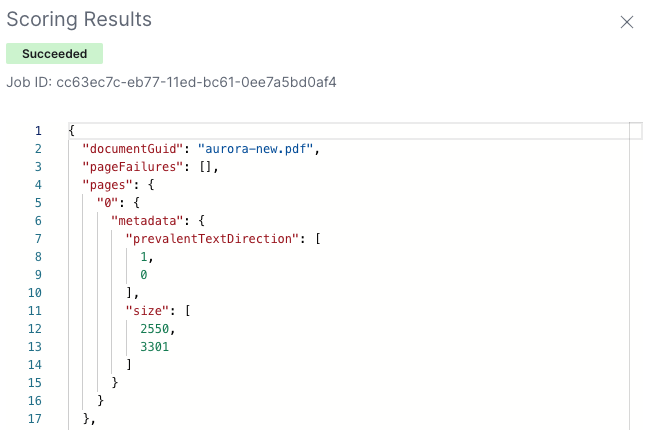
A JSON of your scoring results will be available.
Summary
In this tutorial, you learned how to utilize the basic workflow of H2O Document AI - Publisher. You worked with creating a project, running OCR, annotating your images, applying labels to your tokens, building a token labeling model, and publishing a pipeline.
Next
If you would like to try building another model with validation using the information you have learned from this tutorial, test out Tutorial 1B: Creating an evaluation model in H2O Document AI - Publisher.
- Submit and view feedback for this page
- Send feedback about H2O Document AI to cloud-feedback@h2o.ai