Task 5: Launch the first experiment
In this task, we are going to launch our first experiment. A DAI Experiment refers to generating a prediction using a dataset of our choice. For this task, we will use the Titanic dataset.
Return to the Datasets Overview page and click on the
titanic.csvdataset.Select PREDICT WIZARD. The Predict Wizard analyzes your dataset and helps you create an optimal dataset for modeling based on data science best practices. You can view recommendations and explanations of those best practices directly in the user interface.

The DAI Predict Wizard will launch. Select the option that best describes your role and specify how many years of experience you have with machine learning and data science. This is an optional step to help with future improvements but it does not affect the flow of your experiment setup process. For this example, select Data Scientist and 1-2 years.

Click Continue to proceed.
At this point, you are prompted to select a problem type and a target column for that problem type. Note that you can select a target column for only one of the available problem types. In this case, it makes sense to have
survivedas our target column. We want to know who will be surviving based on the information the model will be trained on (e.g., age).Select
survivedas the target column in the Binary Classification section, and click Continue. info
infoThe
survivedattribute was selected because, as an insurance company, we want to know what attributes can contribute to passengers' survival. Knowing these attributes from the perspective of an insurance company can be beneficial because it can give the insurance company a good idea of how to manage the rate of insurances.The DAI Wizard provides information about the selected target column and prompts you to confirm that the target column looks as expected. Click Yes to proceed.
You are then prompted to drop any ID columns that exist within the dataset. ID columns are generally dropped from an experiment to avoid misleading the model. This step in the Wizard gives you the opportunity to double-check, from a business perspective, whether it makes sense to drop the suggested column. For this case, click Yes, drop ID columns.
The DAI wizard then prompts you to check for other columns to drop from the experiment. Dropped columns are not used as predictors for the target column. Columns are dropped in order to create a cleaner dataset. Click Yes, I know which columns to drop to select the column(s) you want to drop.
infoAlternatively, you can click Yes, please check for columns to drop to let H2O Driverless AI do its own automatic check.
Select the following columns to drop and then click Continue.
- name_with_salutations
- name_without_salutations
- boat
- body
- home.dest
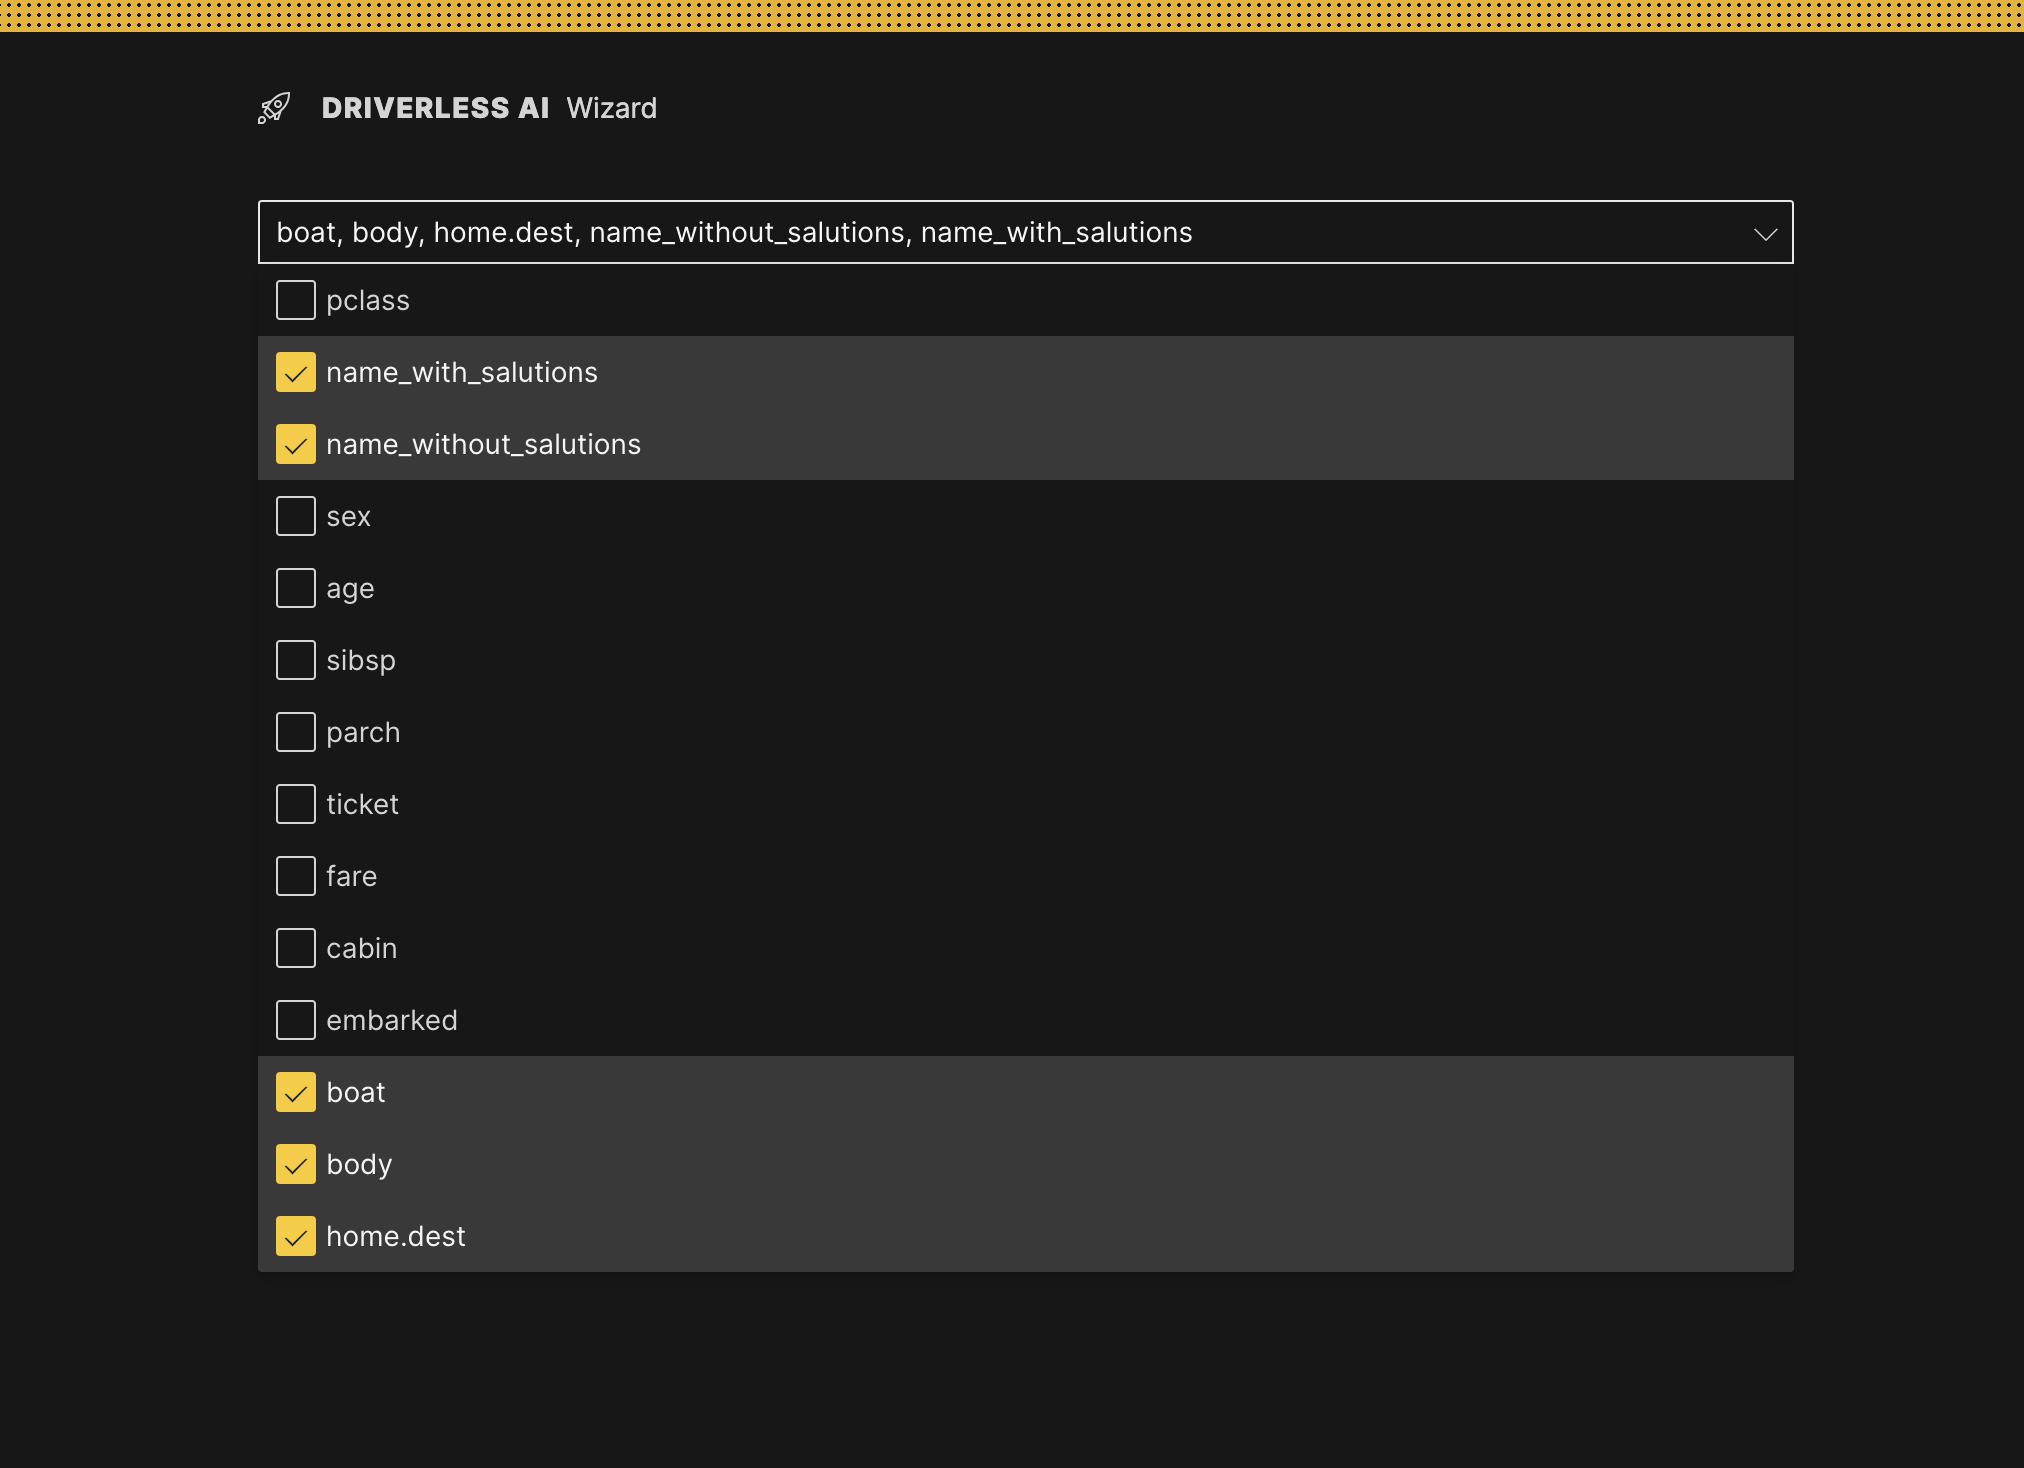 info
infoAttributes such as
boatandbodyare excluded because they are clear indicators that a passenger survived and can lead to data leakage. A clean dataset is essential for the creation of a good predictive model. The process of data cleansing needs to be done with all datasets to rid the set of any unwanted observations, structural errors, unwanted outliers, or missing data.The DAI Wizard prompts you to specify the model deployment scenario that you need to support. For this case, select I'm not ready for production.
infoThis tells DAI whether or not to set up a scoring pipeline for production and build the deployment artifacts for this experiment. If you are intending to use this model for production, you would choose I am going into production.
However, this means that your experiment setup will take a bit more time (the time it takes to set up the scoring pipeline and build deployment artifacts). Since we don't really need the deployment artifacts for this try-out, you can select I'm not ready for production for now. You can always change your mind and build scoring deployments after the experiment has completed as well.
Click Continue for the next couple of prompts that confirm your deployment scenario, sets the default level of reproducability, and confirms that there are no time/date columns in the dataset. Since we are not going into production, DAI will set the default values for these settings.
Next, confirm that the data properties are independent by clicking Yes, rows are independent.
Specify a test set to use for the experiment. You can select an existing test set, create a test set from the training data, or skip this step entirely. For this case, let's Create test set from the training data. This will split the dataset into two sets; one for testing the data, and one for training the data.
infoThe Predict Wizard analyses the dataset and our problem type and identifies that it is a standard binary use case with only structured data. Therefore, it prompts us for a test set.
In general, a test dataset is recommended because it gives a view of how the experiment will perform on truly unseen data. H2O DAI does not use the test dataset at all during the training of models in the experiment. It is simply provided as a way to easily see performance metrics on your test dataset and compare results across experiments.
Use the slider to specify what fraction of the training dataset you want to use for testing. The Driverless AI Wizard automatically suggests a percentage based on the size of your training dataset. 80% of the data will be used to train the model, and the other 20% will be used to test the trained model as recommended. Click Split my training data to create the training and test datasets.

Review the train/test split and click Yes to confirm that it is as expected. In this case we assume that there is no overlap between our training and testing data.
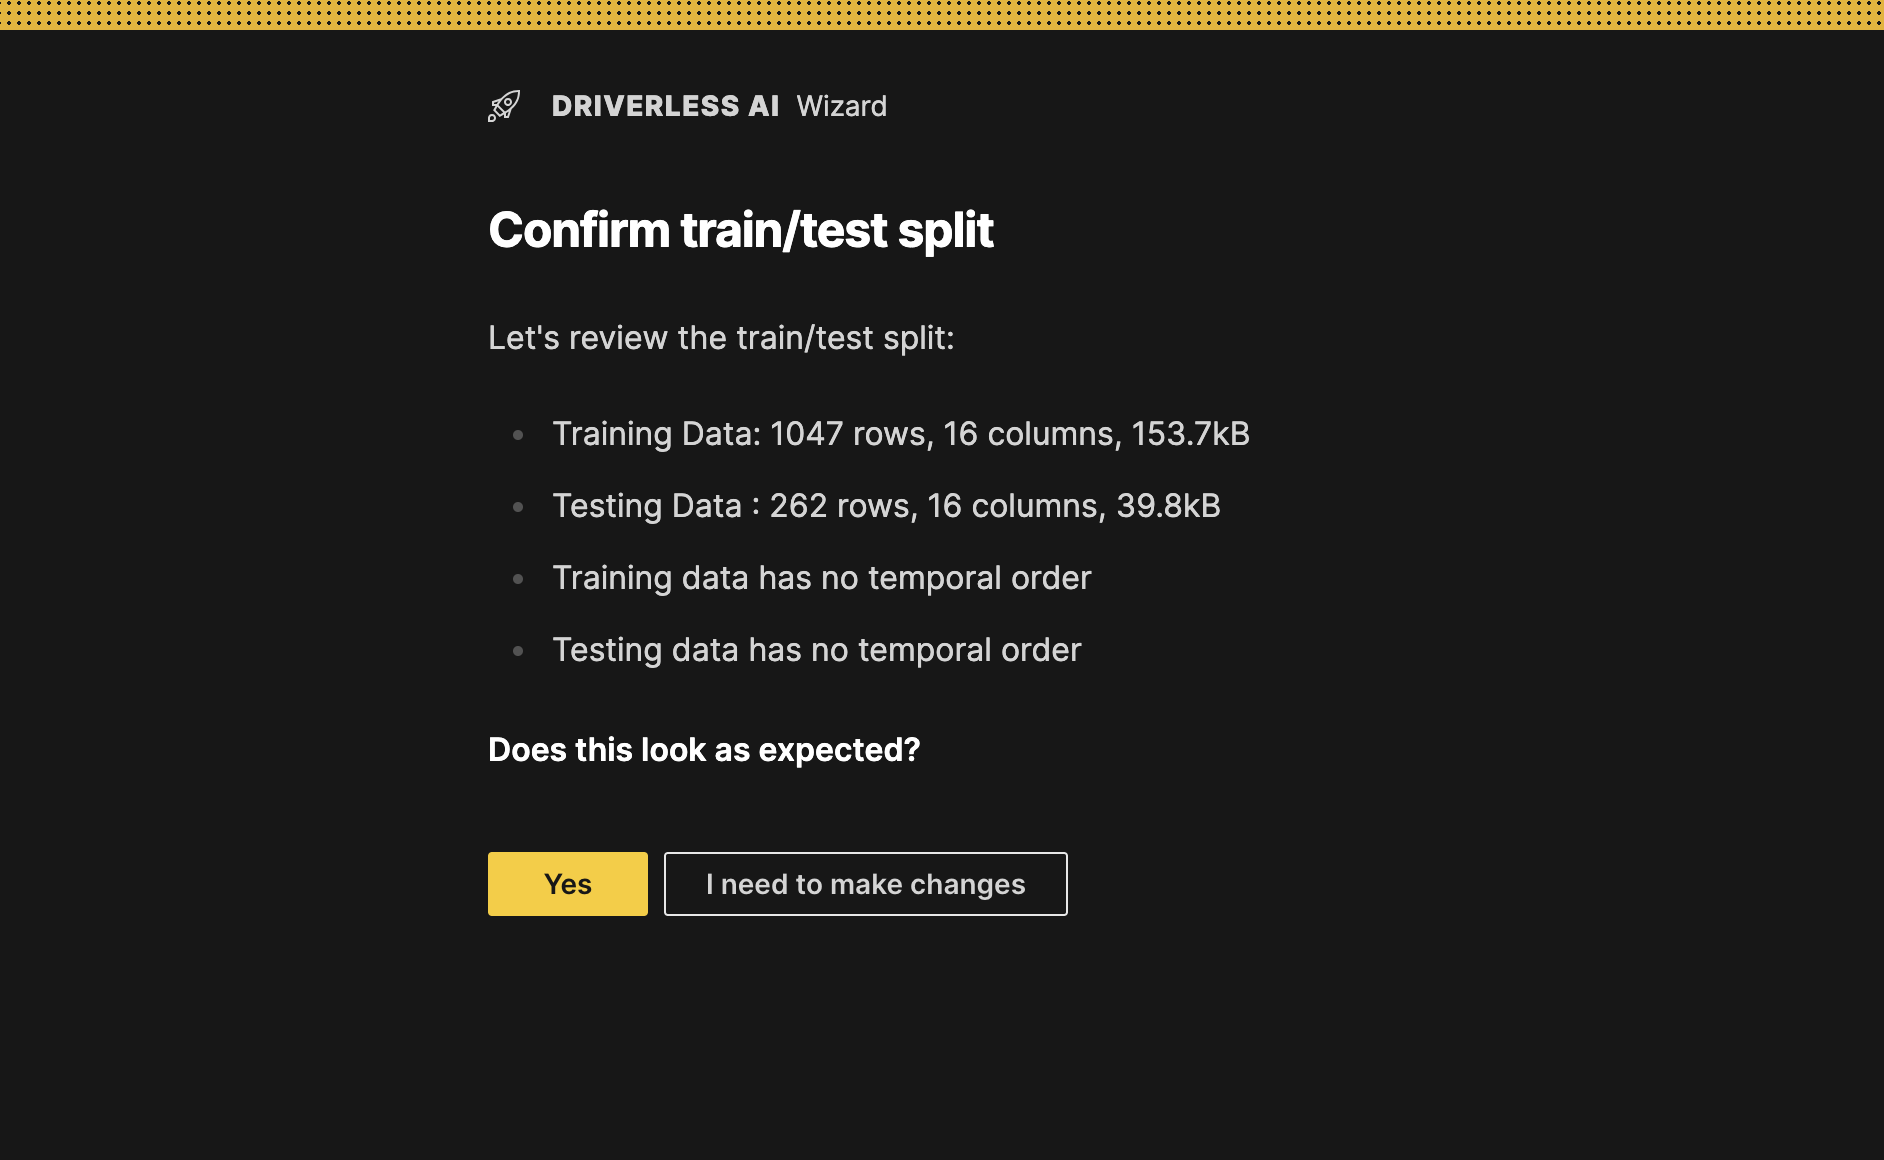 info
infoThroughout the experiment, DAI continuously builds models and evaluates how they perform on this internal test dataset.
- Specify a model type based on settings for accuracy, time, and interpretability, as well as training time and deployment size. You can also optionally specify whether you have strict runtime limits or if you want to limit the complexity of the model. For this case, select Keep it simple and click Continue to proceed.

Specify a scorer to optimize. For this case, select Area under ROC Curve (AUC) and click Continue to proceed.
infoThe Scorer is a vital part of the experiment because it is how H2O Driverless AI evaluates each model that is trained during the experiment. Since the Scorer is the criteria used to select our final model, we want to make sure it’s as closely aligned to our business use case as possible.
Optional: Specify a display name for the new experiment. There are no character or length restrictions for naming. If this field is left blank, Driverless AI will automatically generate a name for the experiment. Click Start Training!.
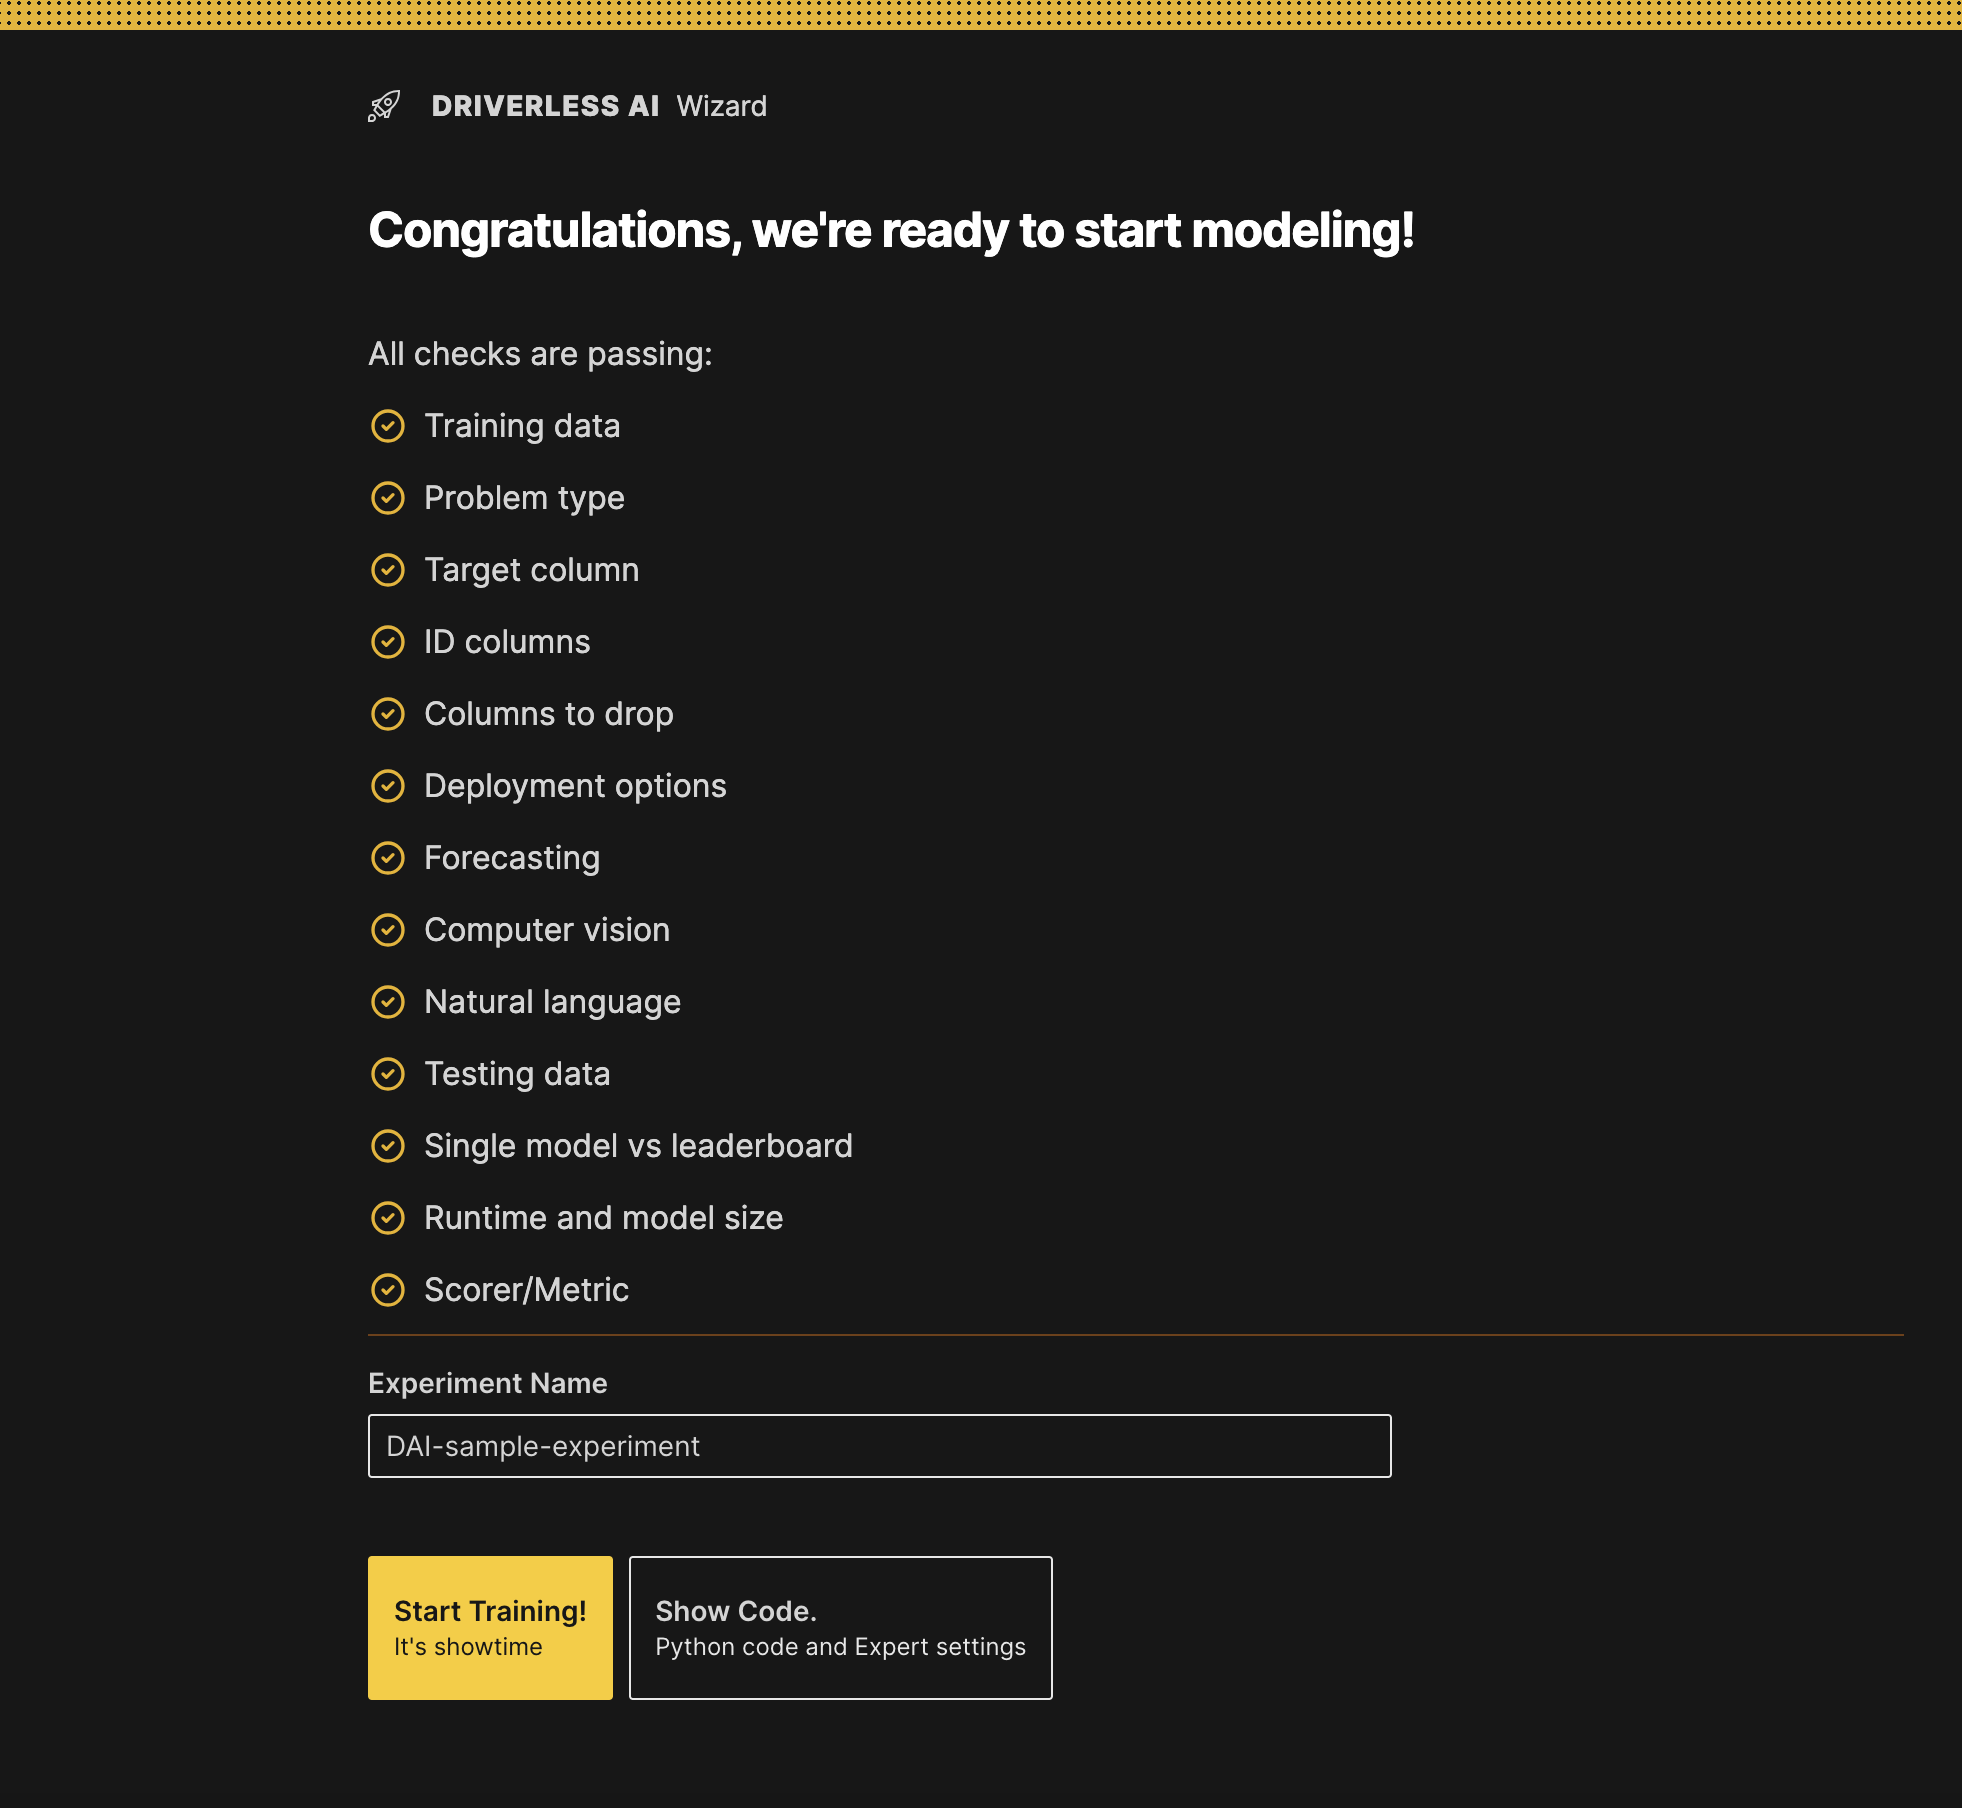 info
infoYou can leverage the Wizard to create the best initial setup of the experiment and then use the auto-generated Python code to continue iterating on the experiment. Click Show Code to see expert settings that were overridden by the Wizard based on our input as well as the Python code that could be used to create the same experiment.
Congratulations, you created your first DAI experiment. You can use the Experiment Progress percentage that is displayed on the resulting page to view the experiment progress.
Explore experiment details
Once the experiment has finished running, verify that the three Titanic datasets,
titanic.csv_wizard_test,titanic.csv_wizard_train, andtitanic.csv, are listed on the Datasets page.Navigate to the Experiments page. Your experiment should be listed there. Click on the experiment to view the experiment summary.
 note
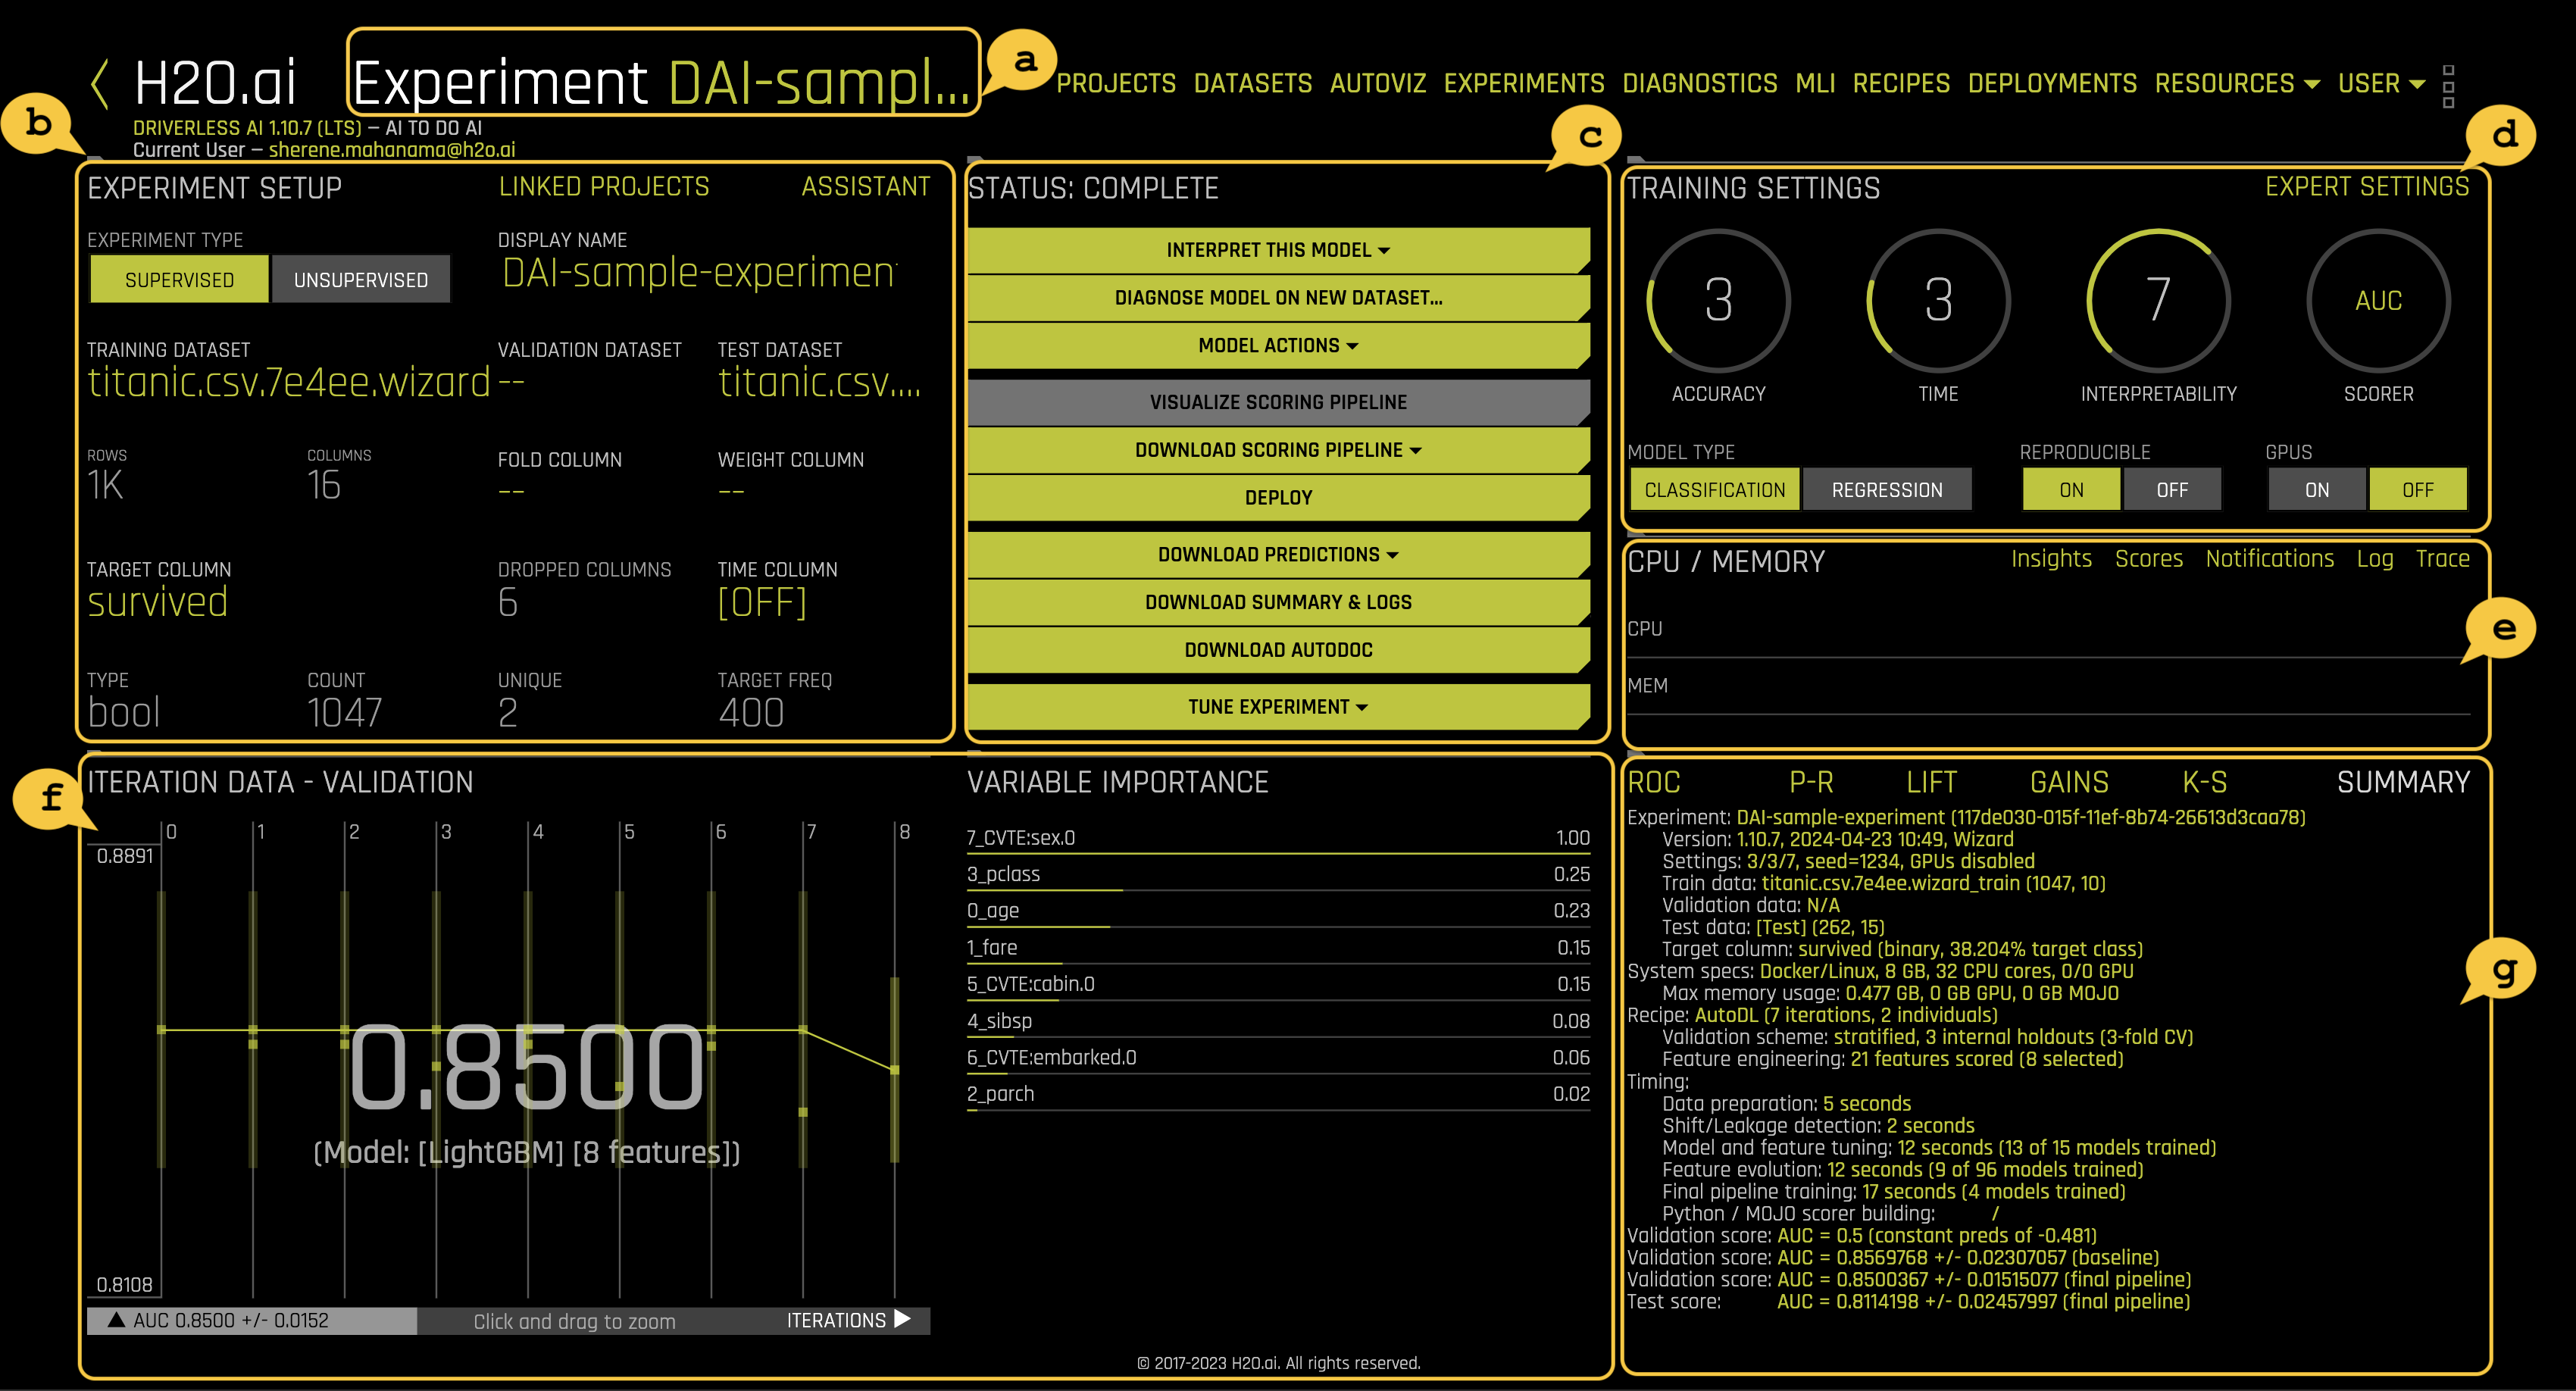
note- a. The Experiment Name section displays the name of your experiment. If you do not assign a name to it, Driverless AI will generate a random name. The name can be changed at any time. You can click on the title and change it.
- b. The Experiment Setup section displays a summary of the experiment setup. As well, it displays information about which datasets are currently used for the running experiment.
- c. The Status section provides a status on the training process of the model. Note that you can stop an experiment by clicking the Finish button. Once the experiment has finished running, this sections shows options of what you can do with the experiment results such as diagnose or interpret the model, download predictions, and more.
- d. The Training settings section provides a general overview of the training settings used for a given experiment. These settings can't be changed while an experiment is running.
- e. The CPU/Memory section provides information around Notifications, Logs, Trace, and Scores.
- Trace is used for development/debugging and to show what the system is doing at that moment.
- Scores or model scores allow you to view the detailed information about model scores after an experiment is complete.
- While the experiment is running, you can access the logs by clicking on the Log button on the experiment screen. The Log button can be found in the CPU/Memory section.
- Notifications inform you of different aspects of the experiment running(e.g., Shift in variable importance detected). Clicking on the Log button will present the experiment logs in real-time. You can download these logs by clicking on the Download Logs button in the upper right corner.
- f. Iteration Data and Variable Importance:
- The iteration data (internal validation) for each cross validation fold along with the specified scorer value. Click on a specific iteration or drag to view a range of iterations. Double click in the graph to reset the view. In this graph, each "column" represents one iteration of the experiment. During the iteration, Driverless AI will train 𝑛 models. (This is called individuals in the experiment preview). So for any column, you may see the score value for those 𝑛 models for each iteration on the graph.
- Driverless AI performs automatic feature engineering as part of an experiment's model building process. New features are created by doing transformations and/or interactions on the dataset columns. Feature creation and selection is evolutionary (based on variable importance of previous iteration) in nature and uses genetic algorithms to find the best set of feature transformations and model parameters for an experiment/dataset.
- The variable importance values. To view variable importance for a specific iteration, just select that iteration in the Iteration Data graph. The Variable Importance list will automatically update to show variable importance information for that iteration. Hover over an entry to view more info.
- g. This section provides different graphs depending on the machine learning algorithm being used. The dashboard graphs are displayed for running and completed experiments. These graphs are interactive. Hover over a point on the graph for more details about the point. For example:
- For Binary Classification experiments, Driverless AI shows a ROC Curve, a Precision-Recall graph, a Lift chart, a Kolmogorov-Smirnov chart, and a Gains chart.
- For multiclass classification experiments, a Confusion Matrix is available in addition to the ROC Curve, Precision-Recall graph, Lift chart, Kolmogorov-Smirnov chart, and Gains chart. Driverless AI generates these graphs by considering the multiclass problem as multiple one-vs-all problems. These graphs and charts (Confusion Matrix excepted) are based on a method known as micro-averaging.
- For Regression Experiments, Driverless AI shows a Residuals graphs and an Actual vs. Predicted graph.
Once you have finished exploring the experiment details, proceed to Task 6 to explore feature engineering and transformers in H2O Driverless AI.
- Submit and view feedback for this page
- Send feedback about H2O Driverless AI | Tutorials to cloud-feedback@h2o.ai