Using published pipelines
This page describes how to publish a scoring pipeline, how to use the pipeline to score new documents, and how to make curl requests to the published pipeline.
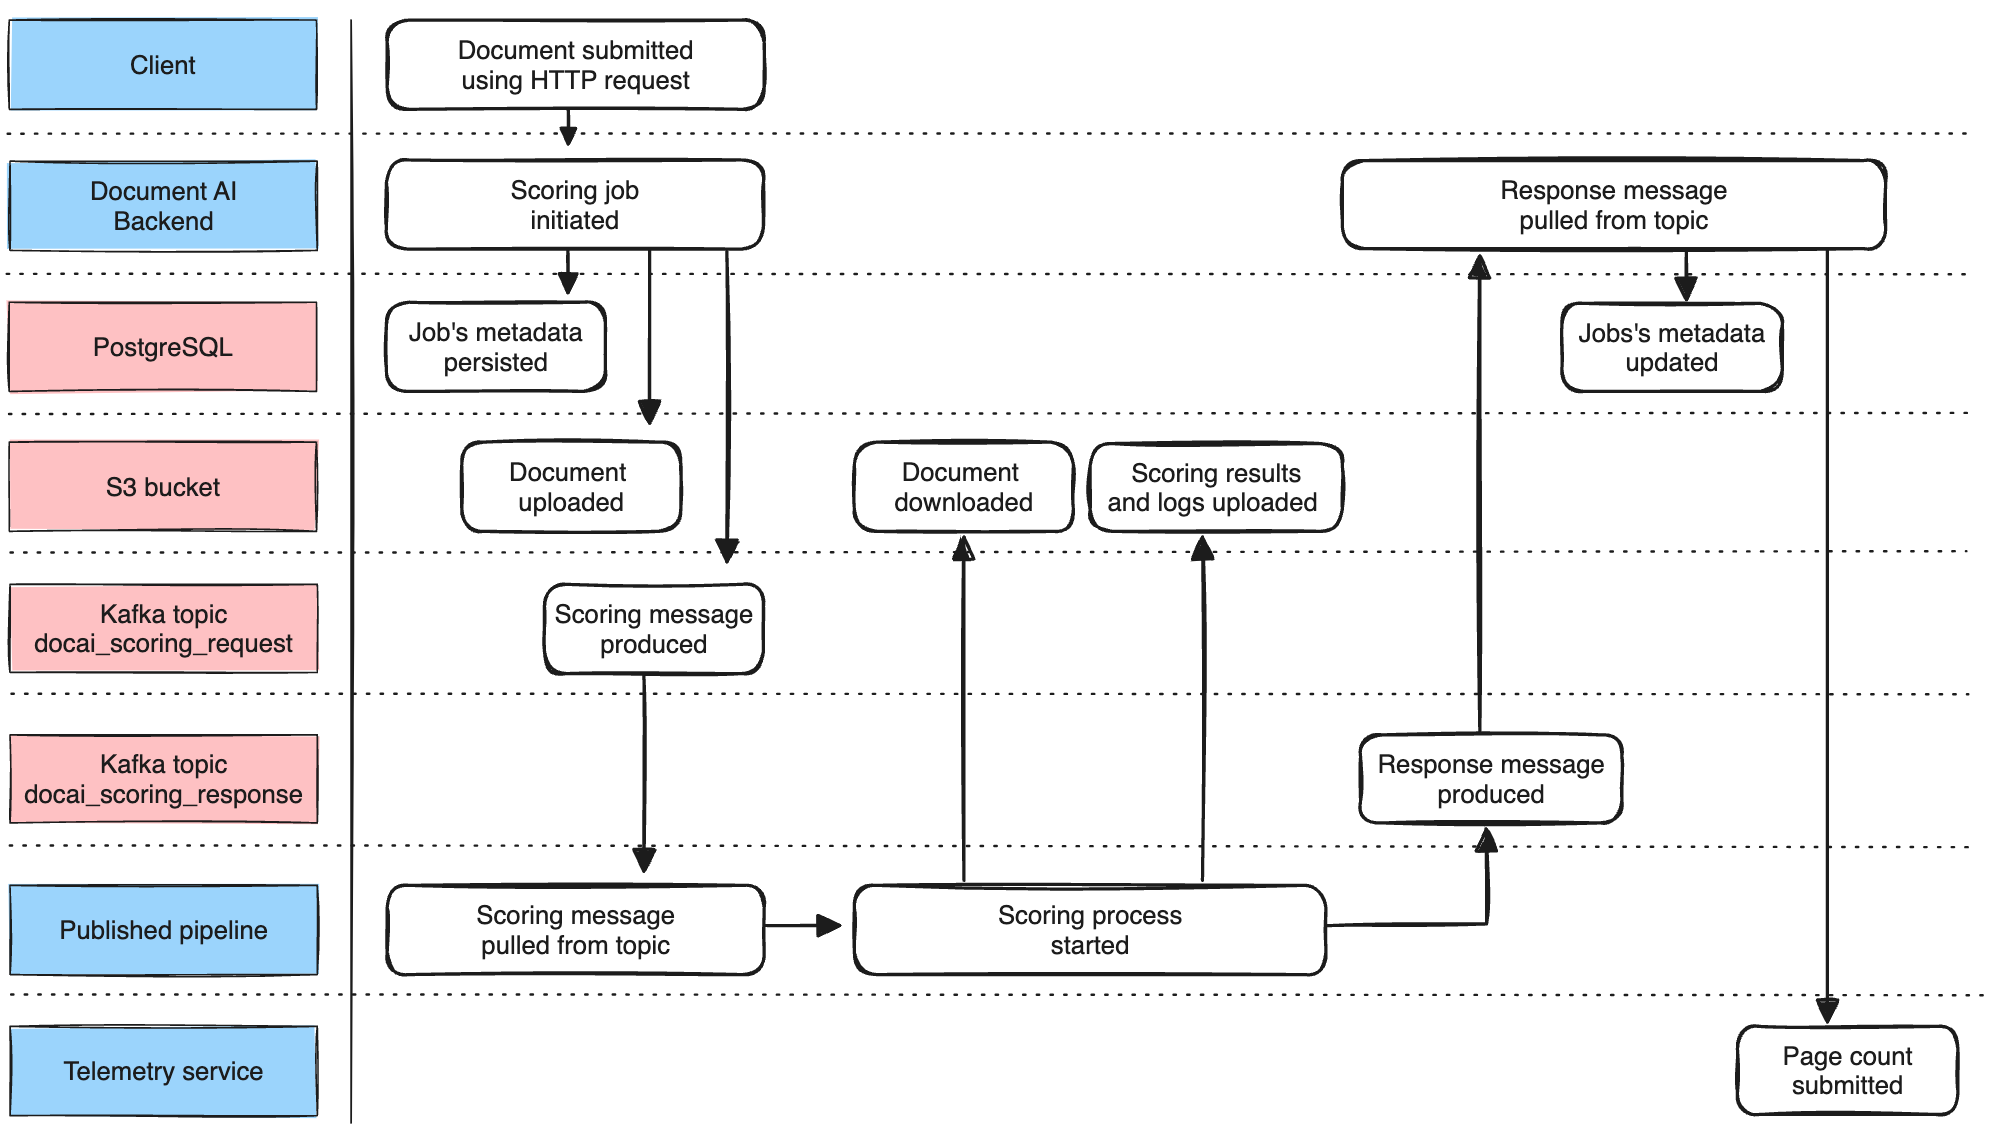
Process of document scoring
The following section outlines how documents are scored.
- You submit a document (input) to the docai-backend using a multipart upload HTTP request. This request is handled by a single replica of the backend.
- The backend creates corresponding job records in a PostgresSQL database and stores the uploaded document in an S3 bucket.
- The backend publishes a scoring request message to a single partition of
docai_scoring_requestKafka topic. This message contains only scoring job metadata like location of the input document, the name of the pipeline, etc. - A corresponding replica of each published pipeline (scorer) pulls the message from the connected Kafka partition. It checks whether the message is addressed to it by comparing the target pipeline name. The addressed scorer will start processing that document. Non-addressed scorers discard the message.
- Before scoring a document, the scorer downloads the input document from the S3 bucket. At the end of a successful scoring, the scorer uploads the result and logs back to the S3 bucket and produces a message to
docai_scoring_responseKafka topic. - The backend pulls that message and updates the job metadata in the PostgresSQL database. The backend also sends the number of processed pages to the Telemetry service.
- A pipeline must be published in order to score a document.
- All published pipelines share one Kafka topic. Therefore, there must be enough partitions for the pipeline with the highest number of replicas. If the number of replicas is higher than the number of partitions, replicas that exceed this will not receive scoring messages. Keep in mind that the number of partitions can’t be decreased, only increased.
Publishing a scoring pipeline
The following steps describe how to publish a scoring pipeline.
-
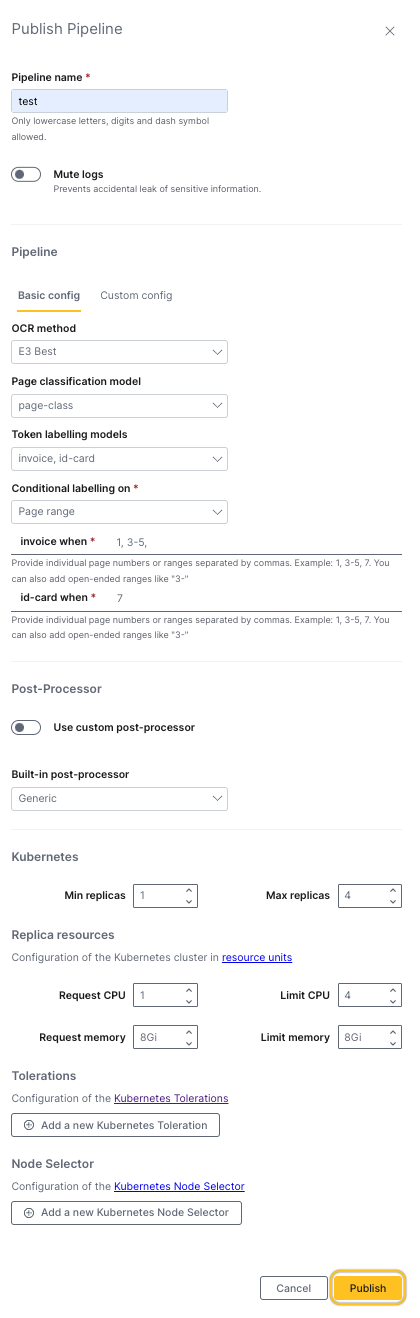
Navigate to the Pipelines page in the left navigation bar after training your model.
-
Click Publish Pipeline.

-
Provide a name for your pipeline. The name has to be unique and can only support lowercase letters, digits, and the dash ("-") symbol.
-
(Optional) Toggle to mute your logs if you need to protect sensitive information.
-
Next, under the Pipeline section, you can either use the basic configuration or use a custom configuration.
noteWhen using a custom configuration, changes will be reflected in the YAML file found under the Custom Config menu.
-
Select which optimal character recognition (OCR) method you want your Pipeline to use for scoring from the menu. Use a different method for scoring than you used for training.
-
Choose a Page classification model from the drop-down menu if required. This model categorizes pages based on their content type, improving processing accuracy.
-
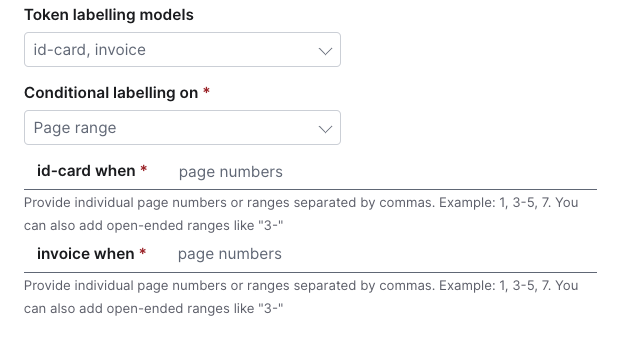
Choose a Token labeling model(s) from the drop-down menu.
noteIf you are choosing multiple labeling models, select a condition from the dropdown menu and specify the criteria for each labeling model.
-
Select a post-processor:
- Generic
- Supply-chain
- Create a custom post-processor
-
Configure how your scoring pipeline is scheduled:
-
Kubernetes:
- Min replicas: Set the minimum number of replicas required
- Max replicas: Set the maximum number of replicas to handle traffic spikes
-
Replica resources:
- CPU:
- Request CPU: Allows pipeline to be provisioned so long as the requested amount is available
- Limit CPU: If the limit is reached, the pipeline is throttled down to the limit
- Memory:
- Request memory: Amount of memory required to schedule the pipeline
- Limit memory: If the limit is exceeded, the pod will be killed and the pipeline will be restarted
- CPU:
-
Tolerations: (Optional) Nodes you want to schedule your scoring pipeline to
-
Node selector: (Optional) Select nodes that have specific labels on them
-
-
Click Publish.
Pipeline information
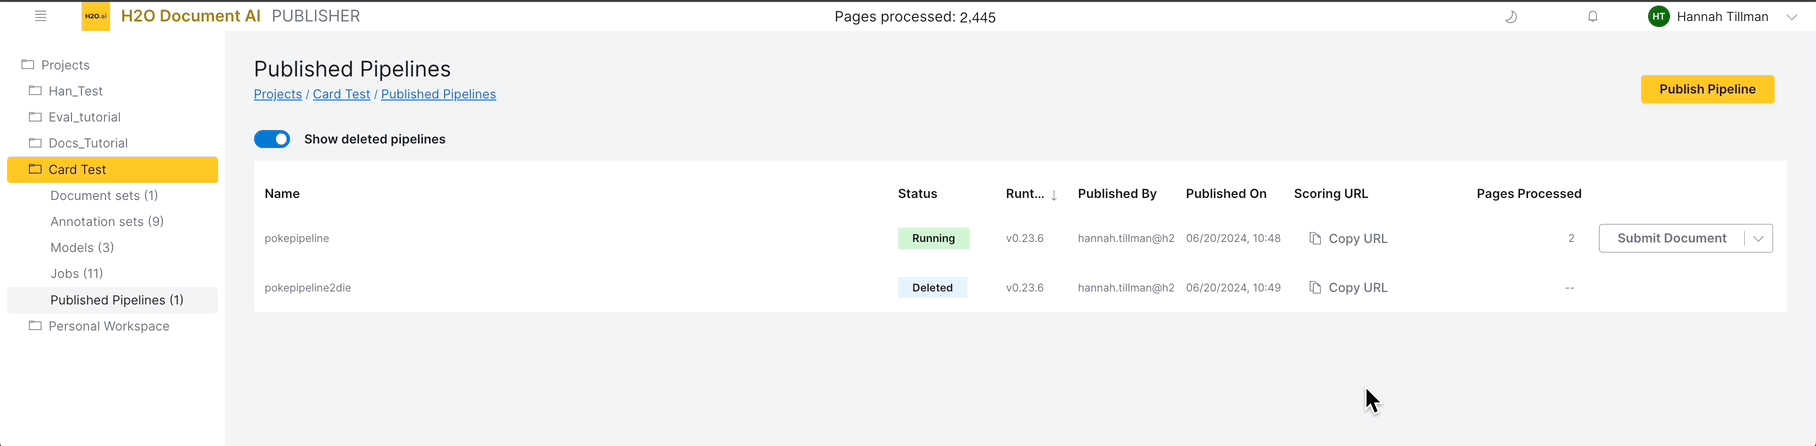
A published pipeline provides the following information:
- Name: The name of the pipeline.
- Status: The curent state the pipeline is in.
- Runtime: The version of the pipeline.
- Published By: The user who published the pipeline.
- Published On: The date and time the pipeline was published.
- Scoring URL: The scoring URL you need for the bulk scorer.
- Pages Processed: The number of pages this pipeline has processed.
The following are the available states for the pipelines:
- Starting: Pipeline is attempting to start.
- Pending: Pipeline is unable to attempt starting (usually due to insufficient resources or incorrect Kubernetes settings). Try editing to restart it.
- Running: Pipeline successfully started and is ready to score documents.
- Failing: Pipeline that is failing to start (perhaps due to wrong YAML configuration or wrong post-processor).
- Deleted: Pipeline that has been unpublished and can no longer be edited.
Edit your pipelines
You can edit everything about your pipeline except the name. You can interact with pipelines in any state except for a pipeline that you have unpublished. If you want to change the name of your pipeline you have to make a new pipeline.
When editing your pipeline, there is additional information about it at the top of the editing panel in a blue box. This can be helpful to figure out why your pipeline won't start.
To edit your pipeline, do the following:
- Click the dropdown arrow at the end of your pipeline.
- Select Edit.
- Make your desired edits.
- Click Edit to save your changes.
Pipeline logs
You can access logs for your pipeline. Pipeline logs are seen next to the failing status, and you can access them by clicking on the log. This can help you debug the reason your pipeline failed.
Upgrade your pipelines
When upgrading Document AI to a new version (e.g. 0.7 > 0.8) Document AI will automatically upgrade all existing pipelines to the new version as well. The pipelines using the older Document AI version also use the old runtime, but the new version installation will attempt to update them. If the pipeline does not start once it has been updated to the new version, then the pipeline will be rolled back to the previous version.
Revert to a previous version of your pipeline
You can revert your pipeline to a previous version of that pipeline. You can see all the previous versions of a pipeline (similar to how you can see prior edits) which will let you rollback your pipeline to a previous version if your upgraded pipeline is failing.
Deleted pipelines
Toggle on Show deleted pipelines to see your pipelines in the deleted state. Deleted pipelines cannot be interacted with. You can, however, make a new pipeline using the same name as the deleted pipeline. If you use the same name as a deleted pipeline, you won’t reuse anything else from that deleted pipeline. That deleted pipeline will just be overwritten.
To delete your pipeline, do the following:
- Click the dropdown arrow at the end of your pipeline.
- Click Unpublish.
- Select the check that your acknowledge that this act is destructive and irreversible.
- Click Unpublish.
Put your pipeline to sleep
You can provide a setting to put your pipeline to sleep if a document has not been submitted in a certain amount of time. Sleeping pipelines don't use resources because they're scaled down to 0 replicas.
Wake Up sleeping pipelines
Wake your pipeline back up by submitting a document to it. The submitted document will stay in a queue before the pipeline wakes back up. Waking up pipelines go from starting to running.
Configuring the sleeping pipelines feature
You can configure the sleeping pipelines feature globally via Helm during the Document AI installation. This feature applies the same settings to all pipelines.
- Enable the feature: By default, this feature is turned off. To use it, enable it in the Helm configuration.
- Set Idle Time: Define the idle time after which the controller scales the pipeline down to 0 replicas.
UI behavior
- Pipelines scaled down to 0 remain visible in the UI with the status Sleeping.
- Users can submit documents to sleeping pipelines. The system queues these documents and wakes up the pipeline.
Document submission and wake-up process
- Once a sleeping pipeline is woken up, it retrieves the queued document and begins processing.
- This process works the same whether a document is submitted via the UI or API.
- The wake-up time for a pipeline is nearly identical to the time required to publish a new pipeline.
Post-processors
When publishing a pipeline, you need to add a post-processor. You can either use one of the built-in post-processors (i.e. Generic or Supply-chain) or you can write your own custom post-processor. Both built-in post-processors merge individual tokens that were both predicted as the same label. For example, if token John and token Smith are both predicted as label customer_name they will be merged to the single prediction John Smith.
To access additional post-processor recipes, see the H2O Document AI Recipe Repository.
Generic
The Generic post-processor includes Top N and the ability to produce an image snippet. Top N delivers a second view of the data that shows what the top predicted class will be as well as the second most likely and third most likely. Image snippet returns a cropped image of each prediction rectangle in a byte string. The Generic post-processor produces huge byte strings which can make it difficult to find the real predictions.
Supply-chain
The Supply-chain post-processor includes line ID groupings. Line ID groupings are used to group predictions together (e.g. item ID, price, and quantity).
Table support
H2O Document AI - Publisher offers table support for your documents. To use the table support feature, you need to use a slightly modified version of the supply-chain post-processor. This addition adds the tableID element which is needed for table support to work.
This code takes the class type to label each interesting column of the table. The model then predicts all entities with the extra medatata: tableId and lineID. If the entity belongs to the table, the tableID and lineID metadata are non-empty.
- tableID denotes the table
- lineID denotes the row
- class denotes the column
- entity is the text predict for the cell
Submitting new documents to the pipeline
After your pipeline has been published and is Running, you can use it to score new documents. Track the progress of your submitted file under background processes. You access background processes by clicking the bell icon next to your account name.
When the document you submitted to the pipeline has finished processing, you can access the result (a JSON response) from background processes by clicking the "View" button. This will bring you to the Scoring Results page. You can access the logs from the scoring results page, too.
Universal scoring pipeline
You can construct your own custom pipeline in the UI. This is known as the universal scoring pipeline (USP). The USP grants you more flexibility than is available in the UI alone. All available functionalities exist as processors, and the pipeline module orchestrates them by following the configurations you set via YAML. This lets you chain together many processors to perfrom a single scoring task, thus creating a single pipeline.
The USP affords several interesting functionalities that traditional pipelines do not, such as:
- conditional processing: run a page classifier first and send documents in different classes to separate token classifiers,
- non-text object detection with regular text OCR methods,
- OCR-only pipelines,
- and many more possibilities!
Pipeline flow
The pipeline is broken down into individual tasks with a single processor per task. The tasks are carried out sequentially. The Intake processor ingests the input documents and returns an annotation set wth the documents to be processed further downstream. Then, each subsequent processor ingests a list of annotation sets, performs its process, then outputs a list of annotation sets for the next processor to process. At the end of the pipeline, a post processor is needed to translate the annotation sets into a JSON file for consumption.
There are processors that are highly common amongst most pipelines such as Intake and PdfExtract, but the beauty of the USP is its highly customizable nature.
Accessing the universal scoring pipeline
To use the USP:
- Navigate to the Publish Pipelines panel.
- Click Publish Pipeline.
- Toggle on Use custom pipeline.
This gives you access to the config YAML file that allows you to construct your custom pipeline. When you publish your pipeline, it will read the YAML file when it runs.
If you set options in the UI panel, the YAML file will read them. For example, if you select the Tesseract option for OCR, it will have that preset as the OCR option for your Pipeline in the custom pipeline.
To update the USP with the changes you select in the Publish Pipelines panel, toggle the Use custom pipeline off and back on. The changes you select will now be reflected in the YAML file.
Of course, you do not have to use any of the options in the Publish Pipelines panel. You can set all of your processors directly in the YAML file.
USP and custom post processors
The USP can utilize your custom post processors as well as the ones that come pre-baked into the UI. To use a custom post processor, toggle on Use custom post-processor. Any custom post processor you write or upload will be directly linked to the YAML file as soon as you toggle on Use custom pipeline. Your post processor will be the last task executed.
H2O provided pipelines and processors
H2O provides several premade pipelines and post processors for you to use.
Hybrid OCR
Hybrid OCR reads the embedded text directly and passes only images into the OCR engine. This is useful in instances where most of the content of the document is embedded text but there are some embedded images with text (like a logo) which is not part of the embedded text content. If you were to just use a PDF text extractor, you would miss out on the text present in the images. It could also be very time consuming to run OCR for both the embedded text and the text inside the image. The hybrid OCR processor is an in-between ground where you can utilize the efficiency of PDF text extraction without missing out on the text in logos or other text present in images.
# Hybrid OCR processor:
argus.pipeline -t
argus.processors.ocr_processors.Intake
root_docs_path=/Users/raji/Downloads/test-hybrid-ocr
follow_symlinks=true
-t
argus.processors.ocr_processors.PdfTextExtract
include_embedded_images=True
-t
argus.processors.ocr_processors.NormalizeImages
resample_to_dpi=300
normalize_image_format=.png
-t
argus.processors.ocr_processors.GenericOcr
ocr_style=BestTextExtract
-f
my_via
type=Via
-o
try_ocr
You must set include_embedded_images=True in the PdfTextExtract step in order to perform OCR on the images. The OCR engine is the one mentioned in the following step:
argus.processors.ocr_processors.GenericOcr
ocr_style=BestTextExtract
Manipulating artifacts
When you open a new Publish Pipelines panel and toggle on Use custom pipeline without selecting a model option, the artifacts will be empty in the pipeline. Selecting a model to use for the pipeline will fill the artifacts with the source URL of the model and the unique name of that model. This artifact information will also populate the the Predict task which is the processor task that has your model run predictions. You can fill in this information yourself if you have a model you want to use instead of having the UI prefill this information for you.
Universal scoring pipeline example
Let's look at an example of a custom pipeline and walk through how it works. The following pipeline is USP-exclusive feature: an OCR-only pipeline.
spec: # A general pipeline example that only does OCR on a set of data

  pipeline:
    steps:
    - tasks:
       - name: "Intake" # name of task
         type: PipelineTask # if absent, defaults to PipelineTask.  Can also be PipelineReorderInputs and InputCommand.  InputCommand cannot be used in the scorer.
         class: argus.processors.ocr_processors.Intake # fqn_of_Processor class
         parameters:
           root_docs_path: /input/path
           follow_symlinks: true
    - tasks:
       - name: "PdfExtract"
         type: PipelineTask
         class: argus.processors.ocr_processors.PdfTextExtract
    - tasks:
       - name: "ImageNormalize"
         class: argus.processors.ocr_processors.NormalizeImages
         parameters:
           resample_to_dpi: 300
           normalize_image_format: .jpg
    - tasks:
       - name: "OCR"
         class: argus.processors.ocr_processors.GenericOcr
         parameters:
           ocr_style: DocTROcr
    - tasks:
       - name: "PostProcess"
         class: argus.processors.post_processors.ocr_only_post_processor.PostProcessor
         parameters:
           output_format: 'json'
The first task is Intake which lists all the documents that need to be processed by processors further downstream. The second task is PdfExtract which attempts to extact the text on a page, and if it can't, leaves the page untouched. The third task is ImageNormalize which normalizes the format and DPI and validates the image. The fourth task is OCR which will, in this case, run the docTR OCR method. The final task is the post processor: you need a post processor to translate the data from an annotation set to a JSON file for use.
The MiniProgram processor
The MiniProgram processor is a special type of processor that lets you write small "in-between" steps without implementing a full-fledged processor. It runs once for every page and modifies all aspects of the annotation set (both the current document and the current page) by:
- Defining a local variable for each page which allows it access to the current page/document/annotation set data structure;
- Running the
MiniProgramprocessor (which possibly modifies the local variables); - Updating the output annotation set from the local variables after
MiniProgramprocessor finishes.
The when parameter
All processors take a when parameter (in addition to their processor-specific parameters). The when parameter's value is a slightly extended mini program that allows you to:
- run processors conditionally on some pages or documents depending on the information contained in the input, or to drop them from the output annotation sets.
- manipulate an annotation set in the same way as a regular mini program.
Accessing a scoring pipeline via curl
The following sections describe how to access published pipelines by sending API requests using curl.
Authentication
The following is a sample curl command to retrieve an access token from an identity provider.
- The access token has a short lifetime of approximately five minutes and may expire while a document is being processed. If this occurs, rerun the curl command to retrieve a new access token. The processing of the document is not affected by the token expiry.
- The access token that is returned by this command must be included in all requests to the proxy.
ACCESS_TOKEN=$(curl -X POST 'http://keycloak.34.211.115.161.nip.io/auth/realms/wave/protocol/openid-connect/token' \
-H 'Content-Type: application/x-www-form-urlencoded' \
-d 'password=REPLACE_ME' \
-d 'username=REPLACE_ME' \
-d 'grant_type=password' \
-d 'response_type=token' \
-d 'client_id=admin-cli' | jq -r .access_token)
Listing published pipelines
To retrieve a list of published pipelines, run the following curl command:
curl https://document-ai-scorer.cloud-qa.h2o.ai/pipeline -H "Authorization: Bearer ${ACCESS_TOKEN}"
The following is the expected response to the preceding command:
[{"name":"ak-pipeline-test","scoringUrl":"https://document-ai-scorer.cloud-qa.h2o.ai/async/model/ak-pipeline-test/score"}]
Submitting documents to a scoring pipeline
To retrieve a list of published pipelines, run the following curl command:
curl -v https://document-ai-scorer.cloud-qa.h2o.ai/async/model/bd-trial/score \
-F documentGuid=cdbd0e44-2672-4d63-94dd-9afb110547ec \
-F document=@./test_api_svcs.pdf \
-H "Authorization: Bearer ${ACCESS_TOKEN}"
The following is the expected response to the preceding command:
{"jobUri":"https://document-ai-scorer.cloud-qa.h2o.ai/job/adde851e-b9b4-11ec-9ceb-fe652bf3bfb4","jobId":"adde851e-b9b4-11ec-9ceb-fe652bf3bfb4"}
Checking pipeline status
curl https://document-ai-scorer.cloud-qa.h2o.ai/job/adde851e-b9b4-11ec-9ceb-fe652bf3bfb4 -H "Authorization: Bearer ${ACCESS_TOKEN}"
The following is the expected response to the preceding command:
{"status":"succeeded","resultUri":"https://document-ai-scorer.cloud-qa.h2o.ai/job/adde851e-b9b4-11ec-9ceb-fe652bf3bfb4/result"}
Retrieving a prediction response
To retrieve a prediction response from a published scoring pipeline, run the following curl command after the status of a pipeline has changed to succeeded:
curl https://document-ai-scorer.cloud-qa.h2o.ai/job/adde851e-b9b4-11ec-9ceb-fe652bf3bfb4/result -H "Authorization: Bearer ${ACCESS_TOKEN}"
The following is the expected response to the preceding command:
{"documentGuid":"some-id","entityConfidences":[],"modelMetadata":{"version":"370f1c"},"pageFailures":[],"pages":{"0":{"metadata":{"dpi":200,"size":[10334,14617]}}}}
Template method
The template method lets you easily access the target text in a document by knowing its coordinates ahead of time. The template method is best used for cases where you have many documents from the same vendor (or of the same format) and expect many more in the future. Due to the repetitive nature of these documents, the location of the target text is predictable, so you don’t need a model to predict its location. Instead, you can have the template look at the text in the assigned coordinates. This allows the template to be more accurate than a model.
To use the template method, contact the H2O Document AI team to help you set up your template.
Using the template method
After your template has been created, you need to navigate to the Published Pipelines page to utilize it.
- Click Publish Pipeline.
- Select an OCR method that uses PDF text extraction (for example, E3 Best).
- Add a model (either a finetuned or a dummy model).
If you encounter a document that was not templated, a finetuned model will provide you with reasonable output. A dummy model will provide you with junk output.
- Provide a pipeline name.
- Toggle on Use custom post-processor. Paste your template code into the exposed post-processor.
- Click Publish.
This will create a pipeline that utilizes your template. You can submit documents to your published pipeline by clicking the Submit Document button at the end of the row, or you can use the bulk scorer to submit many documents at once.
- Submit and view feedback for this page
- Send feedback about H2O Document AI to cloud-feedback@h2o.ai