Using annotation sets
Work with available annotation sets or create new ones. An annotation set can contain multiple types of annotations, including text (usually generated from the optical character recognition [OCR] process), token entity annotations of type “label”, and page annotations of type “class”.
Apply Labels
This action applies labels from the “Labels” annotation set to the boxes of a Text annotation set (typically OCR token boxes). The entity label is applied to the token box if the token box sufficiently overlaps the entity box. This job also combines attribute types from the two sets you are using (e.g. giving the applied label set the attributes text and label).
- Select the Text Annotation Set
- Select the Labels Annotation Set
- Provide a name for the resulting labeled Annotation Set
- (Optional) Provide a description
- Select what this method should do if the labels page is missing
- Click Apply Labels
The newly labeled annotation set will appear at the top of your annotation sets list. Open the file in “Edit in Page View” to see the annotated labels.
Predict Using Model
Predict on an annotation set using a successfully built model.
- Select the model to use for predictions
- Provide a name for the prediction set
- (Optional) Provide a description for the prediction set
- Select the Evaluation Annotation set
- Click Predict to retrieve the predictions
Train Model
Train a model based on your annotation sets. Training models is the H2O Document AI - Publisher job that requires the most time.
- Select the model type. One of:
- Token Labeling - requires the annotation set to have the label and text file attributes
- Page Classification - requires the annotation set to have the class and text file attributes
- Select the specific annotation set you want to train the model
- (Optional) Set the batch size and number of epochs
- Provide a name for the resulting model
- (Optional) Provide a description of the model
- Click Train to build the model
In the Train Model screen, you can also select whether you want to evaluate the model. This lets you train a model using a validation set. Before building the model:
- Toggle Evaluate on
- Provide a name for the Prediction Annotation set
- Select the Evaluation Annotation Set
The model will appear on the Models page when it is finished. If you provided a validation set to build your model, you will also be able to access the accuracy of your model. You view the accuracy of your model on the prediction annotation set which is generated after your model is built. The prediction annotation set can be accessed from the Annotation sets page. Learn more about the accuracy panel.
Concatenate
You can concatenate (combine) annotation sets that have the same attributes.
- Select the annotation sets you want to combine (sets must contain the same attributes)
- Provide a result name
- (Optional) Provide a description for your concatenated annotation set
- Click Concatenate
The concatenated annotation set will appear in the Annotation sets page.
Export
Export the selected annotation set(s).
- Select the file(s) you want to export
- Click Export on the upper navigation bar
Import annotations
Import a JSON file of a previously annotated annotation set that you have saved to your local computer.
- Provide a name for the imported annotation set
- (Optional) Provide a description
- Drag and drop the JSON file or browse your local files for the file you want to import
- Click Import
Interacting with an annotation set
Each annotation set has an Info button at the end of the row. Clicking Info will give you details of your annotation set (e.g. the description or number of pages). You can also find the logs for your annotation sets here. To see the full log, click Expand. You can also download the log by clicking Download.
The drop-down arrow next to the Info button gives you the option to edit your annotation set in Page View, rename your annotation set, split your annotation set, export your annotation set, or delete your annotation set.
Edit in Page View
Annotate documents using the VGG Image Annotator (VIA) tool. Fill in the regions on the image and assign region or file attributes.
Tool Bar
![]() : Save all the changes you have made to the annotation set within the project.
: Save all the changes you have made to the annotation set within the project.
![]() : Export your annotation set as a JSON file to your local computer.
: Export your annotation set as a JSON file to your local computer.
![]() : Display all files in a grid. From here, you can group images by file or region type and display images in collated groups.
: Display all files in a grid. From here, you can group images by file or region type and display images in collated groups.
![]() : Toggle the annotation editor open and closed.
: Toggle the annotation editor open and closed.
![]() : Zoom in and out of the image you are actively annotating by using either the buttons or the scroller.
: Zoom in and out of the image you are actively annotating by using either the buttons or the scroller.
![]() : Select all the regions on the image you’re actively working on. This is convenient if you’re working with multiple of the same image with different information on each image since you can copy over all the regions at once.
: Select all the regions on the image you’re actively working on. This is convenient if you’re working with multiple of the same image with different information on each image since you can copy over all the regions at once.
![]() : Copy the selected region(s).
: Copy the selected region(s).
![]() : Paste the copied region(s).
: Paste the copied region(s).
![]() : Paste the copied region(s) to multiple images at once.
: Paste the copied region(s) to multiple images at once.
![]() : Undo the paste to many command.
: Undo the paste to many command.
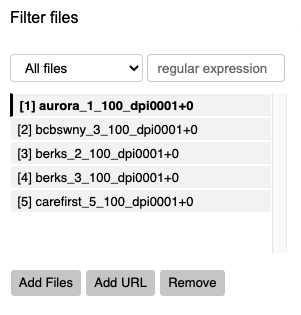
Filter files
This box lets you filter which files you want to see. One of:
- All files - shows all available files
- Show files without regions - shows files without any added bounding boxes
- Show files missing region annotations - shows files that have bounding boxes but are missing annotations for those boxes
- Show files missing file annotations - shows files that are missing file attributes
- File that could not be loaded - shows files that could not be loaded
- Regular Expression - search for a file or group of files by name
Here, you can import new files by choosing them from your local files or by providing a URL. You can also remove files by providing a file id, file name, and a number of regions.
Current workaround
If you are adding a file that is not an image:
- First, export the PDF as a JPG or PNG.
- Then, add the file in edit in page view.
If the number of documents and pages does not update when you add a new file in edit in page view, refresh the page or click on another menu item (e.g. Document Sets) and click back to Annotation Sets to see the updated number of pages.
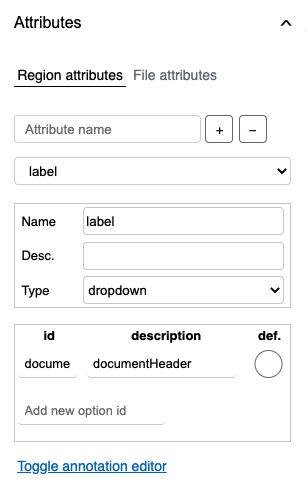
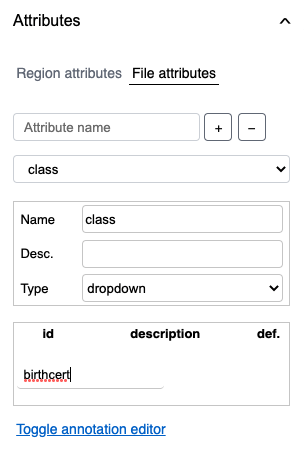
Attributes
This box contains the ability to add region and file attributes. Toggle which one you are actively working with by selecting from the two options.
You can edit or remove your annotations by clicking the Annotations Editor page button on the tool bar, by clicking the “Toggle annotation editor” note in the Attributes box, or by pressing the space bar.
Region attributes
Region attributes allot attributes to specific regions on the page. Applying region attributes gives the annotation set the label attribute.
- In the Attributes box, ensure that Region attributes is selected.
- In the Attribute name field, enter "label". (Note: For this step, the name of the attribute must be set to "label" in order for H2O Document AI to work correctly).
- Click + to add the new attribute.
For the new attribute, you can now create option ids.
-
Select the attribute type (one of: text, checkbox, radio, image, or dropdown)
- text - assign an individual id to each region
- checkbox - assign a single or multiple ids to each region from the created option id list
- radio - assign a single id to each region from the created option id list
- image - assign an image (provided via an image URL or b64) to each region from the created option id list
- dropdown - assign a single id to each region from the created option id list
-
(checkbox, radio, image, dropdown only) Begin filling in the option ids (e.g. “PatientName” or “SupplierAddress”) in the “Add new option id” box
- (Optional) Provide a description of the option id
- (Optional) Set an option id as the default value (def). This value will be the first to appear when selecting option ids for each region
File attributes
File attributes allot attributes for the entire page, not just a region drawn on a page (e.g. tagging a page as a medical referral). Applying file attributes gives the annotation set the class attribute.
- Provide a name for the attribute
- (Optional) Provide a description
- Select the attribute type (one of: text, checkbox, radio, image, or dropdown)
- (checkbox, radio, image, dropdown only) Begin filling in the option ids (e.g. “MedReferral” or “BirthCert”) in the “Add new option id” box
- Assign the file an attribute by opening the annotation editor (one way is to press the space bar). Go to the File Annotations section. Next to file name (the file you are currently on), choose a class for the file attribute or (text only) type in the class
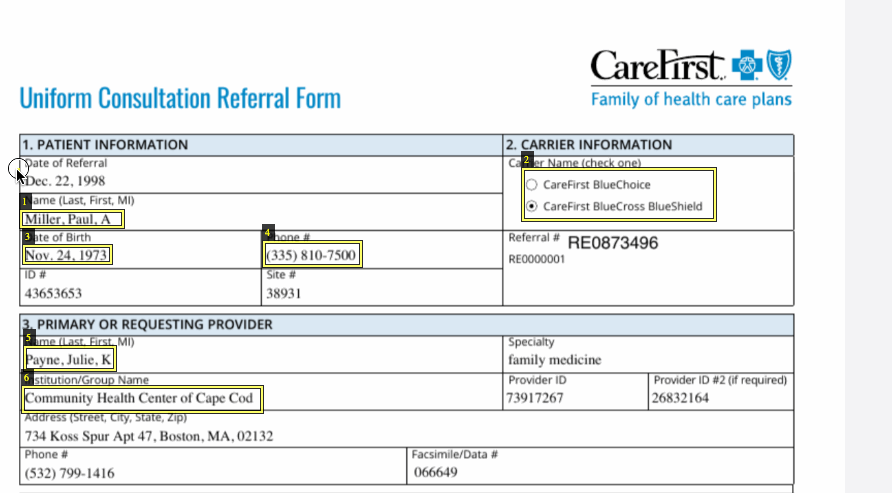
Using bounding boxes to create regions
On your document, find an area you want annotated. Draw regions on the image using bounding boxes:
- Press the left mouse button on the corner of the region you want to bound
- Drag the mouse cursor to encompass the object you are bounding
- Release the mouse button
The region should still be higlighted (colored gray). You can now select an option id (checkbox, radio, image, dropdown only) from the available dropdown menu or type the option id into the text box (text only).
Save your annotations before leaving Page View. This ensures your changes are saved and available to be loaded later for continued annotation.
Rename
Rename the annotation set and provide a new description.
Split
Split the annotation set.
- Select the split ratio or input a custom split (either by regular expression or manually input the split)
- Toggle whether you want to split on a document's boundaries
- Provide a name prefix for the resulting annotation sets
- (Optional) Provide a description
Export
Export the annotation set to your local computer.
Delete
Delete the annotation set. You will be prompted to acknowledge that the act of deletion is irreversible before you can delete your set
- Submit and view feedback for this page
- Send feedback about H2O Document AI to cloud-feedback@h2o.ai