Monitoring alerts
H2O MLOps monitoring supports alerts and reports through Superset's native Alerts & Reports feature. You can configure alerts to notify you when drift metrics exceed thresholds, and schedule reports to receive periodic dashboard or chart snapshots.
Before you begin
- Notifications must be enabled in your Helm values configuration (the
NOTIFICATION_ENABLEDenvironment variable must be set totrue). Contact your MLOps administrator if alerts are not available. - You must have access to the Alerts & Reports section in Superset.
Always use fully qualified SQL format when referencing tables in alert queries:
"workspace-id".aggregates_<deployment_id>
For example:
SELECT AVG(max) FROM "c9fdf502-de4c-45fb-9450-e9903752f392".aggregates_4de0b938_f6b3_401e_9140_21e9e228b1e8 WHERE column_name = 'AGE';
Alerts and reports are only visible to their creator. If you do not see an alert created by a team member, this is expected behavior. Admin users can see all alerts and reports across the platform.
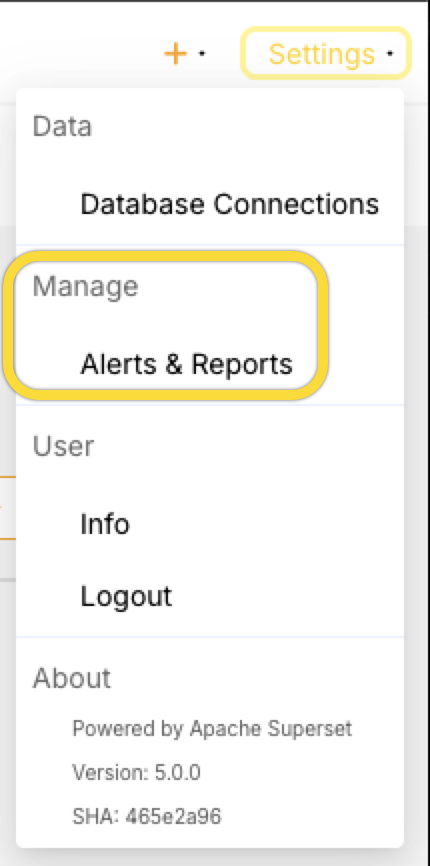
Step 1: Open Alerts & Reports
Click Settings at the top right corner, then locate Alerts & Reports under Manage.
Step 2: Create an alert
-
Click + Alert to create a new alert.
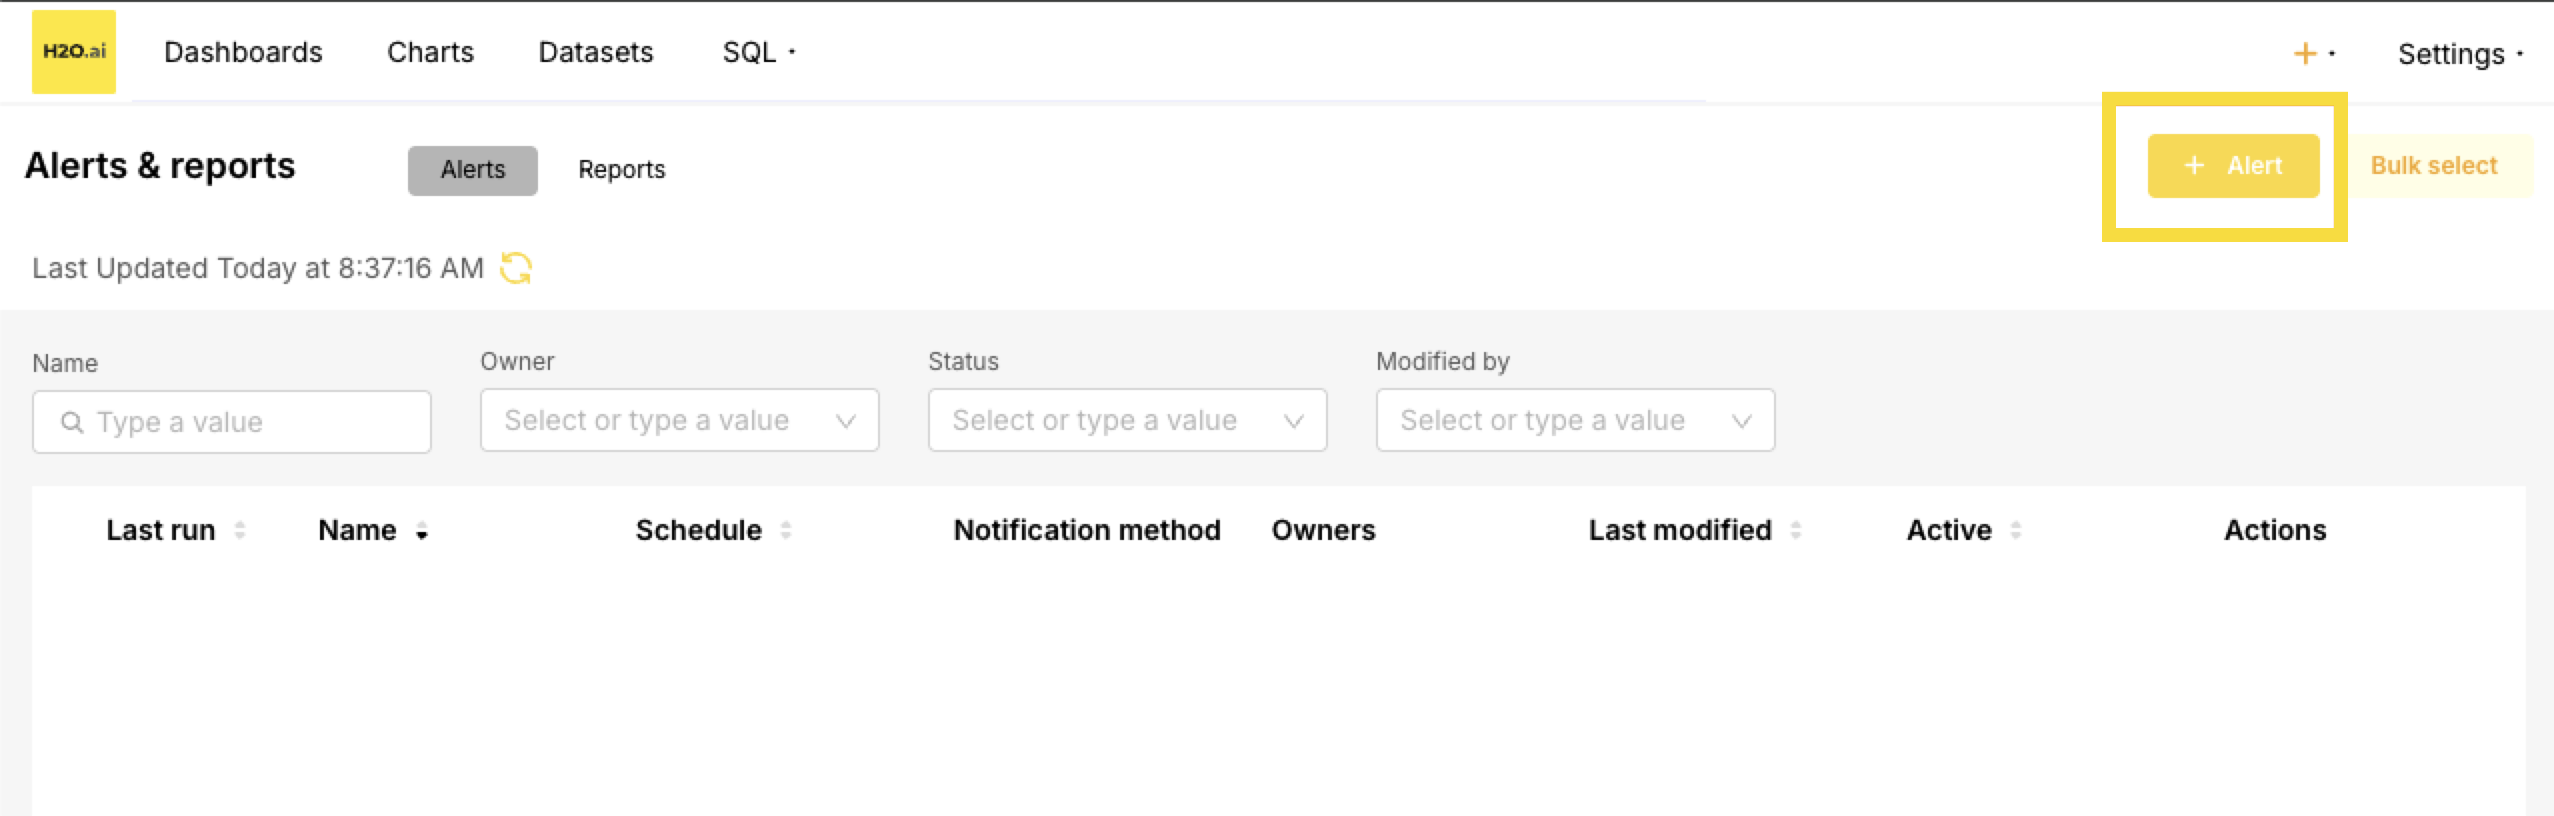
-
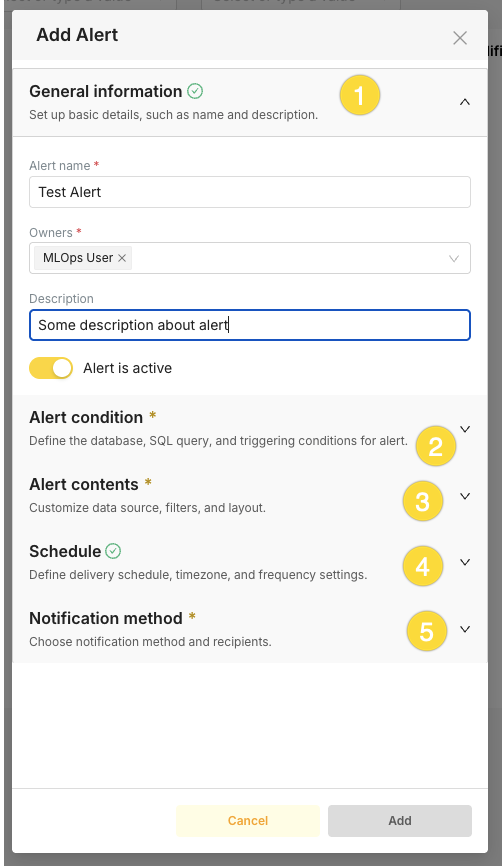
In the Add Alert dialog, work through the sections in order. The Add button stays disabled until all required sections (marked with *) are complete:
- General information: Enter an Alert name (required), add Owners (required), optionally add a Description, and leave Alert is active turned on if you want the alert to run after saving.
- Alert condition: Define the database, SQL query, and trigger condition (see Step 3 and Step 4).
- Alert contents: Choose what to include in the notification—dashboard or chart (see Step 5).
- Schedule: Set how often the alert runs (see Step 6).
- Notification method: Choose the channel and recipients (see Step 7).
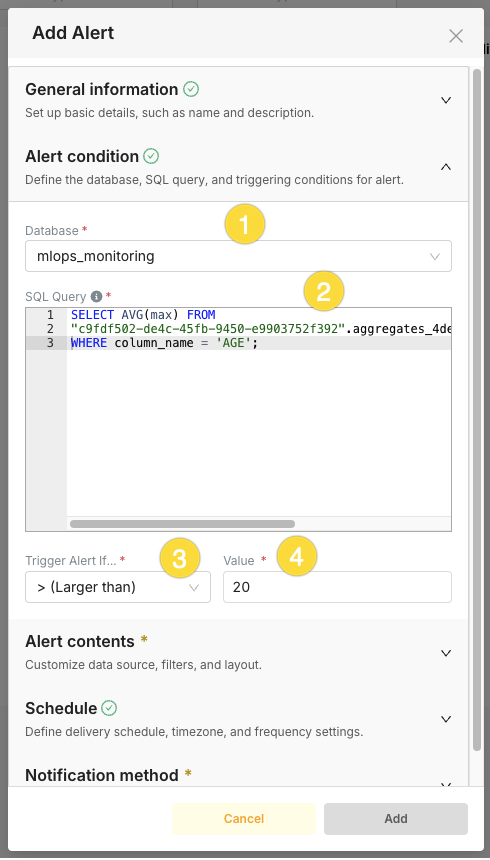
Step 3: Define the SQL query
Write a SQL query that returns a single numeric value and select the database.
Example alert queries:
Alert when the latest TVD drift exceeds a threshold for a specific column:
WITH baseline AS (
    SELECT unnest(bin_counts) AS count
    FROM "your-workspace-id".aggregates_your_deployment_id
    WHERE is_baseline
      AND column_name = 'AGE'
),
baseline_sum AS (
    SELECT sum(count) AS total FROM baseline
),
baseline_props AS (
    SELECT count / total AS prop,
           row_number() OVER () AS rn
    FROM baseline, baseline_sum
),
latest_ts AS (
    SELECT MAX("timestamp") AS ts
    FROM "your-workspace-id".aggregates_your_deployment_id
    WHERE NOT is_baseline
      AND column_name = 'AGE'
),
actual AS (
    SELECT unnest(bin_counts) AS count,
           row_number() OVER () AS rn
    FROM "your-workspace-id".aggregates_your_deployment_id, latest_ts
    WHERE NOT is_baseline
      AND column_name = 'AGE'
      AND "timestamp" = latest_ts.ts
),
actual_sum AS (
    SELECT sum(count) AS total FROM actual
),
actual_props AS (
    SELECT count / total AS prop, rn
    FROM actual, actual_sum
)
SELECT sum(abs(a.prop - b.prop)) / 2 AS drift_score
FROM actual_props a
JOIN baseline_props b ON a.rn = b.rn;
This query assumes one baseline row per column. If your deployment has multiple baseline rows per column, add additional join constraints or use LIMIT 1 in a baseline subquery to avoid inflated results.
SELECT MAX(ABS(mean - baseline_mean) / NULLIF(baseline_std, 0))
FROM (
    SELECT
        c.mean,
        b.mean AS baseline_mean,
        b.standard_deviation AS baseline_std
    FROM "your-workspace-id".aggregates_your_deployment_id c
    JOIN (
        SELECT column_name, mean, standard_deviation
        FROM "your-workspace-id".aggregates_your_deployment_id
        WHERE is_baseline = TRUE
          AND logical_type = 1
          AND column_name = 'AGE'
        ORDER BY "timestamp" DESC
        LIMIT 1
    ) b ON c.column_name = b.column_name
    WHERE c.is_baseline = FALSE
      AND c.logical_type = 1
      AND c.column_name = 'AGE'
) sub;
Step 4: Set the condition
Set the trigger condition for the alert. For example, trigger when the returned value is greater than 0.3 (indicating significant drift for TVD). Different drift methods use different threshold scales. See the drift interpretation tables for TVD, PSI, Z-Score, and Hellinger Distance for guidance on choosing appropriate thresholds.
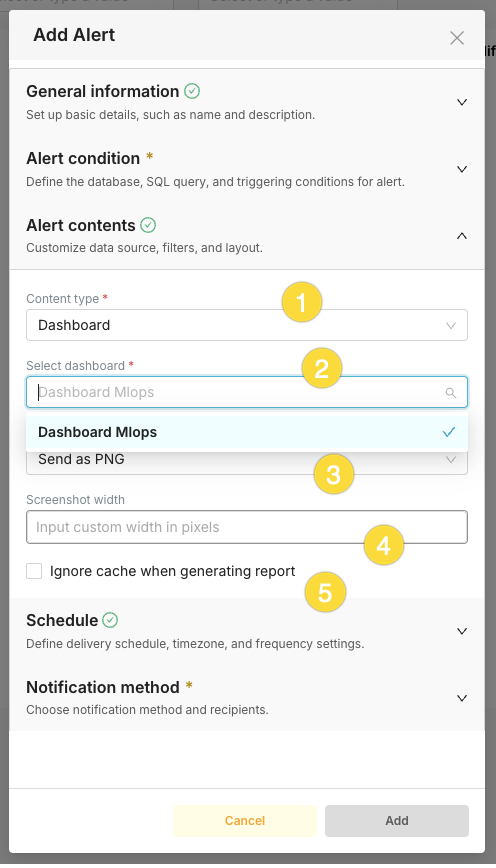
Step 5: Configure alert contents
In the Alert contents section, use these controls to choose what is sent with the alert:
- Content type: Choose Dashboard to attach a screenshot of a dashboard, or Chart to attach a screenshot of a specific chart.
- Select dashboard (when Content type is Dashboard): Search and select the dashboard to capture. The notification will include a screenshot of this dashboard.
- Send as: Choose the image or report format (e.g., PNG) for the attached content.
- Screenshot width: Optionally enter a custom width in pixels for the screenshot. Leave blank to use the default size.
- Ignore cache when generating report: Check this box to force a fresh render of the dashboard or chart instead of using cached data when the alert runs.
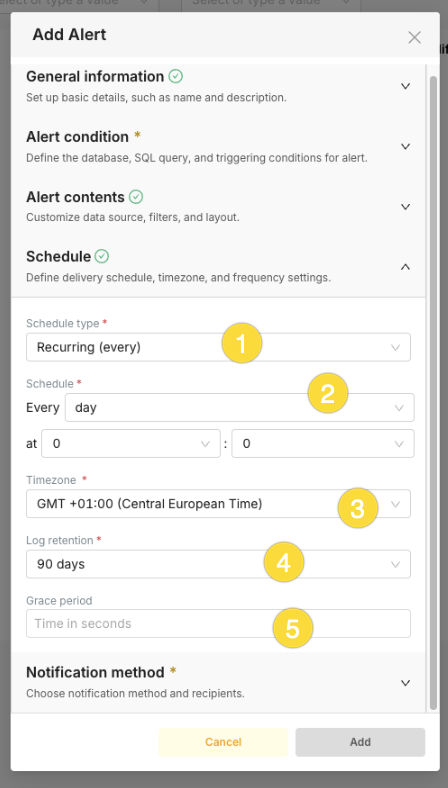
Step 6: Set the schedule
In the Schedule section, define when and how often the alert runs. Use these controls:
- Schedule type (required): Choose Recurring (every) to run the alert at a fixed interval, or CRON to define a custom cron expression. For drift monitoring, use Recurring (every).
- Schedule (required): Set the frequency and time using the first dropdown (e.g., minute, hour, day, week, month) and the at hour/minute fields for the exact time of day when the interval is daily or less frequent (e.g., every day at 00:00).
- Timezone (required): Select the timezone for the schedule (e.g., GMT +01:00 (Central European Time)) so the "at" time is correct for your region.
- Log retention (required): Choose how long to keep execution history (e.g., 90 days). Older alert run logs are pruned after this period.
- Grace period: Optionally enter a time in seconds. After the alert condition is met and a notification is sent, the alert will not trigger again for this many seconds, reducing noise from short-lived or flapping conditions.
Common schedules for drift monitoring:
| Schedule | Use case |
|---|---|
| Every 5 minutes | High-frequency scoring with real-time alerting needs |
| Every hour | Standard production monitoring |
| Every day | Daily drift summary checks |
Step 7: Configure notifications
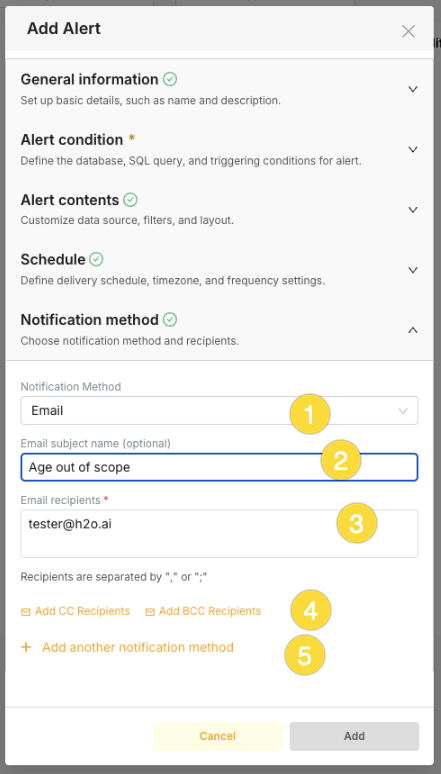
In the Notification method section, choose how the alert is delivered and who receives it. Use these controls:
- Notification Method: Select the delivery channel—for example Email or Slack. Available options depend on your environment (e.g., Slack requires
SLACK_API_TOKEN, email requires SMTP configuration). - Email subject name (optional): When using Email, you can set a custom subject line for the alert message (e.g., "Age out of scope"). If left blank, a default subject is used.
- Recipients (required for Email): Enter one or more email addresses. Separate multiple addresses with a comma (
,) or semicolon (;). - Add CC Recipients / Add BCC Recipients: Use these links to add Carbon Copy or Blind Carbon Copy recipients so additional people receive the email (CC) or receive it without others seeing their address (BCC).
- Add another notification method: Click this link to add a second channel for the same alert (e.g., both Email and Slack). You can configure multiple notification methods so the alert is sent to email and to a Slack channel.
Step 8: Save and enable
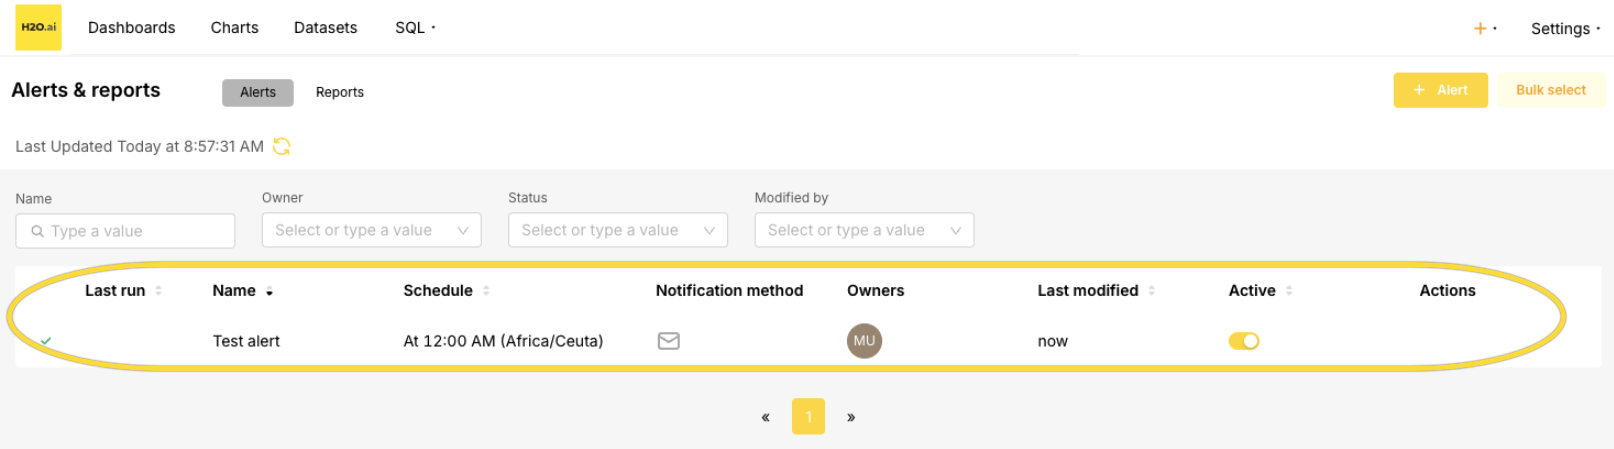
Click Add to save the alert. The alert appears in the Alerts & Reports list.
Common mistakes
| Mistake | Solution |
|---|---|
| Missing schema name in SQL | Always use fully qualified format: "workspace-id".aggregates_<deployment_id> |
| Query returns multiple rows | Ensure your query returns a single numeric value (use MAX, AVG, or COUNT) |
| Alert not triggering | Verify the condition operator and threshold match your expected drift values |
| No notification received | Check that Slack or Email notifications are enabled in Helm values |
Best practices
- Test queries in SQL Lab first: Verify that your alert SQL query returns the expected single numeric value before creating the alert.
- Avoid overly frequent schedules: Running alerts every second or every minute is resource-intensive and typically unnecessary. For most production deployments, scheduling alerts every hour provides timely detection without excessive load on the database.
- Keep queries efficient: Alert queries run on a schedule. Prefer simpler queries where possible, but use CTEs when the drift calculation requires them (as in the TVD example above).
- Name alerts clearly: Use descriptive names such as
TVD Drift > 0.3 - AGE columnso you can quickly identify what each alert monitors. - Set appropriate thresholds: Start with conservative thresholds and adjust based on your model's behavior. See the drift interpretation tables for guidance.
- Use graduated alerting: Create multiple alerts at different thresholds (e.g., warning at 0.2, critical at 0.35) to get early warnings before drift becomes severe.
- Submit and view feedback for this page
- Send feedback about H2O MLOps to cloud-feedback@h2o.ai