Specify an annotation task rubric
Overview
After creating a new annotation task, specify an annotation task rubric in the Rubric tab. An annotation task rubric refers to the labels (for example, object classes) to use when annotating a dataset. For example, after creating a new annotation task for an object detection dataset, you have to specify the object classes to use when labeling the dataset in the annotation task rubric.
Instructions
An annotation task rubric differs based on the specified task type of the dataset used to create the annotation task.
Text annotation tasks
- Text classification
- Text regression
- Text-entity recognition
- Text summarization
- Text-generative AI
- Instructions: Specify one or more categorical target labels for a text classification task rubric.
- Example: To specify
happyandunhappyas labels, one can consider the following instructions in the Rubric tab of the annotation task:
To learn how to access the Rubric tab of an annotation task (or other tabs), see Access an annotation task's tabs.
- In the New class name box, enter
happy. - Click Add.
- Click Add class.
- In the New class name box, enter
unhappy. - Click Add.
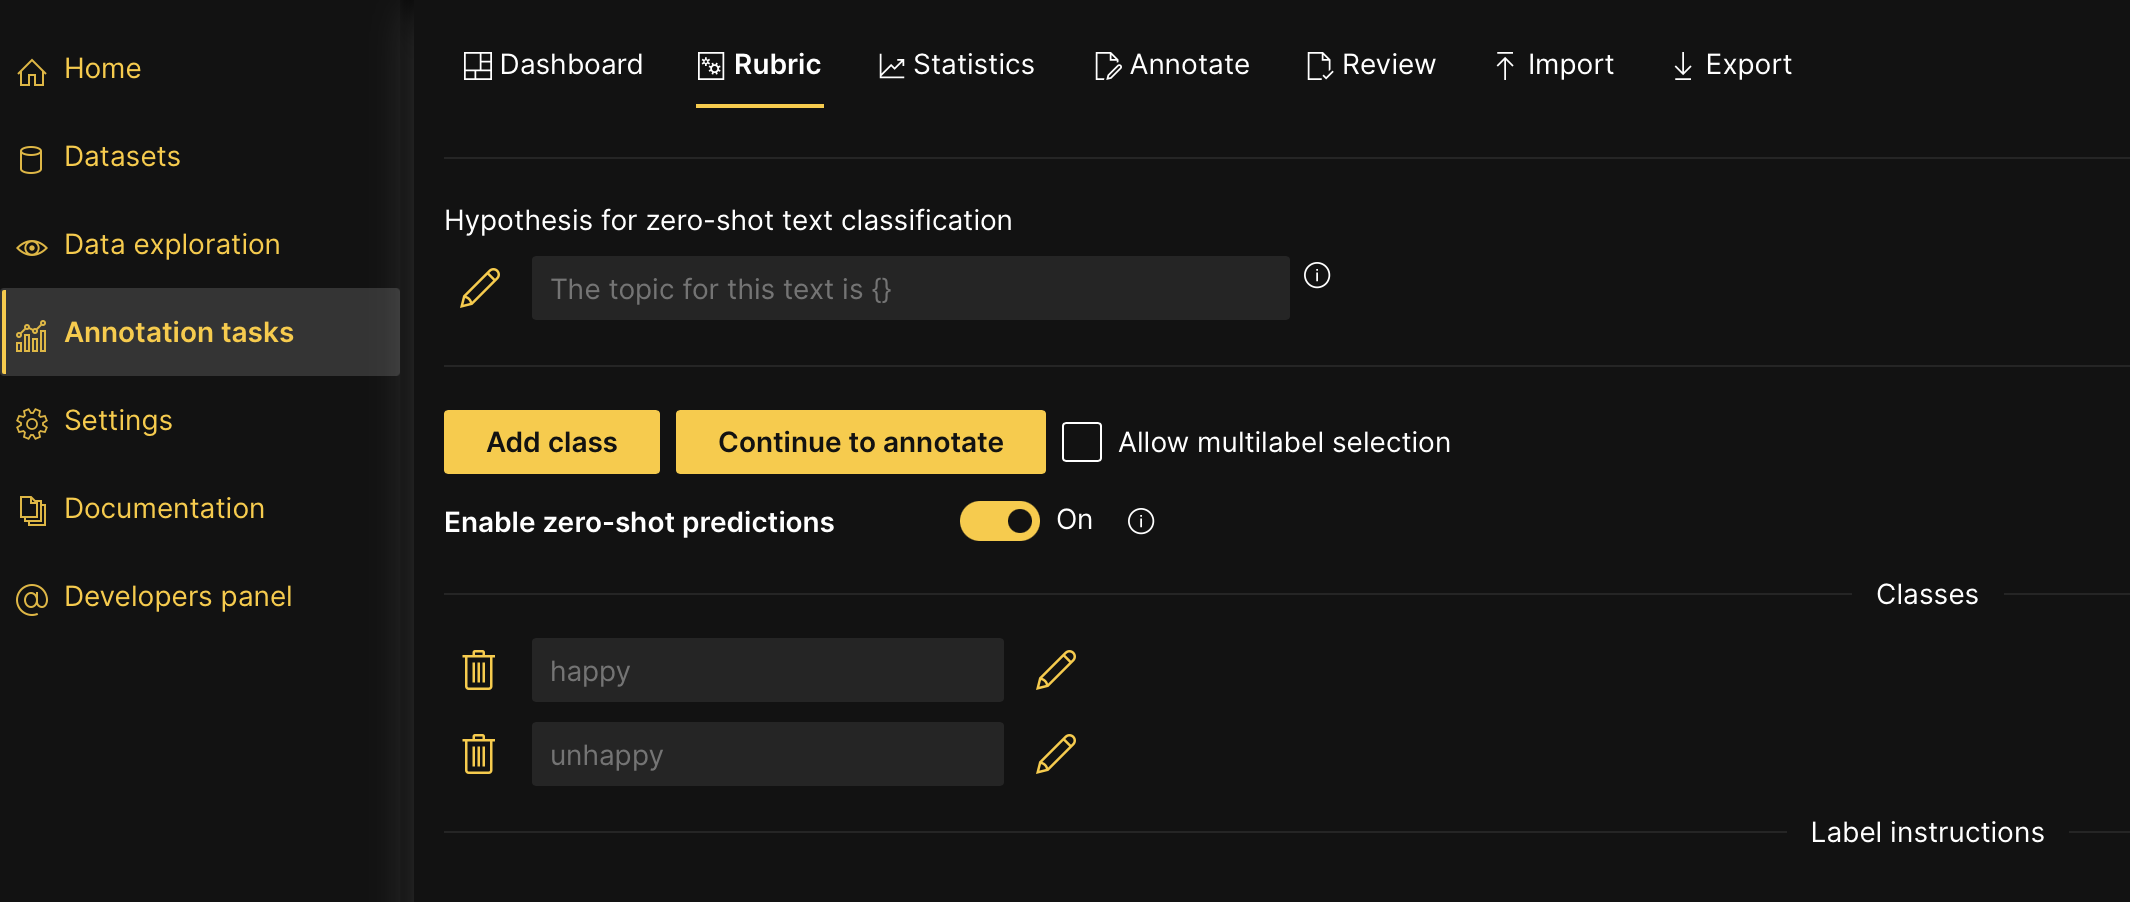
To learn more, see Tutorial 1A: Text classification annotation task.
- Instructions: You need to specify one continuous target label for a text regression task rubric.
- Example: To create one continuous target label from 1 to 5, one can consider the following instructions in the Rubric tab of the annotation task:
To learn how to access the Rubric tab of an annotation task (or other tabs), see Access an annotation task's tabs.
- In the Data minimum value box, enter
1.- The Data minimum value value refers to the minimum value in your continuous values (star ratings from 1 to 5)
- In the Data maximum value box, enter
5.- The Data maximum value value refers to the maximum value in your continuous values (star ratings from 1 to 5)
- In the Data step size (interval) box, enter
1.- The Data step size (interval) value refers to the value the label range slider interval takes (the slider is used in the next step to label a review)
- Click Apply.
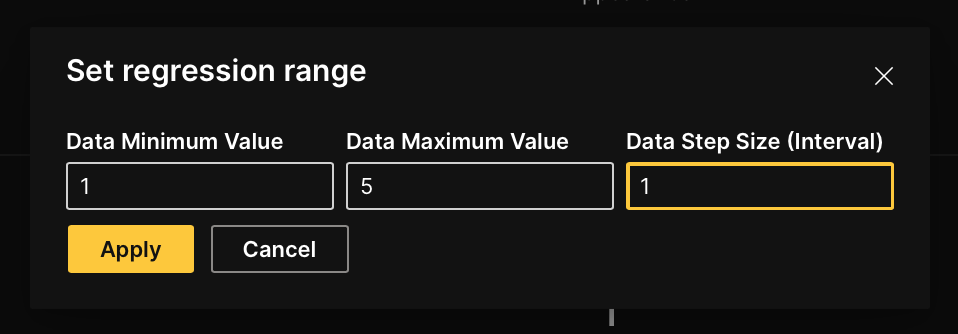
To learn more, see Tutorial 2A: Text regression annotation task.
- Instructions: You need to specify one or more defined entities.
- Example: To create a
productandemotionentity, one can consider the following instructions in the Rubric tab of the annotation task:
To learn how to access the Rubric tab of an annotation task (or other tabs), see Access an annotation task's tabs.
- In the New object name box, enter
product. - Click Add.
- Click Add entity.
- In the New object name box, enter
emotion.
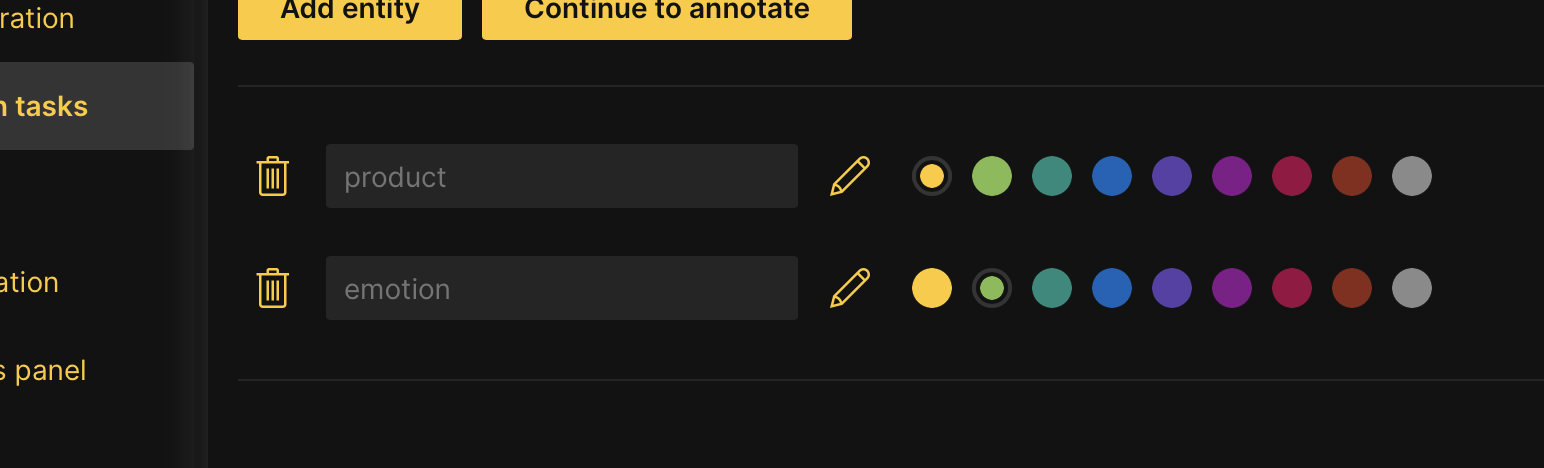
To learn more, see Tutorial 3A: Text-entity recognition annotation task.
- Instructions: You need to specify a zero-shot learning model and a maximum target length.
- Example: To specify a zero-shot learning model and a maximum target length, one can consider the following instructions in the Rubric tab of the annotation task:
To learn how to access the Rubric tab of an annotation task (or other tabs), see Access an annotation task's tabs.
- In the Select model box, select sshleifer/distilbart-cnn-12-6.
- The Select model value refers to the zero-shot learning model to utilize in your annotation task. To learn more, see Annotation tasks + zero-shot learning models: Text summarization
- In the Max target length box, enter
128.- The Max target length value refers to the minimum character length of your summaries
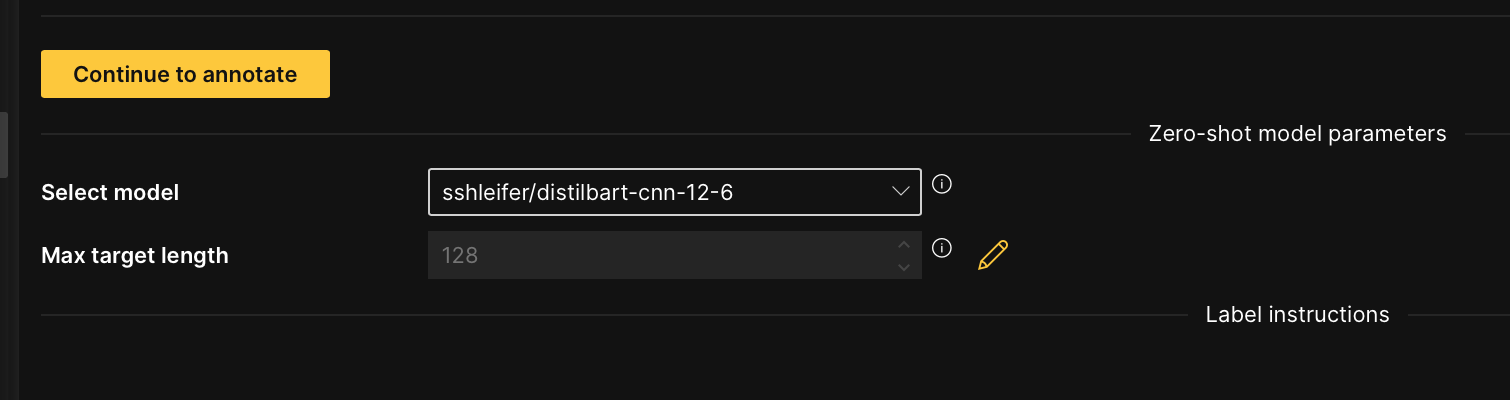
To learn more, see Tutorial 4A: Text summarization annotation task.
- Instructions: You need to:
- Specify a zero-shot learning model (LLM) and its parameters.
- To learn more, see Large language model (LLM) parameters
- Define a prompt template (that is the input for the LLM).
- To learn more, see Prompt template
- Specify a zero-shot learning model (LLM) and its parameters.
- Example: To specify a zero-shot learning model and define a prompt template, one can consider the following instructions in the Rubric tab of the annotation task:
To learn how to access the Rubric tab of an annotation task (or other tabs), see Access an annotation task's tabs.
- In the Select API endpoint type list, select h2oGPT.
- The Select API endpoint type value refers to the zero-shot learning model to utilize in the annotation task. To learn more, see Zero-shot learning models: Text-generative AI
- Define the large language model (LLM) parameters.
- To learn more about each parameter, see Large language model (LLM) parameters
- In the Select example prompt list, select summarize.
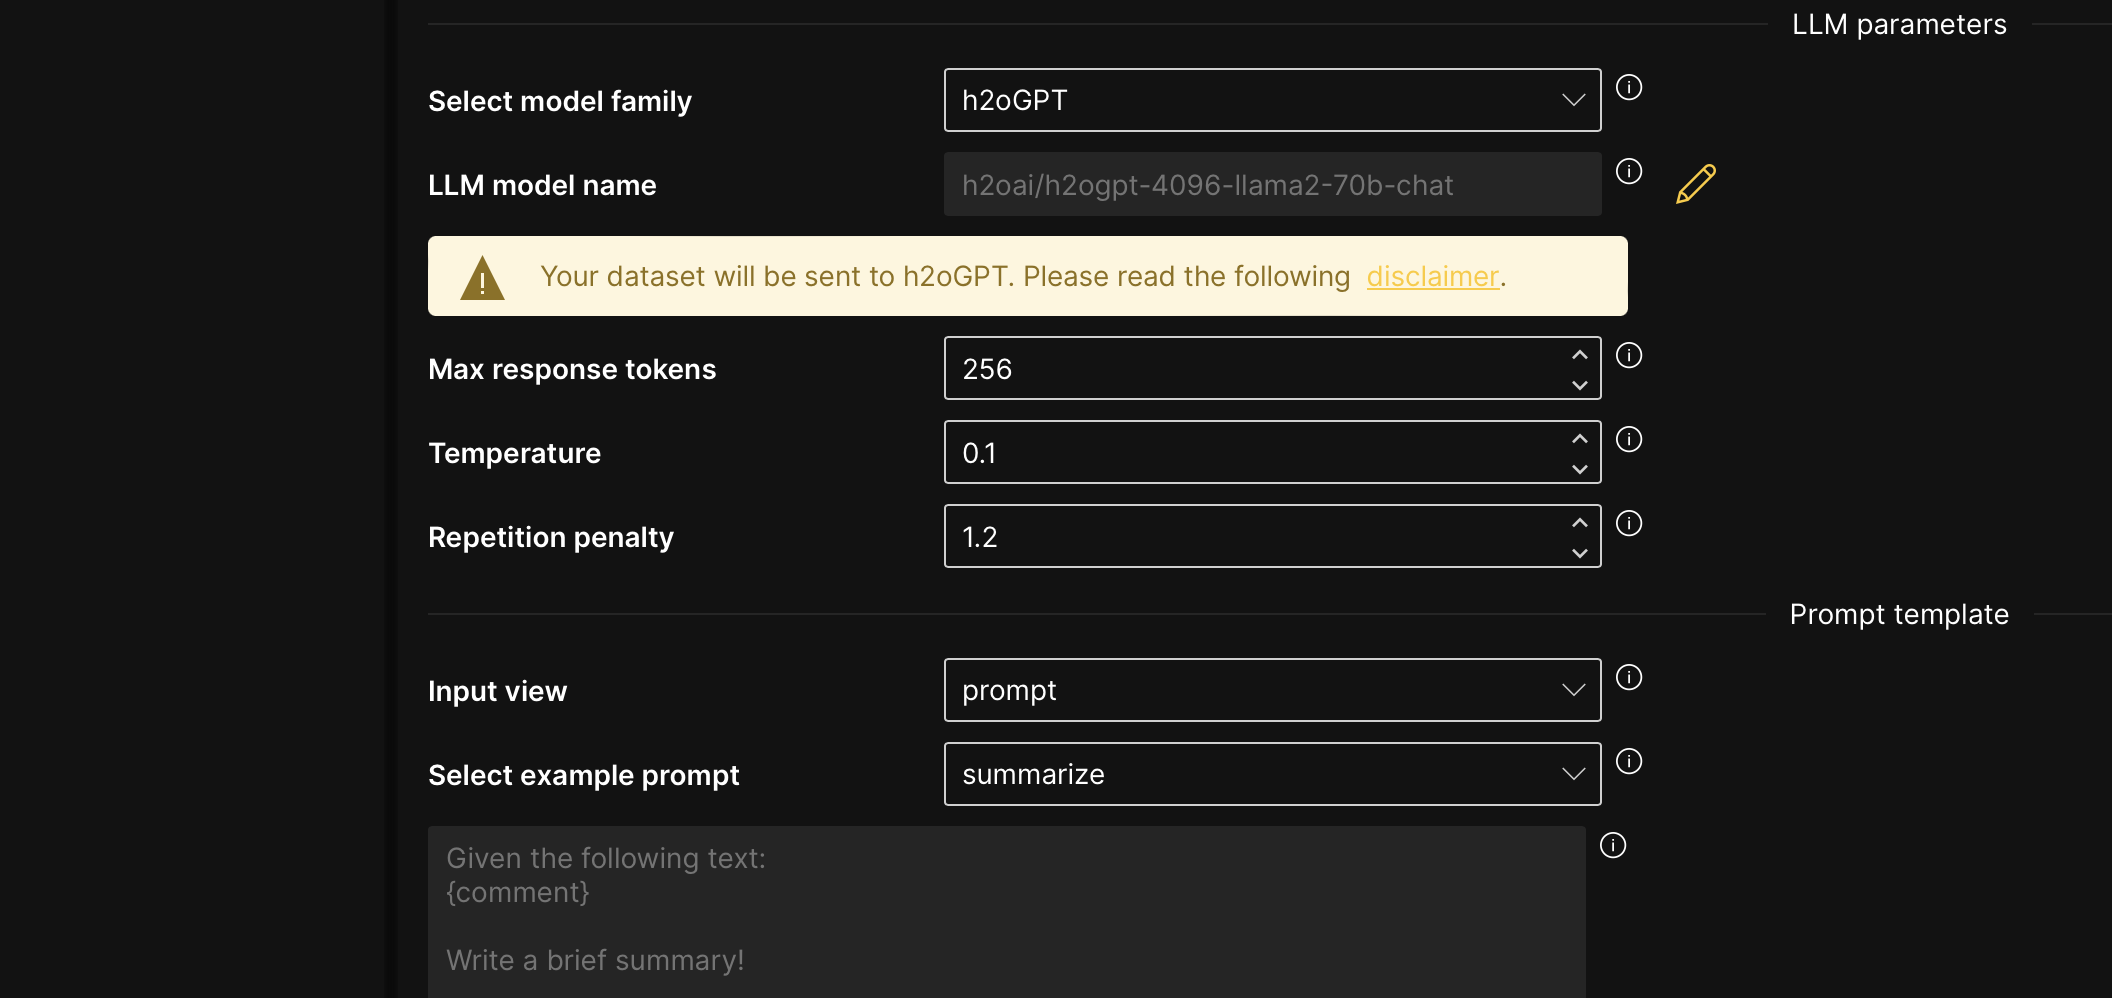
To learn more, see Tutorial 5A: Text-generative AI annotation task.
Image annotation tasks
- Image classification
- Image regression
- Object detection
- Image instance segmentation
For an image classification task rubric, you need specify one or more categorical target labels in the annotation task rubric for an image classification annotation task. To learn more, see Tutorial 1B: Annotation task: Image classification
-
Instructions: Specify one or more categorical target labels.
-
Example: To create a
carandcoffeelabel, one can consider the following instructions in the Rubric tab of the annotation task:noteTo learn how to access the Rubric tab of an annotation task (or other tabs), see Access an annotation task's tabs.
- In the New class name box, enter
car. - Click Add.
- Click Add class.
- In the New class name box, enter
coffee. - Click Add.
- In the New class name box, enter
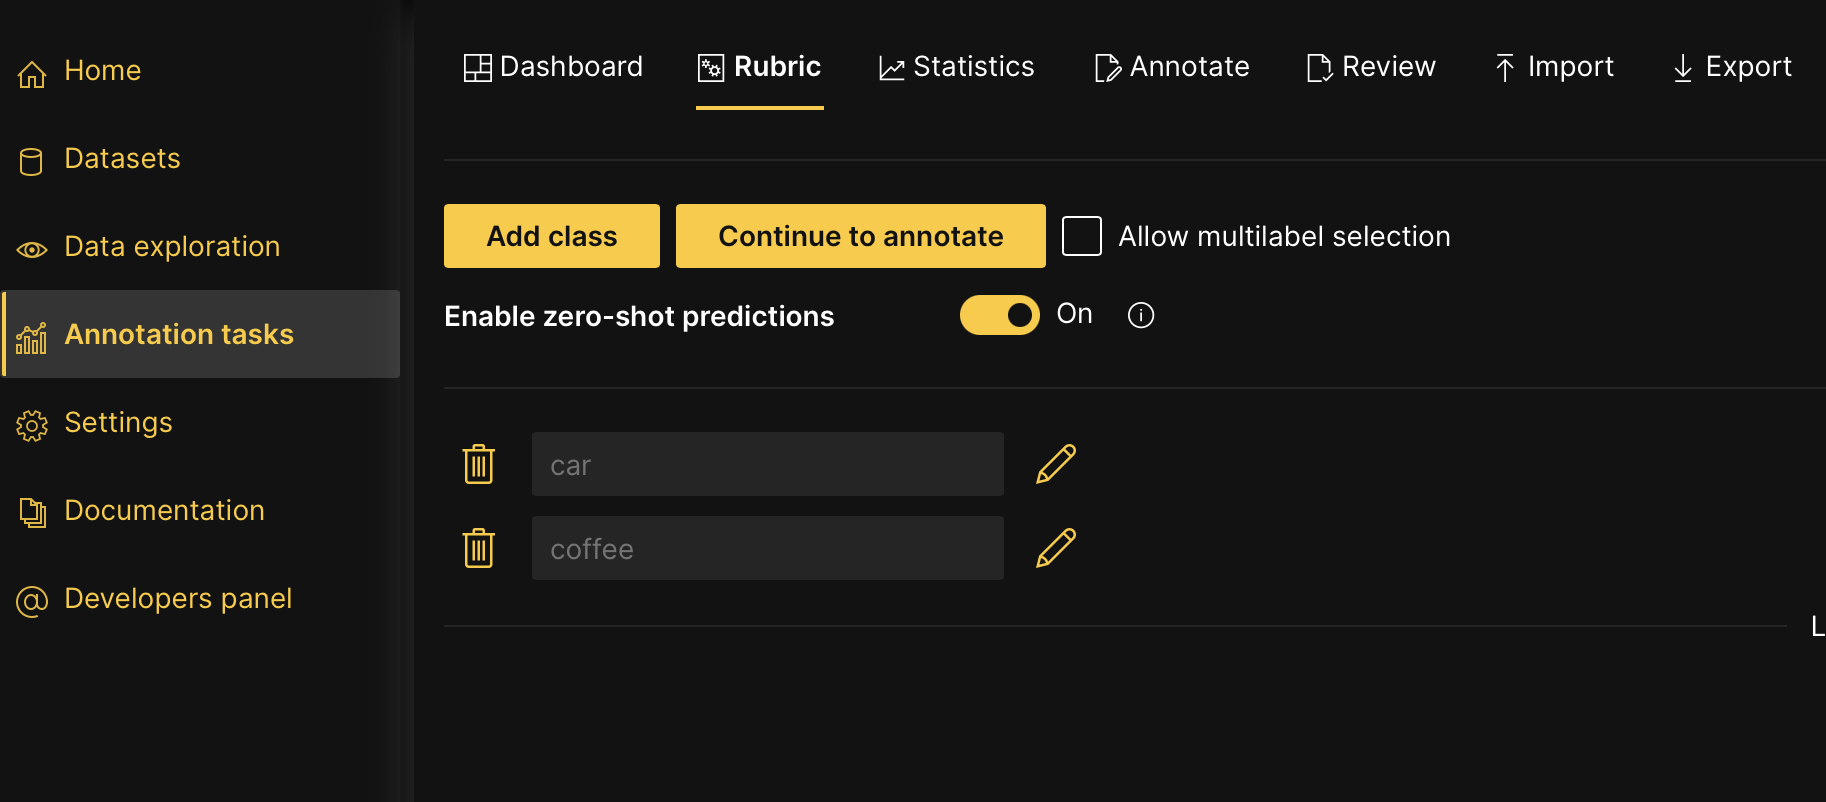
To learn more, see Tutorial 1B: Image classification annotation task.
- Instructions: Specify one continuous target label.
- Example: To create one continuous target label from 0 to 9, one can consider the following instructions in the Rubric tab of the annotation task:
To learn how to access the Rubric tab of an annotation task (or other tabs), see Access an annotation task's tabs.
- In the Data minimum value box, enter 0.
- The Data minimum value refers to the minimum value in your continuous values (digits ranging between 0 to 9)
- In the Data maximum value box, enter 9.
- The Data maximum value refers to the maximum value in your continuous values (digits ranging between 0 to 9)
- In the Data step size (interval) box, enter 1.
- The Data step size (interval) value refers to the value the label range slider interval takes
- Click Apply.
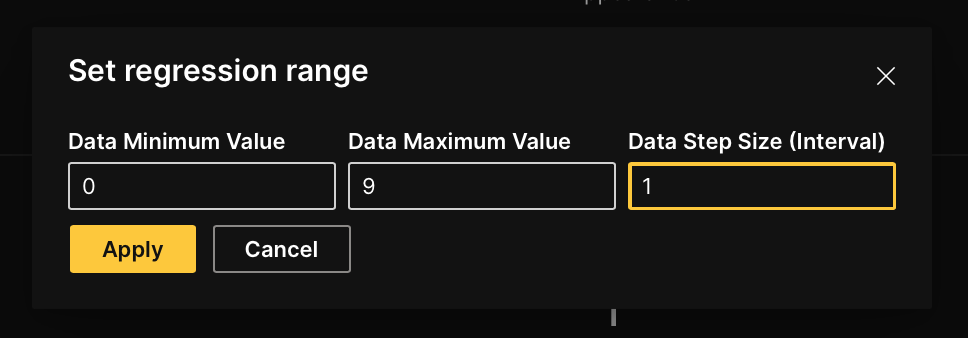
To learn more, see Tutorial 2B: Image regression annotation task.
- Instructions: Specify one or more object classes (labels).
- Example: To specify
carandcoffeeas a label, one can consider the following instructions in the Rubric tab of the annotation task:
To learn how to access the Rubric tab of an annotation task (or other tabs), see Access an annotation task's tabs.
- In the New object name box, enter
car. - Click Add.
- Click Add object class.
- In the New object name box, enter
coffee. - Click Add.
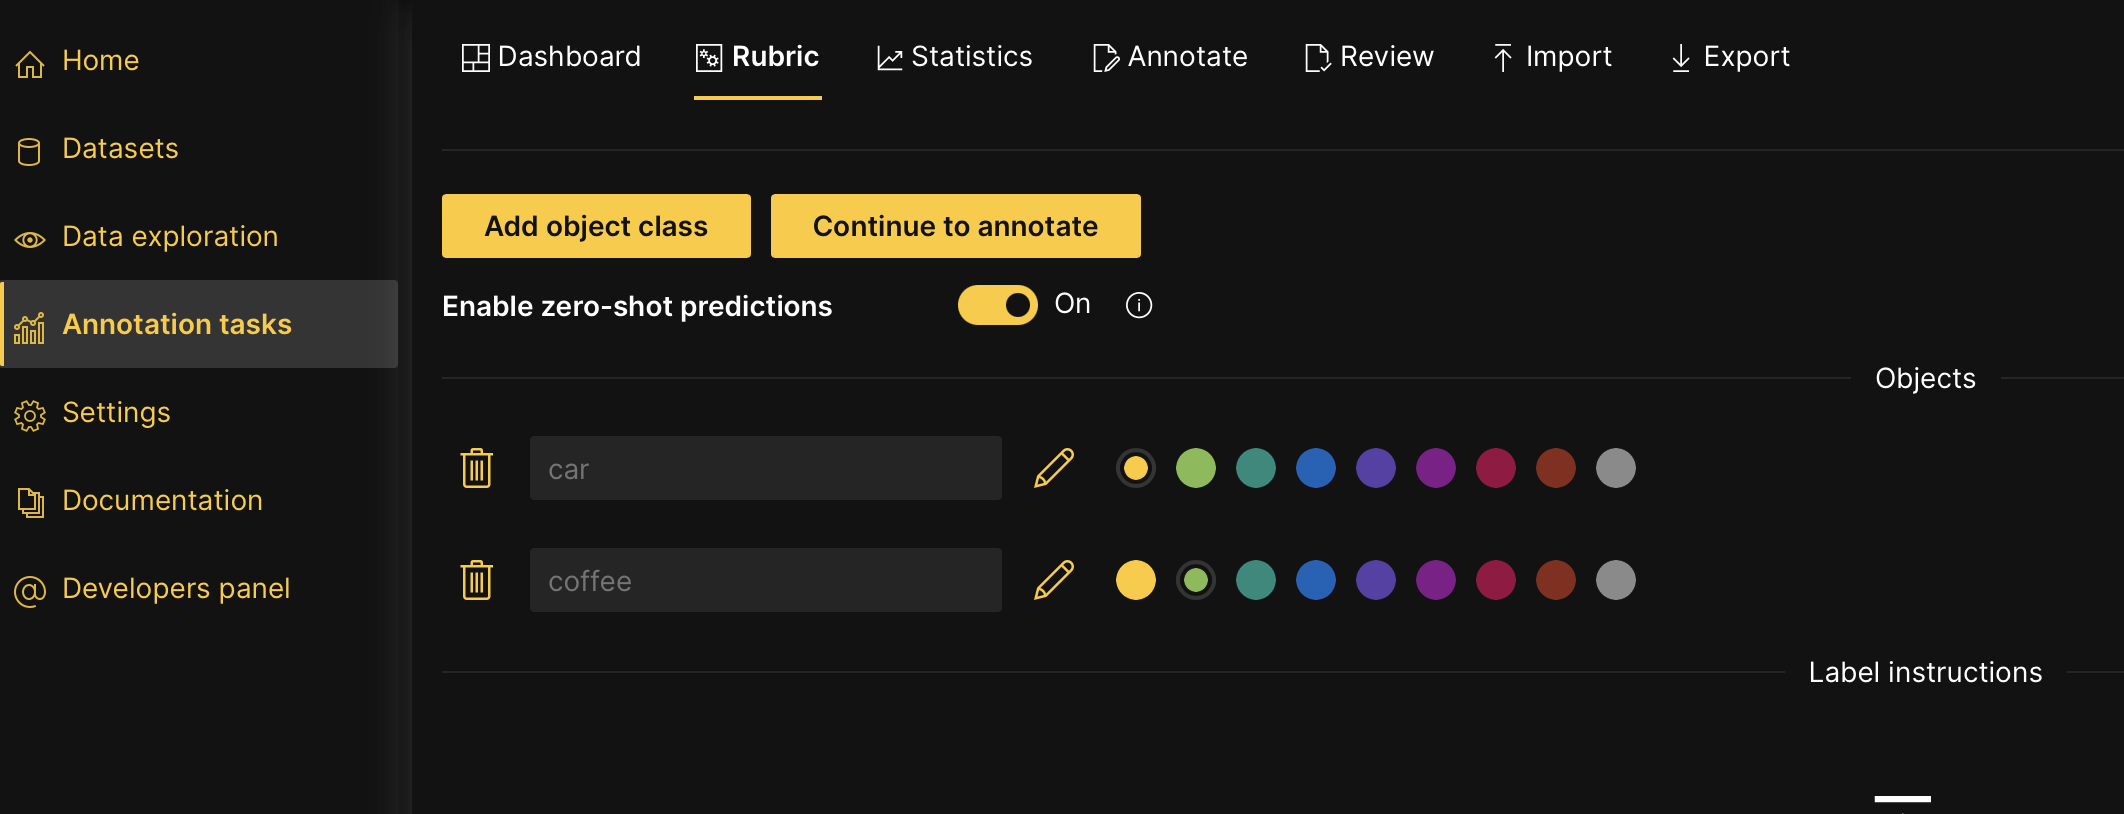
To learn more, see Tutorial 3B: Object detection annotation task.
You need to specify one or more object classes (labels) in the annotation task rubric for an image instance segmentation annotation task. To learn more, see Tutorial 4B: Annotation task: Image instance segmentation.
- Instructions: Specify one or more object classes (labels).
- Example: To specify
carandcoffeeas object classes, one can consider the following instructions in the Rubric tab of the annotation task:
To learn how to access the Rubric tab of an annotation task (or other tabs), see Access an annotation task's tabs.
- In the New object name box, enter
car. - Click Add.
- Click Add object class.
- In the New object name box, enter
coffee. - Click Add.
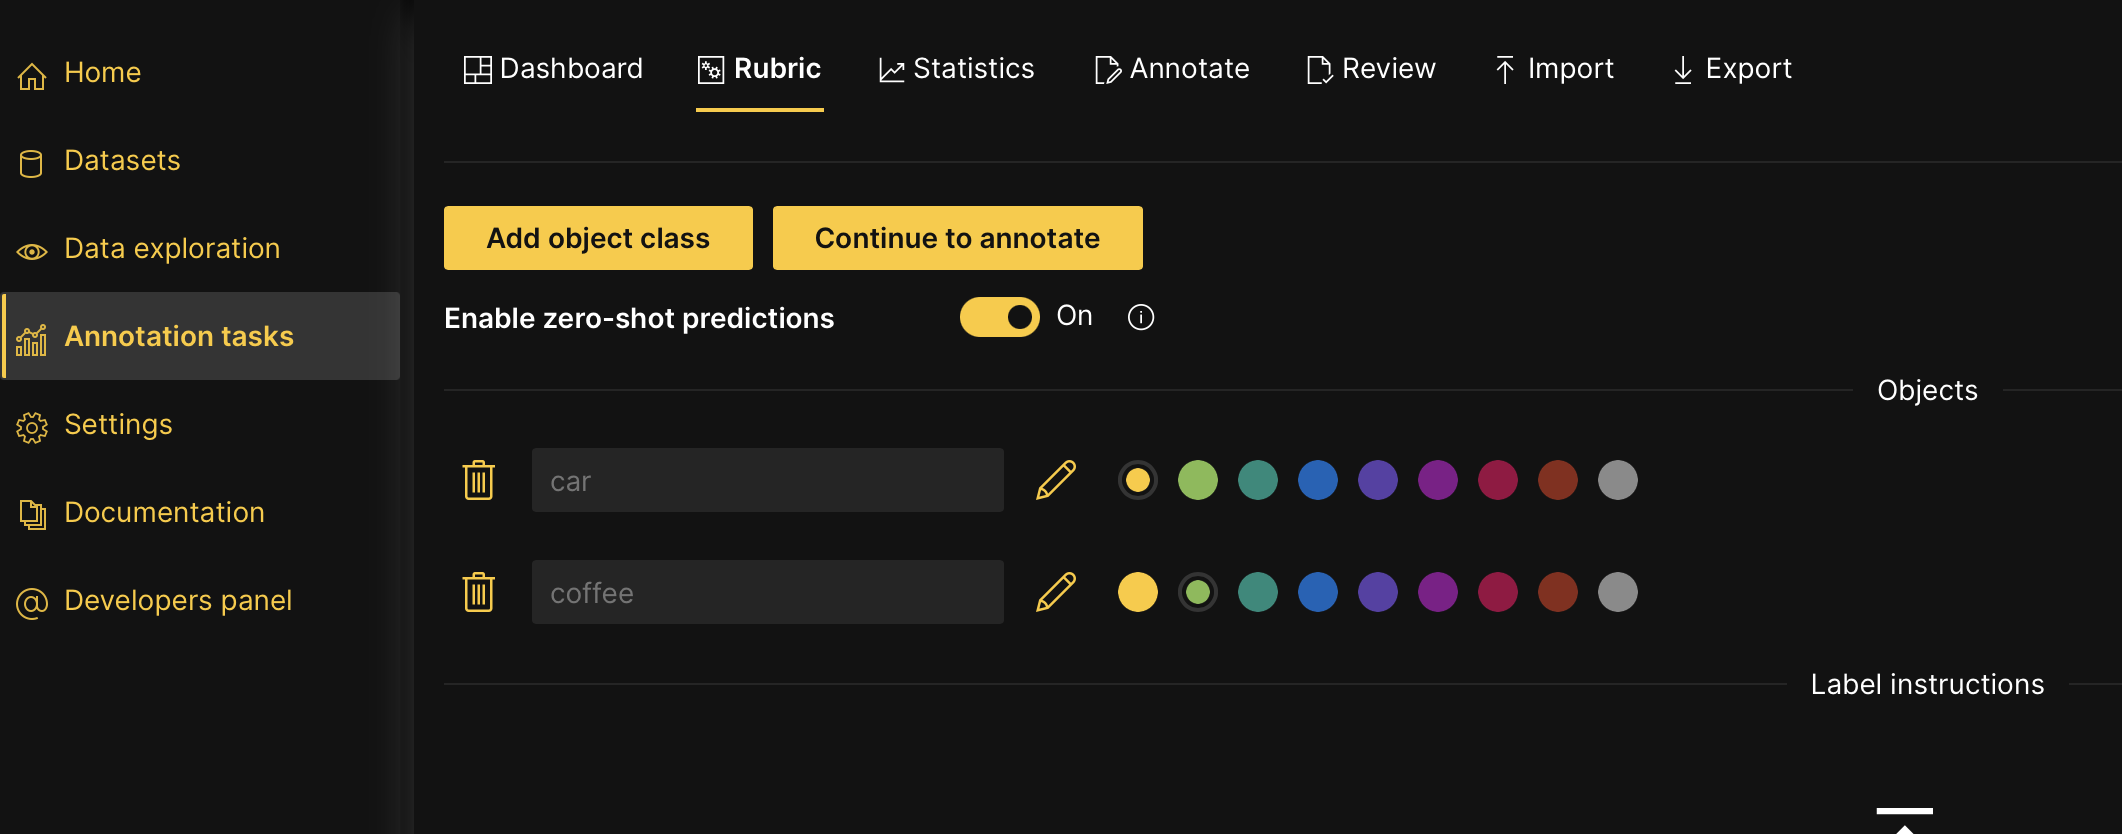
To learn more, see Tutorial 4B: Image instance segmentation annotation task.
Audio annotation tasks
- Audio classification
- Audio regression
- Instructions: Specify one or more categorical target labels.
- Example: To specify
chainsawandclock_tickas labels, one can consider the following instructions in the Rubric tab of the annotation task:
To learn how to access the Rubric tab of an annotation task (or other tabs), see Access an annotation task's tabs.
- In the New class name box, enter
chainsaw. - Click Add.
- Click Add class.
- In the New class name box, enter
clock_tick. - Click Add.
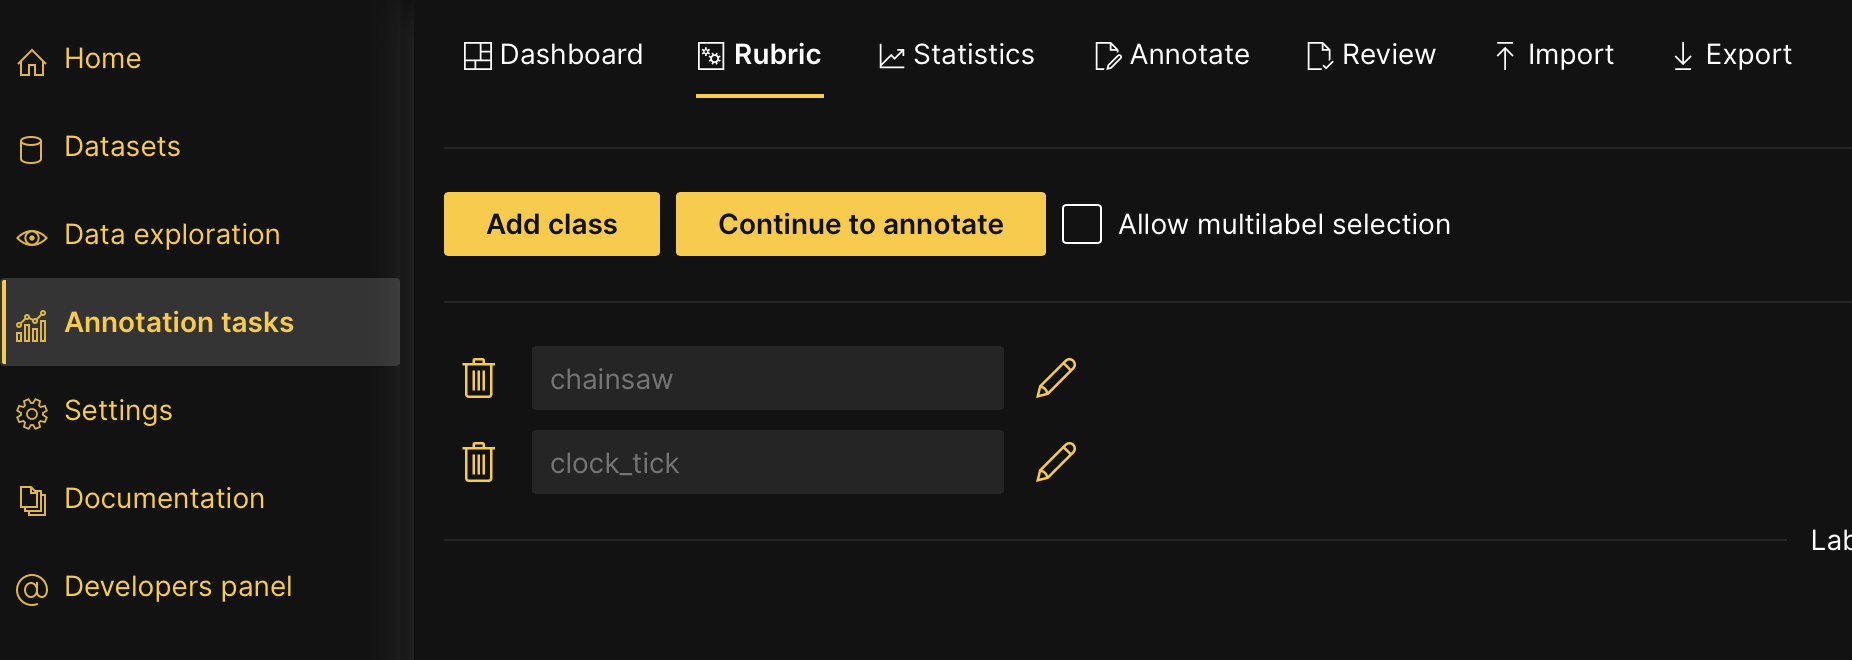
To learn more, see Tutorial 1C: Audio classification annotation task.
- Instructions: Specify one continuous target label.
- Example: To create one continuous target label from 0 to 9, one can consider the following instructions in the Rubric tab of the annotation task:
To learn how to access the Rubric tab of an annotation task (or other tabs), see Access an annotation task's tabs.
- In the Data minimum value box, enter
0.- The Data minimum value refers to the minimum value in your continuous values (in this case, digits ranging from 0 to 9)
- In the Data maximum value box, enter
9.- The Data maximum value refers to the maximum value in your continuous values (in this case, digits ranging from 0 to 9)
- In the Data step size (interval) box, enter
1.- The Data step size (interval) value refers to the value the label range slider interval takes
- Click Apply.
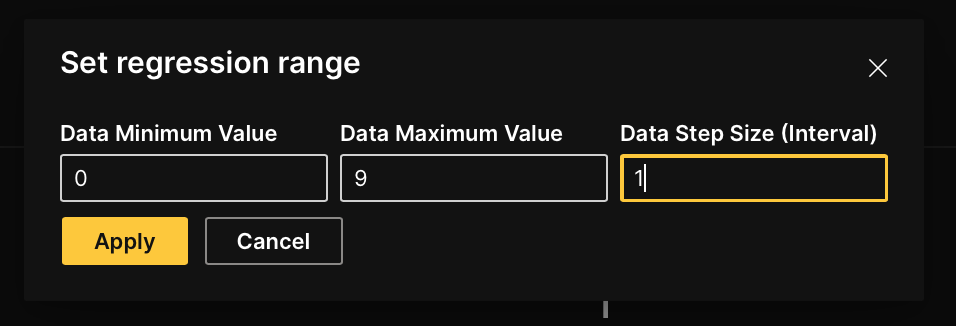
To learn more, see Tutorial 2C: Audio regression annotation task.
Large language model (LLM) parameters
Select API endpoint type
This LLM parameter defines the zero-shot learning model family (LLM) to utilize for the text-generative AI annotation task.
Options:
- h2oGPT
- This option enables h2oGPTe LLMs to be available for a text-generative AI annotation task.
- OpenAI
- This option enables OpenAI LLMs in your OpenAI account (API key) to be available for a text-generative AI annotation task. To connect to your OpenAI LLMs, see OpenAI API settings
LLM model name
This LLM parameter defines the zero-shot learning model name (LLM) to utilize for a text-generative AI annotation task.
Max response tokens
This LLM parameter defines the maximum number of tokens for a response; a low number can result in short responses, which might limit the responses.
Temperature
This LLM parameter defines the randomness of predictions by scaling the logits. Higher temperature values increase creativity on the part of the model while producing more diverse outputs. In other words, the temperature makes the distribution more random.
Repetition penalty
This LLM parameter defines the penalty value of tokens frequently reappearing in the text (response). For example, a token that has already appeared ten times can be penalized more than a token that has appeared only two times. A 1.0 value means no penalty.
This setting can be helpful when attempting to reduce the model's tendency to generate verbatim/identical text.
Prompt template
Select example prompt
This setting defines the input format for the selected model. There are several options, including the option to create your own custom input format (custom).
Options:
- summarize
- Asks the LLM to write a brief summary of the text column.
- translate
- Asks the LLM to translate the text column into German.
- product_review
- Asks the LLM to rate the product review in the text column and return a satisfaction score, the product name, and the main issue with the product.
- evaluate
- Asks the LLM to rate how good an existing summary is and to suggest improvements. Unlike the other example prompts, evaluate refers to two columns: the annotation task's text column and an extra column named
summary. To learn more, see Prompt placeholders.
- Asks the LLM to rate how good an existing summary is and to suggest improvements. Unlike the other example prompts, evaluate refers to two columns: the annotation task's text column and an extra column named
- custom
- Inserts a placeholder for the text column only, so that you can write your own prompt.
Prompt placeholders
A prompt template refers to a dataset column by placing the column name in curly braces (for example, {text}). When you select an example prompt, H2O Label Genie inserts the name of the annotation task's text column into the prompt for you.
The prompt must contain a placeholder for every column listed in the Selected columns section of the Rubric tab. The first list in that section shows the text column of the annotation task. The second list, which is only available when the dataset contains columns other than the text column, lets you select extra columns to include in the prompt.
H2O Label Genie does not correct the prompt for you. Fix it before annotating, or the LLM request will fail and the annotation task will report a failed background task.
The evaluate example prompt contains a {summary} placeholder in addition to the text column placeholder, and no H2O Label Genie dataset contains a summary column by default. As a result, selecting evaluate displays an Invalid prompt error until you do one of the following:
- In the Selected columns section, use the second list to select an extra column named
summary. - Click the edit icon (pencil button) next to the prompt text box, and then replace
{summary}with a placeholder for a column that your dataset contains. Make sure that the column is also selected in the Selected columns section.
- Submit and view feedback for this page
- Send feedback about H2O Label Genie to cloud-feedback@h2o.ai