Configure custom models
Overview
Enterprise h2oGPTe allows administrators to configure custom large language models (LLMs) through the System Settings page. Custom models are configured using the LLMs Configuration setting in Global Settings and become available for use across Enterprise h2oGPTe, including in chat sessions, document processing, and agent workflows.
This feature is available to administrators only. You must have administrator privileges to configure custom models.
Step 1: Access the LLMs Configuration setting
To configure custom models, consider the following steps:
- In Enterprise h2oGPTe, click Account Circle.
- Select System Dashboard.
- Click the System Settings tab.
- In the Global Settings section, locate the LLMs Configuration setting in the table.
- Click Edit on the LLMs Configuration row.

If the LLMs Configuration setting does not exist in the table, click New Setting and select LLMs Configuration from the dropdown.
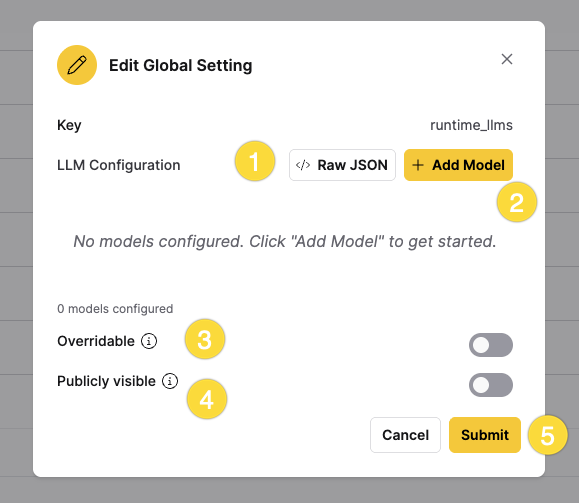
Step 2: Configure models in the Edit Global Setting dialog
The Edit Global Setting dialog appears, allowing you to configure custom models. The dialog shows the Key field set to runtime_llms and provides two methods for configuring models: Raw JSON and + Add Model.
Step 2.1: Raw JSON option
Click < /> Raw JSON to switch to JSON editing mode. In this mode, you can directly edit the model configuration as a JSON array. This is useful for advanced users or when copying configurations from external sources.
The JSON structure follows this format:
[
  {
    "base_model": "",
    "inference_server": "",
    "display_name": "",
    "max_seq_len": 8192,
    "max_output_seq_len": 2048,
    "images_num_max": -2,
    "is_actually_vision_model": false,
    "is_actually_reasoning_model": false,
    "lite_llm_yaml": "",
    "cost_per_1k_input_tokens": 0.0001,
    "cost_per_1k_output_tokens": 0.00025
  }
]
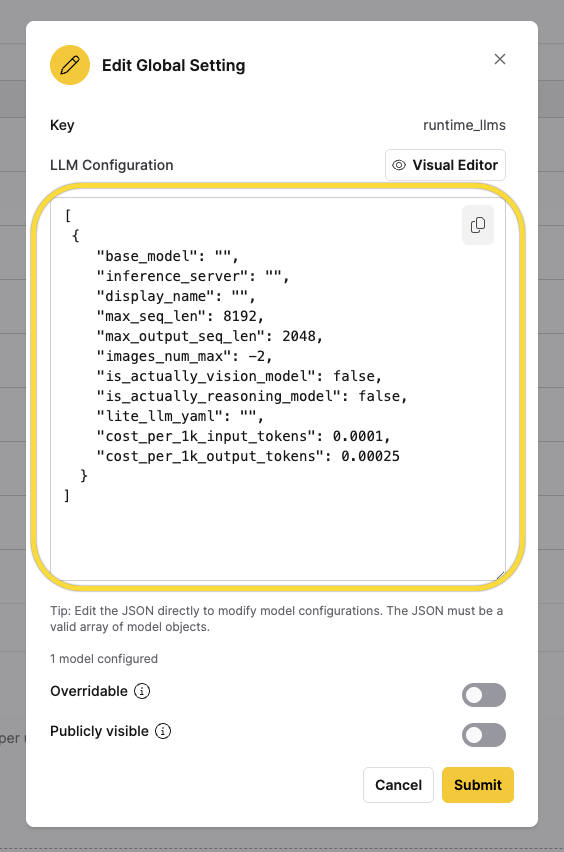
Edit the JSON directly to modify model configurations. The JSON must be a valid array of model objects.
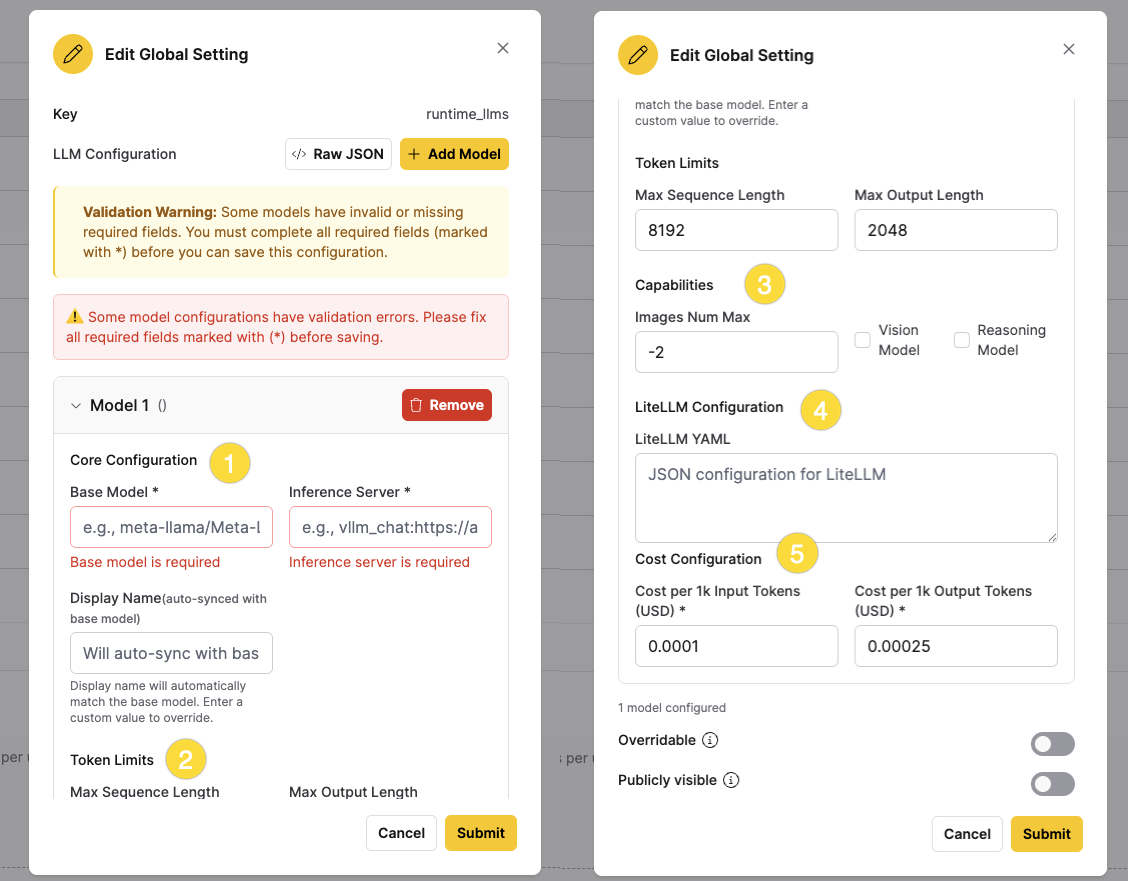
Step 2.2: Add Model option
Click + Add Model to use the visual editor. This provides a form-based interface for configuring model settings, organized into the following sections:
| Section | Field | Description |
|---|---|---|
| Core Configuration | Base Model | The unique identifier for the model. When using litellm, use a LiteLLM model identifier (for example, openai/gpt-4, databricks/llama-3-70b-instruct). Required field. |
| Inference Server | The type of inference server to use (for example, litellm, anthropic, google). Required field. | |
| Display Name | A friendly name shown in the UI (automatically matches base model if not specified). | |
| Token Limits | Max Sequence Length | Maximum number of input tokens the model can process (default: 8192). |
| Max Output Length | Maximum number of output tokens the model can generate (default: 2048). | |
| Capabilities | Images Num Max | Maximum number of images the model supports (-2 for no images, -9 for unlimited, default: -2). |
| Vision Model | Enable this checkbox if the model supports vision/image inputs. | |
| Reasoning Model | Enable this checkbox if the model is a reasoning model. | |
| LiteLLM Configuration | LiteLLM YAML | LiteLLM-specific configuration (required when using litellm). Despite the field name, enter valid JSON, not YAML. See LiteLLM documentation for options. |
| Cost Configuration | Cost per 1k Input Tokens | Cost per 1,000 input tokens (for example, 0.0001). Unit is configurable. Required field. |
| Cost per 1k Output Tokens | Cost per 1,000 output tokens (for example, 0.00025). Unit is configurable. Required field. |
Step 3: Configuration options
Step 3.1: Overridable
The Overridable toggle controls whether this global setting can be overridden at the user or role level. When enabled, users can override the global model configuration with their own settings.
Step 3.2: Publicly visible
The Publicly visible toggle controls whether the configured models are visible to all users in the system. When enabled, all users can see and use the configured models in their chat sessions.
Step 4: Submit
Click Submit to save your configuration. The dialog validates the configuration before saving. If there are validation errors, fix the required fields (marked with *) before submitting.
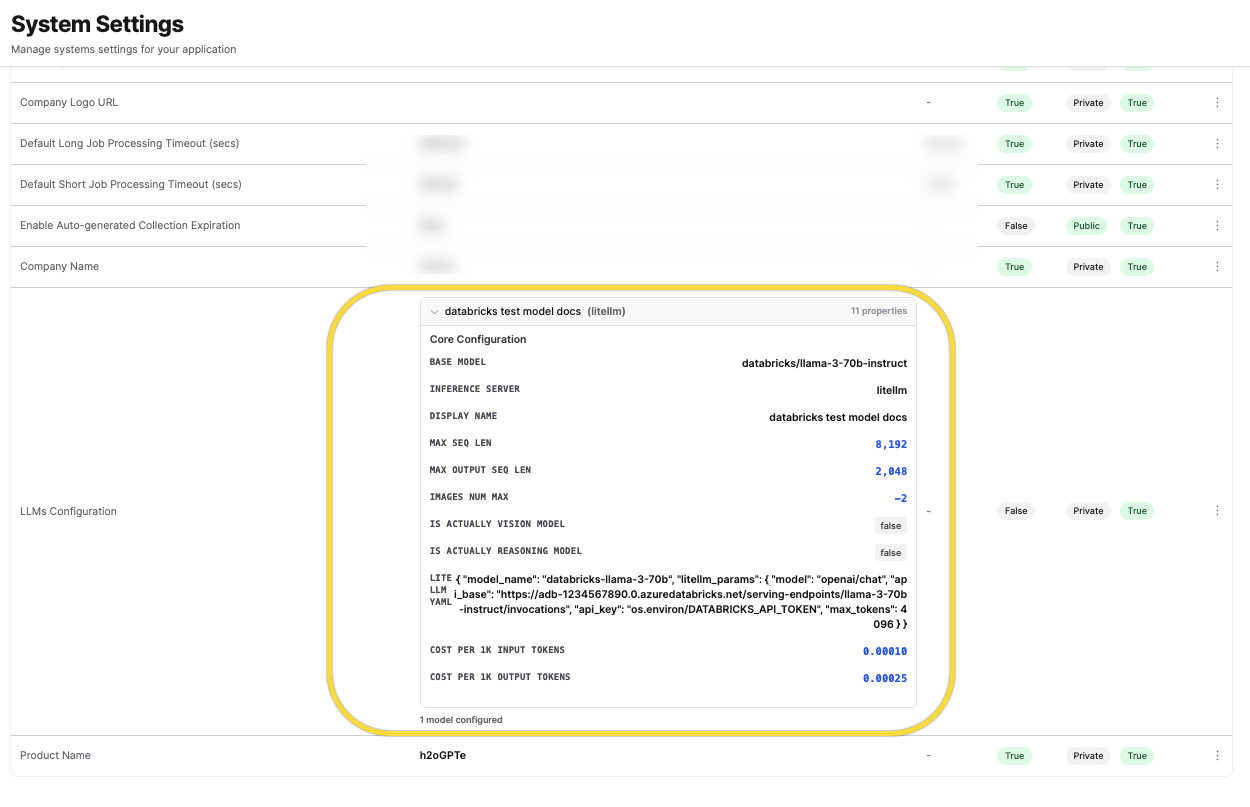
Use case example: Configure Databricks models
This section demonstrates how administrators can configure a Databricks-hosted model as an example of setting up custom models from LLMs Configuration settings.
Prerequisites
Before configuring a Databricks model, ensure you have:
- A Databricks workspace with a serving endpoint already deployed, along with the workspace URL and serving endpoint name
- A Databricks API token
- Administrator privileges for the Enterprise h2oGPTe environment
Configuration steps
-
In the model configuration editor, click + Add Model.
-
Configure the required fields:
- Base Model:
<your-model-identifier>(for example,databricks/llama-3-70b-instruct) - Inference Server:
litellm - Cost per 1k Input Tokens:
<your-input-cost>(for example,0.0001) - Cost per 1k Output Tokens:
<your-output-cost>(for example,0.00025)
- Base Model:
-
Configure optional fields as needed:
- Display Name:
<your-display-name>(for example,Databricks Llama 3 70B Instruct) - Max Sequence Length:
<max-input-tokens>(for example,8192) - Max Output Sequence Length:
<max-output-tokens>(for example,4096) - Images Num Max:
<images-limit>(for example,-2for no images) - Vision Model: Leave unchecked (or enable if your model supports vision)
- Reasoning Model: Leave unchecked (or enable if your model is a reasoning model)
- Display Name:
-
In the LiteLLM YAML field, enter the JSON configuration:
{
  "model_name": "<your-model-name>",
  "litellm_params": {
    "model": "openai/chat",
    "api_base": "https://<workspace-url>/serving-endpoints/<endpoint-name>/invocations",
    "api_key": "os.environ/DATABRICKS_API_TOKEN",
    "max_tokens": 4096
  }
}
Replace the following placeholders:
model_name: A unique identifier for your model configuration (for example,databricks-llama-3-70b)api_base: Your Databricks serving endpoint URL in the formathttps://<workspace-url>/serving-endpoints/<endpoint-name>/invocations- Replace
<workspace-url>with your Databricks workspace URL (include the protocol, for examplehttps://; the workspace URL is typically provided without protocol, so addhttps://if needed) - Replace
<endpoint-name>with your serving endpoint name
- Replace
api_key: Use"os.environ/DATABRICKS_API_TOKEN"to reference an environment variable (recommended), or replace with"<your-api-token>"(not recommended for production)max_tokens: Maximum tokens for the model response
-
Set up the API token (if using
"os.environ/DATABRICKS_API_TOKEN"):For Helm deployments, add the token to your Helm values file:
h2ogpte:
  config:
    agentSecrets:
DATABRICKS_API_TOKEN: "your key" -
Click Submit to save your configuration.
Testing your configuration
After saving your configuration:
- Navigate to the Models page to verify your model appears in the list.
- Run a self-test:
- Go to Models → Run self-tests
- Select your custom model
- Choose a test type (Quick test, RAG test, etc.)
- Test in a chat session:
- Create a new chat session
- Open chat settings
- Select your custom model from the LLM dropdown
- Send a test message
Additional resources
- LiteLLM Documentation - For detailed LiteLLM configuration options
- Databricks Serving Endpoints - For information about Databricks model serving
- Models page - To view and test configured models
- Submit and view feedback for this page
- Send feedback about Enterprise h2oGPTe to cloud-feedback@h2o.ai