Overview
Agents Builder is a feature in Enterprise h2oGPTe that lets you create custom AI agents using natural language instructions. Instead of writing code, simply describe what you want your agent to do, and Agents Builder generates complete, production-ready agent implementations with built-in testing and documentation.
What is Agents Builder?
Agents Builder is a specialized agent type in Enterprise h2oGPTe that creates custom AI agents based on your natural language descriptions. When you select Agents Builder from the agent dropdown in your chat interface, you enter a guided workflow where you describe what you want your agent to do. Agents Builder then generates a complete, production-ready agent implementation in your choice of framework (LangGraph, OpenAI Agents SDK, or CrewAI).
Unlike built-in agents that handle general tasks, Agents Builder creates new, specialized agents tailored to your specific workflows. By acting as an automated development assistant, Agents Builder produces complete agent implementations without requiring programming expertise. These generated agents become reusable tools that can be executed anytime, allowing you to automate complex processes, integrate with external systems through MCP servers, and build multi-agent coordination systems.
Benefits:
- Build custom agents without programming knowledge.
- Generate production-ready code in minutes, not days.
- Automatically integrate with your configured MCP tools.
- Incorporate industry best practices and built-in testing.
Agents Builder requires models with sufficient context length and tool use capabilities. The following models are not compatible:
- Mistral 7B Instruct (mistralai/mistral-7b-instruct-v0.3)
- Mixtral 8x7B Instruct (mistralai/mixtral-8x7b-instruct-v0.1)
How Agents Builder Works
Creating a custom agent with Agents Builder follows a guided, automated workflow:
1. Activate Agents Builder
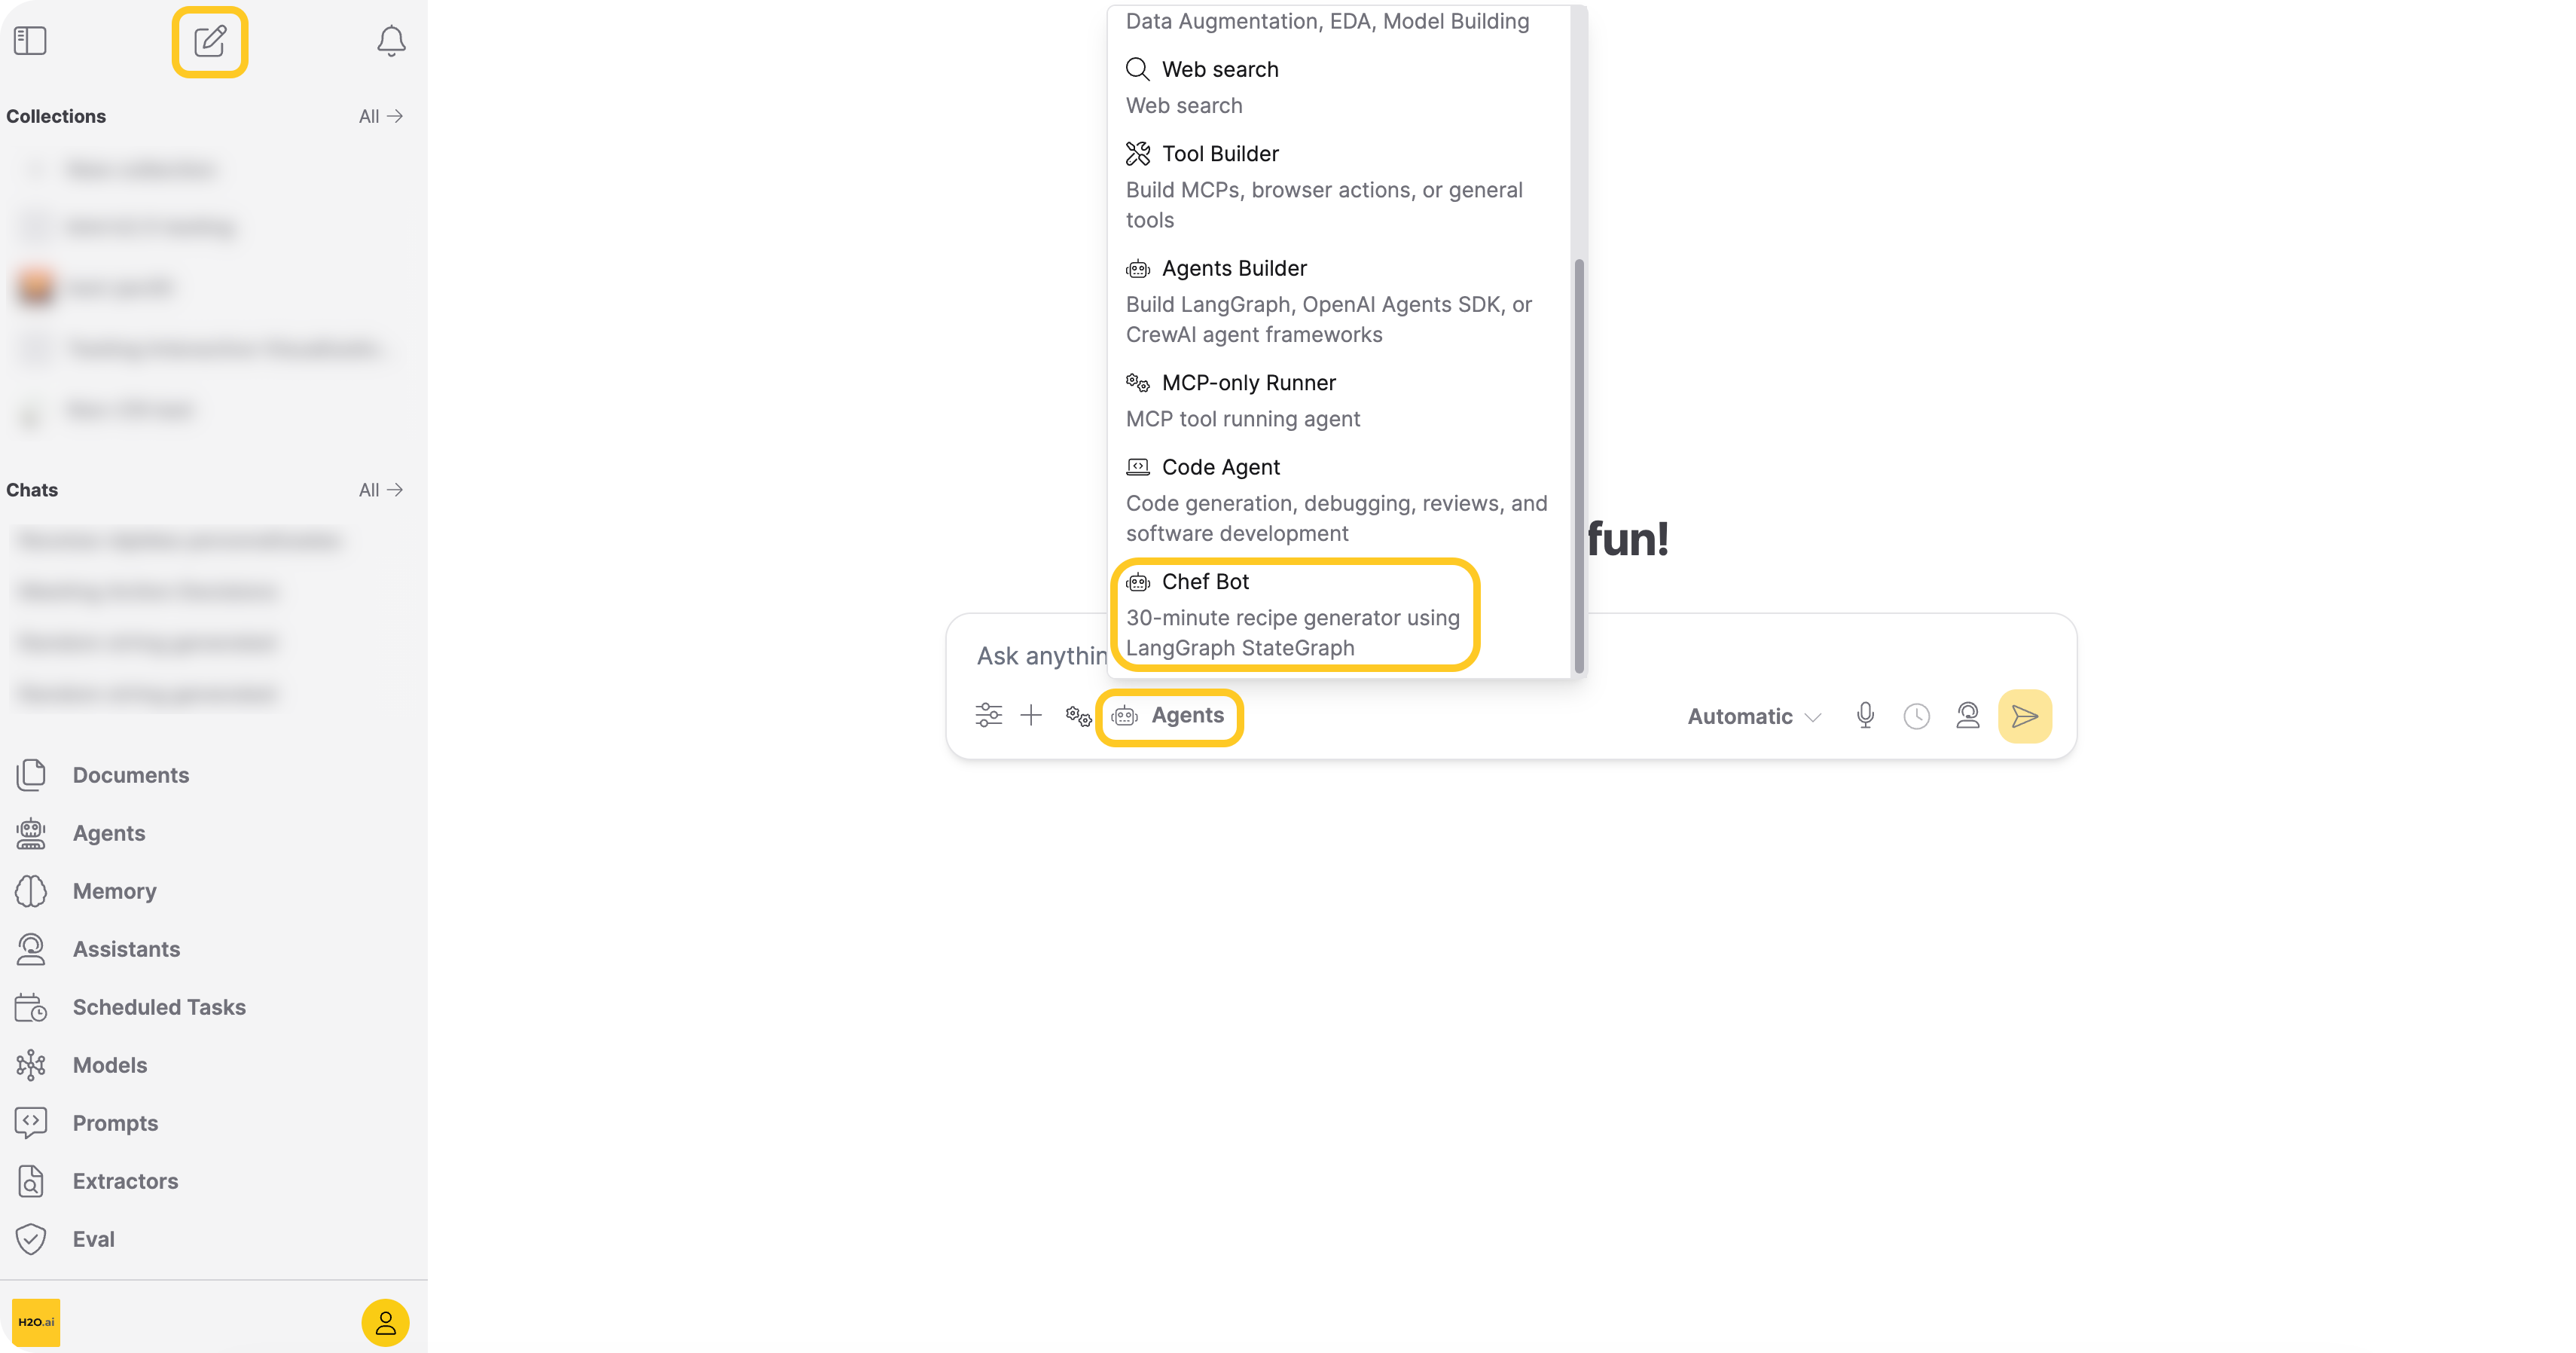
Navigate to your h2oGPTe chat interface and select Agents Builder from the agent type dropdown. This activates the agent building mode where Agents Builder assists in creating your custom agent. 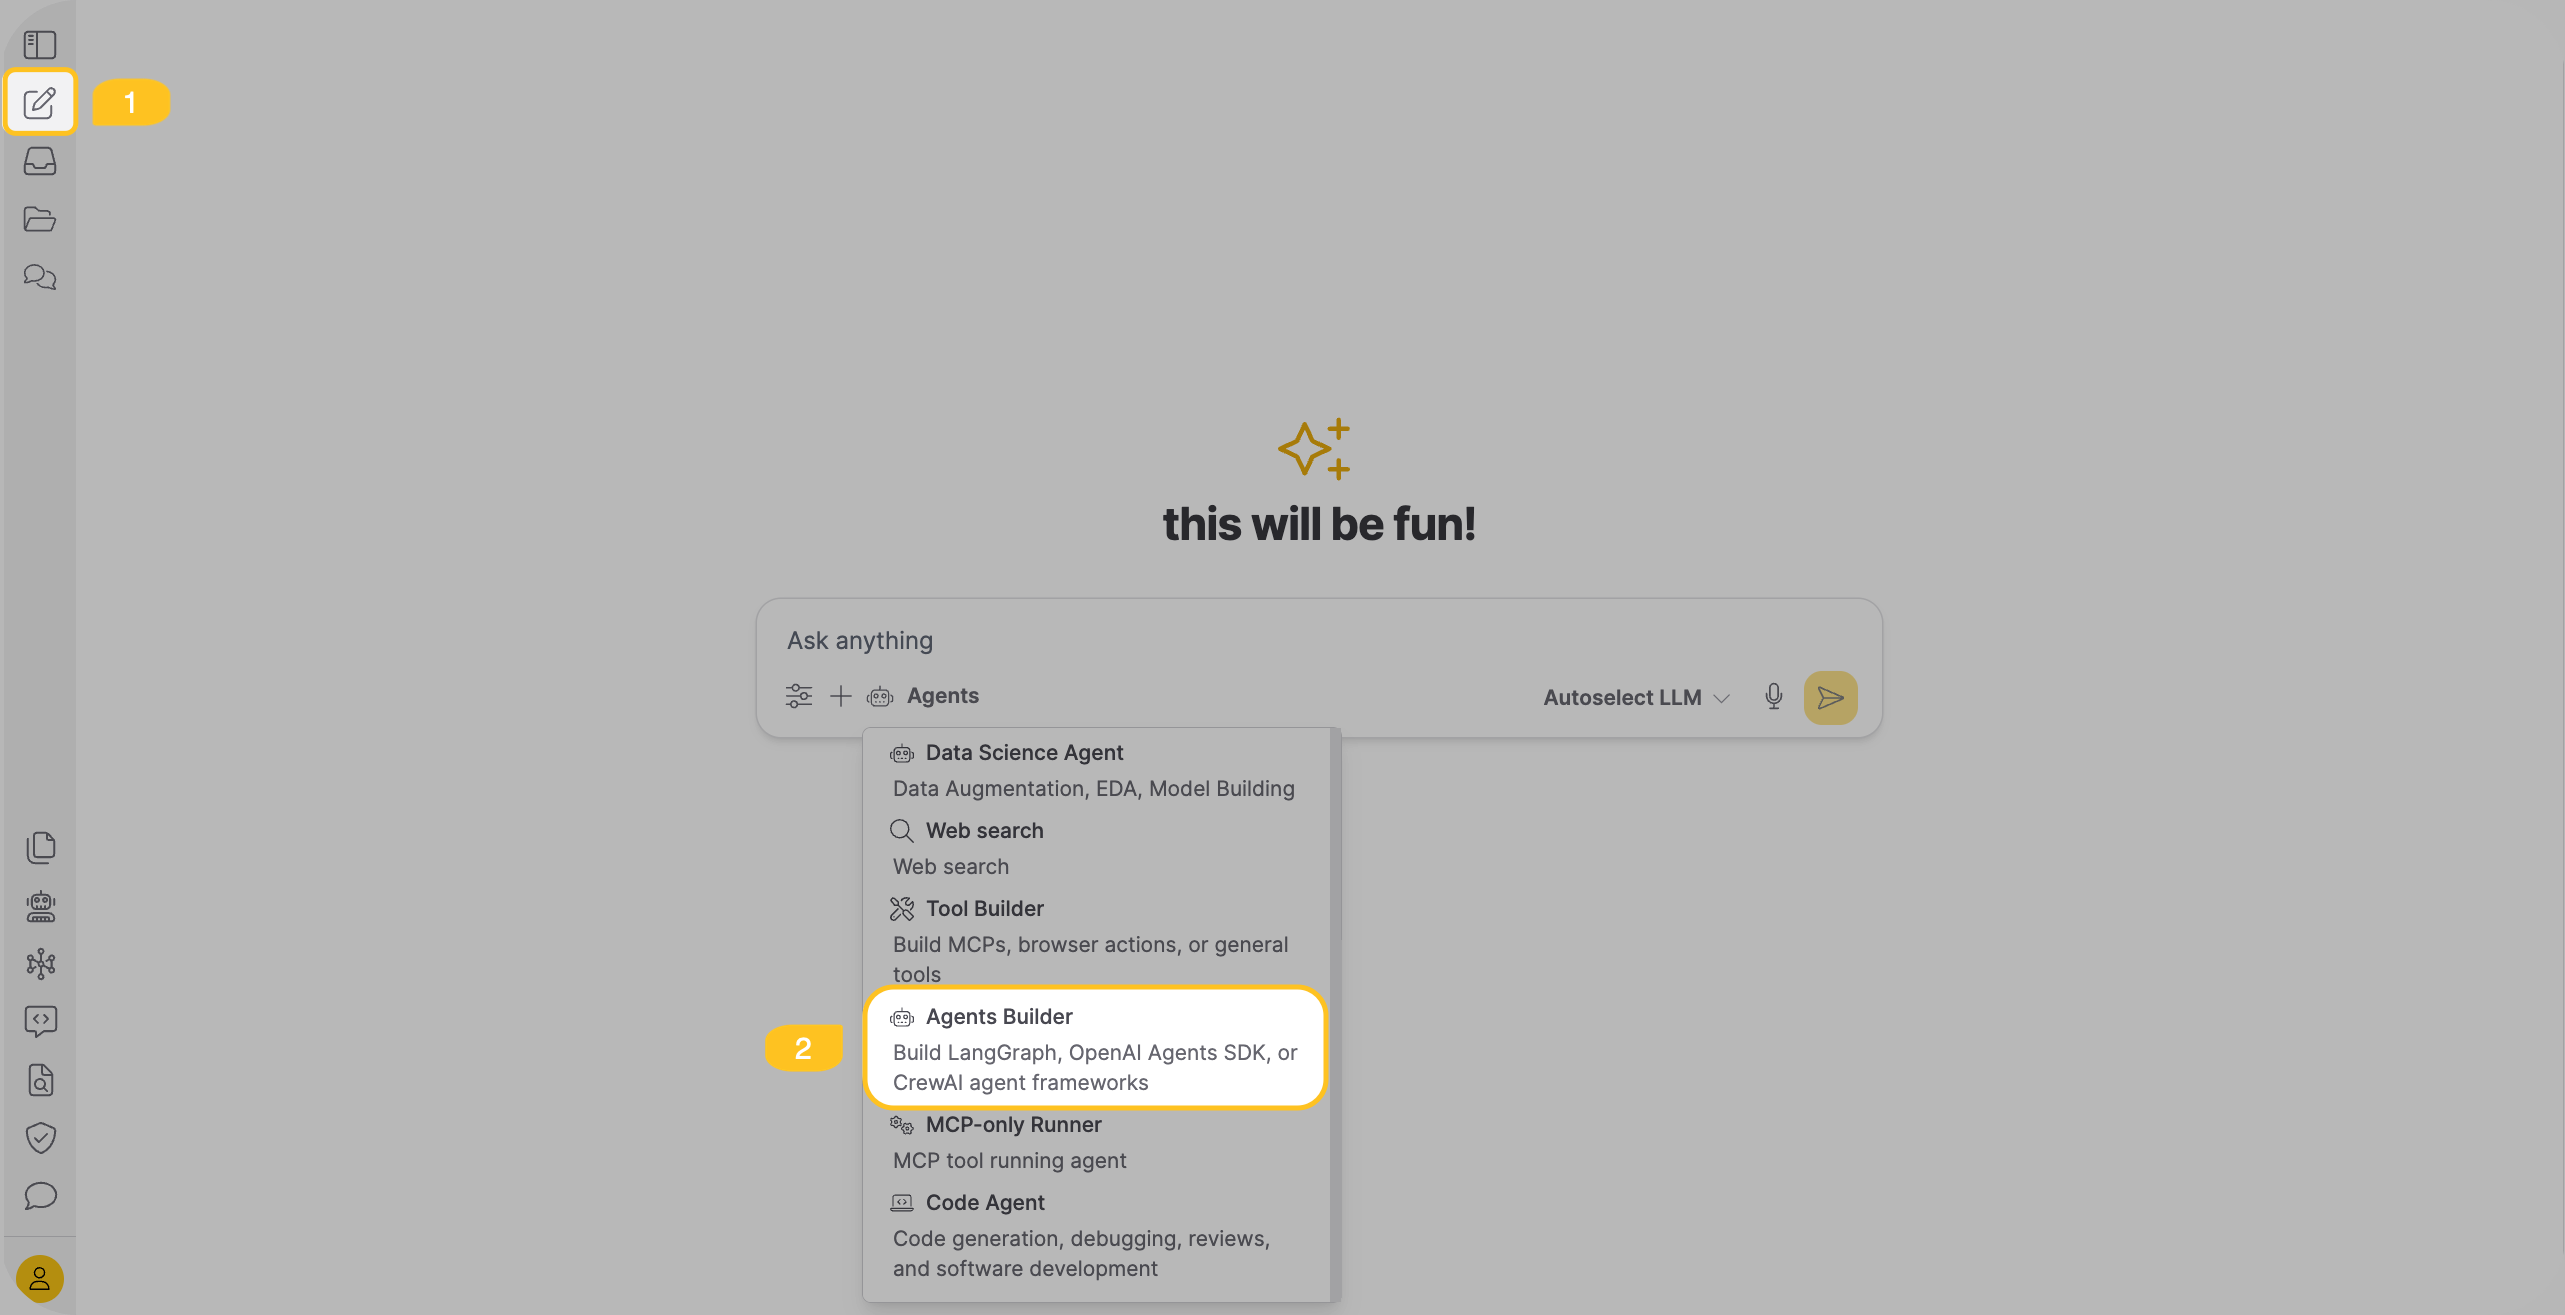
After selecting Agents Builder, configure the agent accuracy setting to control how thoroughly Agents Builder researches and builds your agent:
- Quick - Optimized for speed. Uses existing templates and patterns directly with minimal research. Best for simple agents and rapid prototyping.
- Basic - Balances speed and exploration. Performs light research before implementing straightforward solutions. Ideal for standard agents.
- Standard (default) - Prioritizes thorough research. Explores multiple approaches and gathers context from web sources before building. Suitable for production agents requiring robust implementation.
- Maximum - Enables maximum creativity and exploration. Deeply researches innovative approaches and emerging patterns. Best for complex agents or when you want cutting-edge solutions.
The accuracy level determines the number of research steps, exploration depth, and whether Agents Builder uses proven templates or explores novel approaches.
2. Describe Your Agent
Explain what you want your agent to do in natural language. Be specific about:
- The agent's primary purpose (for example, "research and summarize web content").
- What tools it should use (for example, "use Playwright to scrape web pages").
- The expected output format (for example, "save findings to a markdown file").
- Any special requirements (for example, "coordinate multiple sub-agents").
3. Framework Selection
Agents Builder automatically analyzes your request and selects the most appropriate framework:
- LangGraph: For complex workflows with state management and conditional logic
- OpenAI Agents SDK: For agents that need handoffs and OpenAI ecosystem integration
- CrewAI: For multi-agent teams with role-based coordination
The framework is chosen based on your agent's requirements, though you can specify a preference directly in your chat message (for example, "Create a research agent using LangGraph...").
4. Code Generation
The system generates a complete agent package in the ./agents/{agent_name}/ directory:
custom_agents.py- Main agent implementation with your target functionmetadata.json- Parameter schema and configurationrequirements.txt- Python dependenciestest_custom_agents.py- Automated test suiteenvs.json- Environment variable configurationREADME.md- Usage documentation
5. Testing and Validation
The system automatically tests your agent:
- Runs the generated test suite to verify functionality.
- Validates parameter handling and error cases.
- Checks code quality with type checking and formatting tools.
- Confirms integration with any required MCP tools.
If tests fail, Agents Builder iterates on the code and regenerates the necessary components.
6. Test and Iterate
After the agent is built, test it by asking Agents Builder to execute it on a sample task. Agents Builder runs your agent and shows you the results.
If the agent doesn't perform as expected, ask Agents Builder to improve it by describing what needs to change. The system iterates on the agent code and regenerates the necessary components.
7. Download Your Agent
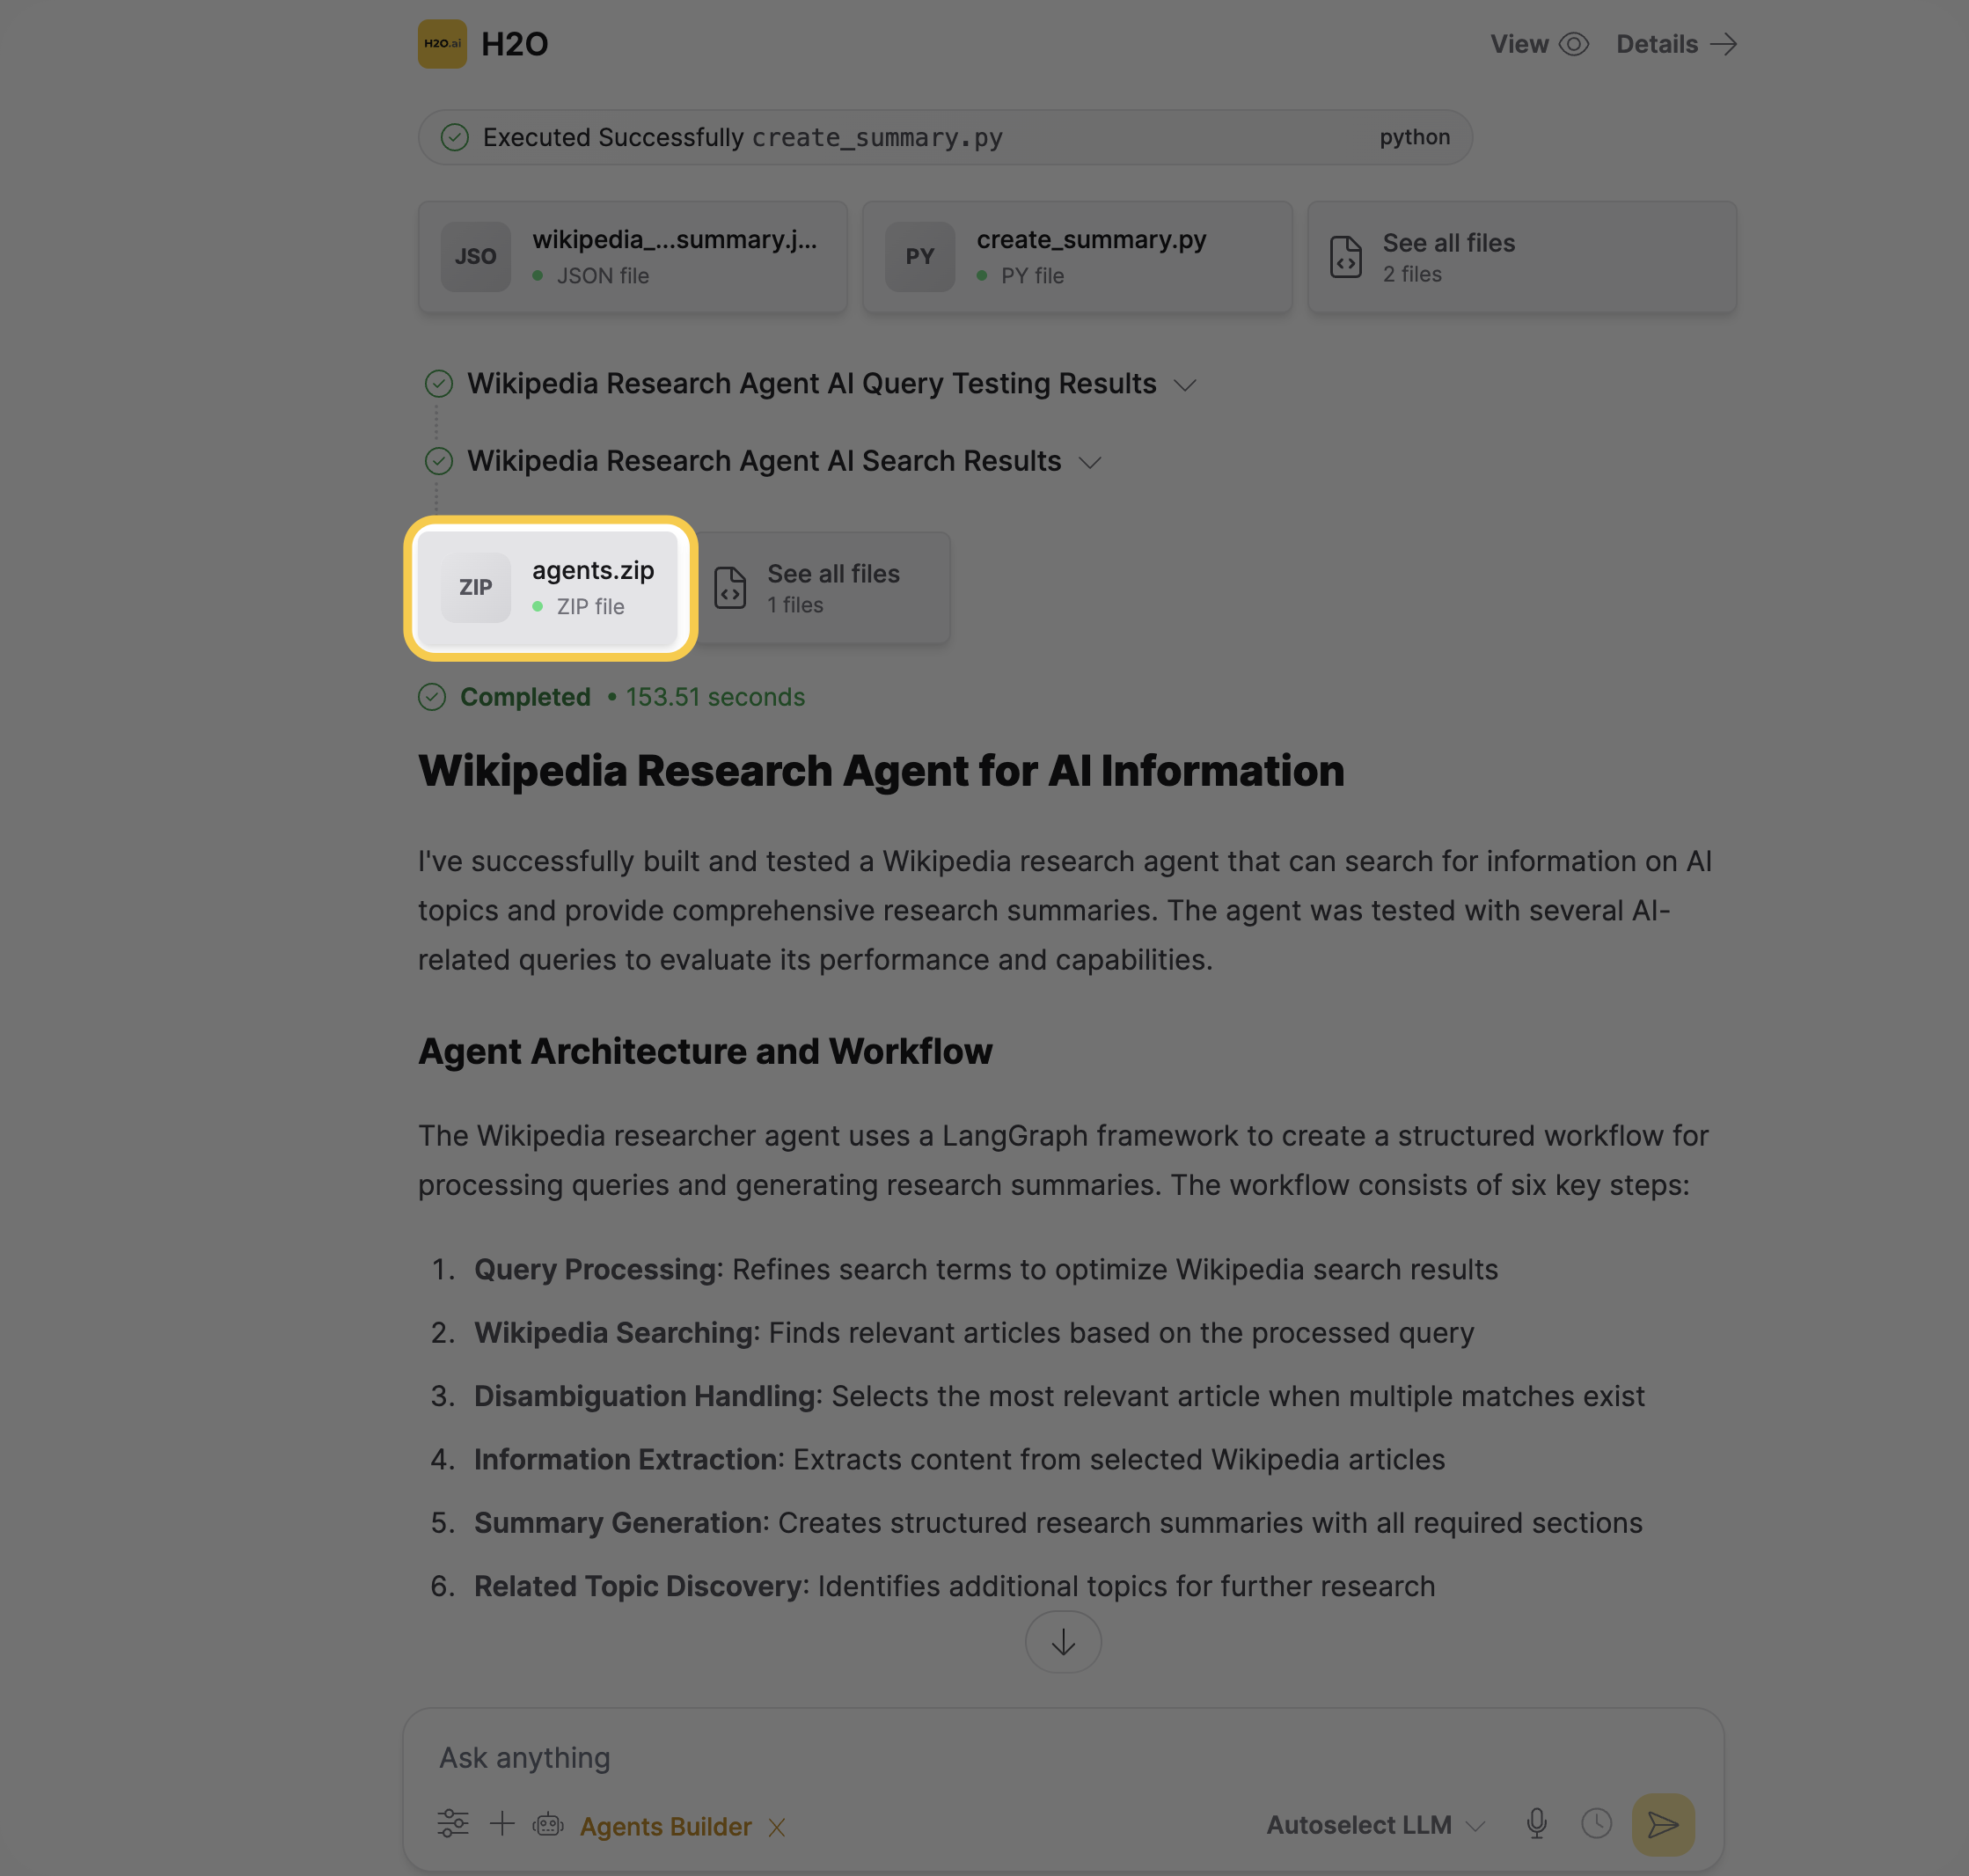
When your agent works as expected, download it as a ZIP file containing all the generated code, tests, and documentation.
Download agents.zip in one of two ways:
-
Directly from chat — Download the file from the files shown in the conversation.
-
From Files — Click Files to view all generated files, then download
agents.zip.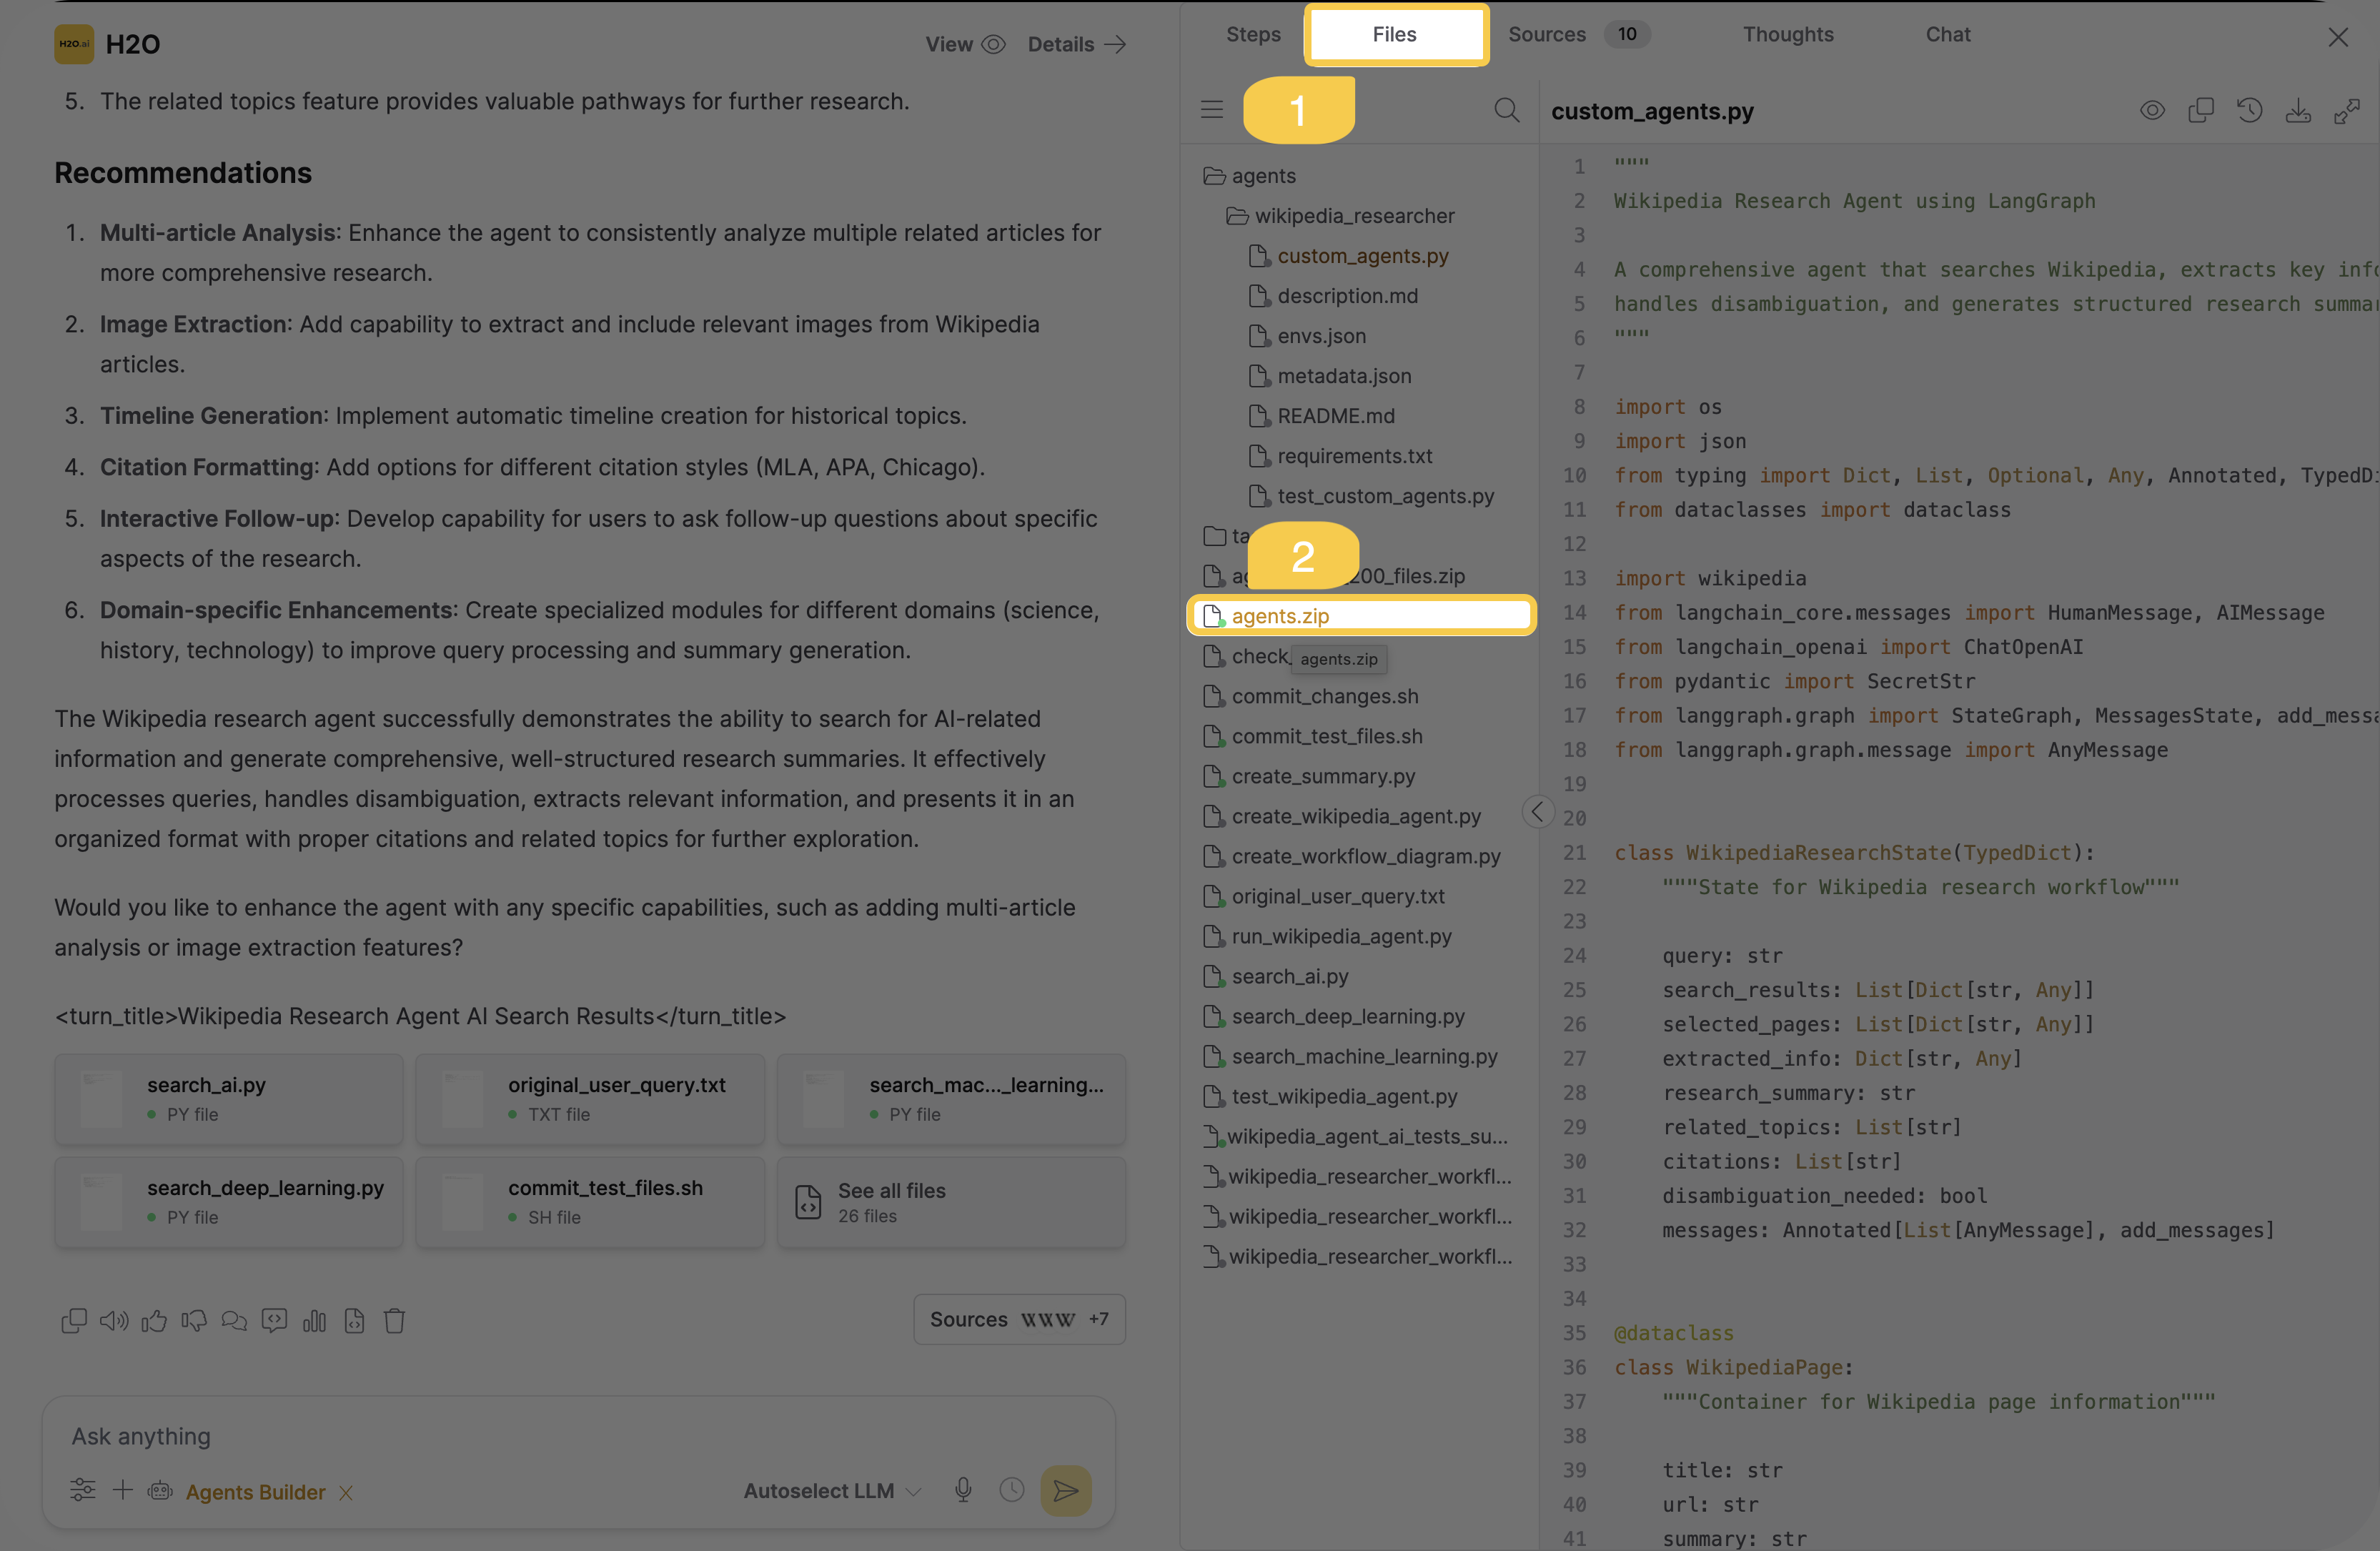
The agent package includes everything needed to run independently:
- Agent implementation code
- Test suites
- Documentation
- Configuration files
- Dependencies list
The entire process is automated and guided—you focus on describing what you need, while Agents Builder handles all technical implementation.
After downloading, upload the agent package to h2oGPTe as a custom agent to use it in chat.
Start with a simple agent like "Create a research agent that searches the web and summarizes findings" to get familiar with the process.
Generated Files
When Agents Builder creates your agent, it generates six essential files in the ./agents/{agent_name}/ directory:
custom_agents.py
Your agent's main implementation file containing the core logic. This Python script includes:
- The target function that executes your agent's task
- All necessary imports and helper functions
- Command-line interface (argparse) for standalone execution
- Environment variable handling for API keys and configuration
This file is self-contained and can run independently outside of h2oGPTe.
metadata.json
Configuration metadata describing your agent:
- Agent name, description, and framework used
- Function name and parameters with types
- Parameter defaults and requirements
- Return type information
This file helps other systems understand how to call your agent and what parameters it expects.
requirements.txt
List of Python dependencies your agent needs:
- Framework packages (langgraph, openai-agents, crewai)
- MCP integration libraries (if using MCP tools)
- Testing tools (pytest, mypy, ruff)
- Any additional packages your agent requires
Install dependencies with: pip install -r requirements.txt
test_custom_agents.py
Automated test suite that validates your agent works correctly:
- Tests core functionality with real API calls
- Validates parameter handling
- Checks error conditions
- Verifies integration with MCP tools (if applicable)
Run tests with: pytest test_custom_agents.py -v
envs.json
Environment variable configuration (see Configuration section below for details).
README.md
Complete documentation for your agent including:
- Overview and use cases
- Capabilities and features
- Installation instructions
- Environment variable requirements
- Usage examples with command-line syntax
- Testing instructions
The README.md file is your starting point. It contains everything you need to understand, install, and run your agent. Start there when working with your downloaded agent package.
Configuration
The envs.json file controls environment variables and settings. This file is essential for running your agent outside of h2oGPTe.
Environment Variable Format
The envs.json file uses a simple key-value format. The specific values depend on the LLM provider you specified when building your agent:
{
  "CUSTOM_AGENT_MODEL": "llama-3.1-70b-instruct",
  "CUSTOM_AGENT_BASE_URL": "https://api.together.xyz/v1",
  "CUSTOM_AGENT_API_KEY": "os.environ/TOGETHER_API_KEY",
  "MCP_DIR": "./mcp_tools_runner"
}
The model, base URL, and API key are configured based on your agent request. You can use any LLM provider (OpenAI, Anthropic, Together AI, local models, etc.) by specifying it when building your agent.
Value Types
Direct values - String values are used as defaults:
"CUSTOM_AGENT_MODEL": "llama-3.1-70b-instruct"
Environment references - Use os.environ/VARIABLE_NAME to load from system environment:
"CUSTOM_AGENT_API_KEY": "os.environ/LLM_API_KEY"
This keeps sensitive credentials out of your configuration files.
Never hardcode API keys or sensitive credentials directly in envs.json. Always use the os.environ/ prefix to reference environment variables, which keeps your credentials secure and out of version control.
Optional values - Use null for optional variables:
"CUSTOM_AGENT_TIMEOUT": null
For multi-agent systems using different models per role, Agents Builder generates role-specific variables like CUSTOM_AGENT_MODEL_RESEARCHER and CUSTOM_AGENT_MODEL_WRITER. The same pattern applies for role-specific URLs and API keys when requested. See the generated agent's README.md file for detailed provider configuration options.
Using custom agents
Add a custom agent
Before you begin, ensure you have downloaded your custom agent as a ZIP file.
- In the sidebar, click Agents.
- Click + New Agent.
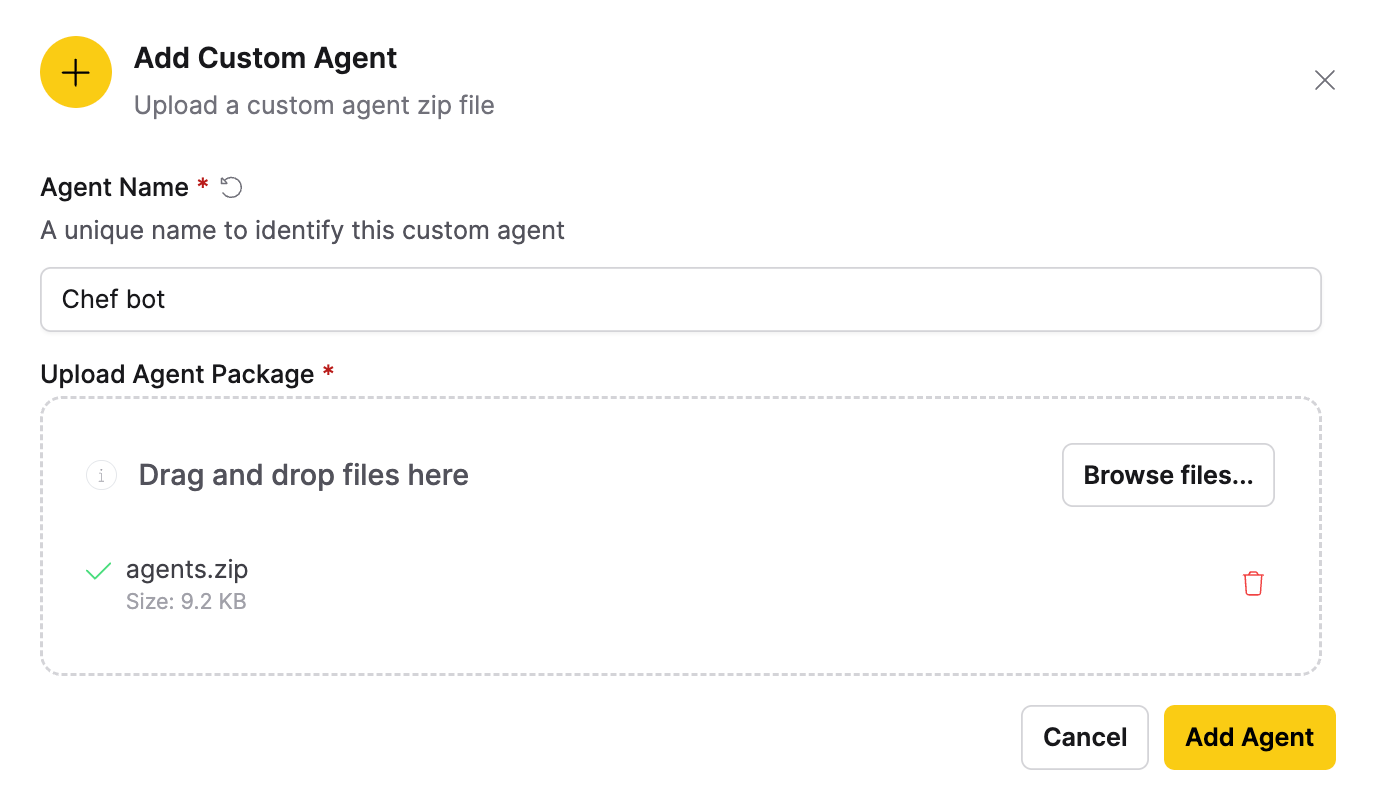
- In the Add Custom Agent dialog box, enter a unique identifier in the Agent Name field.
- Under Upload Agent Package, drag and drop your agent ZIP file, or click Browse files... to upload it.
- Click Add Agent.
Your new custom agent appears at the bottom of the Agents list.
Chat with your custom agent
- Start a new chat.
- In the chat interface, click Agents.
- Select your custom agent from the bottom of the list.
You are now ready to chat with your custom agent.
Add custom agents directly from chat
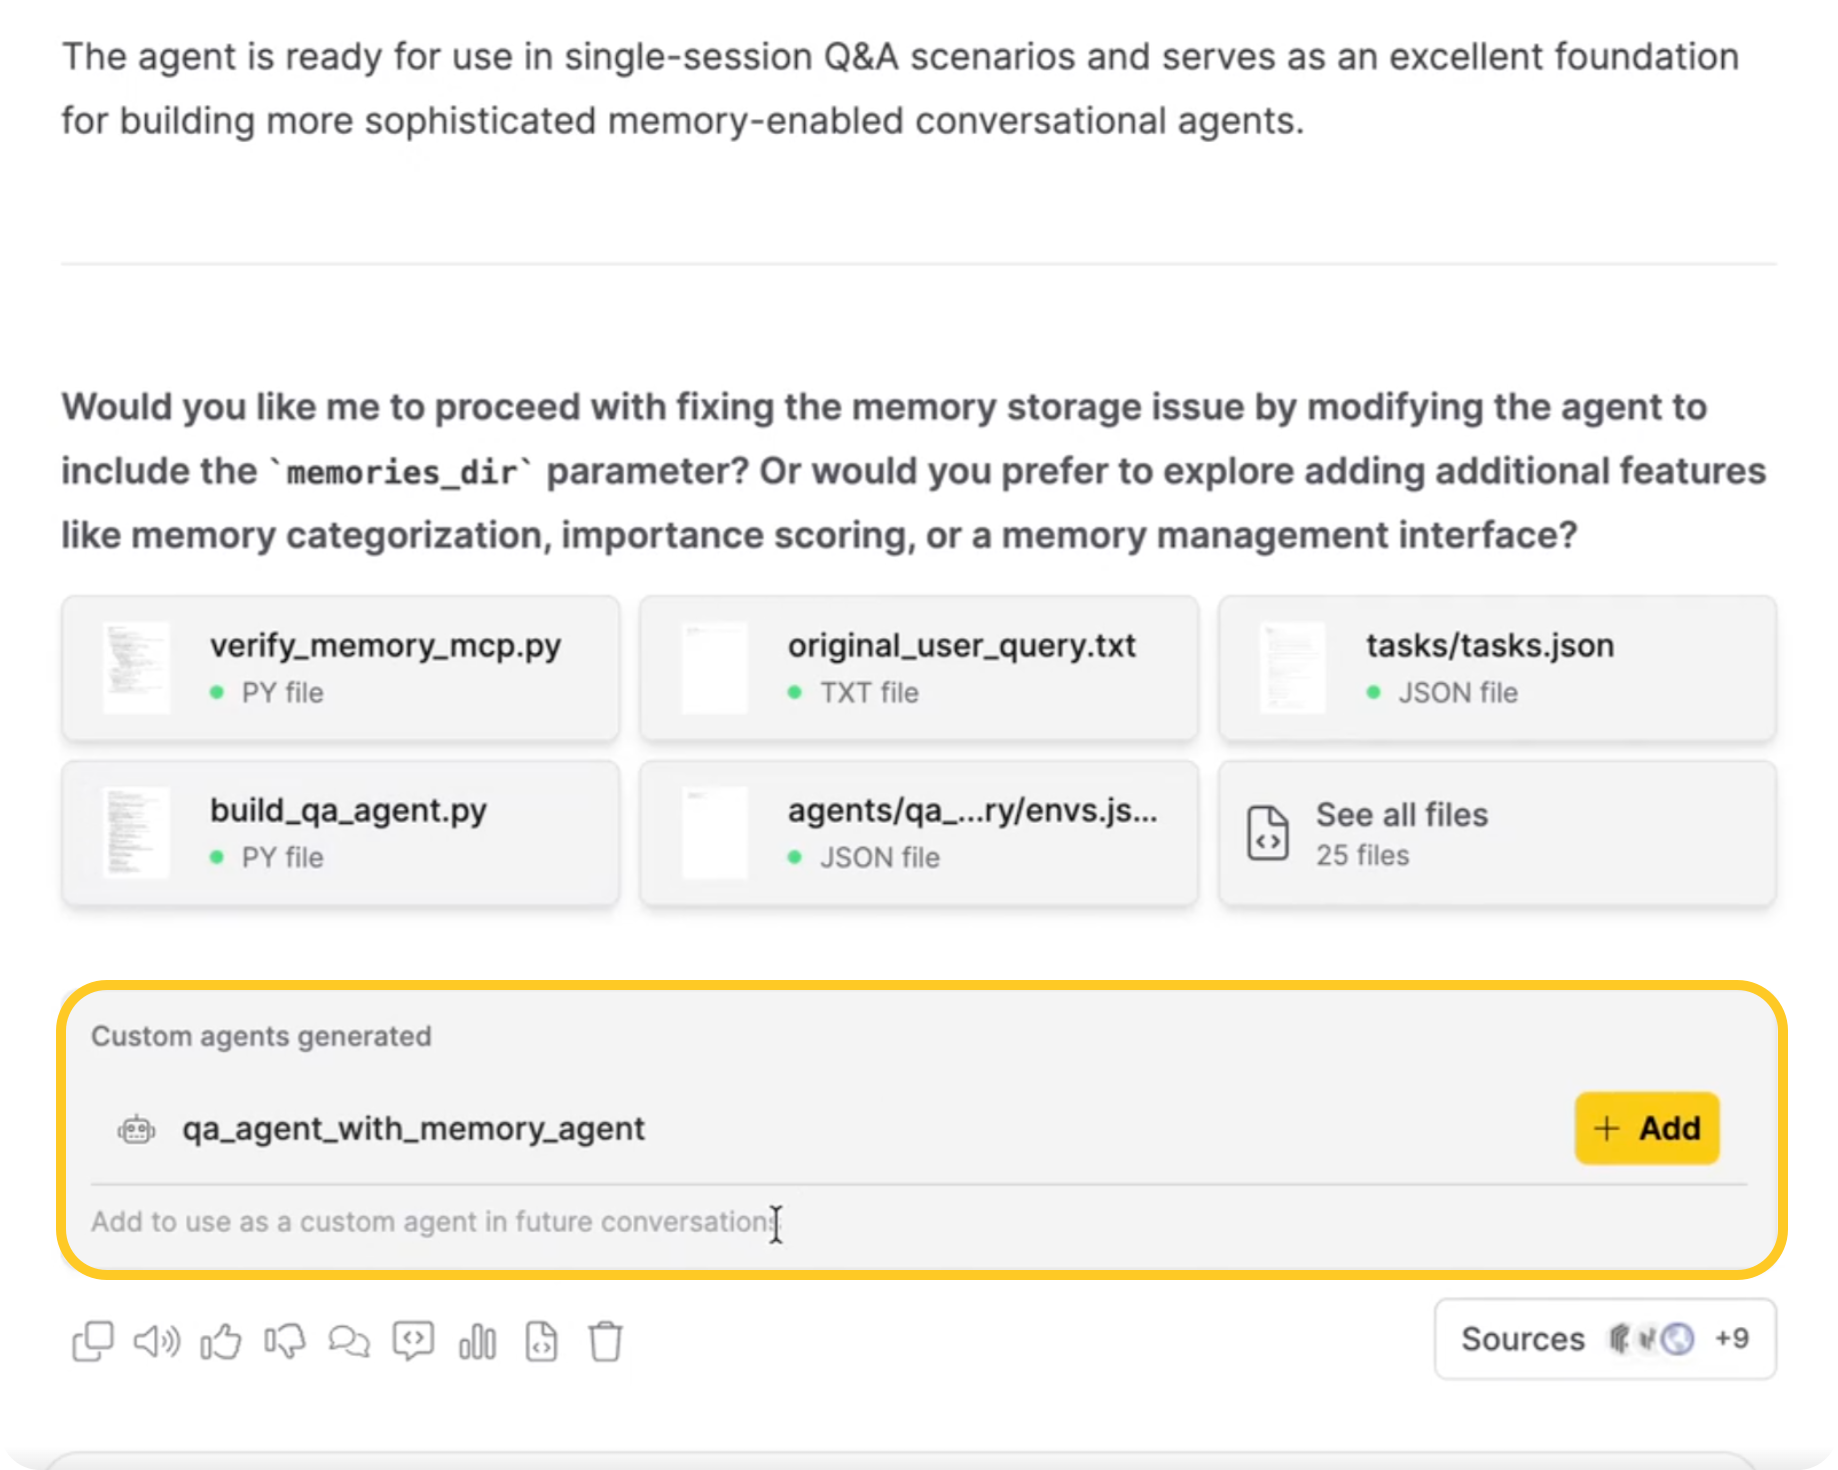
When an agent generates custom agent packages during a chat, you can add them to your workspace directly from the chat window. A card titled Custom agents generated appears inline in the chat message. The card includes:
- A list of generated agents, each with a robot icon and the agent name
- An + Add button next to each agent
- A footer note: "Add to use as a custom agent in future conversations"
To add an agent, click + Add next to the agent name.
Run your agent independently
To run your downloaded agent outside of h2oGPTe:
-
Set required environment variables in your system (values depend on your chosen LLM provider):
export LLM_API_KEY="your-api-key-here"
export MCP_DIR="./mcp_tools_runner" -
Install dependencies:
cd agents/your_agent_name
pip install -r requirements.txt -
Run your agent:
python custom_agents.py --query "your query here"
The agent reads envs.json to determine which environment variables to use and what default values to apply.
Types of Agent Frameworks
Agents Builder automatically selects the most appropriate framework based on your agent's requirements. It supports three industry-standard frameworks:
LangGraph
LangGraph is designed for complex workflows with state management and conditional routing. It uses a state machine architecture where agents navigate through nodes and edges, making it ideal for multi-step processes with decision points and loops.
Learn more: LangGraph Documentation
OpenAI Agents SDK
The OpenAI Agents SDK enables agent handoffs and delegation patterns, allowing multiple specialized agents to work together. It's designed for systems where a triage agent routes requests to specialized sub-agents, providing tight integration with the OpenAI ecosystem.
Learn more: OpenAI Agents SDK
CrewAI
CrewAI specializes in multi-agent teams where each agent has a specific role, goal, and backstory. It coordinates task execution across team members, supporting both sequential and parallel workflows with task dependencies.
Learn more: CrewAI Documentation
What Can You Build?
Agents Builder enables you to create a wide variety of specialized agents tailored to your specific needs:
Research and Information Gathering
- Research Agents: Search the web, gather information from multiple sources, and compile comprehensive reports
- Data Analysis Agents: Process datasets, generate insights, create visualizations, and produce analytical reports
- Competitive Intelligence Agents: Monitor competitors, track market trends, and synthesize findings
Automation and Workflows
- Task Automation Agents: Automate repetitive workflows and business processes
- Integration Agents: Connect with external services, APIs, and databases to orchestrate data flows
- Document Processing Agents: Extract, transform, and route documents through approval workflows
Multi-Agent Systems
- Customer Support Teams: Coordinate triage, technical support, and escalation agents
- Content Creation Teams: Research, write, edit, and publish content with specialized agents
- Development Teams: Plan, implement, test, and deploy with coordinated agent roles
Specialized Business Functions
- Sales Agents: Qualify leads, research prospects, and generate personalized outreach
- Compliance Agents: Monitor activities, check policies, and flag compliance issues
- Report Generation Agents: Gather data, analyze trends, and produce formatted reports
The flexibility of Agents Builder means you can create agents for virtually any workflow that can be described in natural language and benefits from AI automation.
When to Use Agents Builder
Use Agents Builder when:
- Need specialized automation beyond built-in agents.
- Want to integrate multiple tools in a custom workflow.
- Need multi-agent coordination for complex tasks.
- Want to automate specific business processes.
- Require custom logic or specialized behavior.
What's Next?
Explore advanced features and capabilities:
- A2A Protocol Support - Enable agent-to-agent communication with REST API endpoints
- MCP Servers - Configure tools and integrations for your agents
If you encounter issues or have questions, reach out to your administrator.
- Submit and view feedback for this page
- Send feedback about Enterprise h2oGPTe to cloud-feedback@h2o.ai