Create remote MCP tools
This guide walks you through creating a Remote MCP tool by setting up an external MCP server connection in Enterprise h2oGPTe, enabling and using it within your agent conversations.
Overview
Remote MCP tools are accessed over the network and can be configured using the standard MCP tool configuration JSON format, with extra fields specific to Enterprise h2oGPTe: tool_usage_mode and description. It supports various transport protocols like stdio, HTTP, and SSE, and can work with any MCP-compatible server. In most cases, you can copy the JSON configuration from an MCP server README and paste it directly into Enterprise h2oGPTe.
Prerequisites
- Access to Enterprise h2oGPTe
- An external MCP server to connect to (either self-hosted or from the community)
- API keys or credentials for the MCP server (if required)
- Basic understanding of MCP (Model Context Protocol). See the Remote MCP Tools overview for more details.
Step 1: Prepare your MCP server configuration
Before adding a remote MCP tool, make sure you have the following information about your MCP server:
- Command or URL: The executable command to run the server, or the server URL
- Type protocol: stdio, HTTP, or SSE
- Arguments: Any command-line arguments required
- Environment variables: API keys, tokens, or other credentials needed
Example configurations:
- STDIO transport (command-based)
- HTTP transport (using mcp-remote client)
- HTTP transport (direct URL)
{
  "slack": {
    "command": "npx",
    "args": [
      "-y",
      "slack-mcp-server@latest",
      "--transport",
      "stdio"
    ],
    "env": {
      "SLACK_MCP_XOXP_TOKEN": "os.environ/SLACK_MCP_XOXP_TOKEN"
    }
  }
}
{
  "huggingface": {
    "command": "npx",
    "args": [
      "mcp-remote",
      "https://huggingface.co/mcp",
      "--header",
      "Authorization: Bearer os.environ/HF_TOKEN"
    ],
    "env": {
      "HF_TOKEN": "os.environ/HF_TOKEN"
    }
  }
}
{
  "http-api": {
    "url": "https://api.example.com/mcp",
    "headers": {
      "Authorization": "Bearer os.environ/API_KEY"
    },
    "transport": "http"
  }
}
Step 2: Set up Authentication
-
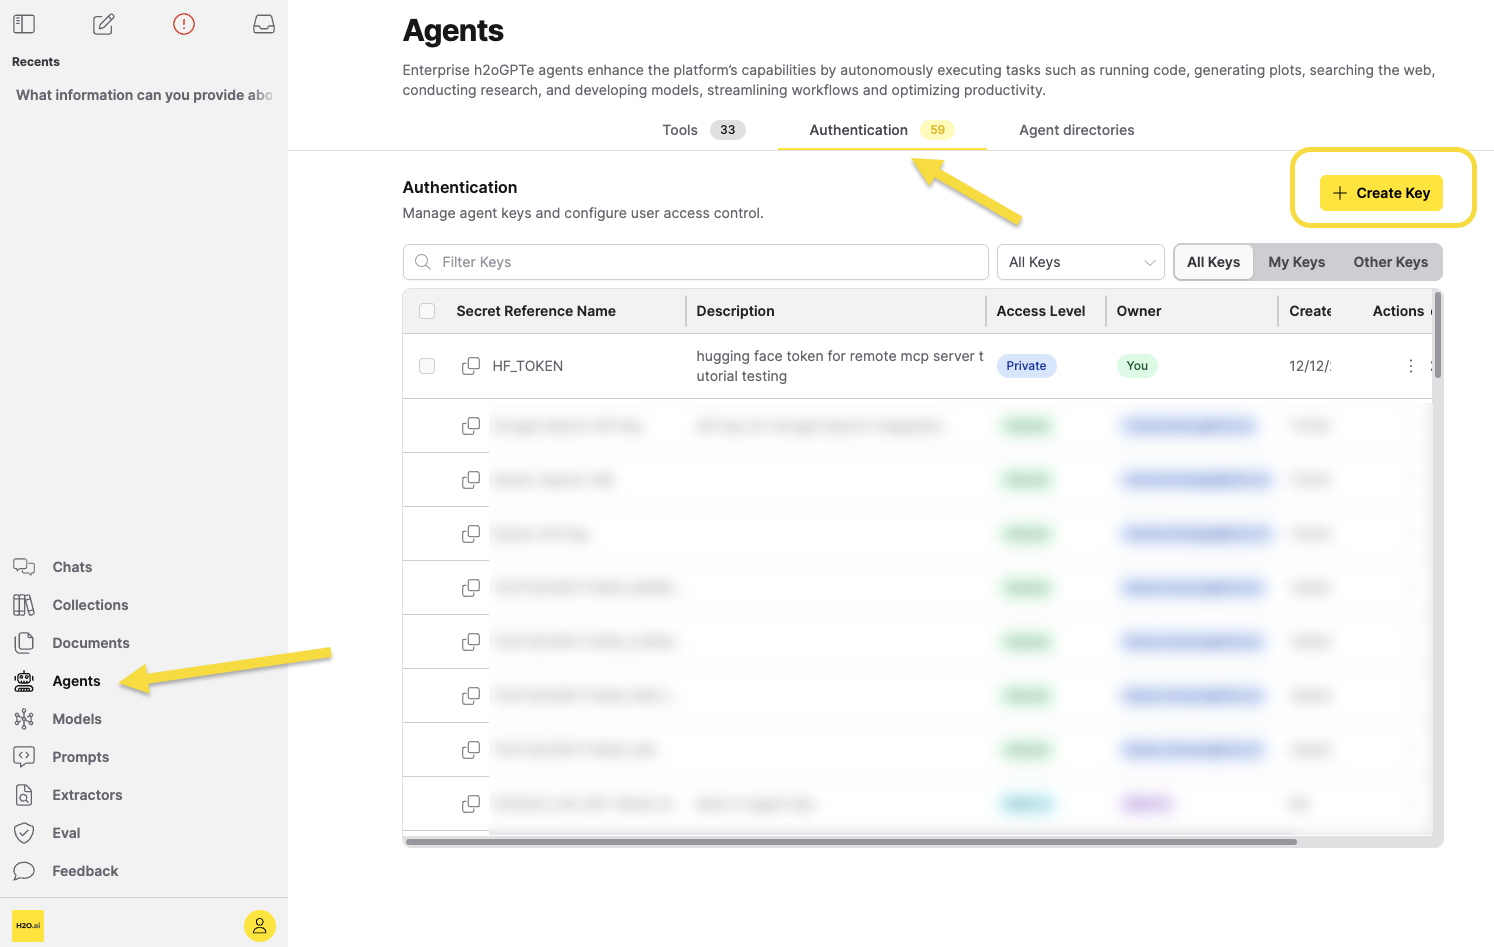
In the main navigation, click Agents > Authentication.
-
Add the required environment variables for your MCP server.
-
Click + Create Key to open the dialog.
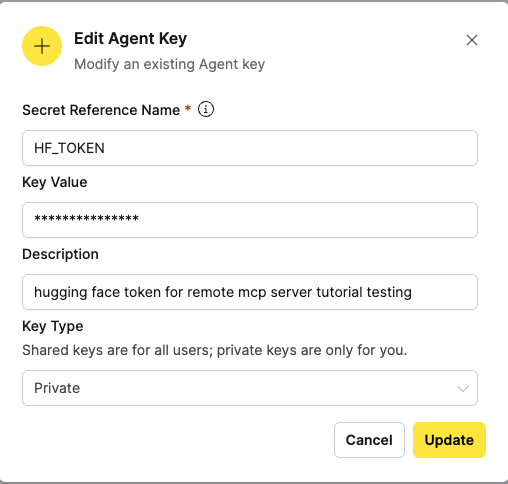
Configure the following fields:
- Secret reference name (required): The name you will reference in tool configurations (for example,
SLACK_MCP_XOXP_TOKENorHF_TOKEN). - Key value (required): The secret value.
- Description (optional): Add context for other admins.
- Key type: Select Private (only you) or Shared (all users).
- Secret reference name (required): The name you will reference in tool configurations (for example,
-
Click Save to store the credentials securely.
- Do not hardcode API keys or credentials in your JSON configuration.
- Always use the
os.environ/VARIABLE_NAMEsyntax to reference environment variables. - Store all sensitive credentials in Agents > Authentication before configuring the tool.
Step 3: Add your remote MCP tool
-
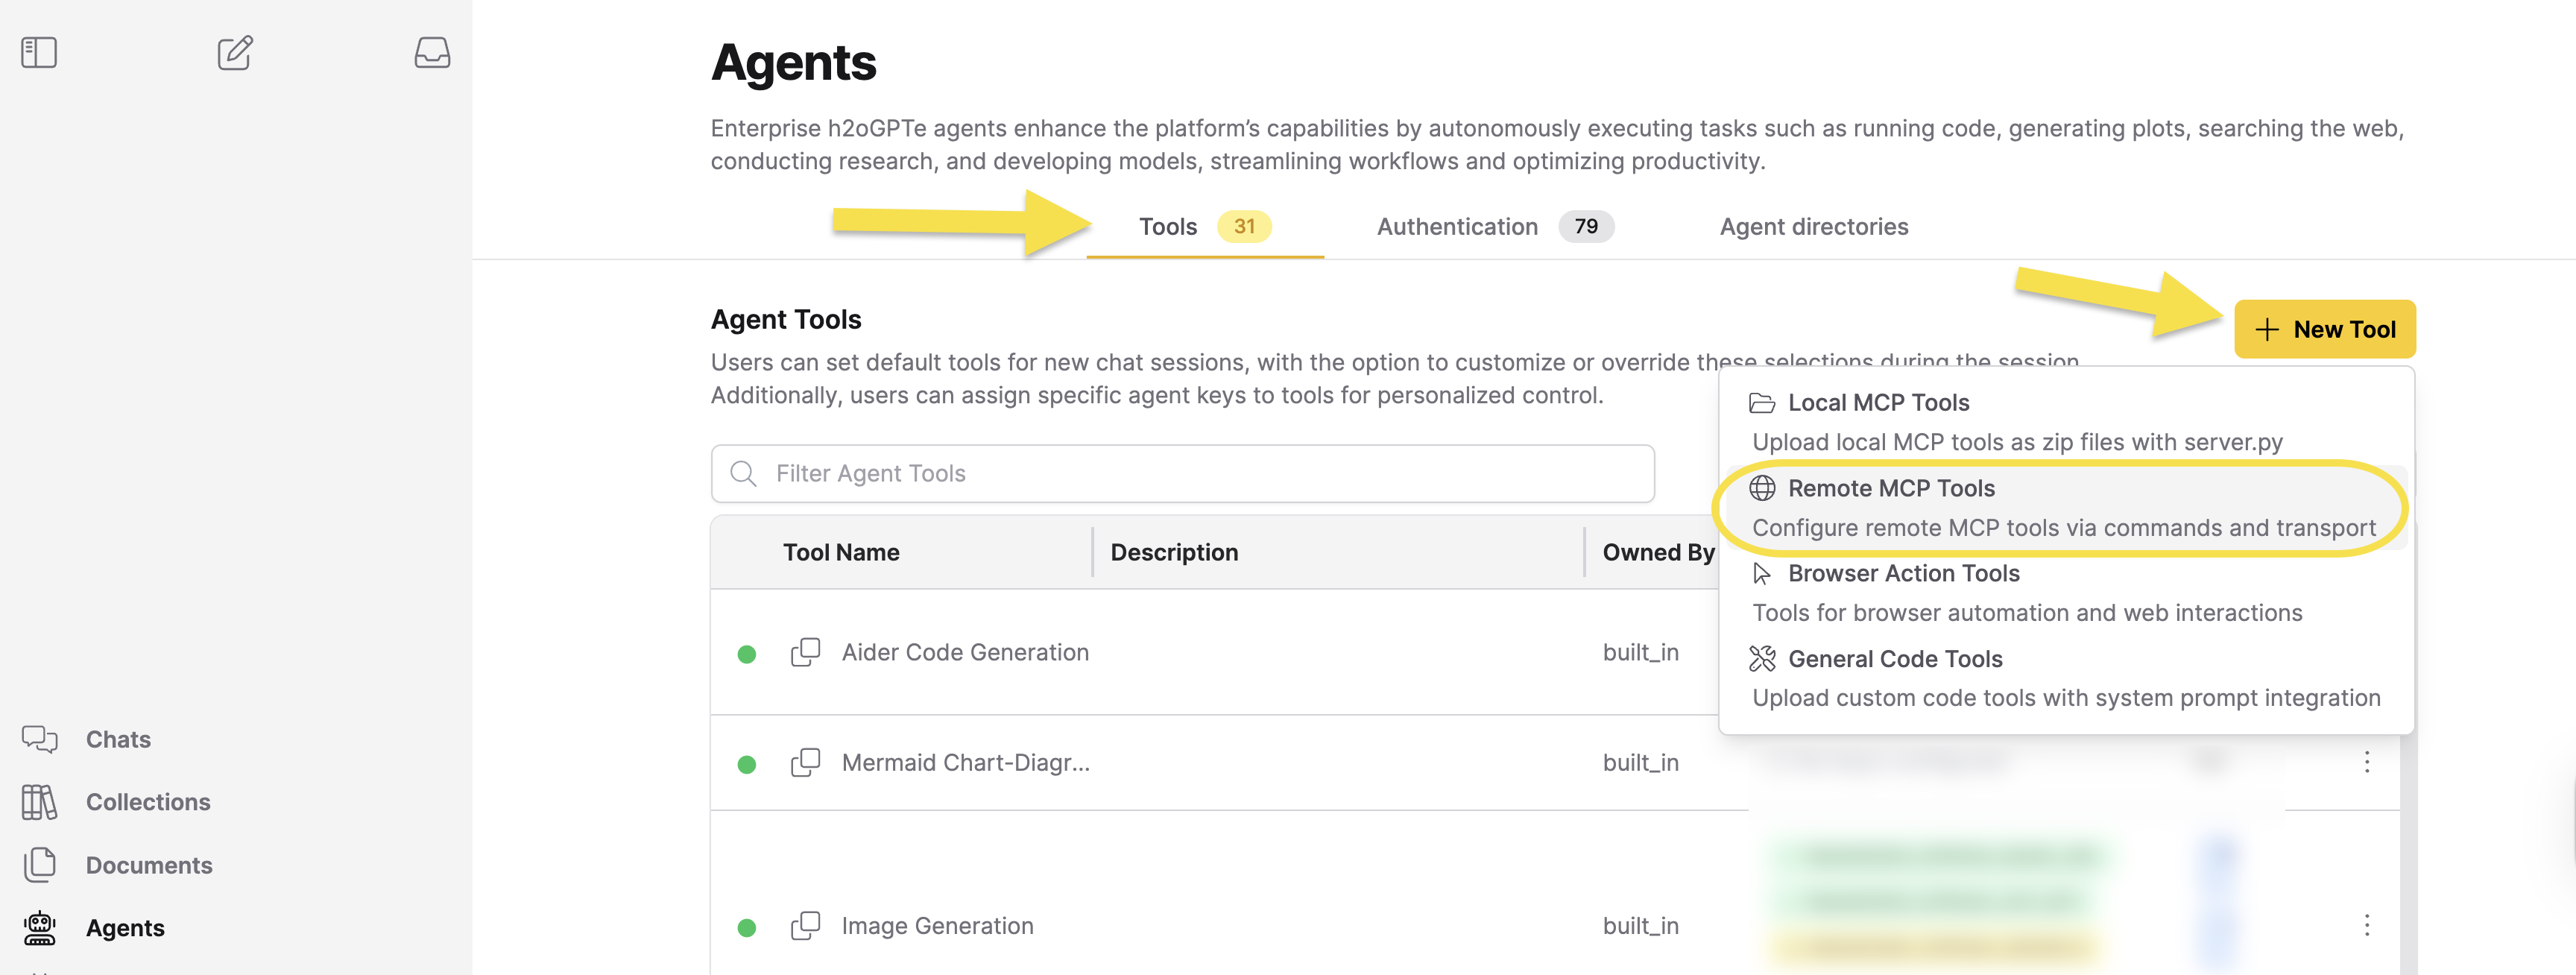
In the main navigation, click Agents > Tools.
-
Click + New Tool
-
Select Remote MCP Tools from the dropdown menu.
-
Enter your JSON configuration in the MCP Configuration JSON field.
tipYou can often copy a configuration directly from an MCP server README. Use a standard launcher like
uvx,npx, orpythonas the command. Do not run MCP server binaries directly.Example: Hugging Face MCP server
Paste the following configuration:
{
  "mcpServers": {
    "huggingface": {
      "command": "npx",
      "args": [
        "mcp-remote",
        "https://huggingface.co/mcp",
        "--header",
        "Authorization: Bearer os.environ/HF_TOKEN"
      ],
      "env": {
        "HF_TOKEN": "os.environ/HF_TOKEN"
      }
    }
  }
} -
Review the JSON validation messages. If your configuration does not include
tool_usage_modeordescription, the dialog may suggest adding them.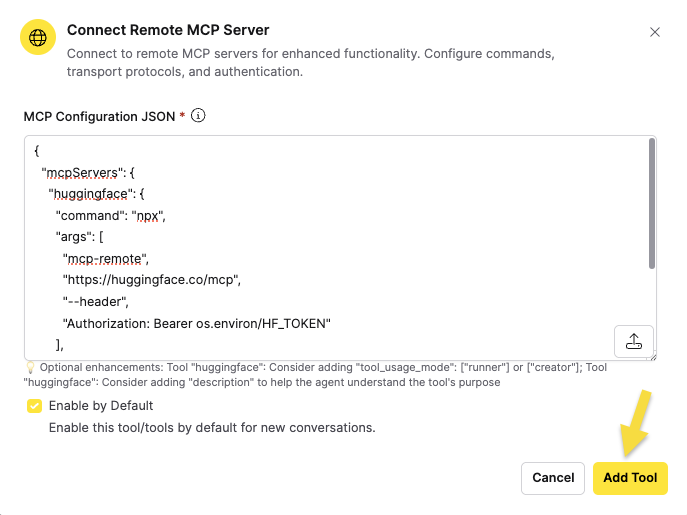
-
Discover sub-tools (optional): Click Refresh sub-tools to inspect the server and view its available sub-tools before adding.
noteFor tools that use environment variables (for example,
os.environ/API_KEY), the server resolves credentials securely. Tools requiring authentication to fetch sub-tools must have properly configured environment variables. -
Select sub-tools (optional): Select the specific tools you want to enable. For details, see Sub-tool selection.
-
Toggle Enable by Default if you want the tool to be active automatically whenever it is available in a conversation. Leave it off to enable the tool manually per conversation.
-
Click Add Tool.
Configuration fields:
command: Executable command to run (required ifurlis not specified)url: Server URL for HTTP or SSE transport (required ifcommandis not specified)args: Array of command arguments (optional)env: Environment variables usingos.environ/VARIABLE_NAMEsyntax (optional). The variable name must match in three places: theenvobject key, the variable name inos.environ/VARIABLE_NAME, and the secret reference name in Agents > Authentication (for example,"HF_TOKEN": "os.environ/HF_TOKEN"requiresHF_TOKENin all three locations)headers: HTTP headers for HTTP or SSE transport (optional, used withurl)description: Tool description (optional, but recommended)tool_usage_mode: Array with["runner"],["creator"], or both (optional, defaults to["runner", "creator"]). Use["runner"]for tools that execute actions and provide data during conversations (most common). Use["creator"]for tools that generate code, create files, or build other tools programmatically. Use both when the tool supports both use cases.allowed_tools: Array of tool names to enable (optional). When set, limits agent access to only the specified tools. The sub-tool selection UI populates this field automatically when you select sub-tools.type: Transport protocol -stdio,http, orsse(optional)
- You can configure multiple MCP servers in a single JSON configuration.
- Each server in the configuration becomes a separate tool that agents can use.
Expected result: Your remote MCP tool appears in Agents > Tools and is ready to enable in conversations.
You can also update sub-tool selection after adding. In Agents > Tools, click the actions menu (three dots) on your tool row and click Select Sub-tools. See Sub-tool selection for details.
Step 4: Enable and test your tool
- Go to a new chat session.
- Select your preferred agent (e.g., General Agent or another agent)
- Open Agent Configuration (⚙️ gear icon or Settings button)
- Open the Custom Tools section
- Enable your remote MCP tool by toggling it on in the list
- Send a test message and verify the response
Use the following prompts to test your tool:
Slack MCP tool:
- "Send a message to #general channel saying 'Hello from Enterprise h2oGPTe'"
- "What are the last 5 messages in #general channel?"
Hugging Face MCP tool:
- "Find me a text classification model on Hugging Face"
- "What information can you provide about the bert-base-uncased model?"
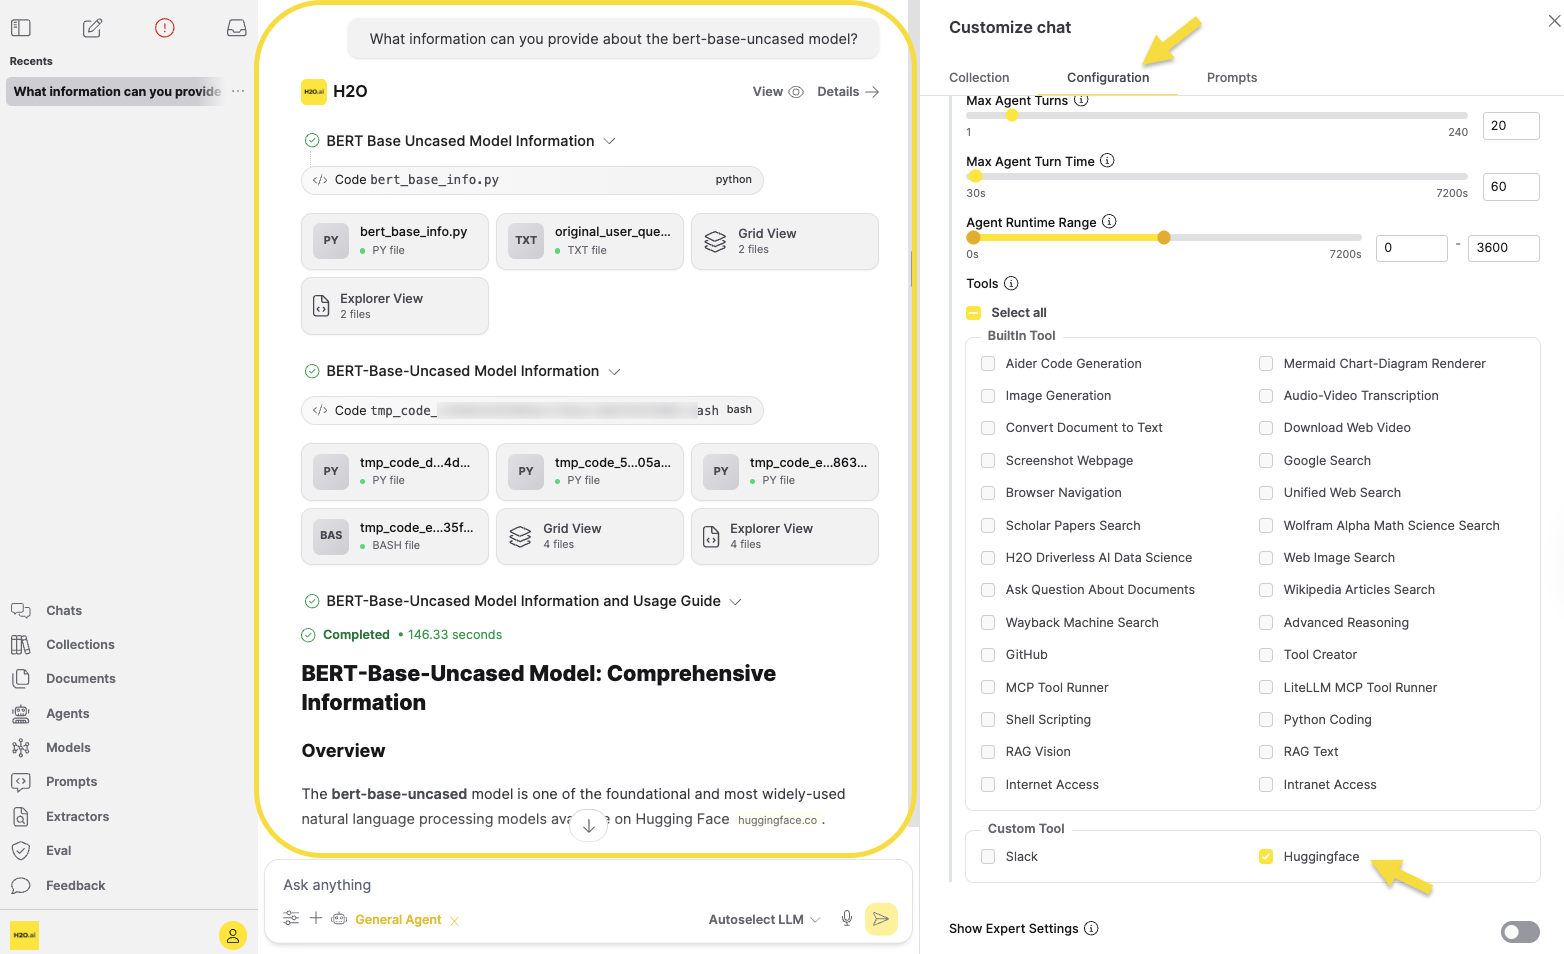
The screenshot above shows a successful Hugging Face MCP tool execution in a chat session.
Step 5: Verify Tool Execution
After you send your message, confirm that:
- The tool runs successfully.
- The response contains the expected data.
- Errors are handled as expected.
Test common error scenarios:
- Invalid API keys or authentication failures
- Network connection errors
- Malformed requests or invalid parameters
Use remote MCP tools with custom agents
Remote MCP tools integrate with custom agents through automatic association. When you upload a custom agent whose metadata.json declares mcp_servers, Enterprise h2oGPTe automatically links matching tools by name, so you don't need to assign tools manually.
Auto-association is not limited to remote MCP tools — it also matches local MCP tools and built-in tools using normalized name matching. This page focuses on the remote MCP workflow, but the same mechanism applies across all tool types.
For example, if you register a remote MCP tool named server-filesystem and then upload a custom agent whose metadata includes "mcp_servers": ["server-filesystem"], Enterprise h2oGPTe creates the association automatically. You can verify this in the MCP Tools column of the Agents tab or through the Python SDK auto-association example.
Register your remote MCP tools before uploading the custom agent. Auto-association runs at upload time, so tools must already exist for the platform to match them.
Next steps
- Explore the MCP server directory for pre-configured community servers
- Learn about Create local MCP tools for custom integrations
- Review Agent tool configuration for built-in agent tools
- See Automatic MCP tool association for a full Python SDK example
- Submit and view feedback for this page
- Send feedback about Enterprise h2oGPTe to cloud-feedback@h2o.ai