Custom agents
Custom agents extend Enterprise h2oGPTe with your own AI agent implementations. Unlike built-in agents, custom agents contain your own logic, tool integrations, and configuration, all packaged as a ZIP file and managed from the Agents tab.
Prerequisites
- You have access to an Enterprise h2oGPTe instance.
- You have a custom agent packaged as a ZIP file. See Agent package structure for requirements.
- If you need API keys, add them to Secret Manager before assigning them to an agent.
Custom agent properties
Each custom agent has the following properties:
- Name and description that identify the agent in the platform.
- Agent type indicating which framework it uses: LangGraph, CrewAI, OpenAI Agents SDK, or Claude.
- API key associations that map the agent's environment variables to secrets stored in the platform.
- MCP tool associations that link the MCP server names in the agent's code to tools configured in the Tools tab.
For more advanced workflows, use Agents Builder to generate complete agent packages from natural language descriptions, without writing any code. First use the Tool Builder agent to create a custom MCP tool, then ask Agents Builder to build custom agents that use that tool.
Agent package structure
An agent package is a ZIP file containing one or more agent folders. Each folder must include the following files:
| File | Purpose |
|---|---|
custom_agents.py | Main agent implementation with the entry-point function |
metadata.json | Agent name, description, framework, and parameter schema |
requirements.txt | Python dependencies |
envs.json | Environment variable declarations for API keys and configuration |
test_custom_agents.py | Tests for the agent. Validated on upload but not required; a missing file logs a warning only. |
The folder name inside the ZIP becomes the agent name unless you provide a custom name during upload. If the ZIP contains multiple agent folders, each one is registered as a separate agent.
Supported frameworks
| Framework | Description |
|---|---|
| LangGraph | Complex workflows with state management and conditional logic |
| CrewAI | Multi-agent teams with role-based coordination |
| OpenAI Agents SDK | Agent handoffs and OpenAI ecosystem integration |
| Claude | Agents built with the Anthropic Claude SDK |
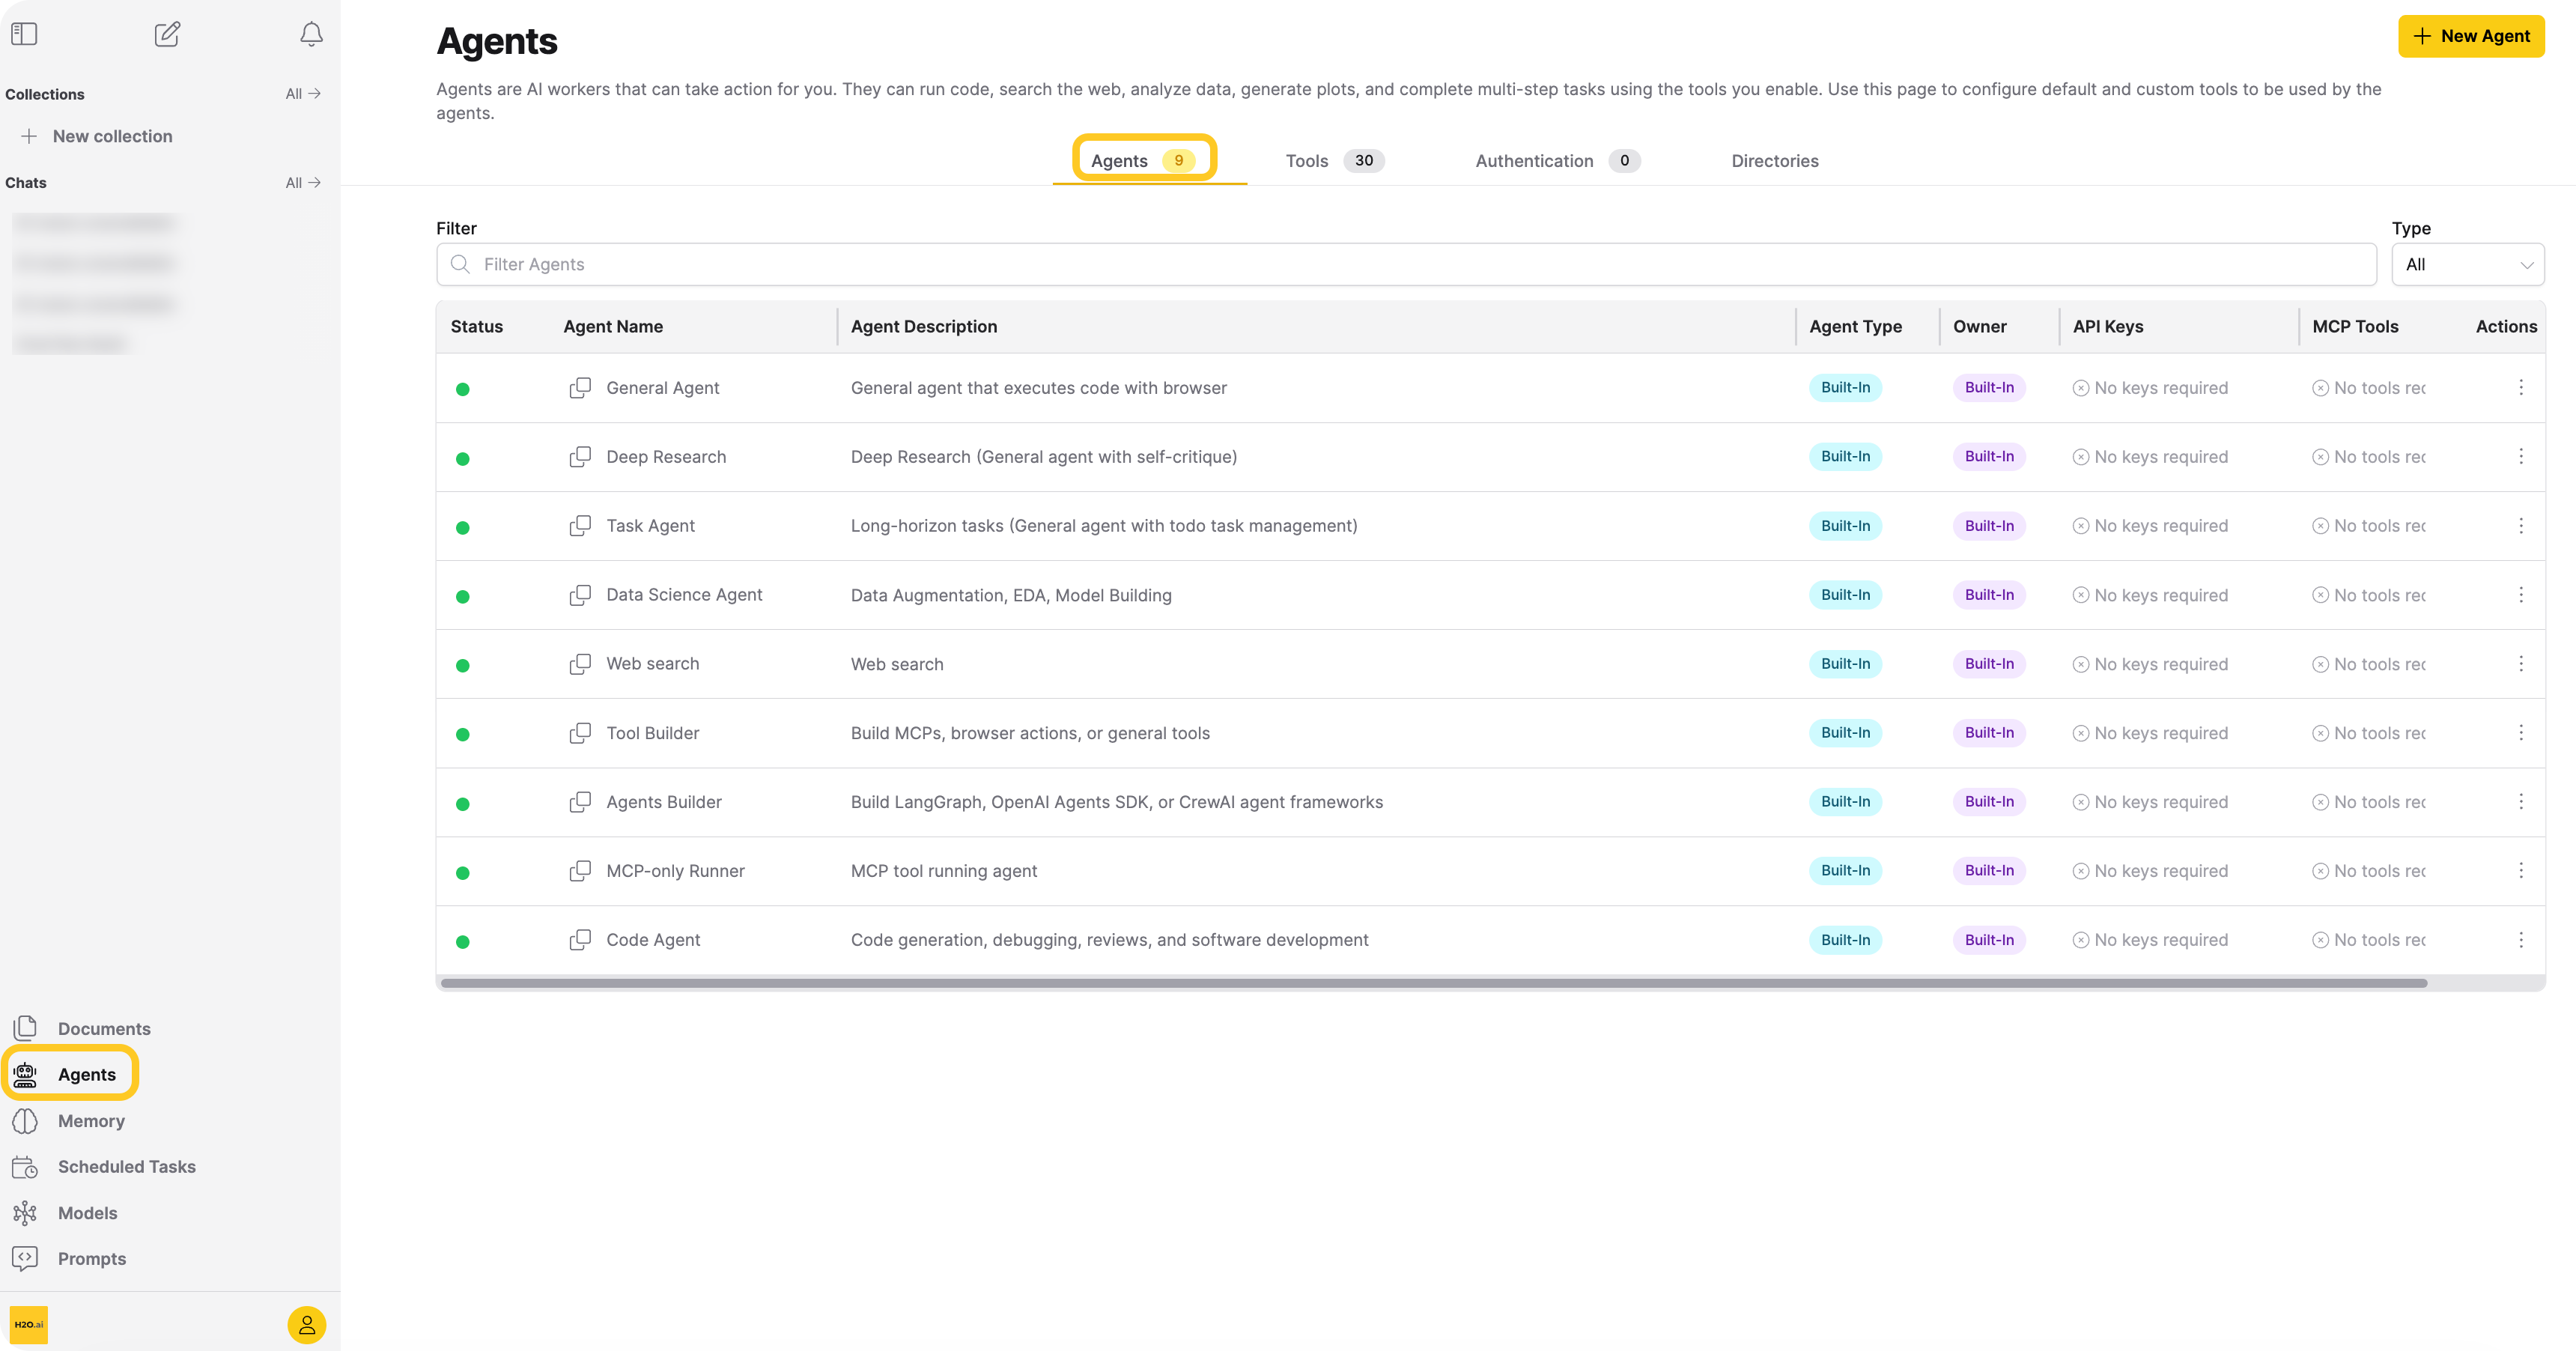
Access the Agents tab
- In the left navigation, click Agents.
- Click the Agents tab.
From the Agents tab, you can view all built-in and custom agents, assign API keys and MCP tools, edit names and descriptions, and delete custom agents.
| Column | Description |
|---|---|
| Status | A colored dot indicating whether the agent is ready to use. See Agent status for details. |
| Agent Name | The agent's display name. Click the copy icon to copy the agent ID. |
| Agent Description | A short description of the agent's purpose. |
| Agent Type | A badge indicating the agent framework: LangGraph, CrewAI, OpenAI, Claude, or Built-In. |
| Owner | Built-in for platform agents, or your account for agents you have added. |
| API Keys | Badges for each environment variable the agent declares. Green: configured. Yellow: unassigned optional key. Red: unassigned required key. |
| MCP Tools | Badges for each MCP server the agent requires. Green: assigned. Red: not configured. |
| Actions | Opens the actions menu for managing the agent. |
Platform agents display No keys required and No tools required because the platform fully manages their configuration. Only custom agents have assignable keys and tools.
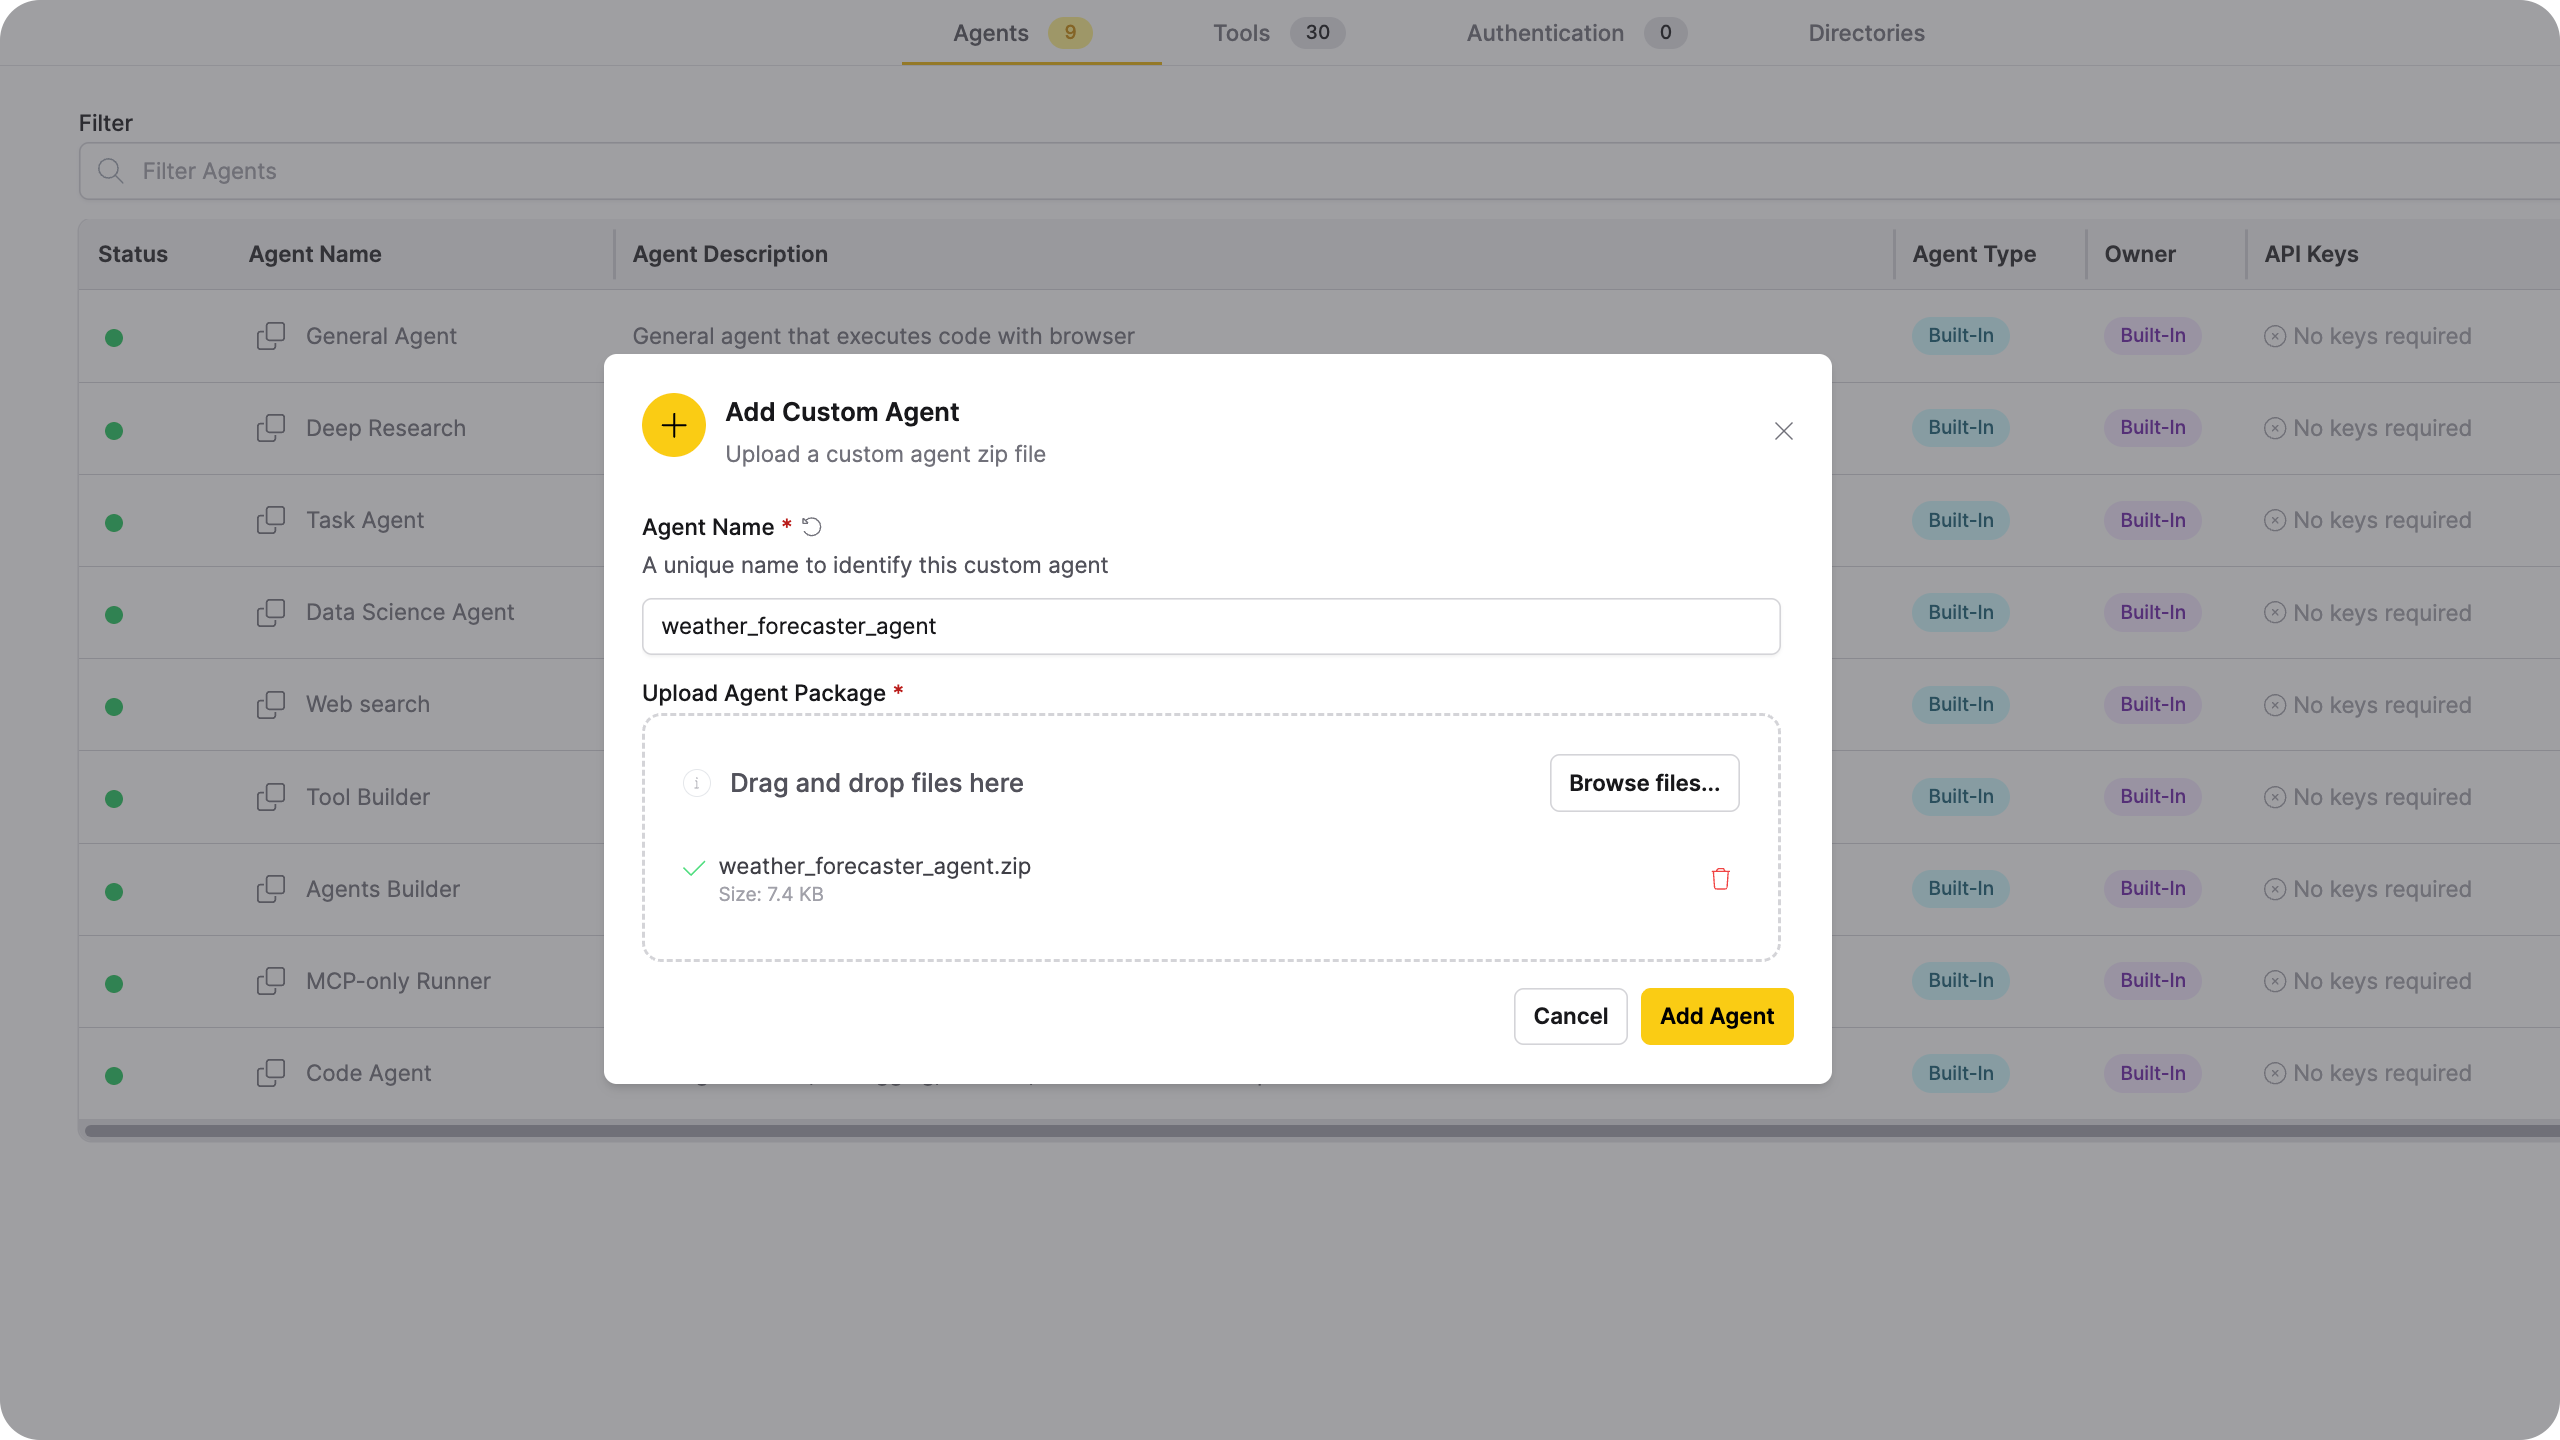
Add a new agent
Click + New Agent in the upper right of the Agents tab to open the Add Custom Agent dialog.
| Field | Description |
|---|---|
| Agent Name | A unique name to identify the agent in the platform. Defaults to the folder name inside the ZIP. If the ZIP contains multiple agent folders, this field is ignored and each folder name is used. |
| Upload Agent Package | The .zip file containing your agent implementation. Only ZIP files are accepted. |
| Add Agent | Registers the agent and adds it to the agents table. |
Manage custom agents
Use the actions menu (⋮) in the Agent Actions column to configure, edit, or delete a custom agent. The sections below describe each action and its dialog.
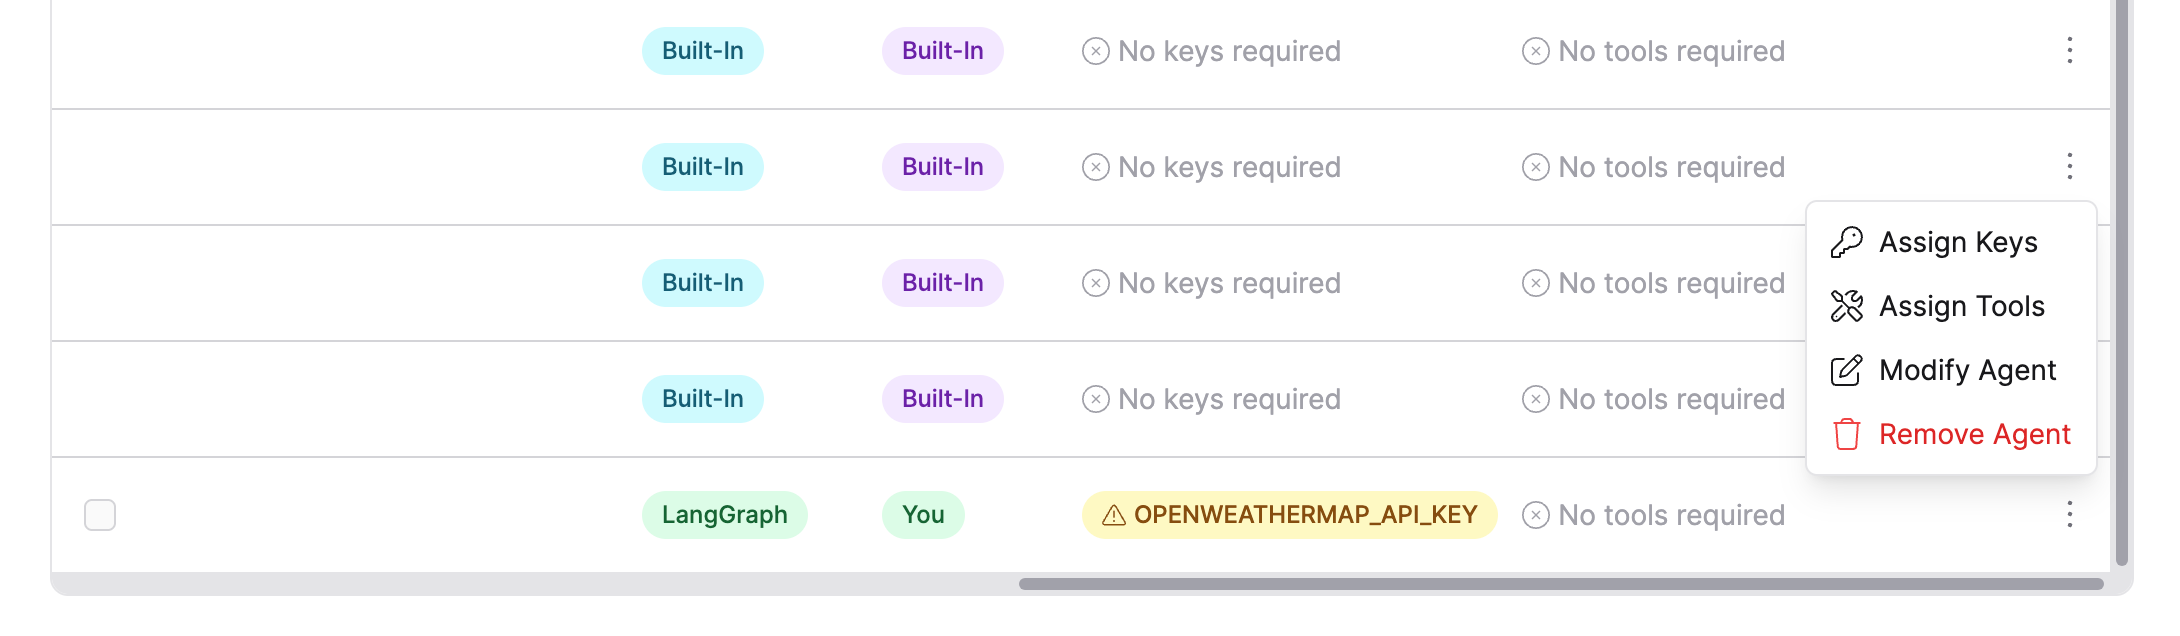
Assign API Keys
Select Assign Keys from the actions menu to open the Assign API Keys dialog. The dialog lists every environment variable declared in the agent's envs.json file.
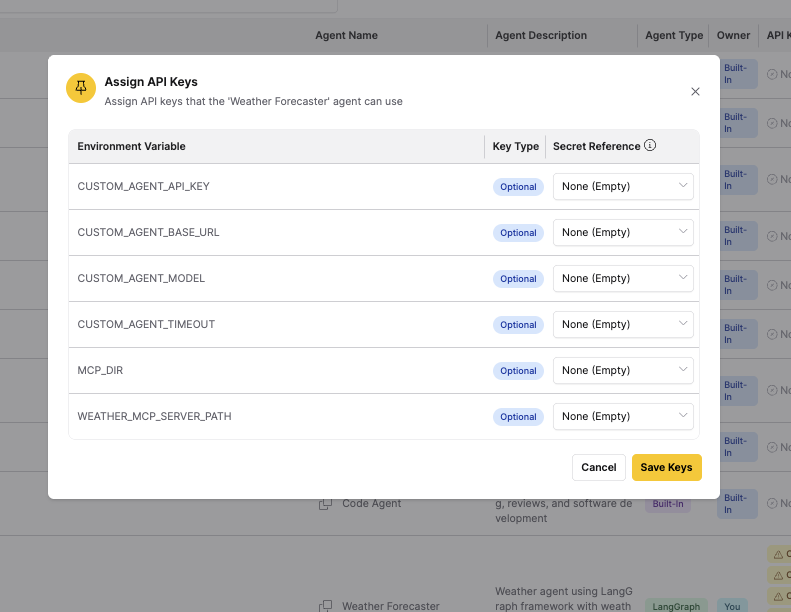
| Field | Description |
|---|---|
| Environment Variable | The environment variable name declared in the agent's envs.json file. |
| Key Type | How critical the variable is. Required: the agent can't run without it; the status dot stays red until you assign all required keys. Optional: the agent runs without it but may have reduced capability. Custom: added manually beyond what the agent declares. |
| Secret Reference | A dropdown of secrets from Secret Manager. Select the secret to inject for this variable at runtime. |
| Save Keys | Saves all secret associations and applies them to the agent. |
Assign MCP tools
Select Assign Tools from the actions menu to open the Assign MCP Tools dialog. The dialog lists each MCP server name the agent declares.

| Field | Description |
|---|---|
| Tool Name | The MCP server name declared in the agent's code. |
| Server | A dropdown of tools configured in the Tools tab. Select the tool that matches this server name. |
| Save Tools | Saves all tool associations and applies them to the agent. |
When you upload a custom agent, Enterprise h2oGPTe reads the MCP server names declared in the agent's metadata.json and automatically associates them with matching tools in the Tools tab without any manual mapping. For details, see Use remote MCP tools with custom agents.
Edit an agent
Select Modify Agent from the actions menu to open the Edit Agent dialog.
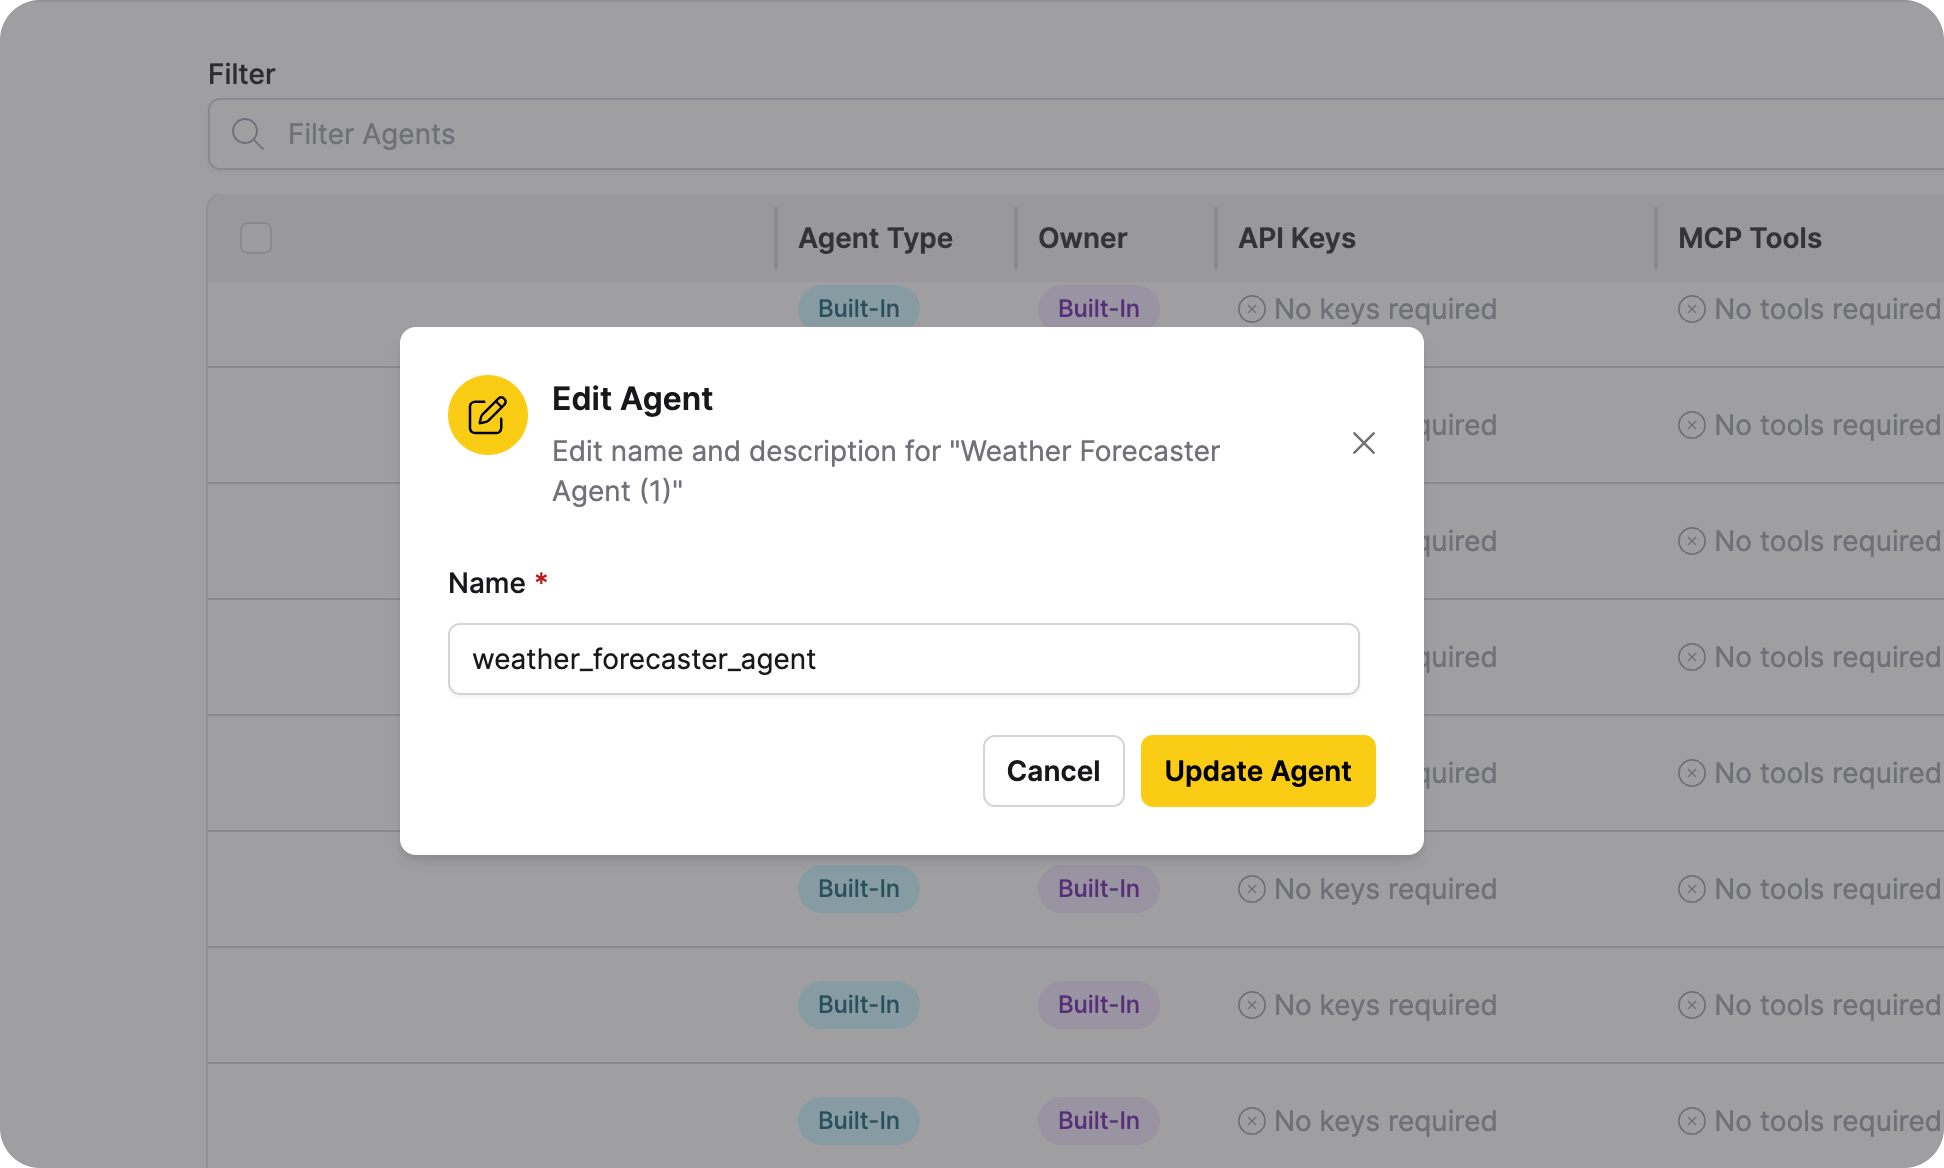
| Field | Description |
|---|---|
| Name | The agent's display name shown in the agents table and chat dropdown. |
| Update Agent | Saves the updated name. |
Delete an agent
Select Remove Agent from the actions menu to open the Delete Agent dialog.
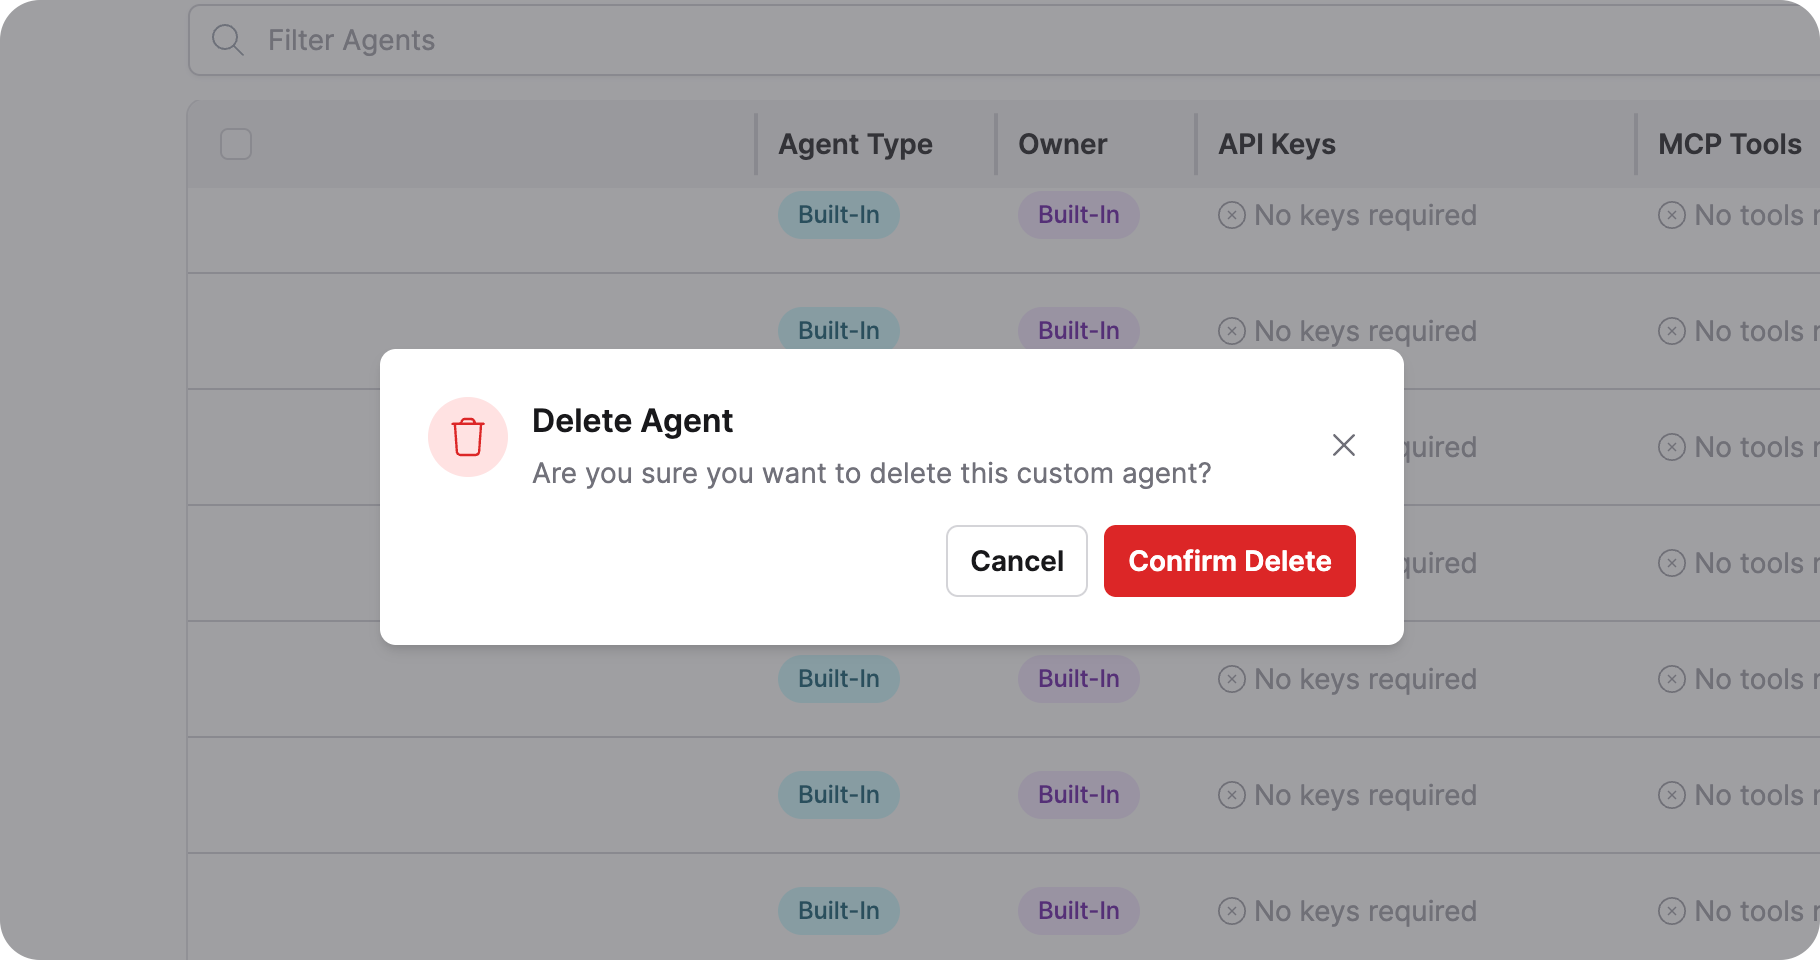
| Action | Description |
|---|---|
| Cancel | Closes the dialog without deleting the agent. |
| Confirm Delete | Permanently removes the agent and all its key and tool associations. |
Platform agents cannot be deleted. The Remove Agent option only appears for custom agents you own.
Filter and search
Use the controls preceding the table to narrow the list of agents.
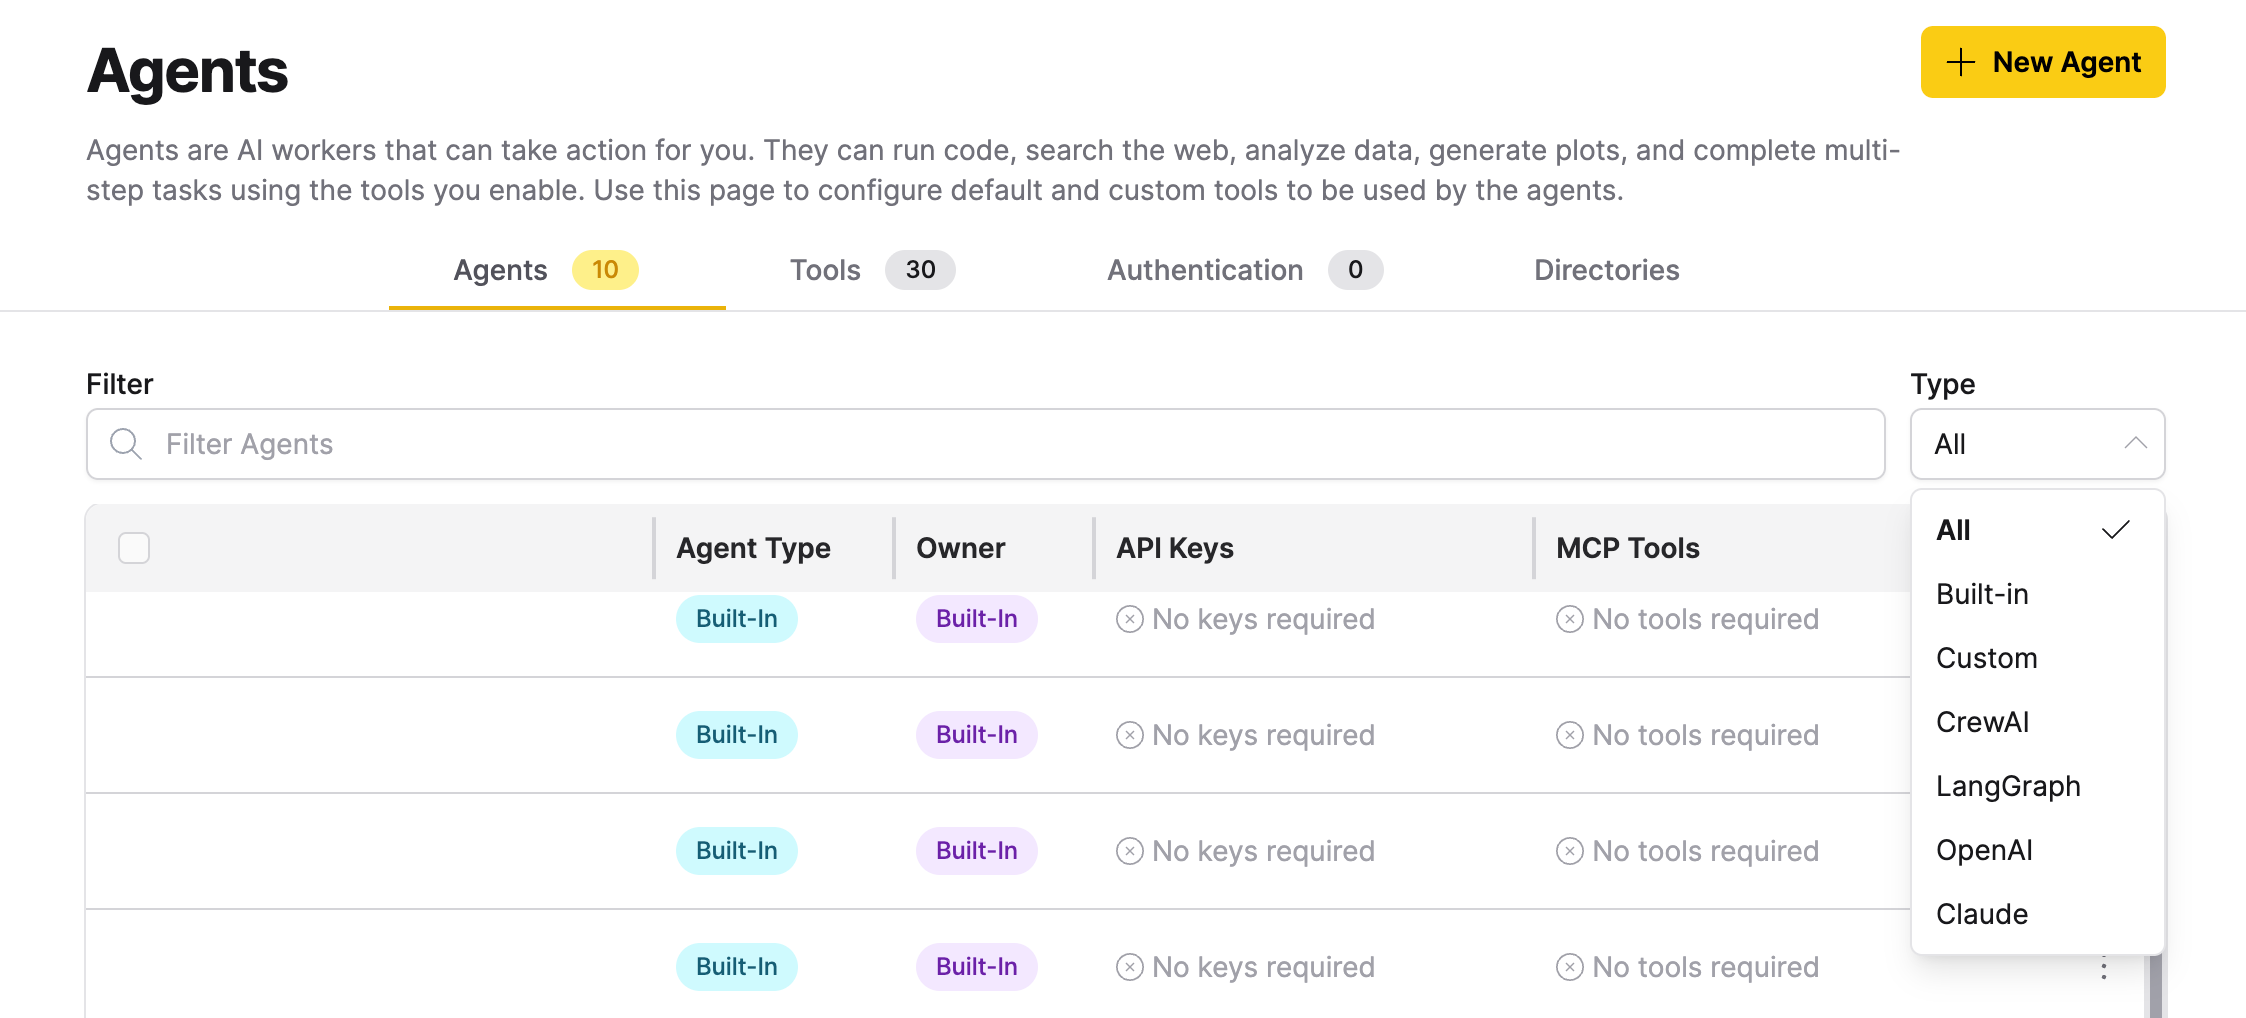
| Control | Options | Description |
|---|---|---|
| Filter Agents | Free text | Filters agents by name or description as you type. |
| Type | All, Built-in, Custom, CrewAI, LangGraph, OpenAI, Claude | Filters the table by agent type or ownership. Select Custom to show only agents you have added, Built-in to show only platform agents, or a framework name to show only agents of that type. |
Agent status
The status dot in each row indicates whether the agent is ready to use. Hover over the dot to see a tooltip with details.
| Status | Tooltip text | Meaning |
|---|---|---|
| Green | Ready to work | All required API keys and MCP tools are assigned. The agent is available for selection in chat. |
| Red | Missing required keys | One or more required API keys are not assigned. |
| Red | Missing required tools | One or more required MCP tools are not configured. |
| Red | Missing required keys and tools | Both required keys and required MCP tools are missing. |
Use a custom agent in chat
After uploading and configuring a custom agent, start a new chat, enable the Use Agent toggle in chat settings, and select your agent from the Agent Type dropdown. Only agents with a green status dot appear in the dropdown. For a complete walkthrough, see Step 6: Test the workflow in the local MCP tool deployment tutorial.
Next steps
- Register and manage custom agents programmatically using the Python SDK.
- Submit and view feedback for this page
- Send feedback about Enterprise h2oGPTe to cloud-feedback@h2o.ai